Join Us On Social Media!

|

|

|
Download The App!
Login To
Remove Ads
Remove Ads
Login To
Remove Ads
Remove Ads
Model Boats Website
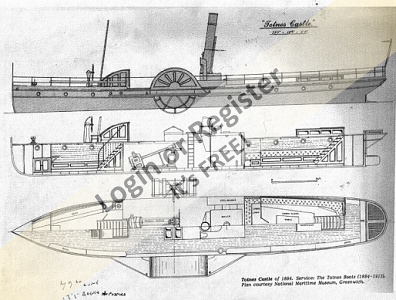
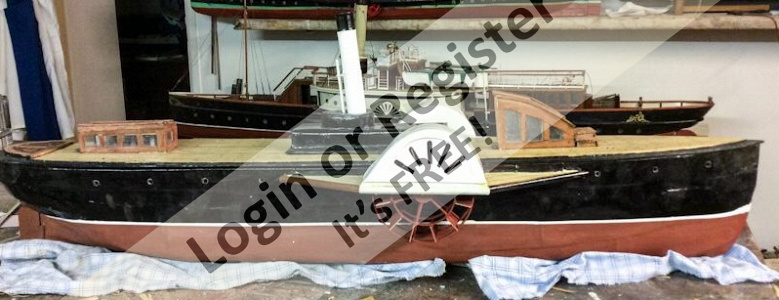
Totnes Castle 1894
8 Posts · 2 Followers · 20 Photos · 32 Likes
Began 7 years ago by
 United Kingdom
Follow This Thread
Not currently following
> Click to follow
> Click to follow
Latest Post 6 years ago by
| Oldest posts shown first (Show Newest First) | (Print Booklet) |
📝 Totnes Castle 1894
7 years ago by 🇬🇧 hammer ( Lieutenant)
Lieutenant)✧ 2 Views · 0 Likes
Flag
💬 Add Comment
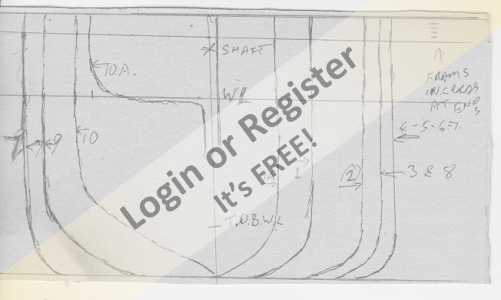
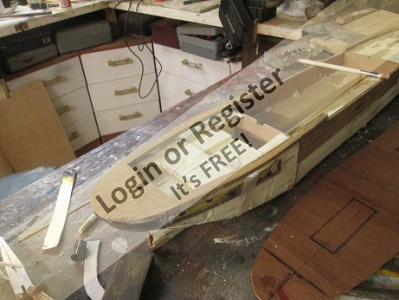
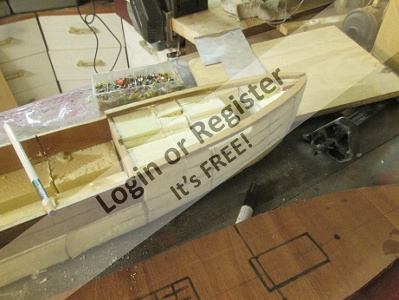
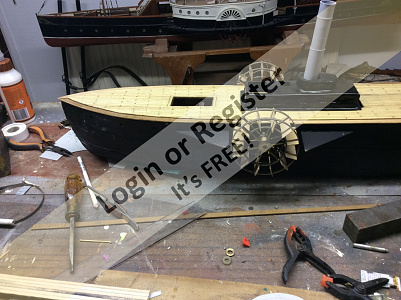
I have posted this on another site, but will continue here if there is interest. I have a plan taken from a book some time ago. Drawn my own sections from experience, having built 2 paddlers before. T.D.B.W. on the sections is the true depth of hull. increased depth for stability, as steam plants are top heavy, experience again.
▲
⟩⟩
No likes yet
This member will receive 1 point
for every like received
This member will receive 1 point
for every like received
Login To
Remove Ads
Remove Ads
📝 Plating
7 years ago by 🇬🇧 hammer ( Lieutenant)
Lieutenant)✧ 10 Views · 8 Likes · 5 Comments
Flag
💬 Add Comment
The patient slept most of yesterday, so managed a little play.
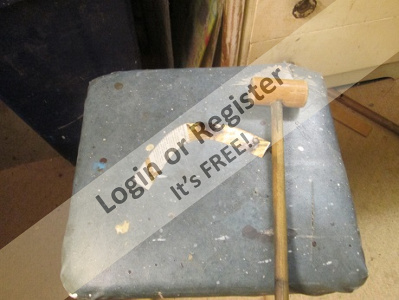
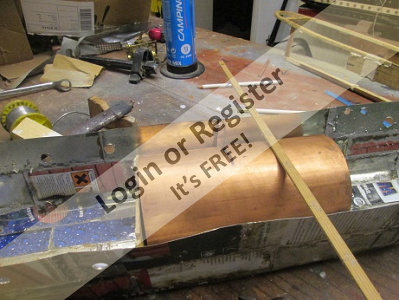
Cut and joined 3 plates, beet to shape on the padding on my stool. Cleaned the edges with sand paper & steel wool. Tinned where they join, big soldering iron is ideal. Seeing as I may have success I will now fit edging around the top to strengthen the edge of the tin.
The reason for tin plate, I have a plan of the Duchess of Fife specifying this method. I was afraid to try before now.
▲
⟩⟩
doghouse
SelwynWilliams
jtdavid
Donnieboy
Dave M
Colin H
AllenA
RNinMunich
|
💬 Plating
6 years ago by 🇬🇧 hammer (
Lieutenant)✧ 3 Views · 1 Like
Flag
Finished the hull, will be other wise engaged for a wile, so no post. I will be back.
▲
⟩⟩
Dave M
|
|
Login To
Remove Ads 💬 Plating
6 years ago by 🇬🇧 hammer (
Lieutenant)✧ 5 Views · 3 Likes
Flag
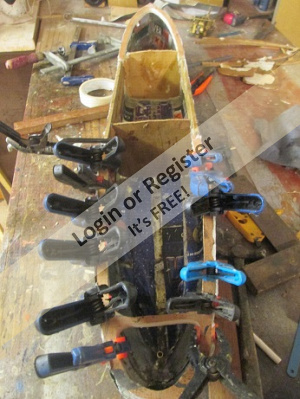
Soldering almost finished. I have used two different melting point solders, I found that very useful. Tip don't keep you legs under the solder point, OW!
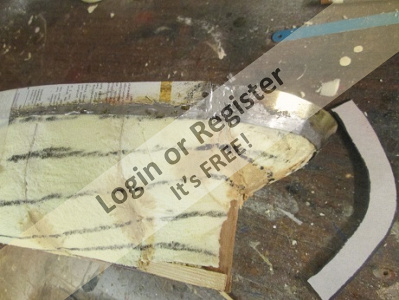
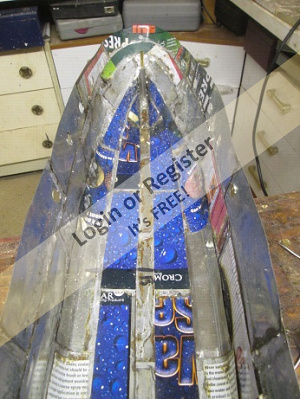
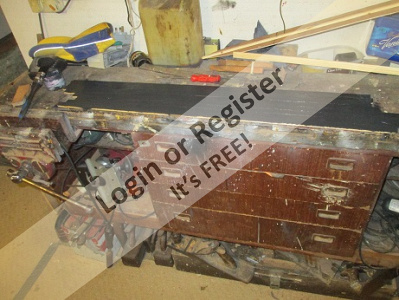
The foam mould removed along with the wooden frame. Will be replacing the frame around the deck level, and the two bulkheads each side of the engine room. Bulkheads will be recut 15mm deeper, to allow for the extra depth to accommodate the different boiler. This will be cut to the mark, the stick is on the shaft line. keeping the shorter section. Need to clean up the outside and stop the leaks, Yes there are a few, but then to few to mention. 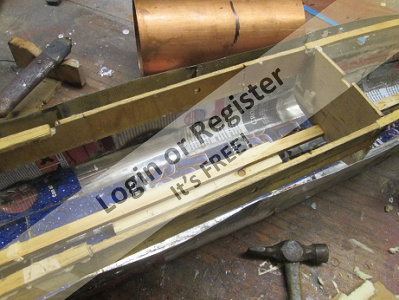
▲
⟩⟩
Dave M
mactin
marky
|
|
💬 Plating
6 years ago by 🇬🇧 hammer (
Lieutenant)✧ 4 Views · 2 Likes
Flag
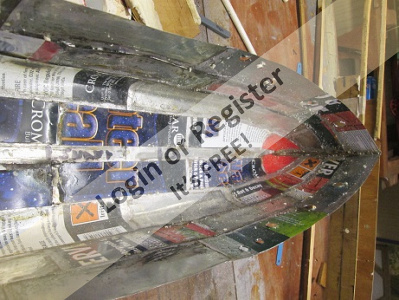
I said on post until the plating finished. Well finished one side, just three more on the other. Drilling the portholes with a cone drill. Holding with grips don't want to cut my fingers. Sized to fit brass tube, (chromed will skim off) That will be the surrounds, fitted after finished painting the hull.
▲
⟩⟩
Dave M
marky
|
|
💬 Plating
7 years ago by 🇬🇧 hammer (
Lieutenant)✧ 4 Views · 2 Likes
Flag
The plating is going essayer with every plate, just a slow job. Finished the garboard strakes & the keel. A brass rod joins the bow. At the rudder post a tube for the rudder stock. No more on plating until it is complete. Unless someone has a question.

▲
⟩⟩
RNinMunich
Colin H
|
|
💬 Plating
7 years ago by 🇬🇧 hammer (
Lieutenant)✧ 2 Views · 0 Likes
Flag
Over the weekend I had been thinking maybe it would be easer to epoxy the plates together. Having almost finished the 2 bottom strakes I will continue soldering. Finding it easer with each plate, as I learn, little tricks. Cleaning the plates with a sanding drum (dermal), keep the plate flat on the bench. Otherwise the plate will cruel up and destroy the sand paper. Don't put to much solder on the iron, or I get lumps of solder as it runs down. I am now holding the plates in place with masking tape. That is working well. Two strakes are taking almost half a can, as there are 12 strakes I will cut up 2 more cans.
▲
⟩⟩
No likes yet
This member will receive 1 point for every like received |
📝 deck planks
7 years ago by 🇬🇧 hammer ( Lieutenant)
Lieutenant)✧ 8 Views · 6 Likes · 15 Comments
Flag
💬 Add Comment
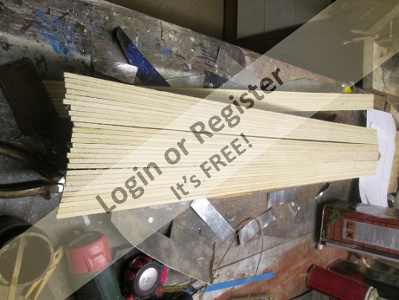
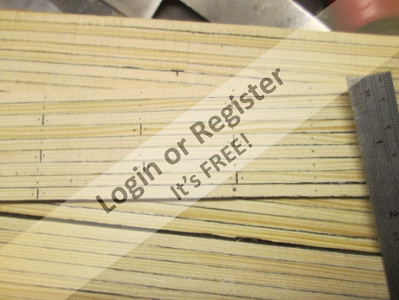
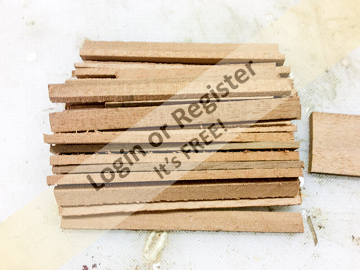
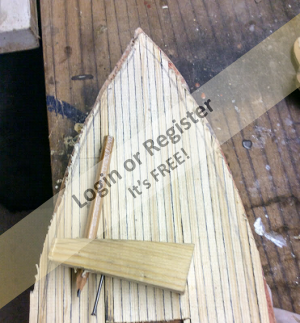
I usually use coffee stirring sticks. But at this scale far to wide. I cut 3/32" strips off a 7/8" plank. Stuck them back together with a mixture of P.V.A. & acrylic black paint. Clamping over the whole length. Next day cut down the opposite way to about 1/16 & sand to a finish. Mark in the joints & nails with a pen. The planks could be any width required, & the black joints aren't to big.
▲
⟩⟩
doghouse
Donnieboy
SelwynWilliams
jtdavid
Dave M
RNinMunich
|
💬 deck planks
6 years ago by 🇬🇧 hammer (
Lieutenant)✧ 15 Views · 0 Likes
Flag
All work on T. C. stopped for a wile. I have 7 boats after the summer sailing none are seaworthy. Repairs WILL TAKE SOME TIME.
▲
⟩⟩
No likes yet
This member will receive 1 point for every like received |
|
Login To
Remove Ads 💬 deck planks
6 years ago by 🇺🇸 figtree7nts (
 Admiral) Admiral)✧ 3 Views · 1 Like
Flag
Great work Hammer! I really like the craftsmanship!
▲
⟩⟩
Donnieboy
|
|
💬 deck planks
6 years ago by 🇬🇧 hammer (
Lieutenant)✧ 16 Views · 2 Likes
Flag
All the rails made, deck held up as the ends not cut off yet.

▲
⟩⟩
Donnieboy
figtree7nts
|
|
💬 deck planks
6 years ago by 🇬🇧 hammer (
Lieutenant)✧ 17 Views · 3 Likes
Flag
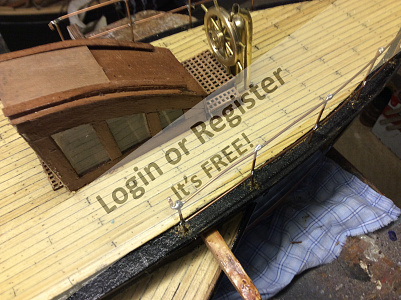
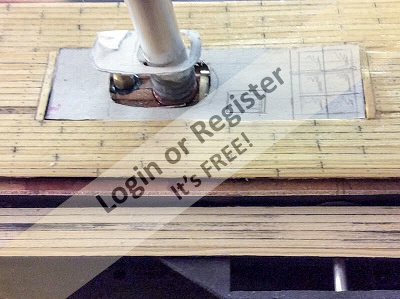
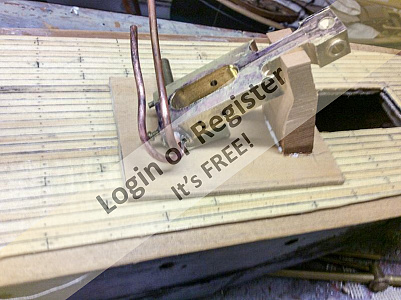
Rails fitted just to see how they look. Remove and paint when the aft section is at this stage. Etching primer for copper & brass. I will cut off the excess below after final fitting. The speaking tube also fixed.

▲
⟩⟩
Donnieboy
figtree7nts
Northumbrian
|
|
💬 deck planks
6 years ago by 🇬🇧 hammer (
Lieutenant)✧ 15 Views · 3 Likes
Flag
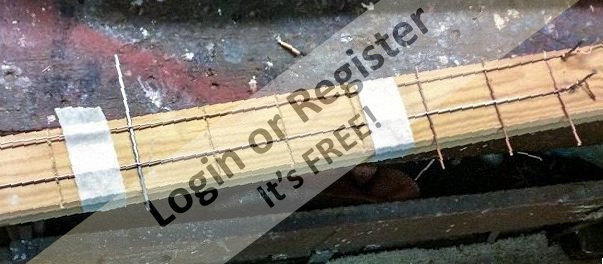
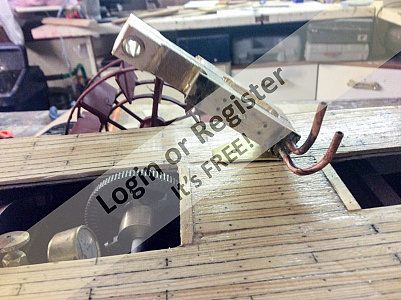
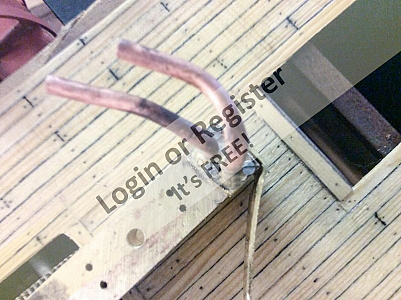
On to the railings. I am using striped electrical wire. Free & easy to solder, and different sizes. The only drawback it is a little soft. The hardest job is getting it straight. This is done in vice & between fingers.( fingers not in vice) I also flatten the stanchions where rails cross. The long silver is the flagstaff at the bow, half way along the section being made. Held in a jig to solder, saw cut hold stanchions & nails stretch rails. The tape was to hold rails against stanchions. This was not needed as I pushed them down with a screwdriver as I removed the soldering iron.
▲
⟩⟩
Donnieboy
figtree7nts
RNinMunich
|
|
💬 deck planks
6 years ago by 🇬🇧 hammer (
Lieutenant)✧ 10 Views · 1 Like
Flag
the state of play. I must wipe off those finger marks.😁
▲
⟩⟩
Northumbrian
|
|
💬 deck planks
6 years ago by 🇩🇪 RNinMunich (
 Fleet Admiral) Fleet Admiral)✧ 2 Views · 0 Likes
Flag
"Take him down Bailiff"! 😁
▲
⟩⟩
No likes yet
This member will receive 1 point for every like received |
|
💬 deck planks
6 years ago by 🇬🇧 hammer (
Lieutenant)✧ 13 Views · 4 Likes
Flag
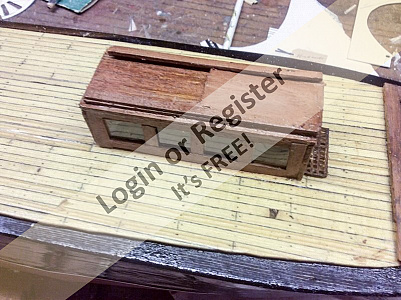
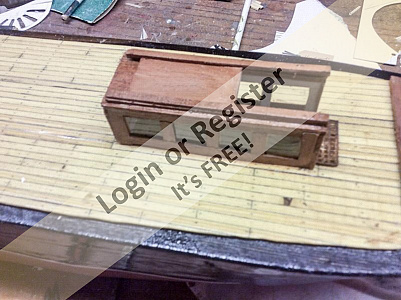
Finished companion ways. Open & shut case

▲
⟩⟩
Ronald
figtree7nts
Donnieboy
kmbcsecretary
|
|
💬 deck planks
6 years ago by 🇬🇧 hammer (
Lieutenant)✧ 9 Views · 0 Likes
Flag
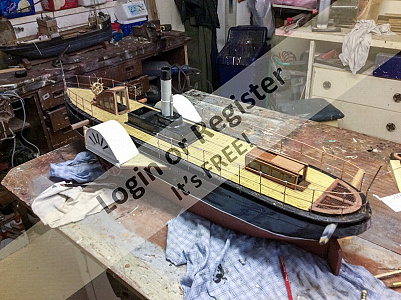
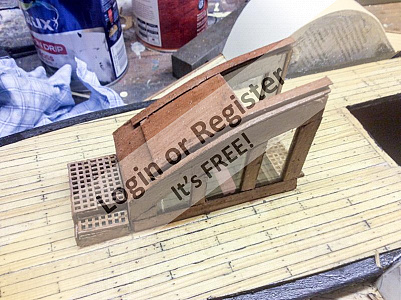
Paddle boxes well on the way. Just the face to do now. Note they are bolted to hull & fit behind plates holding bearings. So they are removable.
▲
⟩⟩
No likes yet
This member will receive 1 point for every like received |
|
💬 deck planks
6 years ago by 🇬🇧 kmbcsecretary (
 Warrant Officer) Warrant Officer)✧ 3 Views · 0 Likes
Flag
nice tip that hammer regarding the grating would never of thought of that.
▲
⟩⟩
No likes yet
This member will receive 1 point for every like received |
|
💬 deck planks
6 years ago by 🇬🇧 hammer (
Lieutenant)✧ 3 Views · 1 Like
Flag
I have added wood to the outer edge of the deck, (the scuppers) it projects out from the hull, forming the knuckle. That's what I call the half round strip around the hull, another needed below the sponsons, this one just stuck on. There is a raised section over the rudder arm, with a grating. Small gratings can be a problem, here is a solution, not my idea but a good one. A plastic hit & miss air vent, D.I.Y. store. I cut it with a band saw, as the blade cools down, were a jig saw melts it back again.

▲
⟩⟩
kmbcsecretary
|
|
Login To
Remove Ads 💬 deck planks
6 years ago by 🇬🇧 hammer (
Lieutenant)✧ 2 Views · 0 Likes
Flag
the boiler brazed, painted , tested 60psi and safety valve set 25psi. The paint looks grey but is black high temp. timber cut for insulation.
▲
⟩⟩
No likes yet
This member will receive 1 point for every like received |
|
💬 deck planks
6 years ago by 🇬🇧 hammer (
Lieutenant)✧ 3 Views · 1 Like
Flag
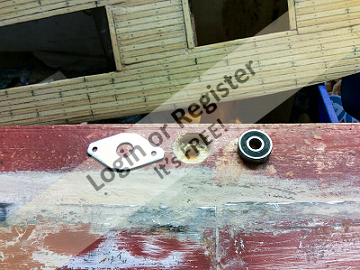
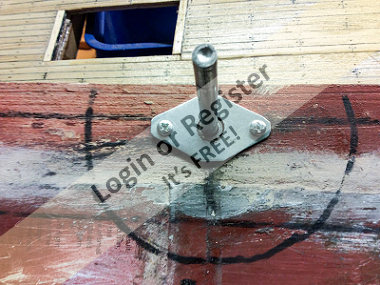
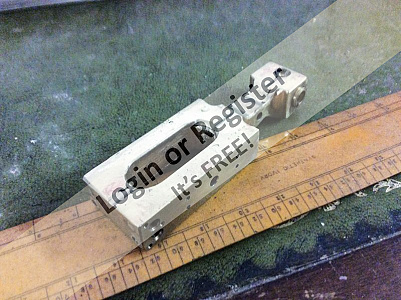
Shaft bearings fitted in hull. hole drilled with brace & bit, brutal but did the job. Out bearing bedded in silicone, shaft & plates fixed wile setting for perfect alignment.
▲
⟩⟩
Dave M
|
|
💬 deck planks
6 years ago by 🇵🇹 Wingcoax (
 Petty Officer 2nd Class) Petty Officer 2nd Class)✧ 5 Views · 3 Likes
Flag
Lead wiping is one of the lost arts, Can't be many left who know the tricks. Elf and stupidity rules.
▲
⟩⟩
Dave M
figtree7nts
AllenA
|
|
💬 deck planks
6 years ago by 🇬🇧 hammer (
Lieutenant)✧ 4 Views · 2 Likes
Flag
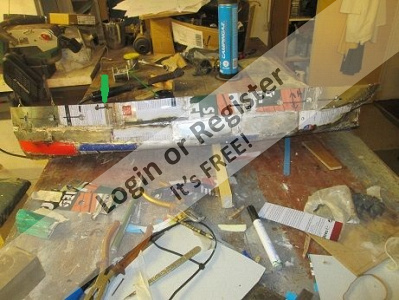
I was not happy with the hull after finishing the plating. The flat sides very wobbly, & lots of runs & lumps of solder. So I removed the internal supports & the top strake up to it curved. Replaced top strake with 3mm ply fitted new bulkheads & top frame. I started to sand off the excess solder would have taken for ever. Then I remembered seeing my father wipe a lead joint, that was when water pipes where lead. I didn't have a tallow cloth so I took lard from the kitchen. Heat a small section with a pencil blow torch & wipe it clean. All done in 10mins.
Glued the plank made before to the sub deck. With a home made gauge mark 3/8th in this will form the scuppers. 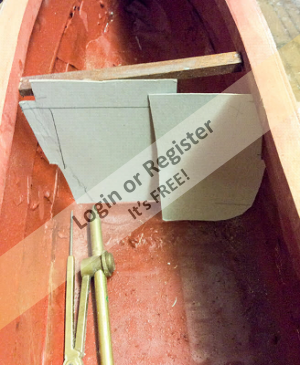
▲
⟩⟩
Dave M
AllenA
|
📝 boiler
6 years ago by 🇬🇧 hammer ( Lieutenant)
Lieutenant)✧ 8 Views · 6 Likes · 14 Comments
Flag
💬 Add Comment
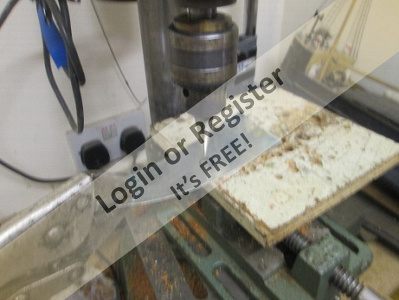
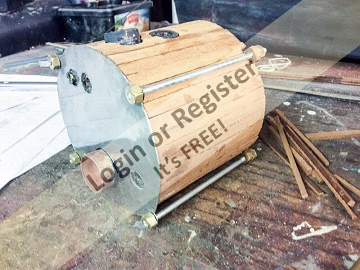
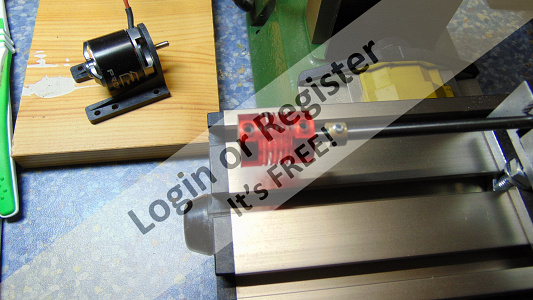
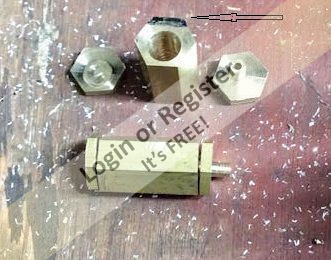
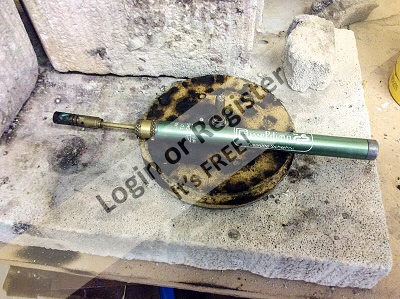
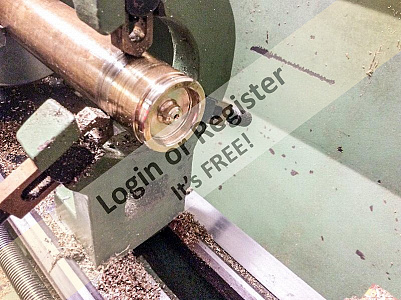
I was lucky to find a 103mm + 300mm copper tube, only £10, bargain. Scored in the lathe then cut with hacksaw. then tided up back in lathe. Fire tube brazed together with fins at the burner end. Silver solder cross tubes next. No cross tubes near boiler end, will disrupt burner. Reason for fins extra heat transfer.
This will be my 7th boiler.
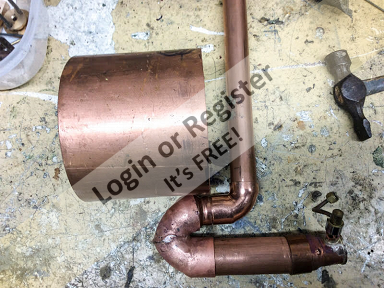
This will be my 7th boiler.
▲
⟩⟩
doghouse
mturpin013
jtdavid
Donnieboy
Colin H
Dave M
|
💬 boiler
6 years ago by 🇬🇧 hammer (
Lieutenant)✧ 3 Views · 1 Like
Flag
I already have two paddle steamers. Glen Usk @ 5ft & Duke of Devonshire @ 6ft. That’s why Totnes Castle is only 2ft-6ins. Sorry you may have to wait, as 2 steam & 3 sail need maintenance. I intend to replcacat the saloons, that is why the engine room is as similar to prototype as practical. Boiler just the flue that’s wrong. The engine & drive not correct at all, just taking the same space. Thanks for you interest.
▲
⟩⟩
RNinMunich
|
|
Login To
Remove Ads 💬 boiler
6 years ago by 🇬🇧 mturpin013 (
Admiral)✧ 2 Views · 0 Likes
Flag
Nice to see some steam -(hopefully)
▲
⟩⟩
No likes yet
This member will receive 1 point for every like received |
|
💬 boiler
6 years ago by 🇬🇧 hammer (
Lieutenant)✧ 5 Views · 3 Likes
Flag
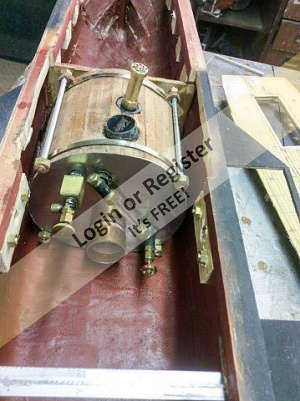
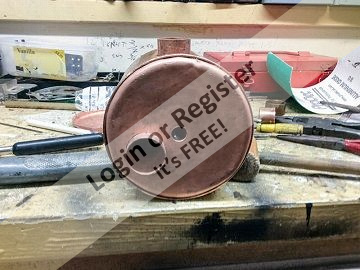
Boiler complete just the pipe work to do when the engine installed. No clack feed as will remove safety valve to fill, & turn the boat over to empty, although there is a valve on the sight glass. Sorry about the shadow across the makers plate, which is level although doesn't look like it in photo.
Boiler room roof tin plate finished & painted (after photo). Skylight & hatch made to open, to allow air to burner. 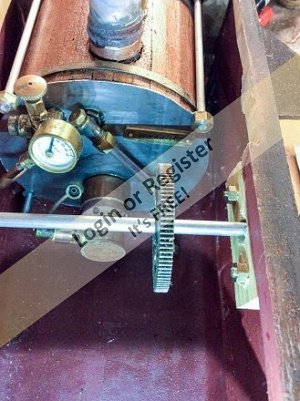
▲
⟩⟩
Donnieboy
RNinMunich
doghouse
|
|
💬 boiler
6 years ago by 🇬🇧 hammer (
Lieutenant)✧ 3 Views · 1 Like
Flag
Slow progress I am afraid, other things to do. Have soldered up the engine room roof. Need to fix angle along the bottom to keep it straight. Found brass angle in my stock, but it will have to be milled smaller & thinner. Then the safety valve extension.
▲
⟩⟩
figtree7nts
|
|
💬 boiler
6 years ago by 🇩🇪 RNinMunich (
Fleet Admiral)✧ 2 Views · 0 Likes
Flag
Neat idea 👍 Must add to my collection 😎
▲
⟩⟩
No likes yet
This member will receive 1 point for every like received |
|
💬 boiler
6 years ago by 🇬🇧 hammer (
Lieutenant)✧ 4 Views · 2 Likes
Flag
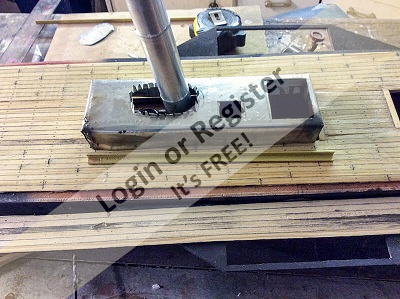
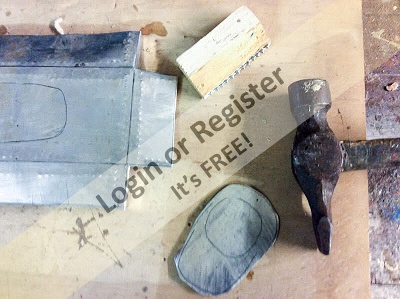
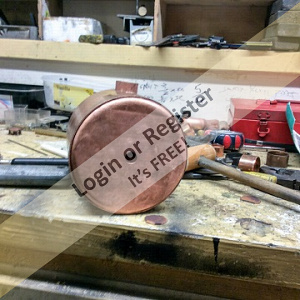
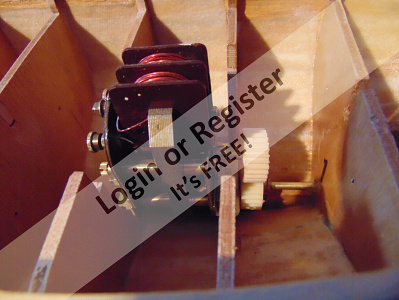
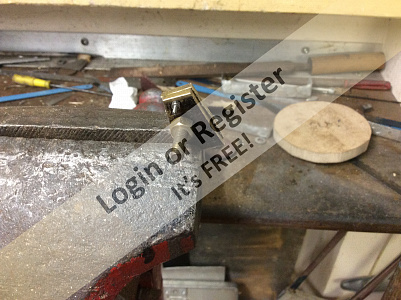
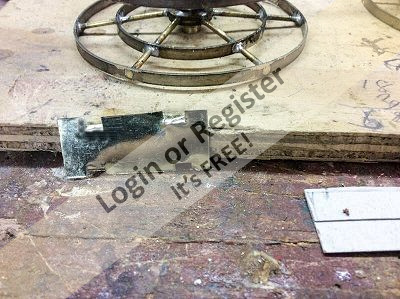
Cut the tinplate & scored the bends inside. As this represents steel or more likely iron. I have represented rivets. Now the clock wheel method has never worked for me. So my method, a block of wood with a row of self punching panel pins. that is the reason for the photo. pins with conical heads.
▲
⟩⟩
figtree7nts
RNinMunich
|
|
💬 boiler
6 years ago by 🇬🇧 hammer (
Lieutenant)✧ 3 Views · 1 Like
Flag
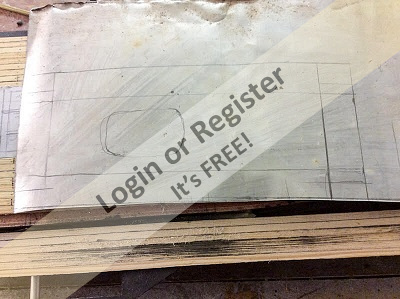
Started on the boiler room roof. Cardboard patterns, with skylight & access hatch drawn in. The tinplate marked out, rivets punched, folded & soldered on the corners.
▲
⟩⟩
figtree7nts
|
|
💬 boiler
6 years ago by 🇬🇧 hammer (
Lieutenant)✧ 6 Views · 4 Likes
Flag
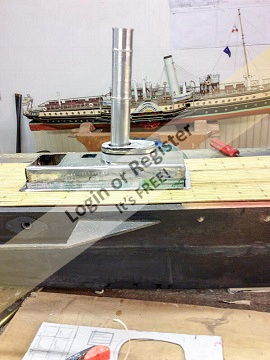
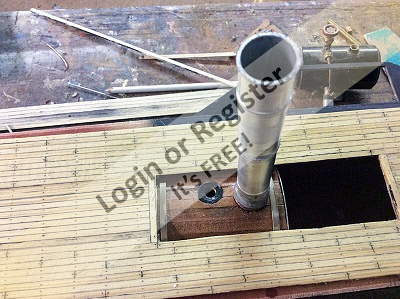
Funnel made from an old hospital walking stick. The aluminium at 1/8th thick, so I turned it down to 1/16th, leaving the rings. Fixed to the boiler at vertical with the correct rake astern. The photos don't give that impression. But it is all correct, honest.
▲
⟩⟩
Donnieboy
figtree7nts
marky
RNinMunich
|
|
💬 boiler
6 years ago by 🇩🇪 RNinMunich (
Fleet Admiral)✧ 2 Views · 0 Likes
Flag
Eminent sense! Nice work 👍
▲
⟩⟩
No likes yet
This member will receive 1 point for every like received |
|
💬 boiler
6 years ago by 🇬🇧 hammer (
Lieutenant)✧ 4 Views · 2 Likes
Flag
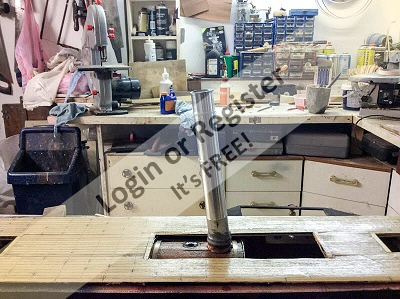
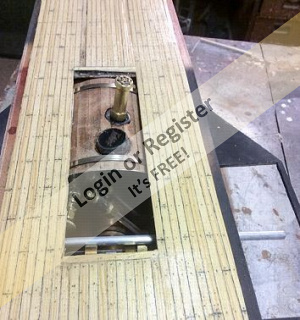
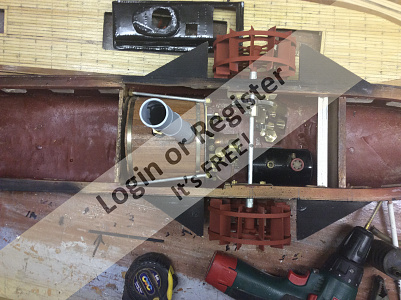
The boiler now finished so back here. it just fits had to cut 3/16" off each side of the deck surround to get it in plenty of room when in. The engine I intended to use will not fit however. So will be making a smaller version, or a completely new design. depending what metal I have in stock. With the deck in place another tight fit. The safety valve will stay at this angle. But the connector angled, to bring the funnel central & upright with a slight rake aft. if that makes sense.
▲
⟩⟩
marky
RNinMunich
|
|
💬 boiler
6 years ago by 🇬🇧 hammer (
Lieutenant)✧ 3 Views · 1 Like
Flag
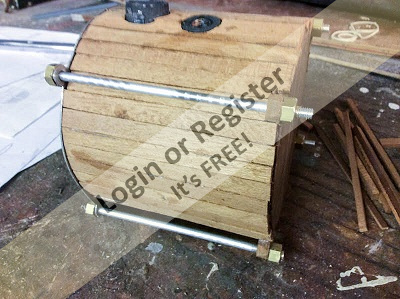
Boiler almost finished. Stainless plate on the front covering an old soldering pad, insulation, the rest wood. clean up & fit brass straps. tested to 60 psi & safety valve set at 25psi.
▲
⟩⟩
figtree7nts
|
|
Login To
Remove Ads 💬 boiler
6 years ago by 🇬🇧 hammer (
Lieutenant)✧ 5 Views · 3 Likes
Flag
Almost ready for silver soldering up. Patch to block centre hole seen in back view, brazed inside. Two holes to drill for sight glass, bushes to turn & thread.
▲
⟩⟩
marky
RNinMunich
figtree7nts
|
|
💬 boiler
6 years ago by 🇬🇧 hammer (
Lieutenant)✧ 4 Views · 2 Likes
Flag
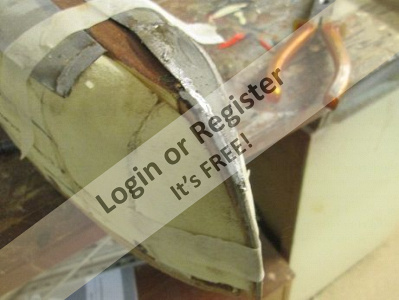
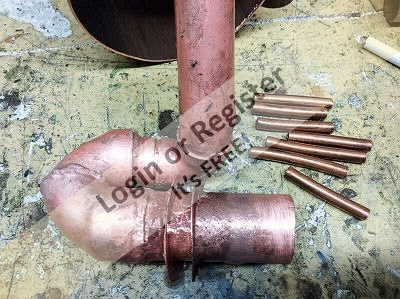
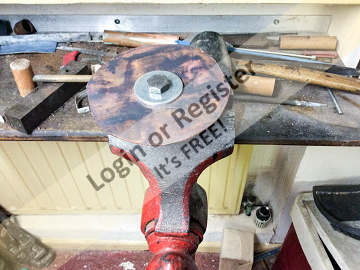
I have a large jubilee clip I tighten around the flange, nearing completion. This stops rebound at the next tap, go around the clip tighten , repeat twice then anneal again. Finally clamped between wood, mounted upside down, the fit can be seen. The problem using wood instead of metal for the former, the edge of the copper can dig in & make removal difficult. Looking at the joint in this way avoids this.
Both caps fitted, holes for sight glass & steam feed. bushes to turn up, then silver solder. 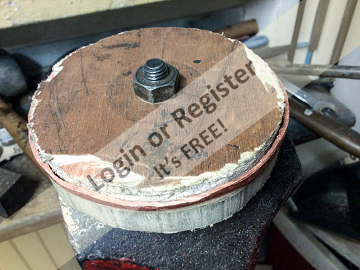
▲
⟩⟩
figtree7nts
RNinMunich
|
|
💬 boiler
6 years ago by 🇬🇧 hammer (
Lieutenant)✧ 4 Views · 2 Likes
Flag
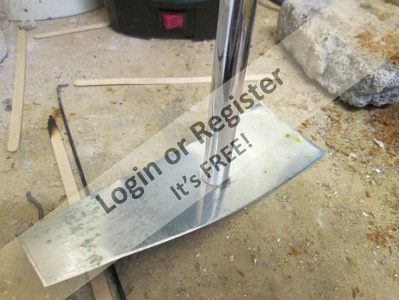
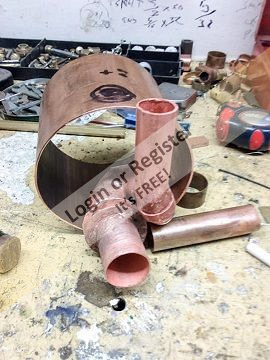
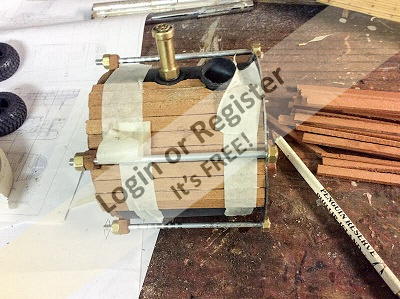
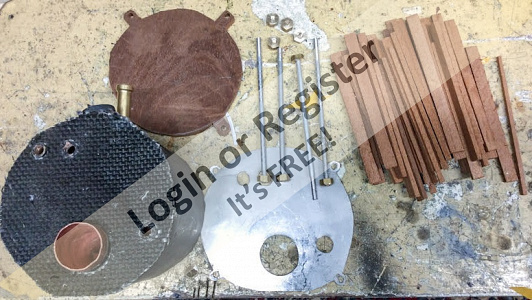
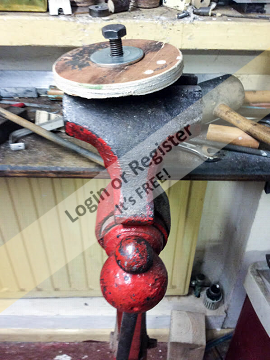
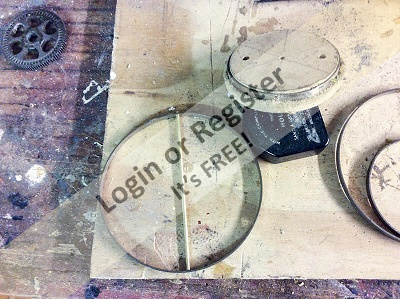
Started the end plates. The former is wood as I don't have any steel thick enough. Managed with wood before. Annealed to flatten the tube & cut circle on band saw. Annealed again persuade over former. Anneal again now in the citric acid.
▲
⟩⟩
Colin H
marky
|
📝 engine
6 years ago by 🇬🇧 hammer ( Lieutenant)
Lieutenant)✧ 5 Views · 3 Likes · 40 Comments
Flag
💬 Add Comment
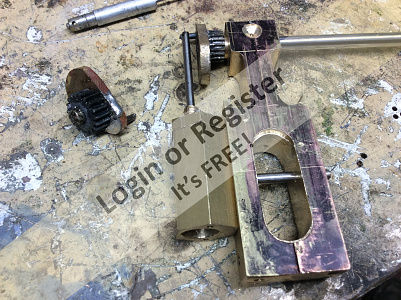
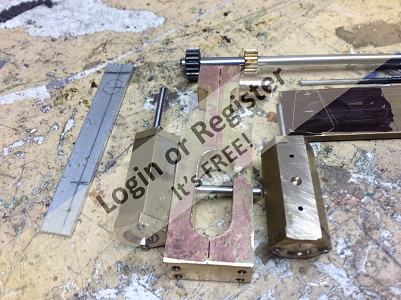
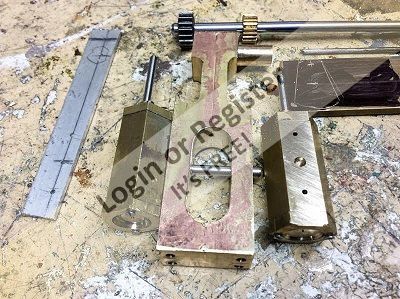
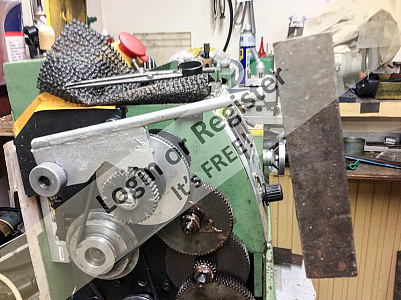
Sketched out the engine, on a scrap of paper. the main frame 1"+ 1/8" two of joined by two 3/8" square. The square drilled through the centres (steam passages). Cylinders 5/8 hexagon, turned off centre to leave one flat. Also 1/8" left at each end to take six 10 BM studs for the end caps. The throttle - reverse mounted upright above to one side. Size over all 3"+ 3" The drawing shows most but questions welcome.
I have altered this from previous engines I have made. Split the standard so I can increase the size of the bearings. This was a weak point before, didn't wear well.
I have altered this from previous engines I have made. Split the standard so I can increase the size of the bearings. This was a weak point before, didn't wear well.
▲
⟩⟩
doghouse
kmbcsecretary
mturpin013
|
💬 engine
6 years ago by 🇬🇧 hammer (
Lieutenant)✧ 9 Views · 0 Likes
Flag
I have engine running at last. but still wants fine tuning. Video soon.
▲
⟩⟩
No likes yet
This member will receive 1 point for every like received |
|
Login To
Remove Ads 💬 engine
6 years ago by 🇬🇧 hammer (
Lieutenant)✧ 7 Views · 0 Likes
Flag
I have tried to run the engine on air, but failed. I soon found the problem. I had designed the ports to be in from the end of the cylinder, to give better cover. I knew I would need a slot cut in the cylinder wall, to get steam past the piston. I had completely forgotten to do this. The photo shows the slot cut in this end of cylinder now. The photo is a close up showing all the scratches. The rough looking wall of cylinder are not that bad. they are a good thing as they will hold oil preventing wear. Well that is the theory.
▲
⟩⟩
No likes yet
This member will receive 1 point for every like received |
|
💬 engine
6 years ago by 🇬🇧 hammer (
Lieutenant)✧ 6 Views · 3 Likes
Flag
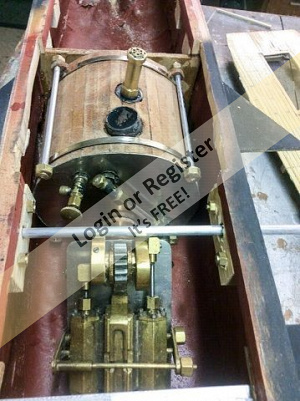
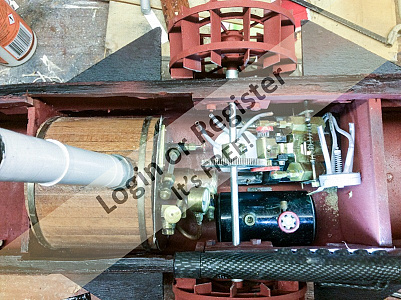
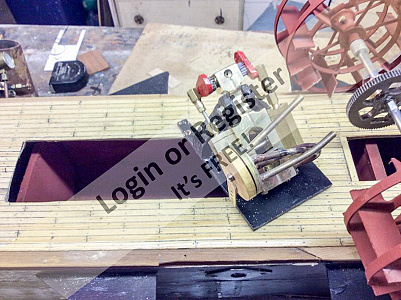
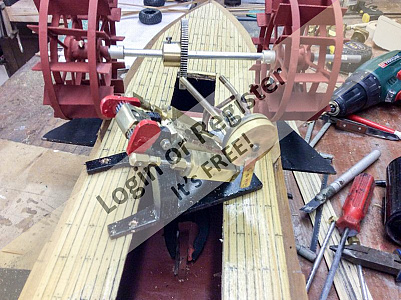
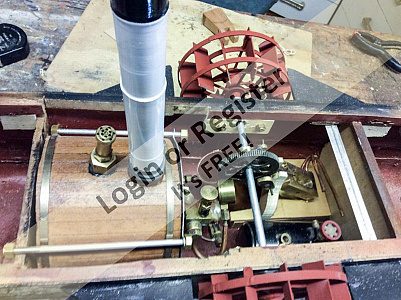
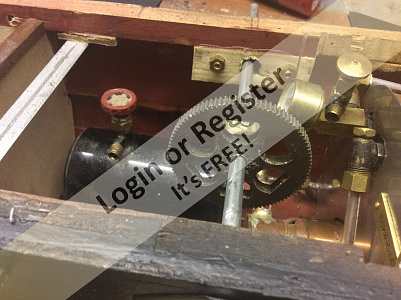
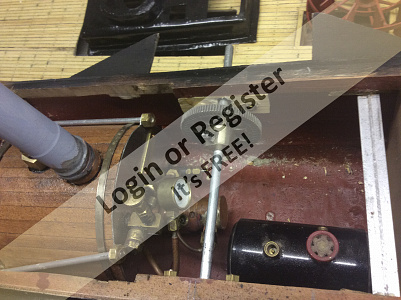
Engine room layout. A very tight fit, will be challenging to operate. The servo for regulator control will be under the forward saloon stairs. There is a bolt into the regulator through the baulkhead. Silicone pipe joining the exhaust copper, exiting up what on original, was the safety valve exit. Normal model practice is for exhaust inside the funnel. I have found this can but the flame out, when excess water runs down into fire tube. True steam out the funnel looks good but only shows on cold days. The copper steam feed pipes need connections made, & lagged. The brass circle will be the oiler. Gas pipe to make. When that is finished it will be test time on the bench. Sh*t or bust😱😱
▲
⟩⟩
RNinMunich
figtree7nts
Donnieboy
|
|
💬 engine
6 years ago by 🇩🇪 RNinMunich (
Fleet Admiral)✧ 2 Views · 0 Likes
Flag
Great stuff Hammer 👍
Fascinating, but baffling😲 If I can't see where the electrons come from and go to, and what they do on the way, I'm lost 😁 Cheers, Doug 😎 ▲
⟩⟩
No likes yet
This member will receive 1 point for every like received |
|
💬 engine
6 years ago by 🇬🇧 hammer (
Lieutenant)✧ 5 Views · 2 Likes
Flag
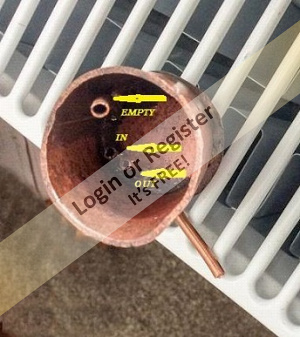
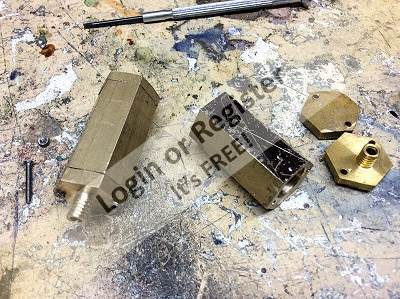
Continuing with the separator. For anyone who is not familiar with a separator. The feed tube goes in to the top about 3/8" & the exit tube about a 1/4". So the oil & water can not turn quick enough & falls to the bottom. The empty tube touches the bottom & is normally shut off. When opened & exit shut off, steam will empty contents. Of course I still have the base to fix.
The photo on window board, also shows my granddaughters steam engine, made for me. Proud granddad 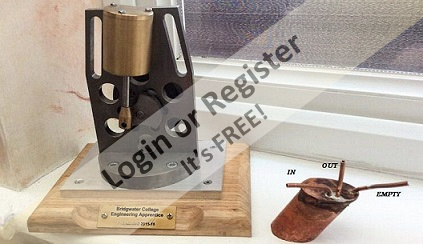
▲
⟩⟩
RNinMunich
figtree7nts
|
|
💬 engine
6 years ago by 🇬🇧 hammer (
Lieutenant)✧ 4 Views · 2 Likes
Flag
For those who cant wait to see it running. Here is one I made earlier.

▲
⟩⟩
kmbcsecretary
RNinMunich
|
|
💬 engine
6 years ago by 🇬🇧 hammer (
Lieutenant)✧ 2 Views · 0 Likes
Flag
Sure dimples are more secure. Guess I am just lazy.
Here is the adjustable frame to keep cylinders against port faces. Still in a rough state rushing to get it together for photo. Fettling & polish tomorrow. 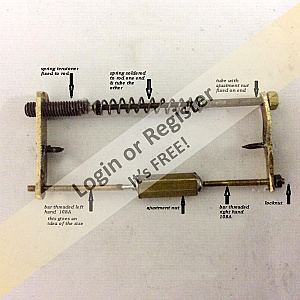
▲
⟩⟩
No likes yet
This member will receive 1 point for every like received |
|
💬 engine
6 years ago by 🇩🇪 RNinMunich (
Fleet Admiral)✧ 4 Views · 2 Likes
Flag
Fascinating, enthralling stuff👍
Can't wait to see it (hear it?) in action 😉 Shame you can't do 'Smell streaming' on the Web 😁 All the best, Doug 😎 PS: I prefer to machine dimples rather than flats to hold grub screws in place. 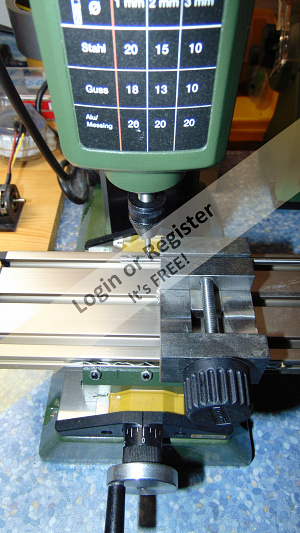
▲
⟩⟩
watson220
Donnieboy
|
|
💬 engine
6 years ago by 🇬🇧 hammer (
Lieutenant)✧ 4 Views · 2 Likes
Flag
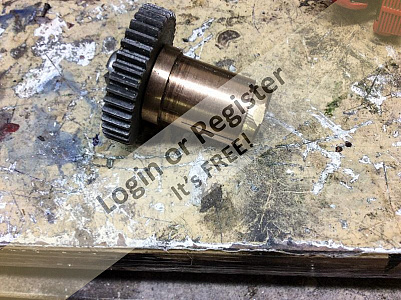
Engine almost complete. Just the springs & fittings for holding the faces together. On the shaft can be seen the spacers that rest against the bearings in the hull keeping the wheels & gear in place. The flats on the shaft to stop grub screws tuning are all inline. I can see the gear is correct line up the wheel will also be right.
▲
⟩⟩
jacko
RNinMunich
|
|
💬 engine
6 years ago by 🇬🇧 hammer (
Lieutenant)✧ 4 Views · 2 Likes
Flag
Removed more metal from the engine frame. ran a bull nose cutter along the joint of the two brass squares. the joint can't be seen now. I have lapped the port faces to the cylinders. Given the rest a good polish.

▲
⟩⟩
kmbcsecretary
RNinMunich
|
|
💬 engine
6 years ago by 🇩🇪 RNinMunich (
Fleet Admiral)✧ 2 Views · 0 Likes
Flag
Bon chance mon ami 👍 if you don't ask ..... 😉
▲
⟩⟩
No likes yet
This member will receive 1 point for every like received |
|
Login To
Remove Ads 💬 engine
6 years ago by 🇬🇧 hammer (
Lieutenant)✧ 3 Views · 1 Like
Flag
Thank you Doug will do. See what I can get from the exchequer.
▲
⟩⟩
RNinMunich
|
|
💬 engine
6 years ago by 🇩🇪 RNinMunich (
Fleet Admiral)✧ 3 Views · 1 Like
Flag
Hi Hammer, Dremmel do some as well I think, maybe not so expensive, but if you want them to last .....
My pension is a bit complex; part UK, part Germany, part my old company! Anytime now the German Taxman will want his bite!🤔 The Proxxon and Dremmel stuff I buy here in various DIY / builders supplies stores, much cheaper than their own online prices😊 Google them some time, you might be pleasantly surprised👍 Dunno about 'intelligenz', when I get stuck I just go back to basic principles and work back up! Anyway; who says mechanical engineers and craftsman are less intelligent? Definitely NOT me! You guys do things I can only aspire to! My Grandad was an 'old' Master Carpenter, I learned an awful lot from him, especially how to look after tools and sharpen chisels so you could slice tomatoes with 'em😉 Keep up the good work. Cheers, Doug 😎 ▲
⟩⟩
Donnieboy
|
|
💬 engine
6 years ago by 🇬🇧 hammer (
Lieutenant)✧ 2 Views · 0 Likes
Flag
Electronic engineering, well you must be far more intelligent than an old carpenter. I will look at the Proxxon range & turn green with envy. I have been retired 21 years on a private pension. Not index linked. 😱
▲
⟩⟩
No likes yet
This member will receive 1 point for every like received |
|
💬 engine
6 years ago by 🇩🇪 RNinMunich (
Fleet Admiral)✧ 3 Views · 1 Like
Flag
Evenin' Hammer,
For smaller milling bits have a look at the Proxxon range. From them I have bits down to 1mm 😊 Those are what I use for milling depressions and slots into shafts for securing keys or grub screws. Not cheap but they do the job time and time again. That's what I used on the new shaft for my Sea Scout, and will use on the prop shaft that Martin made for me for Gina 2👍 Quality has it's price, especially in mini machine tools 😉 I don't have a rotary table either, so the 'banana' slots I make with a diamond file like you do👍 Simple machining ... OK, but conceiving, designing and creating such magnificent machines as you do ...... way beyond the capabilities of a simple electronic engineer, Hat Off Sir 👍👍👍 looking forward to your next steps with great anticipation. Cheers, Doug 😎 Amazing coincidence with the name Gina! 😊 Greetings to her as well😉 ▲
⟩⟩
Donnieboy
|
|
💬 engine
6 years ago by 🇬🇧 hammer (
Lieutenant)✧ 4 Views · 2 Likes
Flag
Thanks for your comments appreciated, Doug. Unfortunately I don’t have a milling cutter smaller than 3mm. The slot is only 1.5. I will have a look at your build. Gina my daughters name.
I also don’t have a rotary table. I needed to cut the curved slots in the regulator- reverser. So with a fiddle I managed, with the vice which can turn. Stuck to a square of brass (super glue). Careful measuring so the centres all line up, including vice pivot. 3mm cutter in use Doug. The two parts of the regulator parted off 1in brass rod. Something learned doing this with a fixed steady, place card between tool and steady. Stop chips getting in the steady & jamming it. Silver soldered the pipes to block. Did have to drill one out after, even being mean with the solder. And carbon on the end of pipe. 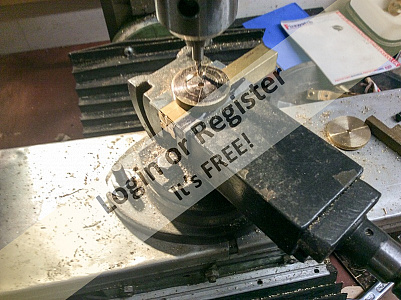
▲
⟩⟩
RNinMunich
Donnieboy
|
|
💬 engine
6 years ago by 🇩🇪 RNinMunich (
Fleet Admiral)✧ 2 Views · 0 Likes
Flag
Hi Hammer,
that's exactly why I use my mini milling machine for such precision drilling tasks! Work piece clamped in a machine vice bolted to the table. Start the hole with a small milling bit, for such a key slot as yours simply continue with the milling bit. I will be using this method on my Gina 2 cutter to key the gears to the shafts. If a hole is required the drill bit can't skid off😉 Drill slowly with cutting oil!! Cheers, Doug 😎
▲
⟩⟩
No likes yet
This member will receive 1 point for every like received |
|
💬 engine
6 years ago by 🇬🇧 hammer (
Lieutenant)✧ 3 Views · 1 Like
Flag
Keyed one web & gear to the shaft. Thought I would drill into the joint but the drill kept drifting off the chrome. So drilled as close as I could each side. Then diamond file to make it into a slot. cut a wedge & hammered it in. Probably fix other side with epoxy on final assemble.

▲
⟩⟩
figtree7nts
|
|
💬 engine
6 years ago by 🇬🇧 hammer (
Lieutenant)✧ 5 Views · 3 Likes
Flag
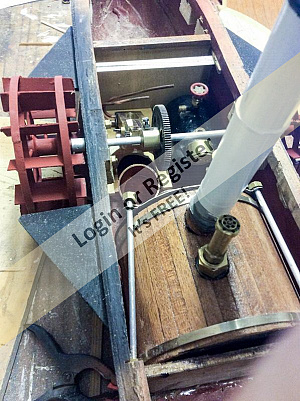
Started the separator tank. Well cut a tube & a space it will just fit, I hope. if not I have a smaller gas tank, in another boat, but like to keep it there. The paddle wheel looks crooked in the photo it is not, blame the ipad lenses

▲
⟩⟩
kmbcsecretary
figtree7nts
Donnieboy
|
|
💬 engine
6 years ago by 🇬🇧 hammer (
Lieutenant)✧ 4 Views · 2 Likes
Flag
Some times I am stupid. No need for extra bends on the pipes. All I needed to do was turn the engine over putting the pipes on the other side. Clear of every thing. I have threaded studs in the passage holes drilled from the side & end to form the steam ways. Fixed with metal-epoxy, trim when set. Also started the bed.
▲
⟩⟩
RNinMunich
Donnieboy
|
|
💬 engine
6 years ago by 🇩🇪 RNinMunich (
Fleet Admiral)✧ 2 Views · 0 Likes
Flag
Hi Hammer, we're all too Gobsmacked to even think about wondering about cylinders and frame! We're now waiting with bated breath to see how you want to bend the 10BA screw heads 😉😁
This dumb lectrickery engineer, who can't seem to cut a simple 3mm thread on a propshaft, is fascinated by your mechanical wizardry 👍 Keep it coming, can't wait for the test and trials! All the best, Doug 😎 ▲
⟩⟩
No likes yet
This member will receive 1 point for every like received |
|
Login To
Remove Ads 💬 engine
6 years ago by 🇬🇧 hammer (
Lieutenant)✧ 5 Views · 3 Likes
Flag
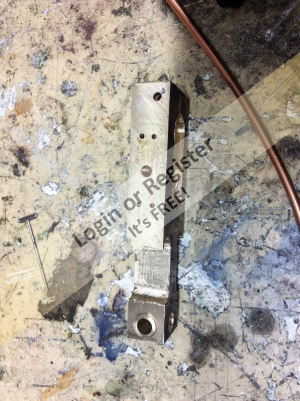
Made a bracket for the bottom of engine. The two holding screws block the holes drilled for the ports, the other two will have studs. The bracket at the other end will be fitted by trial & error. I had a fright thought the shaft gear was going through the deck. but as seen just got away with it. Fitted the pipes towards the regulator - reverser. Those 10BA screw head look big in the photo! I will have to cut and fit bends as they foul the gas tank as they are. No one has asked how the cylinders will be kept against the frame. I have several plans see which is best, soon.
▲
⟩⟩
RNinMunich
kmbcsecretary
figtree7nts
|
|
💬 engine
6 years ago by 🇬🇧 hammer (
Lieutenant)✧ 5 Views · 3 Likes
Flag
Hub made for the shaft gear. Some will notice I am using 10BA slotted counter sunk screws, this is because bought at a show by mistake. So must use them up. The layout of the engine room can be seen now. Gas tank can be removable from ther ,for filling. The engine will not be at such a steep angle. I also have to find room for a separator. O yes the boiler moves back 1/4in when fixed.
▲
⟩⟩
kmbcsecretary
figtree7nts
RNinMunich
|
|
💬 engine
6 years ago by 🇬🇧 hammer (
Lieutenant)✧ 5 Views · 3 Likes
Flag
All parts of the engine made. it is set at the angle it will be installed in the boat. The regulator- reverser will probably be mounted remotely, but how knows.
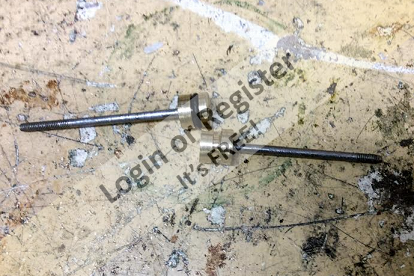
The gland nut drilled down a solid core in the cylinder for better alignment I hope. Have to hold the nut when drilling other wise it will undo. 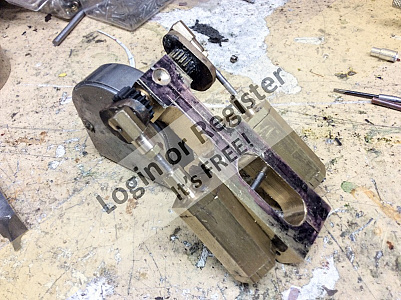

▲
⟩⟩
marky
figtree7nts
RNinMunich
|
|
💬 engine
6 years ago by 🇬🇧 hammer (
Lieutenant)✧ 5 Views · 3 Likes
Flag
Almost done pistons & rods. I had to revert to threading the rods into the pistons. Had a disaster with silver soldering them. Holding rod in the lathe turning the piston true to the rod. I had upset the temper, both rods snapped. I had no stainless of that size left. Had to turn down larger diameter. I had a home made traveling steady, so very easy. All other photos taken to day lost in computer somewhere. Take more tomorrow.
▲
⟩⟩
kmbcsecretary
marky
figtree7nts
|
|
💬 engine
6 years ago by 🇬🇧 hammer (
Lieutenant)✧ 3 Views · 1 Like
Flag
Steam port drilled in frame.
▲
⟩⟩
kmbcsecretary
|
|
💬 engine
6 years ago by 🇩🇪 RNinMunich (
Fleet Admiral)✧ 2 Views · 0 Likes
Flag
Never mind the rough bits, we all appreciate that there's some cleaning and fettling to come.
Main thing we can see the construction detail 👍 Beginning to get very interesting 😉 Doug 😎 ▲
⟩⟩
No likes yet
This member will receive 1 point for every like received |
|
💬 engine
6 years ago by 🇬🇧 hammer (
Lieutenant)✧ 6 Views · 4 Likes
Flag
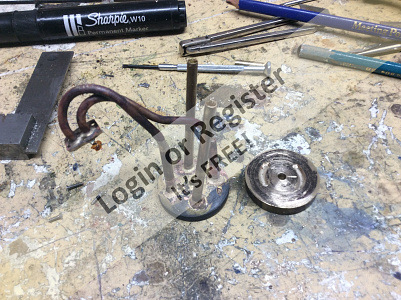
Trouble with big pictures all the rough bits can be seen. I will be smoothing & polishing when construction complete. Made the crank webs first glued the together, super glue, drilled the holes. Unfortunately they fell apart so had to use bolts to file to shape. Soldered the gear & pin, used an aluminium stubb to hold gear in place. Solder won’t stick to it of course.
Marked the ports in the frame with gauge. Not drilled yet will do that in mill. Using a hat pin as a centre finder. 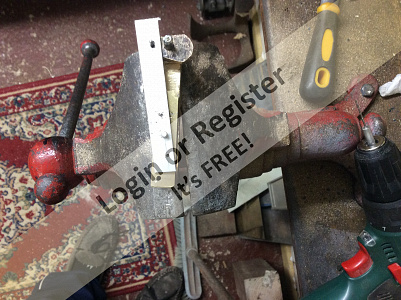
▲
⟩⟩
teejay
Donnieboy
figtree7nts
RNinMunich
|
|
💬 engine
6 years ago by 🇩🇪 RNinMunich (
Fleet Admiral)✧ 2 Views · 0 Likes
Flag
That's brilliant Hammer😊
Now we can see exactly what you're up to, great, many thanks👍👍 ▲
⟩⟩
No likes yet
This member will receive 1 point for every like received |
|
💬 engine
6 years ago by 🇬🇧 hammer (
Lieutenant)✧ 2 Views · 0 Likes
Flag
Is this better? Doug. Straight from iPad no reduction.
▲
⟩⟩
No likes yet
This member will receive 1 point for every like received |
|
💬 engine
6 years ago by 🇬🇧 hammer (
Lieutenant)✧ 2 Views · 0 Likes
Flag
That is strange as they look fine on my iPad and computer. I will post larger see what happens
▲
⟩⟩
No likes yet
This member will receive 1 point for every like received |
|
Login To
Remove Ads 💬 engine
6 years ago by 🇩🇪 RNinMunich (
Fleet Admiral)✧ 2 Views · 0 Likes
Flag
Hi Hammer, this is all fascinating stuff👍 BUT!
Your pictures are way too small🤔 The site blows them up so that all we see are pixels and no details 😭 Please adjust your camera to a much higher resolution. Thanks in advance 😉 Cheers Doug 😎 ▲
⟩⟩
No likes yet
This member will receive 1 point for every like received |
|
💬 engine
6 years ago by 🇬🇧 hammer (
Lieutenant)✧ 3 Views · 1 Like
Flag
A little more done on the engine. Steam ports & pivot holes drilled in cylinders. Oil light bronze bearing ready to fixed. Piston rods ready I will be silver soldering piston blanks in place. Then with the rod in chuck turn the blanks to fit. Chrome crank shaft, pin & web in the picture ready for cutting. The strip of ali with four holes will mark the steam ports in the frame. when the crank is fitted. The small gears fit between the bearing & crank web. As I said before this will give the chance to change ratios if the low is to low.
▲
⟩⟩
kmbcsecretary
|
|
💬 engine
6 years ago by 🇬🇧 hammer (
Lieutenant)✧ 3 Views · 1 Like
Flag
End caps fitted to cylinders. Drilled & tap 10BA. Marked the centre for pivot hole. I use marker pen cheaper, than engineer's blue. Only two screws on the caps, might be considered poor. That is one reason I have made them thicker than normal. the other reason will give more cover to the ports, as they will be very near the end. Not much time in shop, at the pool with grand kids.
▲
⟩⟩
marky
|
|
💬 engine
6 years ago by 🇩🇪 RNinMunich (
Fleet Admiral)✧ 2 Views · 0 Likes
Flag
Hi Hammer. all Greek to me but I do enjoy seeing the magnificent results under way and appreciate the precision work required 👍😊
Watching with (ignorant😲) interest, but learning a little along the way. Keep it up, All the best, Doug 😎 ▲
⟩⟩
No likes yet
This member will receive 1 point for every like received |
|
💬 engine
6 years ago by 🇬🇧 hammer (
Lieutenant)✧ 3 Views · 1 Like
Flag
Thanks for replying Doug. Steam is simple I wish I understood electronics. it will be come clear soon I hope. The steam passages inside the frame are the difficult bits t o explane. The 4 holes in the end drilled 1-1/4ins along the frame they have to miss the pivot hole & connect to holes in the port face to be drilled later. I do like to design my own engines.
▲
⟩⟩
RNinMunich
|
|
💬 engine
6 years ago by 🇩🇪 RNinMunich (
Fleet Admiral)✧ 2 Views · 0 Likes
Flag
Don't understand the half of it, I'm just a dumb electronics man, but I do admire your ingenuity and tenacity 👍
Await the outcome with great interest. 😉 Cheers, Doug 😎 ▲
⟩⟩
No likes yet
This member will receive 1 point for every like received |
|
💬 engine
6 years ago by 🇬🇧 hammer (
Lieutenant)✧ 2 Views · 0 Likes
Flag
Original Standard sadly distorted when silver soldering together I got it to hot. A change of plan I now intend have two output gears one at 3to1 the other at 5to1. Three to one is my normal preference. But the 12 floats (paddles) are very close together so will start with 5to1. if this is slow can use 3to1 without much trouble.
I have remade the standard, Second attempt soldered the bar then machined it after, this stopped any distortion. Stainless pivot bar fitted, will cut out inner section later. Large hole for removable crank bearing. Just the exit holes to the ports to drill when the crank it finished & blank off the 4 ports at entry end. 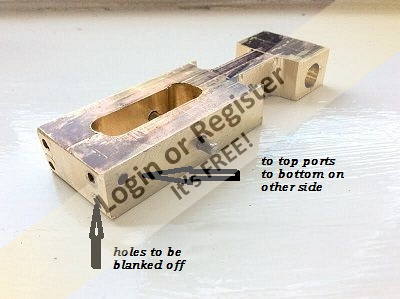
▲
⟩⟩
No likes yet
This member will receive 1 point for every like received |
|
💬 engine
6 years ago by 🇬🇧 hammer (
Lieutenant)✧ 4 Views · 2 Likes
Flag
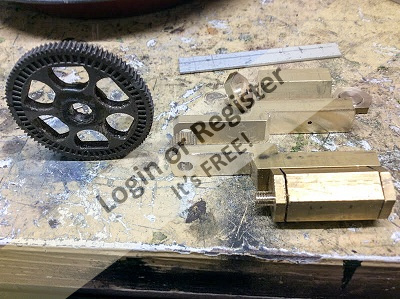
Milled the frames from square bar for the engine. Drilled the pivot hole & hole to take the bearing. Second photo shows the layout. The gearing is lower than me previous models at 5.7 to 1. I have used 3.5 to 1 before. We will see.

▲
⟩⟩
Colin H
marky
|
|
💬 engine
6 years ago by 🇬🇧 hammer (
Lieutenant)✧ 2 Views · 0 Likes
Flag
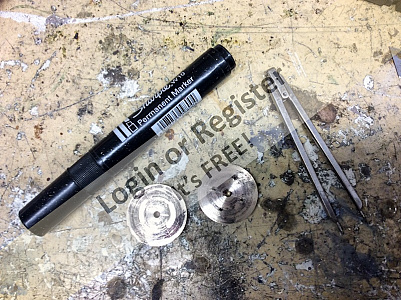
Started work on the engine. Drilled & turned the cylinders & end caps off centre. Simply done by packing one jaw of the chuck. The reason so I can mill down the port face to increase the width. (arrow & black mark) Also reducing the amount of metal, reducing start up condensation.
▲
⟩⟩
No likes yet
This member will receive 1 point for every like received |
📝 Wheels
6 years ago by 🇬🇧 hammer ( Lieutenant)
Lieutenant)✧ 7 Views · 5 Likes · 14 Comments
Flag
💬 Add Comment
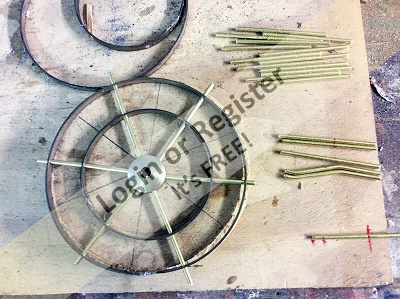
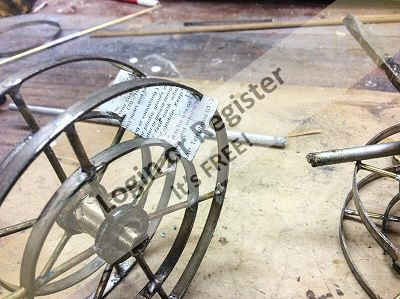
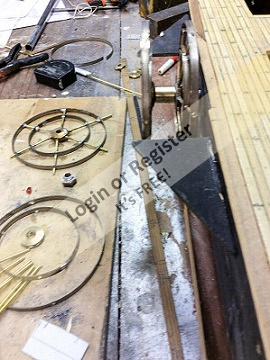
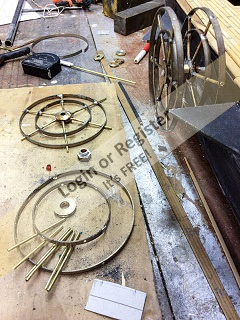
I though I had posted about wheels but cant find it. so am repeating. I have cut wheel from aluminium plate in the past. This is a waste & a tedious job. This time I am building them up with strip & rod. Wooden formers turned up for inner & outer rims. Strip raped around & Joint soldered. then holes drilled for the spokes. A hub tuned & drilled, the accurate holes have aligned every thing in the right position. One ready for soldering. inner wheel almost flat. Outer dished to stop lateral movement. Spokes marked in red from board for bends.
▲
⟩⟩
doghouse
jtdavid
Donnieboy
RNinMunich
figtree7nts
|
💬 Wheels
6 years ago by 🇬🇧 hammer (
Lieutenant)✧ 3 Views · 1 Like
Flag
If I make another set of wheels I would use brass strip, not the bronze spring material I had this time. I could silver solder the main parts then. I would also try one strip around each size, mark the holes, then use as patterns for the rest. Then soldering them afterward.
▲
⟩⟩
Donnieboy
|
|
Login To
Remove Ads 💬 Wheels
6 years ago by 🇬🇧 jtdavid (
 Petty Officer 1st Class) Petty Officer 1st Class)✧ 4 Views · 0 Likes
Flag
hi hammer,
you have made a nice job building those wheels, 👍 your method works great. keep posting david ▲
⟩⟩
No likes yet
This member will receive 1 point for every like received |
|
💬 Wheels
6 years ago by 🇨🇦 Donnieboy (
Warrant Officer)✧ 2 Views · 0 Likes
Flag
Nice job on the paddle wheels.They look great.
▲
⟩⟩
No likes yet
This member will receive 1 point for every like received |
|
💬 Wheels
6 years ago by 🇩🇪 RNinMunich (
Fleet Admiral)✧ 2 Views · 0 Likes
Flag
"Roll 'em, Roll 'em, Roll 'em, keep them wheels a rollin' ... " 😁
▲
⟩⟩
No likes yet
This member will receive 1 point for every like received |
|
💬 Wheels
6 years ago by 🇬🇧 hammer (
Lieutenant)✧ 5 Views · 3 Likes
Flag
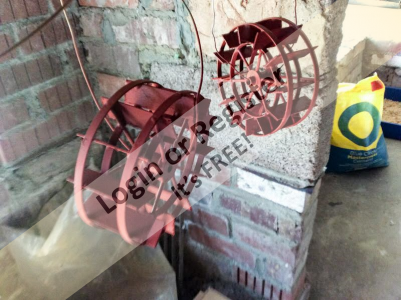
wheels finished. hanging up to dry.
▲
⟩⟩
kmbcsecretary
figtree7nts
RNinMunich
|
|
💬 Wheels
6 years ago by 🇩🇪 RNinMunich (
Fleet Admiral)✧ 3 Views · 1 Like
Flag
Great job, and nice clear pic 👍 Thanks Hammer 😊
Now we can see the refinements of your construction. Good stuff. I also use a mini gas torch sometimes, in pistol grip form with adjustable flame. Pizo ignition, dead easy. Get 'em in good cooking accessory shops. Good for soldering oil tubes on brass prop tubes an such. Cooks call them Gourmet Torches and use 'em for their Crème Brulet 😊 Also various electric irons, 50 W with a 1/4" chisel bit for big stuff, standard 25W general purpose, temp controlled 25W,and a mini 1mm bit temp controlled for SMD work. Good for small LEDs etc. Cheers, Doug 😎 PS Also one electric iron 1200W ........ . . . . for ironing shirts! Ugh!! 😡 

▲
⟩⟩
Donnieboy
|
|
💬 Wheels
6 years ago by 🇬🇧 hammer (
Lieutenant)✧ 4 Views · 2 Likes
Flag
Both wheels framed up, will need cleaning up when epoxy set.
▲
⟩⟩
figtree7nts
RNinMunich
|
|
💬 Wheels
6 years ago by 🇬🇧 hammer (
Lieutenant)✧ 2 Views · 0 Likes
Flag
David thanks for reply. On the wheels I used this small blow torch. Small flame but very hot at point. Temperamental to light. My technique is to listen to the gas escaping, lighting when strong. I also have three soldering irons of different strengths which I used on the dull plating.
▲
⟩⟩
No likes yet
This member will receive 1 point for every like received |
|
💬 Wheels
6 years ago by 🇬🇧 jtdavid (
Petty Officer 1st Class)✧ 4 Views · 0 Likes
Flag
forgot to ask how do you solder all them joints .
david ▲
⟩⟩
No likes yet
This member will receive 1 point for every like received |
|
💬 Wheels
6 years ago by 🇬🇧 jtdavid (
Petty Officer 1st Class)✧ 5 Views · 1 Like
Flag
I have really enjoyed seeing how you made your wheels 👍. will you show the finished job please, when you have done it, as I said very interesting 👍
david ▲
⟩⟩
rcmodelboats
|
|
💬 Wheels
6 years ago by 🇬🇧 hammer (
Lieutenant)✧ 2 Views · 0 Likes
Flag
The floats will be fitted so. the tabs will give the epoxy plenty to grip.
▲
⟩⟩
No likes yet
This member will receive 1 point for every like received |
|
Login To
Remove Ads 💬 Wheels
6 years ago by 🇬🇧 hammer (
Lieutenant)✧ 2 Views · 0 Likes
Flag
Having used spring bronze, (Thanks Derek) I wish now I had used brass & silver soldered the joints. I will have to epoxy the floats in place now. Don't want them to melt the rest.
Can't say I altered the plan because there isn't one. But I dished the inner wheel more than the outer in the end. 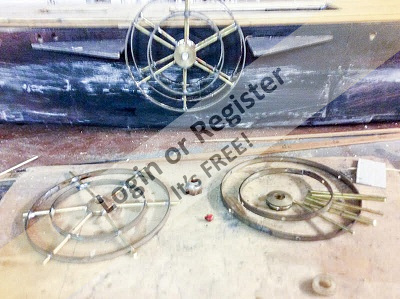
▲
⟩⟩
No likes yet
This member will receive 1 point for every like received |
|
💬 Wheels
6 years ago by 🇬🇧 hammer (
Lieutenant)✧ 5 Views · 3 Likes
Flag
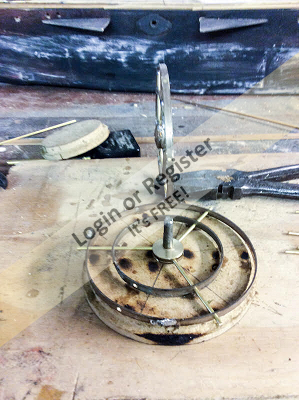
May be someone may want to make paddles using this method. if you do & you have a lathe should be no problems. First turn wooden blanks & mark centre & number of spokes required. Rap strip brass around the former cut & join to a tight fit. it is important as this will keep them the same size. Align the drill accurately to the spokes. Drill one & pin it with a short piece of spoke material, so the strip doesn't move wile drilling rest. The centre hub was divided in the lathe.
On assemble three spokes in my case immediately aligned the rings, that is if the holes are right. if not fettling is the order of the day. I soft soldered mine as the structure is inherently strong. Note soldered away from the marks on blanks, to preserve them. The dishing can be seen on the finished upright wheel. This was achieved by a thick washer under the hub, & clamping the outer ring down on to the former. I did try bending the spokes before fitting. But had trouble as the rings didn't align automatically. Clean up by hand. Only Three more to make. 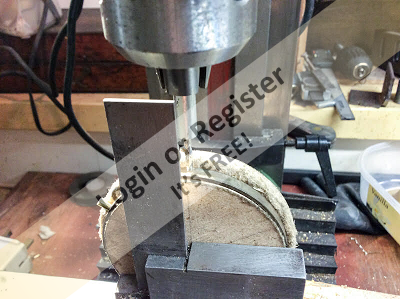
▲
⟩⟩
Donnieboy
RNinMunich
marky
|
|
💬 Wheels
6 years ago by 🇺🇸 figtree7nts (
Admiral)✧ 2 Views · 0 Likes
Flag
Now that's what I call skills!
Great job on the wheel, Hammer! ▲
⟩⟩
No likes yet
This member will receive 1 point for every like received |
📝 helm
6 years ago by 🇬🇧 hammer ( Lieutenant)
Lieutenant)✧ 13 Views · 3 Likes · 2 Comments
Flag
💬 Add Comment
Need a change from wood work. I don't know if the helm was wooden or brass. I do know that brass was very popular on later paddlers, so brass it is.
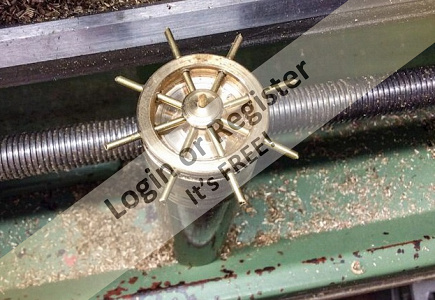
starting with a 1ins rod I turn the end so. I mark the spokes with a pointed tool, divided by my home made arrangement. A change wheel is fixed to back end of main shaft. in this case a 40, for 8 divisions. I could do with a cross drill on the tool post, but don't have an accurate one. I will have to drill the holes in the mill.
starting with a 1ins rod I turn the end so. I mark the spokes with a pointed tool, divided by my home made arrangement. A change wheel is fixed to back end of main shaft. in this case a 40, for 8 divisions. I could do with a cross drill on the tool post, but don't have an accurate one. I will have to drill the holes in the mill.
▲
⟩⟩
doghouse
jacko
marky
|
💬 helm
6 years ago by 🇬🇧 hammer (
Lieutenant)✧ 16 Views · 4 Likes
Flag
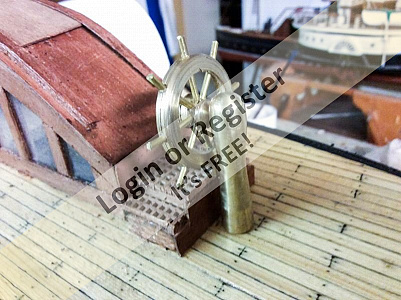
Helm finished, the completion just simple turning & polish.

▲
⟩⟩
Northumbrian
Donnieboy
figtree7nts
RNinMunich
|
|
💬 helm
6 years ago by 🇬🇧 hammer (
Lieutenant)✧ 14 Views · 2 Likes
Flag
Holes drilled spokes cut & fitted, stuck with super glue. Don't want silver from solder showing. I made a mistake, should have drilled the holes before removing the waste. The drill kept skidding side ways off the centre boss. Should have just cut a grove around the boss, to see how things where going. Any way got over that. Skimming off the boss so the spokes lay level. Then made a cap to fit over them. Note the cocktail stick keeping holes aligned. Drill this out when complete. Marked the handles for length in the lathe. cut & file them before patting off.
▲
⟩⟩
RNinMunich
figtree7nts
|
📝 up date
6 years ago by 🇬🇧 hammer ( Lieutenant)
Lieutenant)✧ 16 Views · 1 Like
Flag
💬 Add Comment
No play as I have been on holiday for a month. Now I am back I need to repair six of my boats as they are all out of commission after the summer sailing. So no play on T.C. for a wile. She is not abandoned. will return soon. thanks for watching.
▲
⟩⟩
doghouse


Login To
Remove Ads
Remove Ads