Join Us On Social Media!

|

|

|
Download The App!
Login To
Remove Ads
Remove Ads
Login To
Remove Ads
Remove Ads
Model Boats Website
Amati Riva Aquarama
23 Posts · 25 Followers · 71 Photos · 165 Likes
Began 2 years ago by
 United Kingdom
Follow This Thread
Not currently following
> Click to follow
> Click to follow
Latest Post 9 months ago by
| Oldest posts shown first (Show Newest First) | (Print Booklet) |
📝 Amati Riva Aquarama
2 years ago by 🇬🇧 DuncanP ( Sub-Lieutenant)
Sub-Lieutenant)✧ 229 Views · 6 Likes · 4 Comments
Flag
💬 Add Comment
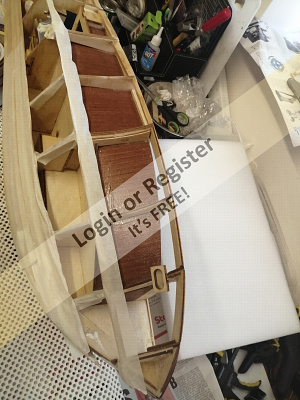
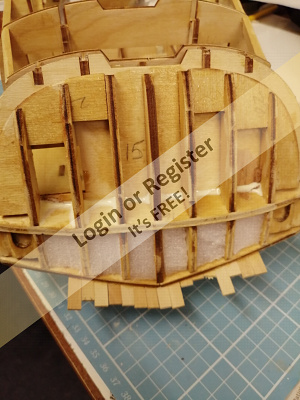
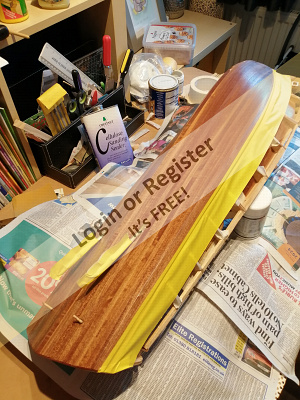
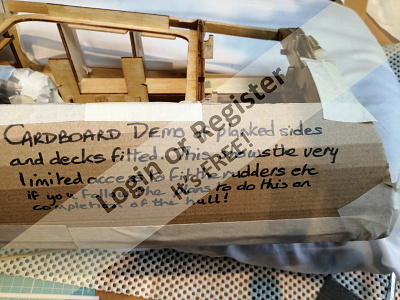
Started the build of this boat in April 2021. Followed the instructions implicitly until now but realised that fitting the optional motorising kit I needed to deviate! Dry running the fitting of the motors, gear boxes, rudders and rudder linkages were very difficult even before any planking. I've therefore decided to blog my deviation from the instructions since they indicate fitting these components on completion. I think otherwise this would be near impossible so I'm going to blog my method and hope it works! Hopefully it might be useful for anyone else building this Amati kit.
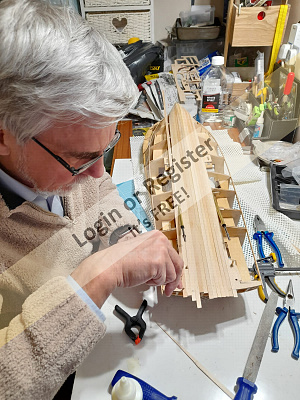
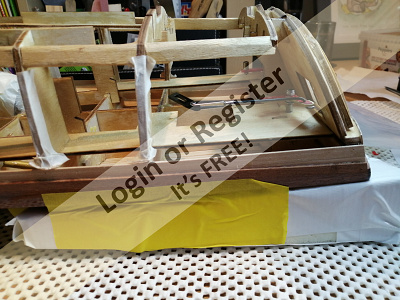
I've just installed the motors and prop shafts as I needed to use the space where the planking would be fitted in order to get them into place! I've wrapped the motors and gear boxes in a plastic bags to protect them until the boat is finished. I will complete the bottom planking and then fit the rudders as again access once planking is complete will make the job almost impossible. The clamps are holding strengthening pieces in place in order to hold the props in correct alignment. This again is a modification plus I've filed out the wood close to where the outer motor terminals are located. Otherwise attaching the wires to the motors would again be difficult.I plan to cover the bottom of the hull with the mahogany planks so I can attach the rudders and linkages before planking the sides.
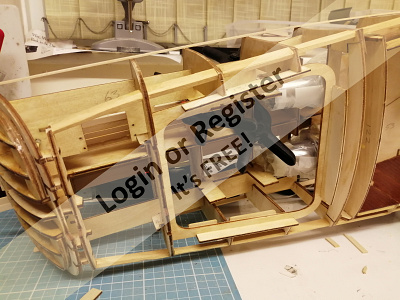
I've just installed the motors and prop shafts as I needed to use the space where the planking would be fitted in order to get them into place! I've wrapped the motors and gear boxes in a plastic bags to protect them until the boat is finished. I will complete the bottom planking and then fit the rudders as again access once planking is complete will make the job almost impossible. The clamps are holding strengthening pieces in place in order to hold the props in correct alignment. This again is a modification plus I've filed out the wood close to where the outer motor terminals are located. Otherwise attaching the wires to the motors would again be difficult.I plan to cover the bottom of the hull with the mahogany planks so I can attach the rudders and linkages before planking the sides.
▲
⟩⟩
DaveWhittaker
jbkiwi
dave976
Colin H
BOATSHED
pressonreguardless
|
💬 Re: Amati Riva Aquarama
2 years ago by 🇬🇧 DuncanP (
Sub-Lieutenant)✧ 225 Views · 3 Likes
Flag
Hi. Thanks for your comments. I must say I cannot fault the quality of the kit. All the wood and fittings are top quality. I think the instructions are bias towards a display model and the motorisation is more of an after thought! My wife bought the kit and the motorosation kit for my 70th birthday as I've always drewelled over the beauty of these boats. I just hope I can do it justice! I've also got an Aerokits RAF crash tender which I originally built in my 20's and refurbished during the 1st lockdown. I've now added a spray rail along the waterline which has improved its performance and stops it getting wet through! Cheers Duncan
▲
⟩⟩
BOATSHED
dave976
Colin H
|
|
Login To
Remove Ads 💬 Re: Amati Riva Aquarama
2 years ago by 🇬🇧 BOATSHED (
 Lieutenant) Lieutenant)✧ 231 Views · 2 Likes
Flag
It looks like you have put a lot of work into her. It's a shame that things are not like the plans advise. I started to build the AeroNuat Sports Boat. That is not a very good build boat. The side stringers are to frail to do a nice strong build. It is a similar hull to the early Aerokits Sea Hornet. The sid and bottom skins I was able to use small brass pins for fitting as I did with the 34" RAF Crash Tender. I got the side skins onto the AeroNaut hull but the bottom skins were too small. And I used a build board that was with the kit. I have fitted the small 380 style motor that it advises. It would be hard to fit that once the bottom skins are on. I shelved the build for now as I got disheartened with it. It has now stood on my mancave window sill for 18 months or so. I wish I had got the Sea Hornet again. I felt the £80 I spent on it was a waste. They seem to use cheaper and thinner wood 🤔and charge the earth for it now. ☹️ I hope you get to finish your boat successfully.Happy building.🚤🚤
▲
⟩⟩
Colin H
DuncanP
|
|
💬 Re: Amati Riva Aquarama
2 years ago by 🇦🇺 Gt108 (
 Master Seaman) Master Seaman)✧ 228 Views · 1 Like
Flag
I built this kit some years ago but found it too small and heavy to be a practical runner once fitted with 2 motors batteries and esc etc Nice to look at for display only though
▲
⟩⟩
BOATSHED
|
|
💬 Re: Amati Riva Aquarama
2 years ago by 🇺🇸 pressonreguardless (
 Rear Admiral) Rear Admiral)✧ 229 Views · 2 Likes
Flag
Hi Duncan,
Looking foward to your updates. The Riva is one of my many favorites😁 Trev ▲
⟩⟩
DuncanP
BOATSHED
|
Login To
Remove Ads
Remove Ads
📝 Planking
2 years ago by 🇬🇧 DuncanP ( Sub-Lieutenant)
Sub-Lieutenant)✧ 223 Views · 4 Likes · 2 Comments
Flag
💬 Add Comment
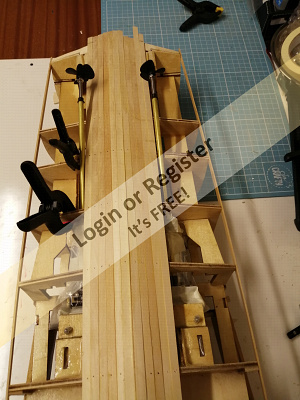
Picture of me applying another plank with an Amati pin pusher. I usually get the nail started with the pin pusher and the complete with the hammer. I'm thinking of applying some expoy resin to the underside of the planks (under the cabin area) as soon this will be unreachable - just in case in future any water gets ingressed into those areas. Has anyone got any thoughts on this please ? This is my first build of a planked hull so any experience greatly received.
▲
⟩⟩
DaveWhittaker
Mike Stoney
BOATSHED
Colin H
|
💬 Re: Planking
2 years ago by 🇬🇧 DPTrainer (
 Able Seaman) Able Seaman)✧ 212 Views · 1 Like
Flag
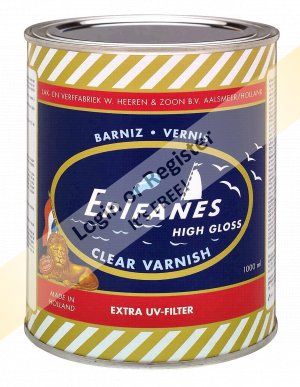
Thank you Chris for your comments. Progress is temporally on hold at the moment because it has been too cold in my outdoor workshop at the back of the garage - basically because I'm trying to be careful with the electricity bill ! As you probably know prices for gas and electricity have unfortunately gone through the roof! I think I will use epoxy with no fibreglass on the inside of the hull (where possible) and like you say use varnish on the outside. Thanks again. Duncan
▲
⟩⟩
BOATSHED
|
|
💬 Re: Planking
2 years ago by 🇬🇧 ChrisG (
 Lieutenant Commander) Lieutenant Commander)✧ 218 Views · 1 Like
Flag
Hello Duncan
From what I can see from the photo`s looks like a good job you are doing, Amati as well as being one of only a few companies making kits today are doubly unusual in that they seem to like lovely wood. I have completed a couple of their kits, the small cruiser and the Bella yacht both turned out well with good straight grained wood in the box. As far as preservation of that which you will be unable to get at after completion all I would recommend is if you are not completely happy using epoxy then several coats of good varnish is a simple cost effective way of achieving much the same thing. I am very interested in seeing the model completed, there are not many modellers that do not like the lines of a Riva. Regards ChrisG Sorry I had no intention to confuse but I now realise that the Bella Yacht and the Diva were in fact Aeronaut models and not Amati. I have only bought plans from Amati. Its very much an age thing, my memory is going along with many other things but looking at some others I have little to complain about. Unlike you I am fortunate in that the `boss` has allowed me the use of a spare bedroom for a play room and only have to go to the garage on occassions for things like rubbing down and smelly grp work or painting. I think it was a calculated move on her part as I am no longer within reach of the on/off tv switch so she can watch her share of rubbish. Regards ChrisG ▲
⟩⟩
BOATSHED
|
📝 Preventing water damage
2 years ago by 🇬🇧 DuncanP ( Sub-Lieutenant)
Sub-Lieutenant)✧ 212 Views · 4 Likes · 2 Comments
Flag
💬 Add Comment
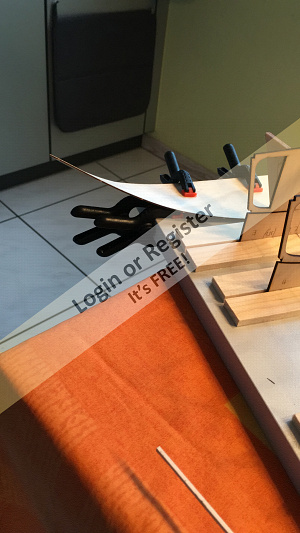
Haven't done much since my last post as it has been too cold in my garage Workshop. Trying to be careful with the electric radiator with the high cost of electricity!! I've put masking tape on the planks and frames to stop any varnish getting on them and then possibly causing problems later when glueing more planks on. As you can see from the photos I soon won't be able to get into protecting the inside of these bottom planks from any ingress of water. Hopefully that won't happen but just in case I have put 2 coats of quick drying satin varnish on the inside of these bottom planks. In order to do this I've put a pvc glove on and applied it with a bent finger!! A brush wouldn't touch the inside of the planks. Next stage will be to continue with the planking when it gets warmer! By the way Happy New Year everyone and happy constructing and sailing! Cheers Duncan

▲
⟩⟩
Mike Stoney
BOATSHED
Colin H
Graham93
|
💬 Re: Preventing water damage
2 years ago by 🇬🇧 DuncanP (
Sub-Lieutenant)✧ 212 Views · 2 Likes
Flag
Ha ha! Yes I even remember forgetting the bung on a full size speed boat! It was struggling to get up onto the plane and then I realised what I had done! Most embarrassing since I had a couple of passengers with me. Got back to the slipway and drained it so no harm done in the end but there was lots of laughter! Cheers Duncan.
▲
⟩⟩
BOATSHED
Peejay
|
|
💬 Re: Preventing water damage
2 years ago by 🇬🇧 ChrisG (
Lieutenant Commander)✧ 217 Views · 2 Likes
Flag
It is very difficult trying to work in the cold to say nothing of increased curing times for paints and glues.
As for water ingress, this is often a problem where the plan instructs the builder to restrict access to areas of the hull and I will deliberate for days before glueing that deck or bulkhead that does that. On a yacht I recently finished although inner hull access was possible it was a right pain and on her maiden trip I noticed after about 30 minutes in the water she was definitely lower. Recovered the boat took it home and repaired the leak in the rudder tube, drilled a small hole in the transom and made a plug to fit. Next trip to the lake, no leak but if in the future water gets in at least I will be able to drain it. I suppose the next problem will be forgetting to fit the plug🤣🤣🤣 Regards ChrisG ▲
⟩⟩
BOATSHED
Peejay
|
📝 Riva Aquarama - extra bouyancy
2 years ago by 🇬🇧 DuncanP ( Sub-Lieutenant)
Sub-Lieutenant)✧ 215 Views · 7 Likes · 6 Comments
Flag
💬 Add Comment
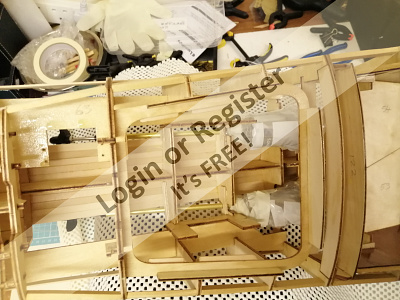
Decided to fill the parts of the hull which will be inaccessible after planking with some extra bouyancy - just in case the unthinkable happens! Had some yellow pool noodle and also some foam packaging that arrived in a parcel this week. Thought it was worthwhile doing before doing any more planking. In my previous post I had treated the underside of the current planks with 2 coats of varnish. Cheers Duncan
▲
⟩⟩
DaveWhittaker
Mike Stoney
jbkiwi
ChrisG
BOATSHED
Rogal118
Colin H
|
💬 Re: Riva Aquarama - extra bouyancy
2 years ago by 🇬🇧 DuncanP (
Sub-Lieutenant)✧ 198 Views · 0 Likes
Flag
Another thought for you! I haven't used any steam on my build and in just a couple of instances I've used the Amati Plank bender. It works really well. Also I have a hot plank bending tool kit which I haven't had to use as yet. It is from the Model Craft Collection and I got it on Ebay. Cheers Duncan
▲
⟩⟩
No likes yet
This member will receive 1 point for every like received |
|
Login To
Remove Ads 💬 Re: Riva Aquarama - extra bouyancy
2 years ago by 🇬🇧 DuncanP (
Sub-Lieutenant)✧ 198 Views · 1 Like
Flag
Sorry to hear you are having trouble. This Amati kit I think is excellent but I think it was originally envisaged as a display model and the R/c was a bit of an after thought! That's why I have started this blog for a working model as I'm having to think my way though this part of the build. Cheers Duncan
▲
⟩⟩
Mike Stoney
|
|
💬 Re: Riva Aquarama - extra bouyancy
2 years ago by 🇨🇭 Mike Stoney (
 Commander) Commander)✧ 200 Views · 2 Likes
Flag
Grüezi Duncan, (Swiss German language for Hello) 😊
I like your idea so far, but I don't know how this material behaves if the hull is leaking. At the moment I am trying to build the Aeronaut Trout with my grandson. He himself would like us to set this up like your boat. The wooden parts are so stiff and small that you can hardly bend them into the right shape even with steam. . The smaller the boat, the harder the processing of the hull. In addition, some parts are not correct, which makes the whole thing even more tricky! Poor grandson, I meant well! well . . My next model will definitely be something similar to yours! Greets from Switzerland Michel-Claude PS:the last picture is me when i lose patience!! 🤣🤣🤣🤣🤣 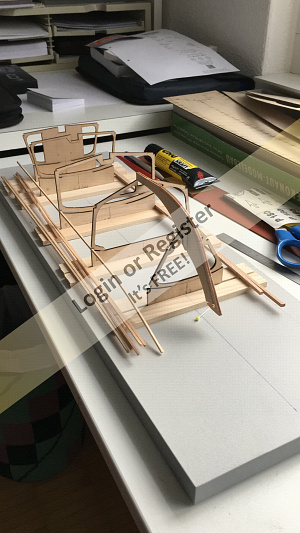


▲
⟩⟩
DaveWhittaker
DuncanP
|
|
💬 Re: Riva Aquarama - extra bouyancy
2 years ago by 🇬🇧 DuncanP (
Sub-Lieutenant)✧ 206 Views · 0 Likes
Flag
Hi, Thanks for your comment. What type of finishing polish do you use? Cheers Duncan
▲
⟩⟩
No likes yet
This member will receive 1 point for every like received |
|
💬 Re: Riva Aquarama - extra bouyancy
2 years ago by 🇬🇧 BOATSHED (
Lieutenant)✧ 218 Views · 2 Likes
Flag
The varnish I use is the same as I have used in the past on a boat I own up on the Norfolk Broads. I have used this and lightly sand between coats then a good polish up at the end you can get a great glass type finish. Used it on model boats in the past. I cannot wait to get back up there and get her sorted out. Due to Covid I have not been near her for 2 years.
▲
⟩⟩
DuncanP
Colin H
|
|
💬 Re: Riva Aquarama - extra bouyancy
2 years ago by 🇬🇧 BOATSHED (
Lieutenant)✧ 217 Views · 1 Like
Flag
That's a great thing to do. I used to use the cheapy swinging pool snakes. They used to sell them in shops like Poundland. Not seen them lately so I used the central heating pipe covering, the grey stuff from B&Q. I still have a blow up bow shapped thing that the model boat shops used to sell. Way back I used the two part mixing stuff that when mixed it swelled up and filled the bow of the boat. I even went as far as stealing my daughters water wings for bouyancy aid. My problem was though, mainly running the boat out of the side of the pond. Too much of a speed freak, 71 and still not slowing down.
▲
⟩⟩
DuncanP
|
📝 Riva Aquarama - planking the bottom
2 years ago by 🇬🇧 DuncanP ( Sub-Lieutenant)
Sub-Lieutenant)✧ 205 Views · 2 Likes
Flag
💬 Add Comment
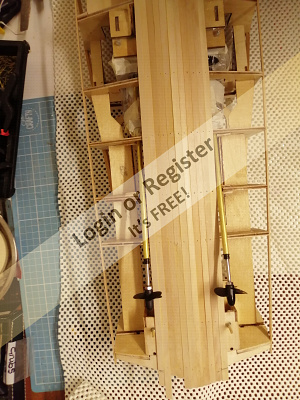
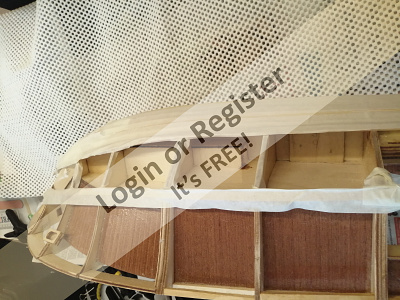
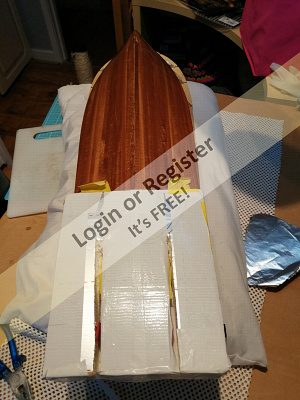
Riva Aquarama slowly coming along. First layer of a planking on the bottom of the hull nearly finished. Needs some filler in places and yet more sanding- ugh! Going to do the 2nd mahogany planking on the bottom so I can get access through the sides of the hull in order to assemble the rudders and linkages. Once the side planks are in place this job will be difficult if not impossible! This is not as per instructions though but I think they are bias towards a display model. I've protected the rudder tubes with greased bbq skewer sticks - a perfect fit! There is masking tape on the prop shafts to protect them. During sanding I've protected the inside of the hull with A4 plastic pockets taped together. Happy sailing and building everyone.
▲
⟩⟩
Colin H
Rogal118
📝 Riva Aquarama 2nd photo -
2 years ago by 🇬🇧 DuncanP ( Sub-Lieutenant)
Sub-Lieutenant)✧ 209 Views · 1 Like
Flag
💬 Add Comment
2nd photo- said run out of memory when I tried to upload with the previous photo not sure which end is at fault!??
▲
⟩⟩
Colin H
📝 Second layer of planking
2 years ago by 🇬🇧 DuncanP ( Sub-Lieutenant)
Sub-Lieutenant)✧ 198 Views · 7 Likes · 3 Comments
Flag
💬 Add Comment
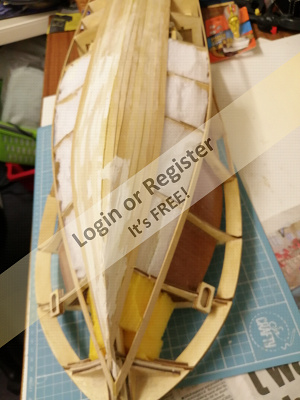
I have started the second layer of planking on my Amati Riva Aquarama. It is the first time that I have built a planked model but having looked at some previous methods I have adopted the following method which is a combination of other ways and seems to be working well. I have purchased off Ebay some BLUNT needles and syringes which are quite cheap. The needles allow you to carefully control the amount of glue applied and enable you to get into the tight gaps. First of all, I glued the bow end with CA glue for a length of about 2" making sure I have a tight fit and let the CA go off. Using the syringe filled with Aliphatic glue I then apply a thin bead of this glue for the rest of the length of the plank onto the hull.( I find using CA glue I end up sticking my fingers!) The needle lets you get glue very close to where the plank is already fixed with the CA glue. Because of the curvature of the hull I have found that the plank will bend and make a tight fit to the preceding plank. I then press it down wiping excess glue away and apply wide masking tape to keep the plank firmly in place - and give it time to set. I didn't want to use nails as shown in the instructions because I didn't want holes showing when the planks are finally finished with varnish. If the CA glue needle gets blocked just burn off the blockage with a lighter. I haven't found the Aliphatic glue blocks the needle but in both cases I always replace the plastic covers on the needles between applications. Next stage is sanding and applying 2 x sanding sealer followed by varnish. I will then fit the rudders, rudder horns and linkages before completing the sides if the boat. This is so I can get my fingers in through the sides of the boat in order to carry out this task - otherwise I think it will be near impossible!!

▲
⟩⟩
DaveWhittaker
jbkiwi
pressonreguardless
stevedownunder
AndyB
Colin H
ChrisG
|
💬 Re: Second layer of planking
2 years ago by 🇬🇧 DuncanP (
Sub-Lieutenant)✧ 196 Views · 0 Likes
Flag
Thank you. I am taking my time as I originally started the model in April last year. Slow and steady as you say. Cheers
▲
⟩⟩
No likes yet
This member will receive 1 point for every like received |
|
Login To
Remove Ads 💬 Re: Second layer of planking
2 years ago by 🇬🇧 mturpin013 (
 Admiral) Admiral)✧ 206 Views · 0 Likes
Flag
Its looking great, its not a race take it steady patience and perseverance is the key.
▲
⟩⟩
No likes yet
This member will receive 1 point for every like received |
|
💬 Re: Second layer of planking
2 years ago by 🇬🇧 ChrisG (
Lieutenant Commander)✧ 198 Views · 1 Like
Flag
I am very interested in your method of planking and the mahogany I love, must try it sometime. The boat will look fabulous when finished as it is a classic and I look forward to seeing the continued build and how your modifications allowing it to be a working model, progress.
Regards ChrisG ▲
⟩⟩
DuncanP
|
📝 Amati Italian Runabout (Riva Aquarama) for use on water
2 years ago by 🇬🇧 DuncanP ( Sub-Lieutenant)
Sub-Lieutenant)✧ 216 Views · 5 Likes · 3 Comments
Flag
💬 Add Comment
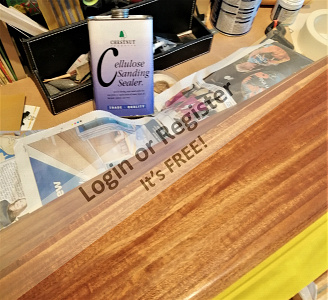
I've completed the second layer of mahogany planking on the bottom of the hull and have now applied the first coat of Chestnut Sanding sealer which will require sanding before another coat is applied. Before applying the sealer I applied Vaseline to the BBQ bamboo skewers to ensure they didn't get stuck in the rudder tubes (they are a perfect fit!) and also applied the yellow masking tape around the last planks fitted in order to ensure a raw wood edge when I'm gluing the side planking on after fitting the rudders and linkages (This method of build is the only way I believe I can get my fingers in to fit these parts!). My plan then is to do another coat of sanding sealer and then two coats of yacht varnish. Not sure whether I should also apply a finishing epoxy resin coat before doing the varnishing. Any thoughts? The bottom of the hull will then be painted with white enamel - Humbrol. The sides once fitted will be the beautiful mahagony. That is my thoughts so far. Any comments please?
▲
⟩⟩
DaveWhittaker
Colin H
pressonreguardless
jbkiwi
ChrisG
|
💬 Re: Amati Italian Runabout (Riva Aquarama) for use on water
2 years ago by 🇬🇧 DuncanP (
Sub-Lieutenant)✧ 216 Views · 0 Likes
Flag
Thanks Trev. In that case I'll probably just epoxy the inside of the hull which is still bare wood. I just want to make sure it is water tight so that I don't get any water damage ! 😊
▲
⟩⟩
No likes yet
This member will receive 1 point for every like received |
|
Login To
Remove Ads 💬 Re: Amati Italian Runabout (Riva Aquarama) for use on water
2 years ago by 🇺🇸 pressonreguardless (
Rear Admiral)✧ 215 Views · 0 Likes
Flag
I don't think the Epoxy is necessary at this point. If it is used it should be applied on raw wood.
Also use the correct hardener to achieve a clear finish. Total Boat and West have these hardeners. Good Luck Trev ▲
⟩⟩
No likes yet
This member will receive 1 point for every like received |
|
💬 Re: Amati Italian Runabout (Riva Aquarama) for use on water
2 years ago by 🇬🇧 ChrisG (
Lieutenant Commander)✧ 215 Views · 1 Like
Flag
Sounds good and certainly looks good to me, that mahogany and the quality of the planking you have achieved should not be covered in my opinion. I am not sure why you are thinking of epoxy finish as well as two coats of varnish, maybe because I find epoxy a lot more difficult to work with than varnish and if varnishing is carried out well the finish can be fantastic as well as giving adequate protection.
Whatever the model is coming along very well you should be proud. Regards ChrisG ▲
⟩⟩
DuncanP
|
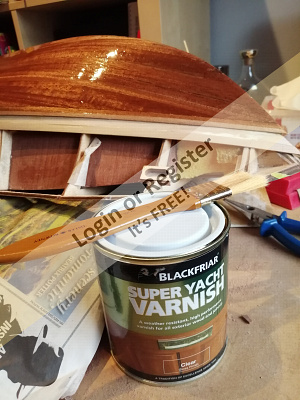
📝 1st coat of varnish
2 years ago by 🇬🇧 DuncanP ( Sub-Lieutenant)
Sub-Lieutenant)✧ 220 Views · 8 Likes · 4 Comments
Flag
💬 Add Comment
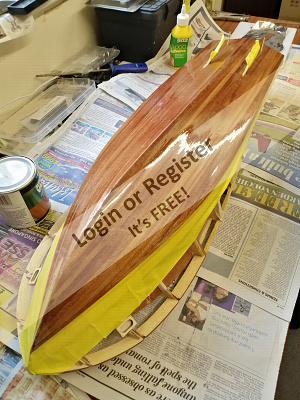
Hi Everyone, Just a small update on progress. Having applied several coats of Cellulose Sanding sealer I have now applied one coat of yacht varnish. Hopefully you can see from the photos the reason I decided to apply the masking tape. This was to protect a raw wood edge in order to get a good bond to glue to when I start the side planking. I'm pleased with the overall finish so far. I forgot to do a test of the varnish on the sealer so there were a few anxious hours of waiting hoping that they wouldn't react with each other!
▲
⟩⟩
DaveWhittaker
jbkiwi
stevedownunder
Ronald
Colin H
DWBrinkman
dave976
ChrisG
|
💬 Re: 1st coat of varnish
2 years ago by 🇬🇧 DuncanP (
Sub-Lieutenant)✧ 220 Views · 0 Likes
Flag
It is the 1st time I have tried building a planked model. I think the main thing is taking your time. I spent quite a lot of time cutting and then sanding the end of the planks to get a really good fit. I started build in April 2021!! Having said that I probably only fitted no more than 4 planks per day to give the glue time to set hard.
▲
⟩⟩
No likes yet
This member will receive 1 point for every like received |
|
Login To
Remove Ads 💬 Re: 1st coat of varnish
2 years ago by 🇺🇸 DWBrinkman (
Lieutenant Commander)✧ 223 Views · 0 Likes
Flag
Very nice work! I only hope to someday get close to that kind of modeling skill!
▲
⟩⟩
No likes yet
This member will receive 1 point for every like received |
|
💬 Re: 1st coat of varnish
2 years ago by 🇬🇧 dave976 (
 Captain) Captain)✧ 227 Views · 0 Likes
Flag
Looking good. Nice neat planking enhanced by the excellent paint finish.
dave976 ▲
⟩⟩
No likes yet
This member will receive 1 point for every like received |
|
💬 Re: 1st coat of varnish
2 years ago by 🇬🇧 ChrisG (
Lieutenant Commander)✧ 219 Views · 0 Likes
Flag
She looks great, fabulous gloss already. The invention of water based paints has caused the likes of most of us a real `faff` it was great in the day when we did not have to worry about one paint reacting badly with another. They should have restricted water based to emulsion, sorry in my opinion😠😠.
Well done Duncan regards ChrisG ▲
⟩⟩
No likes yet
This member will receive 1 point for every like received |
📝 Overcoming difficulty of fitting rudders and linkages
2 years ago by 🇬🇧 DuncanP ( Sub-Lieutenant)
Sub-Lieutenant)✧ 217 Views · 5 Likes · 1 Comment
Flag
💬 Add Comment
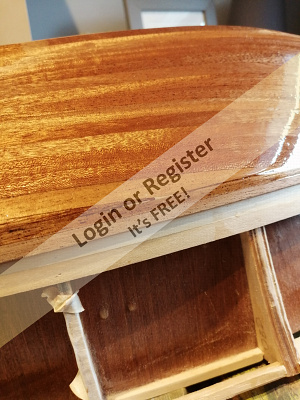
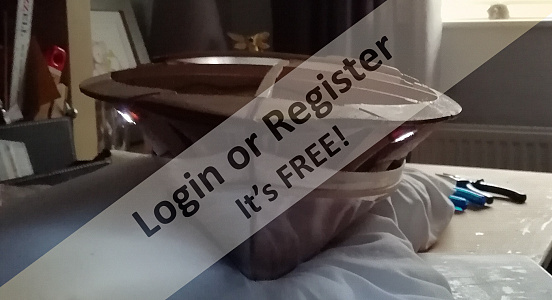
Hopefully the photos that I'm attaching will explain why I'm not following the instructions for a radio control version! The Amati instructions indicate that the rudders and control linkages are fitted at the end of the hull construction. I decided that this will be virtually impossible to get your hands in to accomplish this task so I have planked almost up to the waterline with both 1st and second planking in order to still have some reasonable access to carry out this task. In order to protect the rudders whilst the rest of the hull is completed I've cut out a polystyrene block (or could be balsa blocks) and covered it in gaffer tape to go over the prop shafts and rudders to provide the protection.
It still took all afternoon to get the supplied R/C rudders in place. I've C/A glued a nut onto the bottom of each rudder horn. I found that with the shape of the hull, the rudders when turned fully were catching the bottom of the hull so I've added two small 2mm white plastic spacers which I made from some tubing. Hope this will help anyone else who attempts to build the R/C version of the kit! Next stage is to epoxy the inside below the waterline before continuing with the rest of the planking. I've also installed a 3mm light in the cabin and also added 3mm bulbs for the headlights rather than using the dummy headlights.
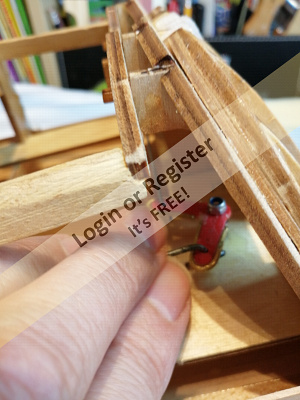
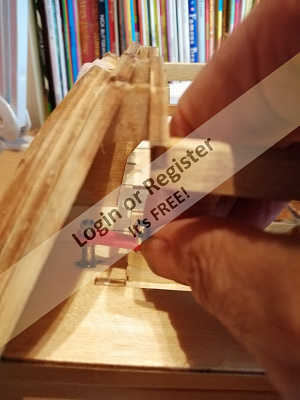
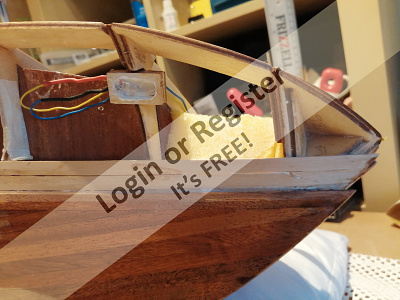
It still took all afternoon to get the supplied R/C rudders in place. I've C/A glued a nut onto the bottom of each rudder horn. I found that with the shape of the hull, the rudders when turned fully were catching the bottom of the hull so I've added two small 2mm white plastic spacers which I made from some tubing. Hope this will help anyone else who attempts to build the R/C version of the kit! Next stage is to epoxy the inside below the waterline before continuing with the rest of the planking. I've also installed a 3mm light in the cabin and also added 3mm bulbs for the headlights rather than using the dummy headlights.
▲
⟩⟩
DaveWhittaker
Norway
stevedownunder
ChrisG
Colin H
|
💬 Re: Overcoming difficulty of fitting rudders and linkages
2 years ago by 🇬🇧 ChrisG (
Lieutenant Commander)✧ 215 Views · 0 Likes
Flag
The hull of your model shown bow on is very impressive, beautiful lines.
I can see that you are having real fun and games trying to shoehorn the steering gear under the stern deck, I don`t think there is an easy answer, on my current project I have abandoned all thoughts of a working model mainly due to space constraints and if good enough it will spend the rest of its days on a coffee table if the boss allows. That of course is not what you want to hear 🤔 I am looking forward to following your build, when finished it will be worth all of the problems. Regards ChrisG ▲
⟩⟩
No likes yet
This member will receive 1 point for every like received |


Login To
Remove Ads
Remove Ads