Join Us On Social Media!

|

|

|
Download The App!
Login To
Remove Ads
Remove Ads
Login To
Remove Ads
Remove Ads
Model Boats Website
Gina 2 Billing Boats Fish Cutter - Restoration & Conversion
3 Posts · 4 Followers · 39 Photos · 12 Likes
Began 6 years ago by
 Germany
Follow This Thread
Not currently following
> Click to follow
> Click to follow
Latest Post 6 years ago by
| Most recent posts shown first (Show Oldest First) | (Print Booklet) |
📝 Gina 2 Billing Boats Fish Cutter - Restoration & Conversion
6 years ago by 🇩🇪 RNinMunich ( Fleet Admiral)
Fleet Admiral)✧ 48 Views · 5 Likes · 12 Comments
Flag
💬 Add Comment
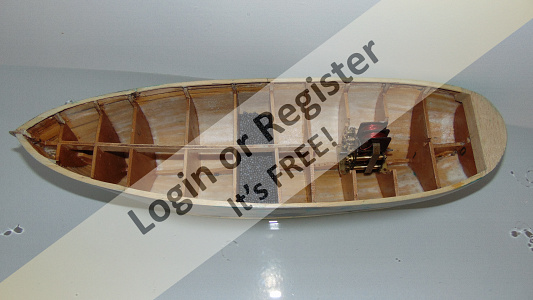
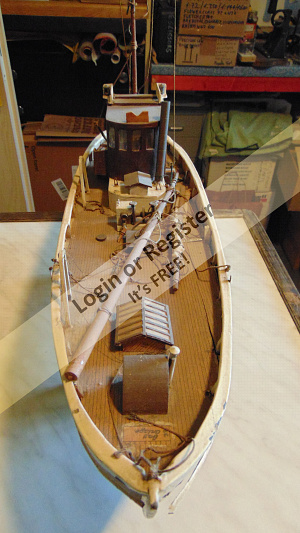
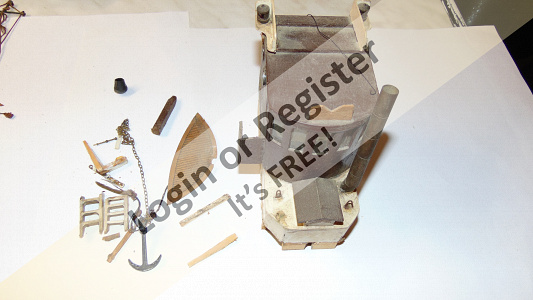
As promised (or threatened?😁) stage two of the hull work and thoughts on motorisation. The hull was sprayed with two coats of grey primer/filler. Pic1.
As usual this showed up the remaining imperfections (pics 2 & 3), but I'm not going to worry about them until I've got prop shaft tube and rudder stock sorted out and permanently fitted 😉
After my attempts to make and thread a 3mm prop shaft went awry Martin (Westway the Mechanicals Master👍) stepped in and made me a decent one complete with a bushed stuffing tube 👍 Vielen Dank Meister😊
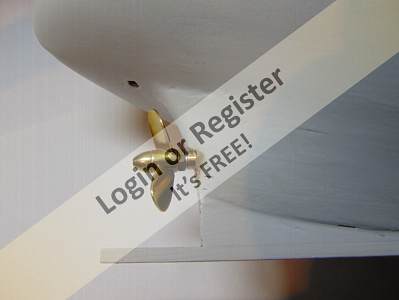
I did however manage to make a 4mm to 3mm reducer so that I could fit a Rabeosch 35mm prop as seen in pics 2 & 3.
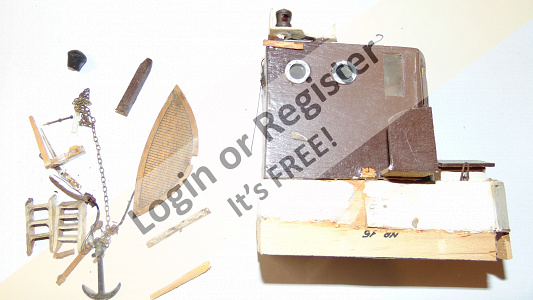
The tube and shaft from Martin, arrived Saturday an' he only made it on Monday😊, have been dry fitted so that I can start setting up the gears, necessary to bring the drive down to the prop shaft fitted very low down in the hull, and motor mount. Pic 4.
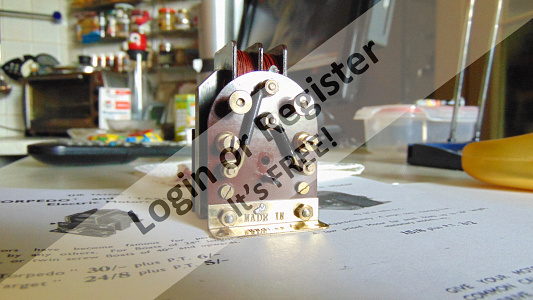
Motorisation: (Remember folks - this kit was designed and built as a static model!) I want to use the old 1950s Taycol Target motor which my Dad originally fitted in the Sea Scout which I have renovated and upgraded to work forward and reverse with a standard ESC. See Build blog 'Sea Scout - Jessica'
Many of you will know that the Taycol motors were field coil motors, meaning that they have no permanent magnet around the rotor coil, and thus reversing the battery connections to the brushes had no effect on the direction of rotation, as this simply reversed the magnetic fields of both stator and rotor coils🤔
To counteract this so that the motor could be used in both forward and reverse with a conventional brushed ESC I modified the motor slightly (separated the two coils) and built a simple converter board to connect it to the ESC. Again see the Sea Scout blog for the details of the conversion.
Basically; once the field coil and brush-gear (rotor coil) have been separated a simple diode bridge can be used to apply the output of the ESC to the motor. This enables the reversal of EITHER field OR rotor coil polarity, depending on how you connect the converter to the motor. Thus reversing the direction of rotation of the motor. Beneficial side effect is that the diodes also suppress the commutator sparking😊
In my case, with the Taycol Target, I also cleaned, flattened and polished the commutator. Thus significantly reducing the potential for spark generation in the first place!
A peculiarity of the Taycol motors is that they all use metal brushes, pressed phosphor bronze strip, so they need oiling!
DO NOT oil conventional brushed motors with carbon brushes unless the brushes are exchangeable or you want to have to buy a new motor!!!!!
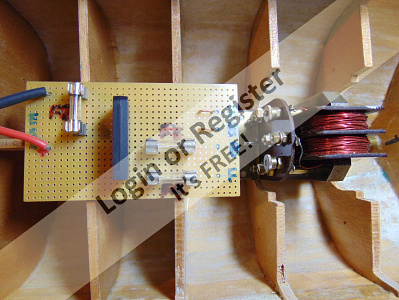
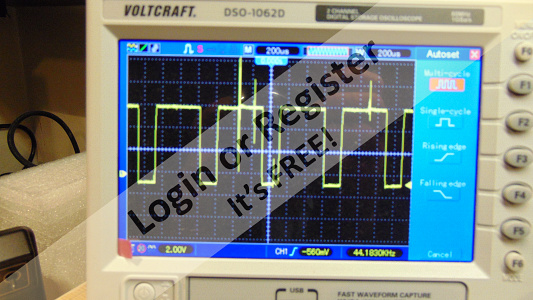
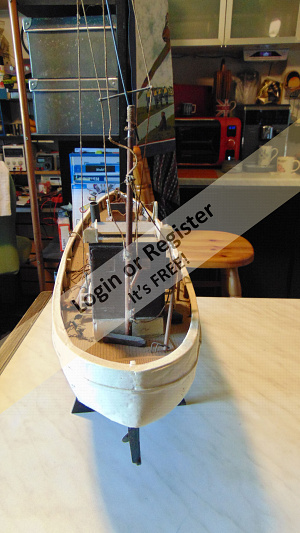
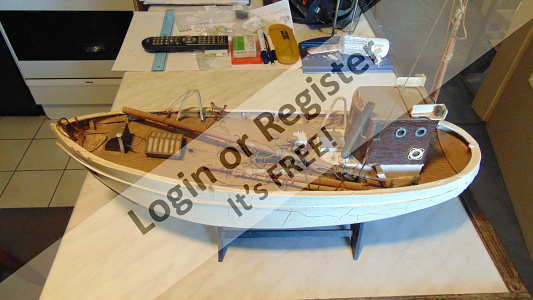
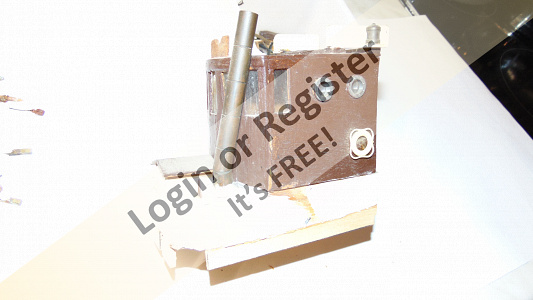
Pics 5 & 6 show the proposed position of the Taycol in Gina 2 and pic 7 the prototype converter board I knocked up to test the motor, together with a Graupner Navy V30R Marine Brushed ESC. Details and results in the Sea Scout blog, including video of the sparks and oscilloscope pics of the drive waveforms before and after conversion! The latter showing the spark suppression effect of the converter😊 Some samples attached - last 3 pics.
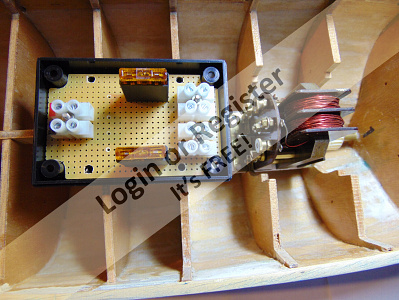
Pic 8 pic shows a more compact version of the converter, one of a few types I'm doing for Martin's various Taycols as a trade for the prop shaft he made for me and some useful material he sent. Thanks mate👍
Next steps will be
1) mounting the gears correctly on the shafts, requiring the manufacture of a 3/32" to 4mm adaptor and a 1/8" to 4mm adaptor, and keying them to the shafts - Hooray for mini milling machines 😉
2) manufacturing bushed end plates to hold the gears in place,
3) fitting the motor mounting platform. I'll probably borrow from my experiences of real shipbuilding and do this as a suspended 'false floor', i.e. mounted on stiff springs to enable adjustments to optimise the gearing mesh!
On real naval ships this is done to improve shock resistance and to minimise engine noise / vibration conduction to the hull, thus significantly reducing the acoustic signature of the ship.
Not that I'm tooo worried about being torpedoed 😁
Worth a try😉
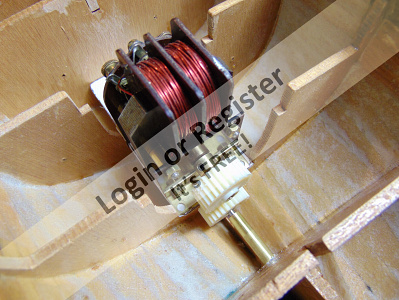
Pic 9 shows the cleaned up and renovated Taycol Target motor.
Pic 10 shows the drive waveform complete with sparks before modification.🤔
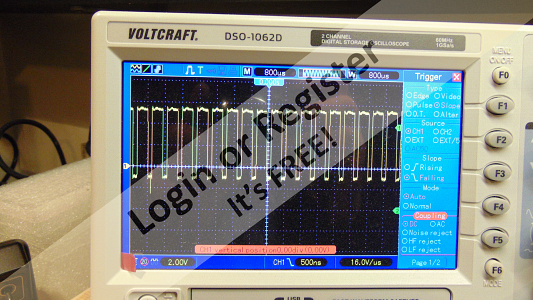
Pic 11 the cleaned 'forward' waveform with the converter board.
Pic 12 the cleaned 'reverse' waveform, no suppression capacitors needed 😉 More soon folks, Cheers, Doug 😎
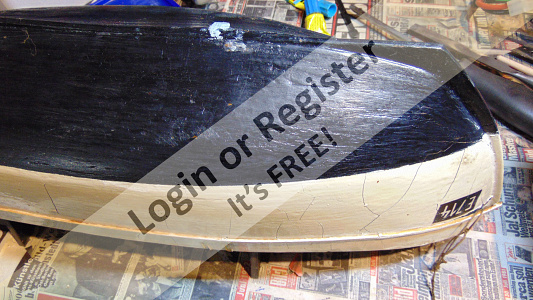
PS Along the way a new keel was fitted as can be seen in pics 1 to 3.
The original builder had 'buried' the keel in the hull planking! 😲


As usual this showed up the remaining imperfections (pics 2 & 3), but I'm not going to worry about them until I've got prop shaft tube and rudder stock sorted out and permanently fitted 😉
After my attempts to make and thread a 3mm prop shaft went awry Martin (Westway the Mechanicals Master👍) stepped in and made me a decent one complete with a bushed stuffing tube 👍 Vielen Dank Meister😊
I did however manage to make a 4mm to 3mm reducer so that I could fit a Rabeosch 35mm prop as seen in pics 2 & 3.
The tube and shaft from Martin, arrived Saturday an' he only made it on Monday😊, have been dry fitted so that I can start setting up the gears, necessary to bring the drive down to the prop shaft fitted very low down in the hull, and motor mount. Pic 4.
Motorisation: (Remember folks - this kit was designed and built as a static model!) I want to use the old 1950s Taycol Target motor which my Dad originally fitted in the Sea Scout which I have renovated and upgraded to work forward and reverse with a standard ESC. See Build blog 'Sea Scout - Jessica'
Many of you will know that the Taycol motors were field coil motors, meaning that they have no permanent magnet around the rotor coil, and thus reversing the battery connections to the brushes had no effect on the direction of rotation, as this simply reversed the magnetic fields of both stator and rotor coils🤔
To counteract this so that the motor could be used in both forward and reverse with a conventional brushed ESC I modified the motor slightly (separated the two coils) and built a simple converter board to connect it to the ESC. Again see the Sea Scout blog for the details of the conversion.
Basically; once the field coil and brush-gear (rotor coil) have been separated a simple diode bridge can be used to apply the output of the ESC to the motor. This enables the reversal of EITHER field OR rotor coil polarity, depending on how you connect the converter to the motor. Thus reversing the direction of rotation of the motor. Beneficial side effect is that the diodes also suppress the commutator sparking😊
In my case, with the Taycol Target, I also cleaned, flattened and polished the commutator. Thus significantly reducing the potential for spark generation in the first place!
A peculiarity of the Taycol motors is that they all use metal brushes, pressed phosphor bronze strip, so they need oiling!
DO NOT oil conventional brushed motors with carbon brushes unless the brushes are exchangeable or you want to have to buy a new motor!!!!!
Pics 5 & 6 show the proposed position of the Taycol in Gina 2 and pic 7 the prototype converter board I knocked up to test the motor, together with a Graupner Navy V30R Marine Brushed ESC. Details and results in the Sea Scout blog, including video of the sparks and oscilloscope pics of the drive waveforms before and after conversion! The latter showing the spark suppression effect of the converter😊 Some samples attached - last 3 pics.
Pic 8 pic shows a more compact version of the converter, one of a few types I'm doing for Martin's various Taycols as a trade for the prop shaft he made for me and some useful material he sent. Thanks mate👍
Next steps will be
1) mounting the gears correctly on the shafts, requiring the manufacture of a 3/32" to 4mm adaptor and a 1/8" to 4mm adaptor, and keying them to the shafts - Hooray for mini milling machines 😉
2) manufacturing bushed end plates to hold the gears in place,
3) fitting the motor mounting platform. I'll probably borrow from my experiences of real shipbuilding and do this as a suspended 'false floor', i.e. mounted on stiff springs to enable adjustments to optimise the gearing mesh!
On real naval ships this is done to improve shock resistance and to minimise engine noise / vibration conduction to the hull, thus significantly reducing the acoustic signature of the ship.
Not that I'm tooo worried about being torpedoed 😁
Worth a try😉
Pic 9 shows the cleaned up and renovated Taycol Target motor.
Pic 10 shows the drive waveform complete with sparks before modification.🤔
Pic 11 the cleaned 'forward' waveform with the converter board.
Pic 12 the cleaned 'reverse' waveform, no suppression capacitors needed 😉 More soon folks, Cheers, Doug 😎
PS Along the way a new keel was fitted as can be seen in pics 1 to 3.
The original builder had 'buried' the keel in the hull planking! 😲
▲
⟩⟩
AlessandroSPQR
chugalone100
hermank
Colin H
Martin555
|
💬 Re: Gina 2 Billing Boats Fish Cutter - Restoration & Conversion
10 months ago by 🇩🇪 RNinMunich (
Fleet Admiral)✧ 24 Views · 1 Like
Flag
Thanks Alessandro👍
I'm sure that your English will get better the longer you are on this site. You will soon be 'up to speed' with us. Any questions or anything you don't understand just ask. We will be pleased to help. I miei migliori auguri, Doug😎 ▲
⟩⟩
AlessandroSPQR
|
|
Login To
Remove Ads 💬 Re: Gina 2 Billing Boats Fish Cutter - Restoration & Conversion
10 months ago by 🇮🇹 AlessandroSPQR (
 Rear Admiral) Rear Admiral)✧ 26 Views · 2 Likes
Flag
Per Diana! Questi sono gli articoli che mi piacciono!
Pieni zeppi di informazioni e dettagli, una vera scuola. Sono impressionato dalle tue conoscenze navali ed elettriche. Credo che inizierò a seguire i tuoi lavori, c'è da imparare. Peccato per il mio inglese che mi limita molto la comprensione. For Diana! These are the items I like! Full of information and details, a real school. I am impressed with your naval and electrical knowledge. I think I'll start following your work, there's something to learn. Too bad my English limits my understanding a lot. ▲
⟩⟩
Colin H
RNinMunich
|
|
💬 Re: Gina 2 Billing Boats Fish Cutter - Restoration & Conversion
11 months ago by 🇬🇧 Colin H (
Fleet Admiral)✧ 30 Views · 2 Likes
Flag
Well Doug, a long awaited blog and well worth the wait.
Beautiful motor, another Taycol back to it's finest. And doing the job it was meant to do. It's a shame more of us don't utilise these great motors. Well done sir a credit to our hobby. Cheers Colin. ▲
⟩⟩
RNinMunich
AlessandroSPQR
|
|
💬 Re: Gina 2 Billing Boats Fish Cutter - Restoration & Conversion
11 months ago by 🇬🇧 Charlie Foxtrot (
 Recruit) Recruit)✧ 25 Views · 0 Likes
Flag
Hi. I've just picked one of these up and keen to restore it too. Did you ever get it completed?
▲
⟩⟩
No likes yet
This member will receive 1 point for every like received |
|
💬 Hull Pt2: Motorisation - Come What May!!
6 years ago by 🇩🇪 RNinMunich (
Fleet Admiral)✧ 47 Views · 2 Likes
Flag
Like your steam engines are to me Hammer 😲
That's what makes this site so good; a colourful mix of interests, knowledge, expertise and skills 😊 More power to your boiler 👍 Cheers, Doug 😎 ▲
⟩⟩
AlessandroSPQR
Donnieboy
|
|
💬 Hull Pt2: Motorisation - Come What May!!
6 years ago by 🇬🇧 hammer (
 Lieutenant) Lieutenant)✧ 48 Views · 1 Like
Flag
Far to complicated for me.
▲
⟩⟩
RNinMunich
|
|
💬 Hull Pt2: Motorisation - Come What May!!
6 years ago by 🇩🇪 RNinMunich (
Fleet Admiral)✧ 47 Views · 2 Likes
Flag
Hi again Mike, forgot to mention the false floor bit!
Sorry, no pics - shipyard design secret! 😁 No, haven't got that far yet. Still have to make the gear end plates so I can get the shaft spacing / gear meshing right, i.e. height of the motor above the prop shaft. Plan is to fix an ally plate into the hull with captive 4mm domed nyloc nuts fixed in it. The Taycol has right angled brass mounting brackets for vertical fixing so I shall mount it using 4mm bolts with compression springs between the brackets and the ally plate. The nyloc nuts SHOULD hold things in position! That way I should be able to adjust the motor height and tilt in any direction (well, pitch and roll anyway!) to get the two shafts parallel in the vertical plane and optimum meshing of the gears and minimum vibration. That's the theory anyway 😉 Then I only have to worry about getting the shafts aligned in the horizontal plane, the 'Yaw'. Which should be relatively easy with careful fitting of the ally plate. Minor yaw adjustment could be accommodated by opening out the bracket holes to curved slots with a diamond file. Objective is max power transfer with minimum noise and friction. Not to mention easier mounting than fiddling about with shims! And I don't have to worry about not getting the angle of the ally plate in the hull dead right 😊 Accurate measurements inside this sloppily built hull are virtually impossible! There are no right angles or straight lines or even symmetry where you would normally expect them 😲 So no true reference points or datum lines. We'll see. Cheers, Doug 😎 Ooops! Somehow my response to the motor conversion 'secrets' slipped into the previous Update!? See below in 'A Messy Business'. ▲
⟩⟩
AlessandroSPQR
Colin H
|
|
💬 Hull Pt2: Motorisation - Come What May!!
6 years ago by 🇬🇧 mturpin013 (
 Admiral) Admiral)✧ 47 Views · 1 Like
Flag
What an interesting post, if only I understood the detail, I grasped the overall concept but the oscilloscope bit lost me (I'm a toolmaker by trade) so I understand the "suspended 'false floor" bit which is an interesting concept. some detail pics please.
▲
⟩⟩
RNinMunich
|
|
💬 Hull Pt2: Motorisation - Come What May!!
6 years ago by 🇩🇪 RNinMunich (
Fleet Admiral)✧ 47 Views · 1 Like
Flag
Fits like the proverbial glove Martin 👍
My new split dies and holders have arrived so I should be OK now for the re-shafting on my HMS Belfast and Graf Spee😊 Cheers, Doug 😎 ▲
⟩⟩
AlessandroSPQR
|
|
💬 Hull Pt2: Motorisation - Come What May!!
6 years ago by 🇬🇧 Westquay (
 Commander) Commander)✧ 47 Views · 1 Like
Flag
So glad the shaft and tube worked, Doug.
Martin ▲
⟩⟩
RNinMunich
|
|
💬 Hull Pt2: Motorisation - Come What May!!
6 years ago by 🇩🇪 RNinMunich (
Fleet Admiral)✧ 48 Views · 2 Likes
Flag
Thanks Ron, the learning curve is steep but I'm getting there 😉
▲
⟩⟩
AlessandroSPQR
kmbcsecretary
|
|
💬 Hull Pt2: Motorisation - Come What May!!
6 years ago by 🇬🇧 kmbcsecretary (
 Warrant Officer) Warrant Officer)✧ 47 Views · 1 Like
Flag
Excellent workmanship there Doug coming along nicely.
▲
⟩⟩
RNinMunich
|
Login To
Remove Ads
Remove Ads
📝 Gina 2: A Messy Business - Hull Restoration
6 years ago by 🇩🇪 RNinMunich ( Fleet Admiral)
Fleet Admiral)✧ 49 Views · 3 Likes · 10 Comments
Flag
💬 Add Comment
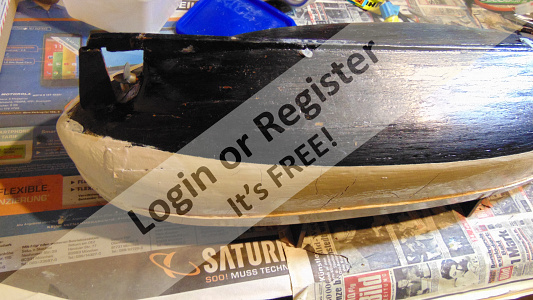
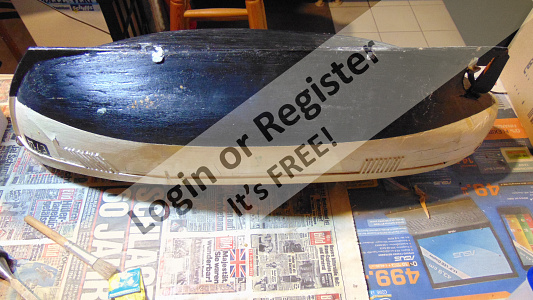
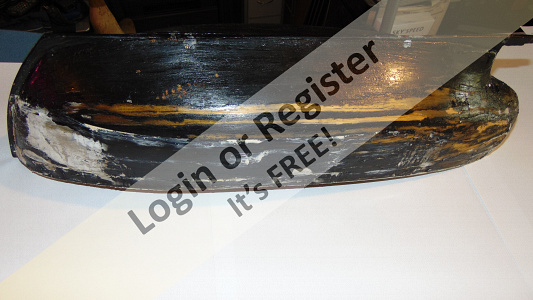
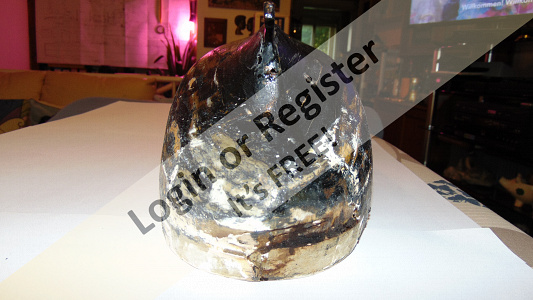
First five pics show 'square one'. 😲
Dave_M reckoned she'd been plastered not painted.😁
Before attempting to strip the hull I figured I had better stabilise it so it wouldn't fall apart when I removed about 1mm of ancient paint.
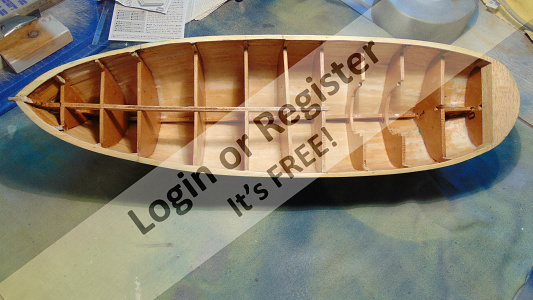
So I applied a couple of layers of resin and FG tissue inside. Pic 6. Not so easy between those somewhat rustically built bulkheads! They weren't even shaped so that the planking fitted properly!
Sanding was obviously out of the question so out came the heat gun.
On medium heat (ca 300°C) about four layers of paint started to bubble up and fly off, gently persuaded with a not too sharp 3/4" wood chisel.
Pics 7 to 10 show the results; almost more filler than wood and Horrors! Upper Stern / gunwhale made from a chunk of thick cardboard cut from a 3M sticky tape reel 😡 This was promptly replaced with a carved chunk of hard balsa. Pic 11. I will later add a mahogany step deck on top of the block, and a mahogany cap rail to finish off the hull.
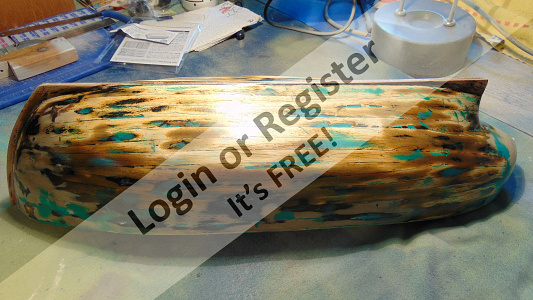
Last two pics show current status after filling, sanding and applying a coat of EzeKote to the outside. Shame the woodwork was so bad, she might have looked quite nice with the wood cleaned up and varnished 🤔
In between these jobs I also stripped and EzeKoted and primer/filled the hull of the PTB I'm renovating as well. Saves getting the same tools and materials out twice😉 But that's another B....log!
As Bamber Gascoigne (What a moniker😁) used to say
"I've started - so I'll finish"!!
Oops! Forgot the last pics🤔 Last three are today's status 😁


Dave_M reckoned she'd been plastered not painted.😁
Before attempting to strip the hull I figured I had better stabilise it so it wouldn't fall apart when I removed about 1mm of ancient paint.
So I applied a couple of layers of resin and FG tissue inside. Pic 6. Not so easy between those somewhat rustically built bulkheads! They weren't even shaped so that the planking fitted properly!
Sanding was obviously out of the question so out came the heat gun.
On medium heat (ca 300°C) about four layers of paint started to bubble up and fly off, gently persuaded with a not too sharp 3/4" wood chisel.
Pics 7 to 10 show the results; almost more filler than wood and Horrors! Upper Stern / gunwhale made from a chunk of thick cardboard cut from a 3M sticky tape reel 😡 This was promptly replaced with a carved chunk of hard balsa. Pic 11. I will later add a mahogany step deck on top of the block, and a mahogany cap rail to finish off the hull.
Last two pics show current status after filling, sanding and applying a coat of EzeKote to the outside. Shame the woodwork was so bad, she might have looked quite nice with the wood cleaned up and varnished 🤔
In between these jobs I also stripped and EzeKoted and primer/filled the hull of the PTB I'm renovating as well. Saves getting the same tools and materials out twice😉 But that's another B....log!
As Bamber Gascoigne (What a moniker😁) used to say
"I've started - so I'll finish"!!
Oops! Forgot the last pics🤔 Last three are today's status 😁
▲
⟩⟩
Colin H
mturpin013
figtree7nts
|
💬 Gina 2: A Messy Business - Hull Restoration
6 years ago by 🇩🇪 RNinMunich (
Fleet Admiral)✧ 47 Views · 0 Likes
Flag
Thanks Mike,
any other questions I'll be glad to try to answer. Maybe I'll start a micro-Business making the conversion boards 😁 30 years ago I used to make my own etched printed circuit boards, maybe I should refresh that skill!? 😉 Hope the info is useful, as a 'dumb' electronic eng. I'm learning a lot from all you 'mechanical wizards' as well. Makes for a great forum site😊 All the best, Doug 😎 ▲
⟩⟩
No likes yet
This member will receive 1 point for every like received |
|
Login To
Remove Ads 💬 Re: Gina 2: A Messy Business - Hull Restoration
6 years ago by 🇬🇧 mturpin013 (
Admiral)✧ 47 Views · 1 Like
Flag
Thanks for Doug -I think! I've read it twice and things are becoming clearer, a third and forth time may bring crystal clarity I hope. All in all a very clever solution to a problem that I think many others would benefit from, well done Doug and thanks for the interpretation.
▲
⟩⟩
RNinMunich
|
|
💬 Gina 2: A Messy Business - Hull Restoration
6 years ago by 🇩🇪 RNinMunich (
Fleet Admiral)✧ 47 Views · 2 Likes
Flag
Evenin' Mike,
Glad you found it interesting😉 The details of the motor conversion are in my Sea Scout renovation blog but the essentials are- All modern ESCs provide a DC output in the form of pulses which are rapidly switched on and off ( several thousand times a second). That's what you can see in the scope pics. The scope timebase (width of one horizontal division) is set to a little less than 1msec so you can see how fast the pulses are switched and how the pulse width (ON time) varies. The inertia of the motor keeps it going during the few milliseconds of 'Off' so the ratio of ON pulse to OFF determines the speed of the motor. The signal from the TX varies this ratio by varying the ON pulse width of the ESC output in proportion to the throttle stick position. A Bridge rectifier is simply 4 diodes arranged in a square (see pic) so that it has 4 terminals; +, - and two AC (~). When an AC signal is applied between the two ~ terminals a DC voltage of constant polarity appears at the + and - terminals. The rectifier sees the ESC output as an AC signal and produces a DC output at the + and - terminals. All I do is apply that constant DC voltage to the field coil of the motor, thus creating a constant magnetic field as if it was a permanent magnet. This means doing a small mod to the motor to separate the field coil from the brush gear and rotor (armature) coil. 3rd pic shows normal wiring of the coils in series. Meanwhile the varying pulsed voltage goes to the brush gear (and thus armature coil) driving the motor just like a normal 'can' motor. No rocket science just a neat trick 😉 The scope just shows the varying pulse train from the ESC to the motor. Zero Volts is on the horizontal centre line of the screen and shows when the voltage pulses are positive (upper part of screen) or negative (lower part of screen) and the motor reacts accordingly. The slight overshoot is probably due to the reaction time of the diodes but the motor doesn't notice that - it's too 'lazy' 😉 Here endeth today's seminar 😁 Hope it's demystified things a little. Cheers, Doug 😎 


▲
⟩⟩
Colin H
Donnieboy
|
|
💬 Gina 2: A Messy Business - Hull Restoration
6 years ago by 🇩🇪 RNinMunich (
Fleet Admiral)✧ 48 Views · 2 Likes
Flag
Couldn't wait! (curiosity killed the cat!) although it IS now 'tomorrow' here!
Load test results: Taycol motor 235gm, lead ballast 965gm, total 1.2Kgm, and still plenty of free board to the projected waterline 😊 An' she ain't sunk yet! 😁😁 so shouldn't have any problems fitting her out, at least not what weight concerns. Space is another question 😲 'Nothing is impossible' so they say 😉 (Please don't mention Titanic😲) Tomorrow (or later today🤔) is another day or what? 😉 Cheers, Doug 😎 

▲
⟩⟩
Colin H
figtree7nts
|
|
💬 Gina 2: A Messy Business - Hull Restoration
6 years ago by 🇩🇪 RNinMunich (
Fleet Admiral)✧ 48 Views · 2 Likes
Flag
That remains to seen Ed!
The Taycol weighs a proud 235gm 😲 and is 7cm tall!! Now that I've sealed the hull with EzeKote resin I'll try a load test tomorrow, in the domestic Test & Trials Tank 😉 Tune in tomorrow, same time (more or less😉) same channel for the next exciting instalment of " Can this work at all!!??" 😁 Where there's a will .... CU tomorrow, cheers, Doug 😎 ▲
⟩⟩
Colin H
figtree7nts
|
|
💬 Gina 2: A Messy Business - Hull Restoration
6 years ago by 🇺🇸 figtree7nts (
Admiral)✧ 47 Views · 0 Likes
Flag
I look forward to seeing the progress on her.
And wait with anticipation on her conversion to RC! Is the Taycol Target motor. going to be too heavy for use on her? ▲
⟩⟩
No likes yet
This member will receive 1 point for every like received |
|
💬 Gina 2: A Messy Business - Hull Restoration
6 years ago by 🇩🇪 RNinMunich (
Fleet Admiral)✧ 48 Views · 2 Likes
Flag
Evenin' Ed,
It was my objective from the outset to convert her to RC. That's why so much effort to stabilise and strengthen the hull😉 Having done that the next stage is to figure out how much load she can carry and how to fit motor and shaft. To keep her 'true to type', i.e. horizontal shaft parallel with the keel, I may have to go to pulley or gear drive 😲 The shaft runs very close to the keel! Proposed motor is the Taycol Target field coil motor that I took out of the Sea Scout 26 years ago refurbished and converted to run forwards and backwards. See pics. Cheers, Doug 😎 

▲
⟩⟩
Colin H
figtree7nts
|
|
💬 Gina 2: A Messy Business - Hull Restoration
6 years ago by 🇺🇸 figtree7nts (
Admiral)✧ 47 Views · 0 Likes
Flag
Evenin' Doug,
Are you going to keep her static. Or are you going to make her RC? ▲
⟩⟩
No likes yet
This member will receive 1 point for every like received |
|
💬 Gina 2: A Messy Business - Hull Restoration
6 years ago by 🇩🇪 RNinMunich (
Fleet Admiral)✧ 47 Views · 1 Like
Flag
Evenin' Mark, yep, must admit I rather liked it as well😉 Unusual!
Keel needs extending so maybe I should do it with lead sheet to prevent 'turtleing' 😁 But have you ever seen such a vile colour filler before?😲 Great shame the planking work was so poor. Would have been nice to do a varnished wood job. C'est la vie, c'est la Guerre 😉 Weather should be dry here tomorrow so hope to get her and the PTB primed. Maybe even underwater hulls done. All the best Marky, Doug 😎 ▲
⟩⟩
Colin H
|
|
💬 Gina 2: A Messy Business - Hull Restoration
6 years ago by 🇬🇧 marky (
 Commodore) Commodore)✧ 47 Views · 1 Like
Flag
Really like the tortoise shell effect in the 2nd and 3rd last pictures lets hope it doesn't turn turtle. Cheers Marky
▲
⟩⟩
RNinMunich
|
📝 Gina 2 Billing Boats Fish Cutter - Restoration & Conversion
6 years ago by 🇩🇪 RNinMunich ( Fleet Admiral)
Fleet Admiral)✧ 49 Views · 4 Likes · 4 Comments
Flag
💬 Add Comment
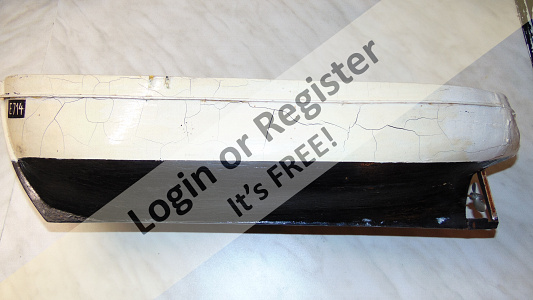
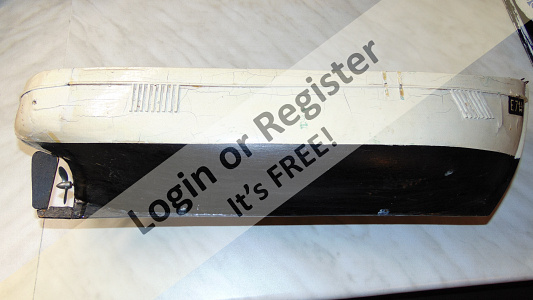
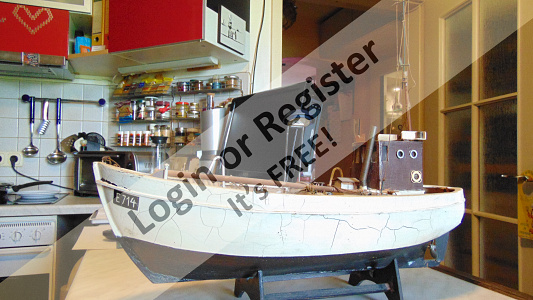
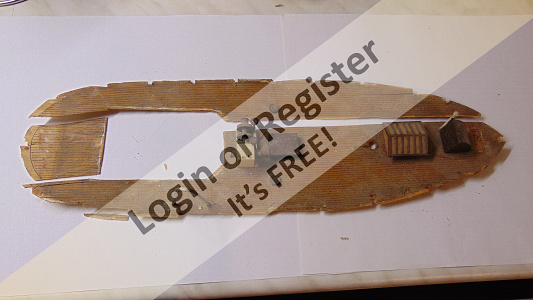
IN THE BEGINNING THERE WAS .......
Inherited from my Aunt Beryle a few years ago. Found it in her studio, no idea how she came by it!
Despite being paralysed from the waist down in a motor bike accident at 16 she became a respected artist, National Academy exhibitions etc.
As we all hail from Kent (mostly Folkestone) and Beryle often painted scenes of the south Kent coast, Dungeness, Rye etc, including the fishing boats, I long assumed that the boat, Reg. E714, was from a south coast port possibly in Kent.
After much research I discovered that she is a Danish fish cutter based in Ebsjerg on the west coast of Denmark.

▲
⟩⟩
dave976
Colin H
mturpin013
marky
|
💬 Gina 2 Billing Boats Fish Cutter - Restoration & Conversion
6 years ago by 🇩🇪 RNinMunich (
Fleet Admiral)✧ 47 Views · 0 Likes
Flag
You're dead right Hammer👍
This is my second renovation / upgrade and the third, a 28" PTB is also already started. I must be nuts! But then, that's a prerequisite for model boaters ain' it!? Following your 'mechanical engineering' with great interest and awe! Cheers, Doug 😎 ▲
⟩⟩
No likes yet
This member will receive 1 point for every like received |
|
Login To
Remove Ads 💬 Gina 2 Billing Boats Fish Cutter - Restoration & Conversion
6 years ago by 🇬🇧 hammer (
Lieutenant)✧ 47 Views · 1 Like
Flag
Great job your doing Doug. I think its more of a challenge renovating an old model than building from scratch.
▲
⟩⟩
RNinMunich
|
|
💬 Gina 2 Billing Boats Fish Cutter - Restoration & Conversion
6 years ago by 🇩🇪 RNinMunich (
Fleet Admiral)✧ 47 Views · 0 Likes
Flag
Evenin' Mike, guess you're right 🤔
Bit of a departure for me I admit, and after I'd cleaned all the crud off and realised how shoddy and weak the hull was I wondered if I'd bitten off more than I can chew😲 However progress has been made😊 I hate to be beaten! See next update 'Motorisation - Come What May!' You'll recognise the topic from the discussion on dies and threading silver steel prop shafts😉 I'm multiplexing this project with a PTB renovation and refit! Like most boat modellers 'a glutton for punishment'. Cheers, Doug 😎 ▲
⟩⟩
No likes yet
This member will receive 1 point for every like received |
|
💬 Gina 2 Billing Boats Fish Cutter - Restoration & Conversion
6 years ago by 🇬🇧 mturpin013 (
Admiral)✧ 47 Views · 1 Like
Flag
That's going to keep you busy for a while, however a most enjoyable project, I look forward to seeing its progress.
▲
⟩⟩
RNinMunich
|


Login To
Remove Ads
Remove Ads