Join Us On Social Media!

|

|

|
Download The App!
Login To
Remove Ads
Remove Ads
Login To
Remove Ads
Remove Ads
Model Boats Website
Lesro Atlantic 21 RNLI RNLB RIB 1:12 scale
33 Posts · 11 Followers · 221 Photos · 260 Likes
Began 4 years ago by
 United Kingdom
Follow This Thread
Not currently following
> Click to follow
> Click to follow
Latest Post 4 years ago by
| Oldest posts shown first (Show Newest First) | (Print Booklet) |
📝 Lesro Atlantic 21 RNLI RNLB RIB 1:12 scale
4 years ago by 🇬🇧 Skydive130 ( Rear Admiral)
Rear Admiral)✧ 11 Views · 6 Likes · 10 Comments
Flag
💬 Add Comment
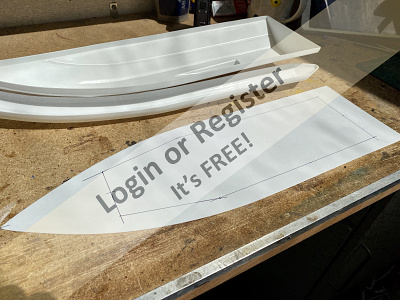
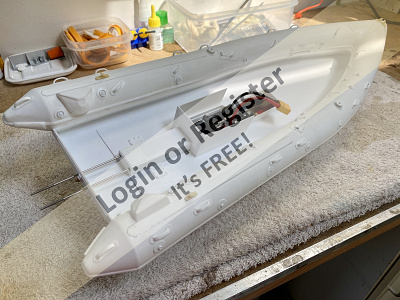
So off we go again....! as promised at the end of my pilot build blog, next up would be the Lesro Atlantic 21 RIB in 1:12 scale.
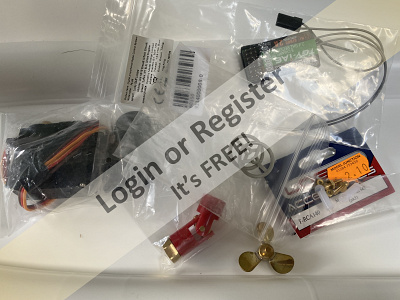
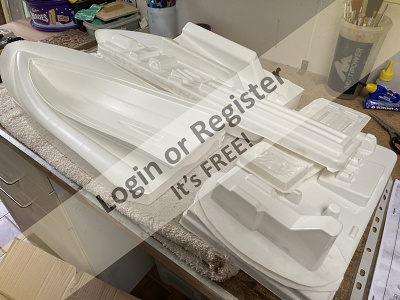
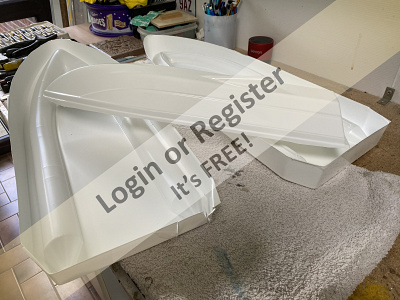
This model is long discontinued and when one does appear on ebay, prepare to part with over £200 for a complete kit! There is a guy on ebay selling the moulded parts and a few of the pages from the instruction sheets (not all of them I add) and I hit the buy-now button on one of those as always wanted to build an inflatable RIB. I was very pleased with the quality of the parts supplied, all look to be mouled well as are the vac-form parts, its now just a case of identifying what is what! Whether these are genuine parts from the old lesro moulds or 3rd party, I dont know, but the quality is good enough to not need to question their origin.
I was planning to build this for display only as at 1:12 its not big and will really only be suitable for flat calm conditions. However, I have decided to build it functional, going brushless so we shall see what the final result will be?
The Evenrude dummy motors are shortly to be reproduced by Dave "Mastman" Watts and I have pre-ordered a pair. I have already ordered a Coxswain from DK Figures and plan on only adding the one figure. My motor will be the D2826 1000kv driving a 30mm 3 blade brass prop, 2 or 3S lipo to be decided. I have found one build on another forum that the builder managed to build to functioning Evenrudes but I will stick to the single internal motor as orginally intended by Lesro.
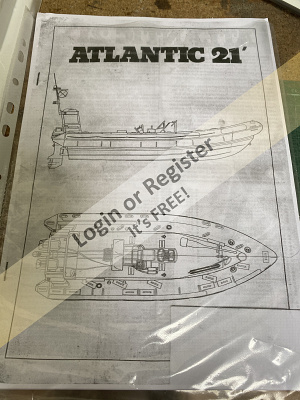
Doug has been kind enough to send me a link to some great photos for the details, but I am really desperate to find a copy of the orginal plans if anyone has a set out there? my main issue will be getting the frame for the self righting airbag right. So, any input as we progress will be appreciated as always, especially when I come to forming the frame parts from 4 and 5mm brass tube.

This model is long discontinued and when one does appear on ebay, prepare to part with over £200 for a complete kit! There is a guy on ebay selling the moulded parts and a few of the pages from the instruction sheets (not all of them I add) and I hit the buy-now button on one of those as always wanted to build an inflatable RIB. I was very pleased with the quality of the parts supplied, all look to be mouled well as are the vac-form parts, its now just a case of identifying what is what! Whether these are genuine parts from the old lesro moulds or 3rd party, I dont know, but the quality is good enough to not need to question their origin.
I was planning to build this for display only as at 1:12 its not big and will really only be suitable for flat calm conditions. However, I have decided to build it functional, going brushless so we shall see what the final result will be?
The Evenrude dummy motors are shortly to be reproduced by Dave "Mastman" Watts and I have pre-ordered a pair. I have already ordered a Coxswain from DK Figures and plan on only adding the one figure. My motor will be the D2826 1000kv driving a 30mm 3 blade brass prop, 2 or 3S lipo to be decided. I have found one build on another forum that the builder managed to build to functioning Evenrudes but I will stick to the single internal motor as orginally intended by Lesro.
Doug has been kind enough to send me a link to some great photos for the details, but I am really desperate to find a copy of the orginal plans if anyone has a set out there? my main issue will be getting the frame for the self righting airbag right. So, any input as we progress will be appreciated as always, especially when I come to forming the frame parts from 4 and 5mm brass tube.
▲
⟩⟩
MouldBuilder
Inkoust
Colin H
Rookysailor
Martin555
Scratchbuilder
|
💬 Re: Lesro Atlantic 21 RNLI RNLB RIB 1:12 scale
4 years ago by 🇬🇧 Skydive130 (
Rear Admiral)✧ 5 Views · 0 Likes
Flag
I saw some discussion about those on that other forum Fred, I am reasonably confident that I’ve ended up with one of them? Nice profit margin if you owned all 30 and managed to flog them At £50-75 a pop!
▲
⟩⟩
No likes yet
This member will receive 1 point for every like received |
|
Login To
Remove Ads 💬 Re: Lesro Atlantic 21 RNLI RNLB RIB 1:12 scale
4 years ago by 🇬🇧 Fred (
 Lieutenant) Lieutenant)✧ 7 Views · 2 Likes
Flag
Hi Pete
Some Atlantic 21 moulding's were put up for sale by some one called "Atlantic Mouldings" I will leave you to make up your mind on this Fred Atlantic 21 Rib mouldings x30 ( Yes thirty ) Please see pics , these are NOT complete kits Option 1. 10 sets £150.00 Option 2. 30 sets £400.00 **COLLECTION ONLY** Workshop clearout ▲
⟩⟩
Rookysailor
Martin555
|
|
💬 Re: Lesro Atlantic 21 RNLI RNLB RIB 1:12 scale
4 years ago by 🇬🇧 Fred (
Lieutenant)✧ 6 Views · 1 Like
Flag
Hi Skydive
I did have one of the original kits, and from memory I had two sets of "C" cells going down the sides of the Rib, a BOB's board in the centre (time before esc) and a servo after that going out to the two outboard's. Hope that is of some help Fred ▲
⟩⟩
Martin555
|
|
💬 Re: Lesro Atlantic 21 RNLI RNLB RIB 1:12 scale
4 years ago by 🇬🇧 Skydive130 (
Rear Admiral)✧ 7 Views · 2 Likes
Flag
Hi Pete, worth it, no not really in reality, however as it’s probably the only way of getting a starting point I bought it anyway. Certainly not a lot for the money especially when you add everything else required!
▲
⟩⟩
Rookysailor
Martin555
|
|
💬 Re: Lesro Atlantic 21 RNLI RNLB RIB 1:12 scale
4 years ago by 🇬🇧 Rookysailor (
 Commodore) Commodore)✧ 6 Views · 2 Likes
Flag
Well Sy, the guy on Ebay has put another up for sale,
buy it now for £75, was interested, but reading your impression has put me off a little, saying it is only a part kit, I nearly got one from 'Models by Design' who did a hull in F/G, but of course they are gone now, do you think the bits are worth the money?😊 Cheers, Pete ▲
⟩⟩
Skydive130
Martin555
|
|
💬 Re: Lesro Atlantic 21 RNLI RNLB RIB 1:12 scale
4 years ago by 🇬🇧 Martin555 (
 Fleet Admiral) Fleet Admiral)✧ 5 Views · 0 Likes
Flag
I too am looking forward to this build log.
Going by your previous builds this will be fantastic. Martin555. ▲
⟩⟩
No likes yet
This member will receive 1 point for every like received |
|
💬 Re: Lesro Atlantic 21 RNLI RNLB RIB 1:12 scale
4 years ago by 🇬🇧 Skydive130 (
Rear Admiral)✧ 6 Views · 1 Like
Flag
Hi Fred, just so happens I’ve read that thread a million times, as it’s got some very useful info there and will I refer to it often. It would have been even better if it had shown his electronics! Having spent hours searching for info on the original kit, that build is about the best of it. Thank you very much for sharing though and I hope you enjoy my attempt of replicating This lovely boat.
Kind regards Simon ▲
⟩⟩
Martin555
|
|
💬 Re: Lesro Atlantic 21 RNLI RNLB RIB 1:12 scale
4 years ago by 🇬🇧 Fred (
Lieutenant)✧ 7 Views · 3 Likes
Flag
Hi Skydiver
I know this is from another forum but have you read this ▲
⟩⟩
Colin H
Martin555
Skydive130
|

|
💬 Re: Lesro Atlantic 21 RNLI RNLB RIB 1:12 scale
4 years ago by 🇬🇧 Skydive130 (
Rear Admiral)✧ 6 Views · 1 Like
Flag
Cheers Bill, hope I dont disapoint!😂
▲
⟩⟩
Martin555
|
|
💬 Re: Lesro Atlantic 21 RNLI RNLB RIB 1:12 scale
4 years ago by 🇬🇧 Scratchbuilder (
 Vice Admiral) Vice Admiral)✧ 6 Views · 2 Likes
Flag
Really looking forward to following this blog.
Regards Bill. ▲
⟩⟩
Martin555
Skydive130
|
Login To
Remove Ads
Remove Ads
📝 A gentle start....!
4 years ago by 🇬🇧 Skydive130 ( Rear Admiral)
Rear Admiral)✧ 10 Views · 5 Likes · 4 Comments
Flag
💬 Add Comment
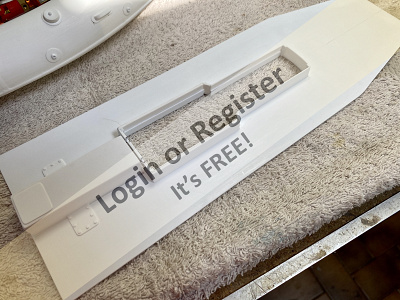
today I’ve spent a couple of hours starting to prepare the 3 main pieces. I felt it important at this stage to get the cutting of the 2 inflatable halves and the hull cut correctly as the integrity of the whole model will hinge on these being right. the cut lines were marked with a permanent sharpie before i took a fresh bladed stanley knife and started cutting.
I removed the main excess first, before scoring the marked lines carefully several times before removing more material. at this point I have cut the hull down to the correct marks and removed the outer film that was included similar to lexan model car body shells (think of the disaster if you didnt know it was there and painted it to find all your painted hard work just pealed off!). It is also important to wash all parts in warm soapy water to remove any residue, releasing agents ect.
That will be it until Thursday, hopefully by which time the propshaft will be here as that will need to go in along with other internal components early. once the 1.5mm deck is on and the hull is glued to the sponsons, it will be come dificult to get at things! another item that will need carefull though will be the motor mount which I will probably make, adding a comercial one might be awkward due to the space but we will see?
▲
⟩⟩
MouldBuilder
Inkoust
Colin H
Martin555
Scratchbuilder
|
💬 Re: A gentle start....!
4 years ago by 🇬🇧 Skydive130 (
Rear Admiral)✧ 7 Views · 2 Likes
Flag
Let’s hope so Bill 👍
▲
⟩⟩
Martin555
Scratchbuilder
|
|
Login To
Remove Ads 💬 Re: A gentle start....!
4 years ago by 🇬🇧 Scratchbuilder (
Vice Admiral)✧ 6 Views · 2 Likes
Flag
Hi Simon.
We are all like kids with new toys when we get something like this arrive. It’s going to be a good project Regards Bill ▲
⟩⟩
Martin555
Skydive130
|
|
💬 Re: A gentle start....!
4 years ago by 🇬🇧 Skydive130 (
Rear Admiral)✧ 6 Views · 1 Like
Flag
Hi Martin, the Atlantic 21 being 21foot in length-full sized, this model works out at 22 inches long by 7 inches beam, so not much bigger than an Airfix kit 😂
▲
⟩⟩
Martin555
|
|
💬 Re: A gentle start....!
4 years ago by 🇬🇧 Martin555 (
Fleet Admiral)✧ 5 Views · 1 Like
Flag
Hi Sy,
I know she is 1:12 scale but what dose that work out to measurement wise ? Martin555. ▲
⟩⟩
Skydive130
|
📝 Hull and sponson progress...!
4 years ago by 🇬🇧 Skydive130 ( Rear Admiral)
Rear Admiral)✧ 11 Views · 6 Likes · 9 Comments
Flag
💬 Add Comment
Today has seen the arrival of the motor, ESC and Coxswain figure from DK Figures. Still awaiting the propshaft and at some point I am going to have to consider the battery options, as to whether to go for 2 x small 2 or 3S lipo's in parallel or for 1 single battery. This is going to be determined by the very limited space under the deck!
Anyway, onwards with the build. It was a nice day weather wise so perfect for doing a lot of cutting, trimming and final sanding of the 2 sponson halves and the hull outside, keeping the mess out of "eye shot" of the Mrs! Following this, all parts were washed in soapy water.
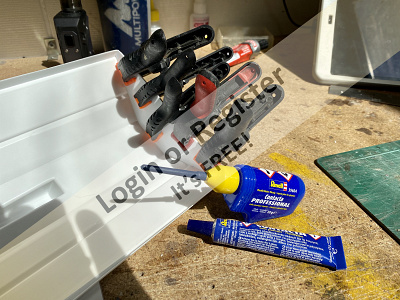
First part glued was a transom doubler and whilst that was setting, it was time to measure and cut the deck from 1mm plasticard sheet. marking out the removebable deck piece dimensions was a little bit of guess work due to lack of good reference, but it looks about right. again, all parts sanded for a good finish and then the deck support lip was cut from a separate piece and glued on using Revell plastic cement. Certainly for large sheet parts, there are various makes of glue, but Revell's has always been a good bond along with Tamiya ultra thin on smaller parts. The deck was then glued into the hull and the use of many clamps to keep in position whilst setting followed by a second fillet of glue on the joint an hour later.
Last job of the day was to glue the bottom sponson half onto the hull which will get a reinforcing fillet of glue later. Tomorrow all joints will be cleaned up and P38 filler in any remaining gaps. I shall seal the inner joint with silicone before adding a plasticard strip to hide it all.
The more i look at the pieces I bought, the more i feel that it was a stupid price to pay for so little!. The included instructions where only partially complete with missing photocopied pages and after emailing the seller who promised he would send some more plans ect, I've heard nothing from him.🤔There are a lot of shaped parts not included that will take a bit of making, the sheet parts are easy from plasticard.
I read somewhere that possibly SLEC will be making an Atlantic 75, now that would be something?


Anyway, onwards with the build. It was a nice day weather wise so perfect for doing a lot of cutting, trimming and final sanding of the 2 sponson halves and the hull outside, keeping the mess out of "eye shot" of the Mrs! Following this, all parts were washed in soapy water.
First part glued was a transom doubler and whilst that was setting, it was time to measure and cut the deck from 1mm plasticard sheet. marking out the removebable deck piece dimensions was a little bit of guess work due to lack of good reference, but it looks about right. again, all parts sanded for a good finish and then the deck support lip was cut from a separate piece and glued on using Revell plastic cement. Certainly for large sheet parts, there are various makes of glue, but Revell's has always been a good bond along with Tamiya ultra thin on smaller parts. The deck was then glued into the hull and the use of many clamps to keep in position whilst setting followed by a second fillet of glue on the joint an hour later.
Last job of the day was to glue the bottom sponson half onto the hull which will get a reinforcing fillet of glue later. Tomorrow all joints will be cleaned up and P38 filler in any remaining gaps. I shall seal the inner joint with silicone before adding a plasticard strip to hide it all.
The more i look at the pieces I bought, the more i feel that it was a stupid price to pay for so little!. The included instructions where only partially complete with missing photocopied pages and after emailing the seller who promised he would send some more plans ect, I've heard nothing from him.🤔There are a lot of shaped parts not included that will take a bit of making, the sheet parts are easy from plasticard.
I read somewhere that possibly SLEC will be making an Atlantic 75, now that would be something?
▲
⟩⟩
MouldBuilder
Inkoust
Colin H
Martin555
RNinMunich
Rookysailor
|
💬 Re: Hull and sponson progress...!
4 years ago by 🇬🇧 Skydive130 (
Rear Admiral)✧ 7 Views · 2 Likes
Flag
The silicone is staying firmly in the tube Ian 👍😂👍😂
▲
⟩⟩
Ianh
Martin555
|
|
Login To
Remove Ads 💬 Re: Hull and sponson progress...!
4 years ago by 🇿🇦 Ianh (
 Commander) Commander)✧ 5 Views · 1 Like
Flag
Remember some silicones particularly the DIY ones have a vinegar smell, why because they contain acetic acid! I have come across some very expensive machinery that has been damaged by use of silicon. One mine had to pay about 12000 GBP after using it. It rotted the bearing surfaces.
▲
⟩⟩
Skydive130
|
|
💬 Re: Hull and sponson progress...!
4 years ago by 🇬🇧 Skydive130 (
Rear Admiral)✧ 8 Views · 3 Likes
Flag
Hi Doug, many thanks for all the info, certainly lots to ponder there.
I hear everything you say about silicone, especially the smell, it’s awful! On the note of it being a pig to apply well and the issues it will cause with paint, I shall NOT use it and go with ensuring my joint between hull and lower sponson is sound with an extra fillet of plastic cement. Looking at it this morning, I’ve managed to get a great joint with only a little spot at the bow that needs a touch of filler. I shall reinforce the internal joint which will be virtually out of sight anyway. As for the battery conundrum, my plan was to buy. 2 or these lipos from good old Hobbyking connected in parallel after making up a lead, but now with your wise words that’s thoughts gone up In smoke (thankfully not literally). Space is the issue, so may get one, put it down the side of the hull, and maybe counter balance the other side with weight if the model need laterally balancing? There maybe also room ahead of the motor once installed for a different shaped battery? I shall hold off until the other electrics are in place before I buy anything 👍 
▲
⟩⟩
Colin H
robbob
Martin555
|
|
💬 Re: Hull and sponson progress...!
4 years ago by 🇬🇧 Skydive130 (
Rear Admiral)✧ 7 Views · 2 Likes
Flag
Hi Pete, thankfully the Coxswain is complete lol, just a strange angle for the photo. He’s actually one of the best figures I’ve had from DK figures, very little in the way of prep required prior to painting, all will be revealed in the fullness of time 😂
As for the kit being a pig, I concur! I’ve paid far too much for what was supplied and in hindsight half the price would still have been expensive, I look at it as one of those unthinking impulse moments! I think once I’ve got the sponsons assembled and providing I can get all the electrics shoehorned in, I will enjoy the challenge of scratch building the remaining bits though? Apart from bending the brass tube for the rear frame! ▲
⟩⟩
Rookysailor
Martin555
|
|
💬 Re: Hull and sponson progress...!
4 years ago by 🇩🇪 RNinMunich (
Fleet Admiral)✧ 9 Views · 5 Likes
Flag
So far so good Sy👍
But I share Martin's reservations vis a viz the use of silicone sealant anywhere near a model build, plastic or wood. Apart from the pong of vinegar 🙊😝; you have taken the precaution of washing the parts in soapy water to remove any residue from the moulding process before assembly, so why ruin and negate that effort by applying silicone which is anathema to any kind of paint or glue? The solvents in it will creep all over and resist all efforts to paint it or glue to it🤔 In such cases, often necessary when building plastic construction kits, especially if I'm intending to convert the kit to RC - Plastic Magic😊, I apply an extra fillet of viscous plastic cement (I also like the Revell plastic cements BTW👍), or even epoxy. In extreme cases I also glue down an L shaped or other suitable plasticard profile. On another, more important subject:- "2 x small 2 or 3S lipo's in parallel ..." I implore and beseech you DON'T DO THAT!!😮🤔 If you absolutely MUST then DO NOT DIRECTLY CONNECT THE TWO POSITIVE TERMINALS TOGETHER💥 Why? Both LiPos MUST be of identical type, manufacture, from the same batch, have identical specifications, state of charge and internal resistance PER CELL!! If there is any difference in charge state between the two then the one with the highest charge/voltage will attempt to charge the lower one. Which can, due to the low internal resistance of healthy LiPos, result in very high currents flowing which can cause a wiring fire and loss of the vessel. Or even workshop if this happens during a bench test!🔥😮😭 If you are forced to do this, due to space/weight distribution difficulties, then PLEASE fit a power distribution board, equipped with fast Schottky power diodes, between the two + terminals. The diodes block this so called 'back charging'. If you are not happy with electricles and soldering then try this ▲
⟩⟩
Rookysailor
Spock66
robbob
Martin555
Skydive130
|


|
💬 Re: Hull and sponson progress...!
4 years ago by 🇬🇧 Rookysailor (
Commodore)✧ 7 Views · 3 Likes
Flag
Looks like this is going to be a pig of a kit to put together Sy, quite relieved to think I nearly bought one after you,btw, has the Coxswain figure got something in his left hand? has he got a left hand? can't quite see from the photo, but the rest of him looks good, fine detail.😊
Cheers, Pete ▲
⟩⟩
Martin555
Skydive130
RNinMunich
|
|
💬 Re: Hull and sponson progress...!
4 years ago by 🇬🇧 Martin555 (
Fleet Admiral)✧ 5 Views · 1 Like
Flag
Hi Sy,
I think i know what you are going to do. I have had something similar and i cut a 1mm strip of 1mm plastic card and glued that down along the seam first then a wider strip over that. Martin555. ▲
⟩⟩
Skydive130
|
|
💬 Re: Hull and sponson progress...!
4 years ago by 🇬🇧 Skydive130 (
Rear Admiral)✧ 7 Views · 2 Likes
Flag
Hi Martin, the plan is for a Thin silicone inner seam, then a plasticard strip Over this butting to the lower sponson and deck, so that painting won’t be affected. It will be easier to show than explain my freind 👍
▲
⟩⟩
Spock66
Martin555
|
|
💬 Re: Hull and sponson progress...!
4 years ago by 🇬🇧 Martin555 (
Fleet Admiral)✧ 7 Views · 3 Likes
Flag
Hi Sy,
If you use silicone on the inner joints then i think that it will make painting over it a bit of a nightmare. Martin555. ▲
⟩⟩
Spock66
RNinMunich
Skydive130
|
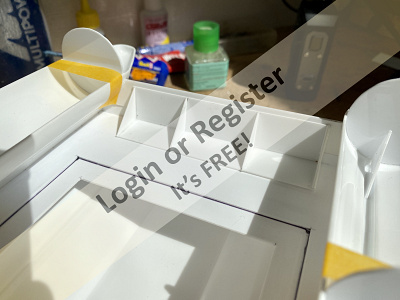
📝 Sponson supports and transom bracket
4 years ago by 🇬🇧 Skydive130 ( Rear Admiral)
Rear Admiral)✧ 11 Views · 6 Likes · 11 Comments
Flag
💬 Add Comment
After listening to the sound advice re: the silicone sealant, I sealed the inner join between hull deck and sponson with a 1mm thick strip of plasticard and after this was dry and and sanded, gave it another bead of cement for belt and braces. The hull has been sanded and filled in the one spot that needed it at the bow, and i reckon once painted, we will have a watertight seal?
I spent some time making the sponson support circles from 1mm plasticard which have also had triangular fillets fitted both sides.
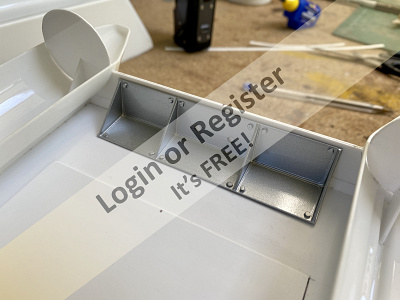
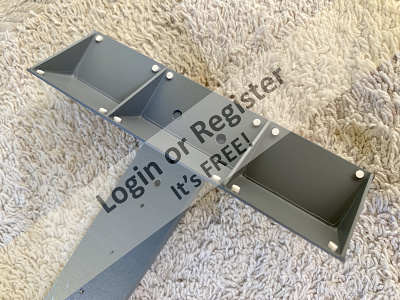
I wanted to make and complete something! so, I built the transom support bracket using the photos that Doug sent for reference. I added my scale bolt heads then primed, silver sprayed and lacquered it. It will be fitted after painting the remaining parts.
Last job of the day was to make and fit the Evenrude outboard motor fixing plate and the rear of the transom.
Hopefull tomorrow will see the top sponson half fitted!


I spent some time making the sponson support circles from 1mm plasticard which have also had triangular fillets fitted both sides.
I wanted to make and complete something! so, I built the transom support bracket using the photos that Doug sent for reference. I added my scale bolt heads then primed, silver sprayed and lacquered it. It will be fitted after painting the remaining parts.
Last job of the day was to make and fit the Evenrude outboard motor fixing plate and the rear of the transom.
Hopefull tomorrow will see the top sponson half fitted!
▲
⟩⟩
MouldBuilder
Inkoust
Colin H
RNinMunich
Rookysailor
Martin555
|
💬 Re: Sponson supports and transom bracket
4 years ago by 🇬🇧 Rookysailor (
Commodore)✧ 6 Views · 2 Likes
Flag
"What is your hull made of though? GRP?"
not so lucky Doug, it's that cheap nasty thin plastic, thermo molded to keep it light, but if you hit a buoy, or another boat, it don't like it👎 Cheers, Pete ▲
⟩⟩
Martin555
Skydive130
|
|
Login To
Remove Ads 💬 Re: Sponson supports and transom bracket
4 years ago by 🇩🇪 RNinMunich (
Fleet Admiral)✧ 7 Views · 3 Likes
Flag
Horses for courses Pete👍
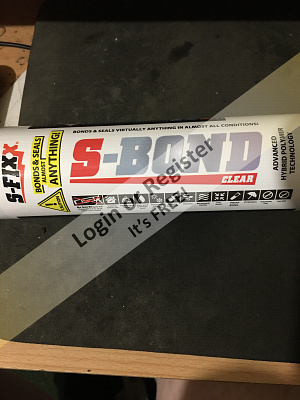
In your case, emergency repair, it was obviously a great asset to have in the lakeside tool box. What is your hull made of though? GRP? If so the usual plastic solvent glues would have little or no effect. They'd probably just sit on the surface and easily crack off so your S-Bond is an ideal alternative. Must sniff (😮) around to see if it's available over here. Sy's kit seems to be moulded polystyrene and is fairly small at 21" so, especially at the construction stage, the solvent glues designed for PS are the best choice. Don't suppose Sy is planning to go RHIB racing either😉 But who knows? We all do nutty things with boats now and again😁 Cheers, Doug 😎 ▲
⟩⟩
Skydive130
Rookysailor
Martin555
|
|
💬 Re: Sponson supports and transom bracket
4 years ago by 🇬🇧 Rookysailor (
Commodore)✧ 7 Views · 3 Likes
Flag
"maybe a bit overkill for plastic model boats" not for me Doug, last year during our Club 500 races, collided with another 500 boat, and got a three inch split in the hull, recovered the boat back and put a bead of this stuff along the split,(inside the hull) and was good and ready for the next race, it completely sealed the split and kept the water out, so for me well worth the money👍👍👍
Cheers, Pete ▲
⟩⟩
Skydive130
Martin555
RNinMunich
|
|
💬 Re: Sponson supports and transom bracket
4 years ago by 🇿🇦 Ianh (
Commander)✧ 6 Views · 1 Like
Flag
Look for polystyrene tiles then cut them👍
▲
⟩⟩
Martin555
|
|
💬 Re: Sponson supports and transom bracket
4 years ago by 🇬🇧 Skydive130 (
Rear Admiral)✧ 7 Views · 2 Likes
Flag
Hi Doug,
again you make some fair points! Technically I’ve built in semi airtight compartments, therefore I won’t bother with foam. The plastic used on the sponsons is quite thick and therefore once joined will be quite strong. It’s only a small model and will only be sailed in calm waters therefore the chances of flipping it will be reduced. ▲
⟩⟩
RNinMunich
Martin555
|
|
💬 Re: Sponson supports and transom bracket
4 years ago by 🇬🇧 Skydive130 (
Rear Admiral)✧ 7 Views · 2 Likes
Flag
Hi Pete, many thanks for your thoughts, but I’m now beyond the point of adding any form of sealer and putting my trust in the joints being sound 😂👍
▲
⟩⟩
Rookysailor
Martin555
|
|
💬 Re: Sponson supports and transom bracket
4 years ago by 🇩🇪 RNinMunich (
Fleet Admiral)✧ 6 Views · 2 Likes
Flag
"Would it be beneficial to pop in some foam in the sponsons before you glue the other half on.? (just incase )"
How fragile are the 'sponsons' Sy? Is there any risk that their integrity will be compromised? Assuming you are not intending to try a destructive test by driving full ahead at the lake wall!😮 Otherwise; the foam is perhaps lighter than water - but certainly not lighter than air. It flops straight to the ground when given a test squirt😐 So your sponsons will have more buoyancy if simply filled with air! I might be more inclined to build in some internal bulkheads to seal off different compartments, much like the damage control zones in real ships. Just my thoughts, but wadda I know😁 Cheers, Doug 😎 ▲
⟩⟩
Martin555
Skydive130
|
|
💬 Re: Sponson supports and transom bracket
4 years ago by 🇩🇪 RNinMunich (
Fleet Admiral)✧ 7 Views · 3 Likes
Flag
Totally different animal Pete😉
Hence the different properties. Probably great for home DIY (like Liquid nails😮)and emergency repairs on full size boats👍 but maybe a bit overkill for plastic model boats😉 Some of the uses of polymers- Clothing, sportswear and accessories: polyester and PVC clothing, spandex, sport shoes, wetsuits, footballs and billiard balls, skis and snowboards, rackets, parachutes, sails, tents and shelters. Electronic and photonic technologies: organic field effect transistors (OFET), light emitting diodes (OLED) and solar cells, television components, compact discs (CD), photoresists, holography. Packaging and containers: films, bottles, food packaging, barrels. Insulation: electrical and thermal insulation, spray foams. Construction and structural applications: garden furniture, PVC windows, flooring, sealing, pipes. Paints, glues and lubricants: varnish, adhesives, dispersants, anti-graffiti coatings, antifouling coatings, non-stick surfaces, lubricants. Car parts: tires, bumpers, windscreens, windscreen wipers, fuel tanks, car seats. Household items: buckets, kitchenware, toys (e.g., construction sets and Rubik's cube). Medical applications: blood bag, syringes, rubber gloves, surgical suture, contact lenses, prosthesis, controlled drug delivery and release, matrices for cell growth. Personal hygiene and healthcare: diapers using super-absorbent polymers, toothbrushes, cosmetics, shampoo, condoms. Security: personal protective equipment, bulletproof vests, space suits, ropes. Separation technologies: synthetic membranes, fuel cell membranes, filtration, ion-exchange resins. Money: polymer banknotes and payment cards. 3D printing. 😎 ▲
⟩⟩
Rookysailor
Martin555
Skydive130
|
|
💬 Re: Sponson supports and transom bracket
4 years ago by 🇬🇧 Rookysailor (
Commodore)✧ 8 Views · 4 Likes
Flag
There is another choice Sy instead of using silicon, it's called S-BOND, they do it in white, black and clear, the clear is similar to silicon, but no smell, it glues while underwater if required, totally waterproof, and made in SHEFFIELD, oh! and Doug, you can paint over it when dry with no problems👍😊
▲
⟩⟩
Colin H
Martin555
Skydive130
RNinMunich
|

|
💬 Re: Sponson supports and transom bracket
4 years ago by 🇬🇧 Skydive130 (
Rear Admiral)✧ 7 Views · 2 Likes
Flag
I heard somewhere Martin that people have used that spray expanding foam, but I have this vision of it blowing up! However, I’ve probably got some expanded foam somewhere, so will hunt it out and pop it in 👍
▲
⟩⟩
Ianh
Martin555
|
|
💬 Re: Sponson supports and transom bracket
4 years ago by 🇬🇧 Martin555 (
Fleet Admiral)✧ 5 Views · 1 Like
Flag
Hi Sy,
You are doing a great job, it is surprising that a splash of paint and a few bolt heads makes such a massive difference. Would it be beneficial to pop in some foam in the sponsons before you glue the other half on.? (just incase ) Martin555. ▲
⟩⟩
Skydive130
|
📝 Bending brass tube?
4 years ago by 🇬🇧 Skydive130 ( Rear Admiral)
Rear Admiral)✧ 6 Views · 1 Like · 14 Comments
Flag
💬 Add Comment
Hi guys, I’m looking for any hints and tips on bending brass tube without if possible spending a fortune on a gadget that may get limited future use. At some point I will be making the framework for the rear Atlantic 21 frame. I’m planning on using 5mm brass tube for the main uprights with 4mm tube for the cross members. The uprights need a 90 degree bend in them and I would like to bend without flat spotting them.
Will it work if I make a wooden jig to the correct shape and anneal (heat to red hot and cool naturally to soften) the tube then bend round the former? I’ve also read somewhere to pack the tube with fine sand before bending?
Any advice as always appreciated 👍
Will it work if I make a wooden jig to the correct shape and anneal (heat to red hot and cool naturally to soften) the tube then bend round the former? I’ve also read somewhere to pack the tube with fine sand before bending?
Any advice as always appreciated 👍
▲
⟩⟩
Colin H
|
💬 Re: Bending brass tube?
4 years ago by 🇩🇪 RNinMunich (
Fleet Admiral)✧ 5 Views · 0 Likes
Flag
Thanks Mike; I could have used several buckets of that about 40 years ago when I took apart and rebuilt the ancient crumbling garden wall, around my 1860 built cottage in Sandhurst.
It was a massive structure, complete overkill, brick and half wide. Just had to lift the bricks off and clean 'em up. Days of work with wire brushes and cold chisels cleaning thousands of 'em🤔 Rebuilt as a single brick wall with the occasional support pillar, using the most decorative vitrified bricks with a nice purple black glassy finish. Had hundreds of bricks left over for other constructions around the garden😊 What does the stuff consist of actually? Doug 😎 ▲
⟩⟩
No likes yet
This member will receive 1 point for every like received |
|
Login To
Remove Ads 💬 Re: Bending brass tube?
4 years ago by 🇬🇧 mturpin013 (
 Admiral) Admiral)✧ 6 Views · 1 Like
Flag
Brick cleaning fluid is from a builders merchant, used for cleaning cement off brick faces
▲
⟩⟩
RNinMunich
|
|
💬 Re: Bending brass tube?
4 years ago by 🇬🇧 Skydive130 (
Rear Admiral)✧ 7 Views · 2 Likes
Flag
Roger that, cherry red then dunk and repeat 👍
▲
⟩⟩
Martin555
RNinMunich
|
|
💬 Re: Bending brass tube?
4 years ago by 🇬🇧 mturpin013 (
Admiral)✧ 6 Views · 2 Likes
Flag
"I presume it’s melted into the tube before bending that will anneal at the same time?"
Sorry no its has to be cherry red and quenched in cold water, twice ▲
⟩⟩
Martin555
Skydive130
|
|
💬 Re: Bending brass tube?
4 years ago by 🇩🇪 RNinMunich (
Fleet Admiral)✧ 6 Views · 2 Likes
Flag
I wasn't laughing when it happened Martin.😭
But a while later I also saw the funny side of it.😂🤣 We learn from our mistakes! From all the above I like the sound of Mike's method best👍 Have no idea where to get brick cleaning acid from though😮 Or even what it would be called over here! 'Backstein Putzmittel Säure' perhaps!? Happy bending folks, don't get kinky now😠 Cheers, Doug 😎 ▲
⟩⟩
Skydive130
Martin555
|
|
💬 Re: Bending brass tube?
4 years ago by 🇬🇧 Skydive130 (
Rear Admiral)✧ 7 Views · 2 Likes
Flag
Good advice Doug, I shall try and avoid the bends or “nitrogen narcosis”, guaranteed to ruin ones day! 😂😂
▲
⟩⟩
Martin555
RNinMunich
|
|
💬 Re: Bending brass tube?
4 years ago by 🇬🇧 Martin555 (
Fleet Admiral)✧ 6 Views · 2 Likes
Flag
Hi Doug,
Ref:- and the tube looked like a dead earthworm That did make me laugh as i did a very similar thing. Martin555. ▲
⟩⟩
RNinMunich
Skydive130
|
|
💬 Re: Bending brass tube?
4 years ago by 🇩🇪 RNinMunich (
Fleet Admiral)✧ 7 Views · 3 Likes
Flag
"Also, you can (use) miniature bending springs. "
Yes you CAN! But be very careful, the spring should not be too tight a fit in the tube, and above all don't forget the annealing process! On my first attempt to bend some 1/8" brass tube to make the boat davits on my 1/72 destroyer the spring got stuck in the tube. By the time I got it out it was zig times longer than it started and the tube looked like a dead earthworm☹️😭 Don't get 'the bends' Gents & Gentle ladies, very painful!🤔 Cheers, Doug 😎 ▲
⟩⟩
Rookysailor
Skydive130
Martin555
|
|
💬 Re: Bending brass tube?
4 years ago by 🇬🇧 mturpin013 (
Admiral)✧ 8 Views · 4 Likes
Flag
Hi Sky, I bend brass tube with success using the following method.
1 cut to a length longer than required. 2 anneal the tube by heating to cherry red and quenching in water, I usually do this twice 3 clean the tube internally. block one end and then put a little flux down the tube. 4 heat with small blow torch and fill with solder to the top (and quench while still hot) 5 I usually cut a piece of hardwood to the required bend radius. 6 clamp one end and proceed to pull around. the block using another piece of hardwood. 7 when required bend is done heat and allow solder to run out (you may have to shake it a bit to get it all out. 8 I then clean in a jar of brick cleaning acid. 9 Job done PS if you look at my crash tender blog you can see the bends I used on the fire monitors. good look ▲
⟩⟩
MouldBuilder
Skydive130
RNinMunich
Martin555
|
|
💬 Re: Bending brass tube?
4 years ago by 🇨🇦 Newby7 (
Fleet Admiral)✧ 6 Views · 2 Likes
Flag
If you can find a heavy spring to fit inside the tube it makes bending easier. Haven't used it myself but there are bending jigs also.
Rick ▲
⟩⟩
Skydive130
Martin555
|
|
💬 Re: Bending brass tube?
4 years ago by 🇿🇦 Ianh (
Commander)✧ 6 Views · 2 Likes
Flag
Hi,
Try getting hold of what they call Roses Metal (Very old fashioned) fill the tube, bend and remove the roses metal. Also, you can miniature bending springs. Try the model engineering supply companies. Blackgates, Tracy Tools RDG etc. ▲
⟩⟩
Skydive130
Martin555
|
|
Login To
Remove Ads 💬 Re: Bending brass tube?
4 years ago by 🇬🇧 Martin555 (
Fleet Admiral)✧ 5 Views · 0 Likes
Flag
Please let us know how you get on Sy.
Martin555. ▲
⟩⟩
No likes yet
This member will receive 1 point for every like received |
|
💬 Re: Bending brass tube?
4 years ago by 🇬🇧 Skydive130 (
Rear Admiral)✧ 6 Views · 1 Like
Flag
Hi Martin, soft solder, now there’s a thought 👍 I presume it’s melted into the tube before bending that will anneal at the same time? Might try that on a practice piece. Many thanks, that maybe the solution 👍😂👍😂
▲
⟩⟩
Martin555
|
|
💬 Re: Bending brass tube?
4 years ago by 🇬🇧 Martin555 (
Fleet Admiral)✧ 6 Views · 2 Likes
Flag
Hi Sy,
It is my understanding that the inside of the tube needs to be packed with sand or soft solder to prevent the walls of the tube collapsing inwards. If you use soft solder you can heat the tube up again to empty it after you are completely happy with the end results. As for a tube bender i am sure a man with your skills can knock something up that will save you a lot of money. Martin555. ▲
⟩⟩
RNinMunich
Skydive130
|
📝 Prop shaft, servo mount and top sponson
4 years ago by 🇬🇧 Skydive130 ( Rear Admiral)
Rear Admiral)✧ 11 Views · 6 Likes · 4 Comments
Flag
💬 Add Comment
firstly a very big thank you to everyone who popped in with their hints and tips for bending the brass tube, im sure there is enough there for me to hopefully produce and nice bend for the rear frames.
Postie bought the propshaft today, so felt that would be the first job to get that fitted. Im please to see that once the motor is mounted it that it will clear the decks underside, although not by much! Next i built a plasticard servo box with lots of internal reinforcement and fitted that above the propshaft on the centreline.
As I like to make and finish an item to keep me motivated, today I made the 2 fore frame deck mounts with my usual bolt heads!
Last job of the day as it needs plenty of setting time was to fit and glue the upper sponson. after much swearing and cussing, finally got it glued and taped following a fairbit of tweaking to get a reasonable fit. tomorrow morning I shall give the join an extra bead of cement follwoed by a third in the evening as I am going to pop down to Essex and see my dad inbetween. Monday will see the joint P38 filled were needed follwed by a complete sanding with wet n dry of the whole hull. I will then consider the hardest part of the build complete apart from the rear frame, it will then be onwards with super detailing and scratch building a new centre consol as the one in the kit is "Dog poop"!
▲
⟩⟩
MouldBuilder
Inkoust
Colin H
mturpin013
RNinMunich
Martin555
|
💬 Re: Prop shaft, servo mount and top sponson
4 years ago by 🇬🇧 Skydive130 (
Rear Admiral)✧ 9 Views · 4 Likes
Flag
I was watching it too Pete, was gonna have a cheeky last minute bid! 😂😂😂
▲
⟩⟩
mturpin013
Rookysailor
RNinMunich
Martin555
|
|
Login To
Remove Ads 💬 Re: Prop shaft, servo mount and top sponson
4 years ago by 🇬🇧 Rookysailor (
Commodore)✧ 6 Views · 2 Likes
Flag
Just an update Sy on the other RIB for sale on Ebay,
nobody bid on it! so he's re-advertised it still £50, so you can get another at a reduced price, NOT😉 Cheers, Pete ▲
⟩⟩
Martin555
Skydive130
|
|
💬 Re: Prop shaft, servo mount and top sponson
4 years ago by 🇬🇧 Skydive130 (
Rear Admiral)✧ 6 Views · 1 Like
Flag
Ha ha, you know me too well Martin 😂
▲
⟩⟩
Martin555
|
|
💬 Re: Prop shaft, servo mount and top sponson
4 years ago by 🇬🇧 Martin555 (
Fleet Admiral)✧ 5 Views · 1 Like
Flag
I see the little details creeping in LOL!!
Martin555. ▲
⟩⟩
Skydive130
|
📝 Electrics and more detailing....!
4 years ago by 🇬🇧 Skydive130 ( Rear Admiral)
Rear Admiral)✧ 14 Views · 9 Likes · 12 Comments
Flag
💬 Add Comment
It’s been a good day of progress today before going back to work tomorrow for 4 days of shifts.
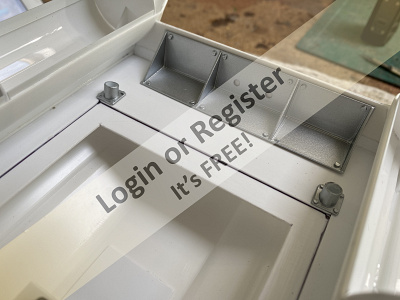
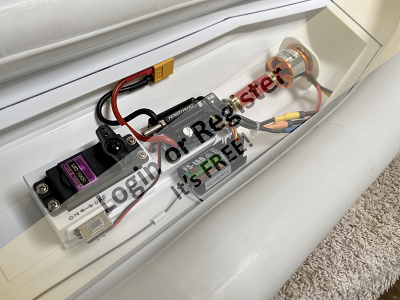
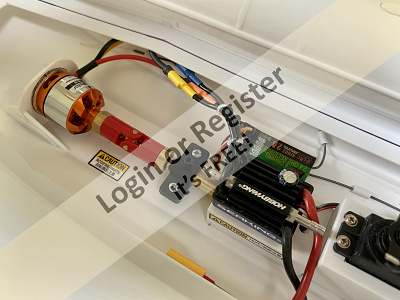
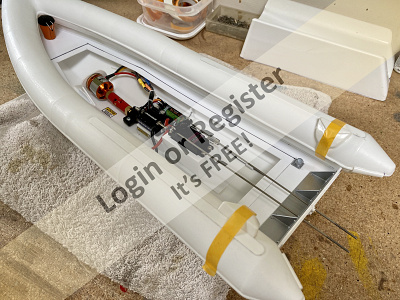
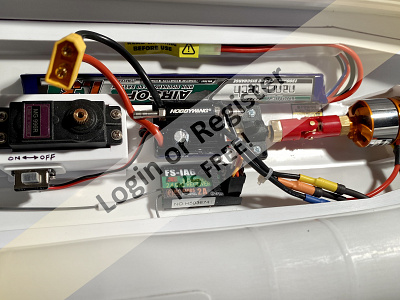
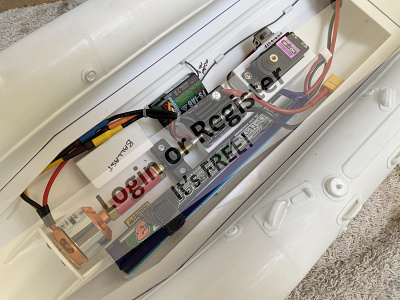
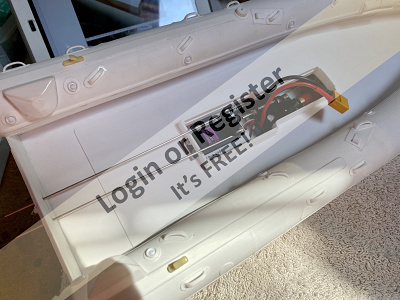
finalized the electric instalation, firstly making a support box for the ESC which helps tidy away the wires. Next I installed the RX and bound to the transmitter and centred the rudder (dummy Outboards are infact the rudders!). Finally I fashioned a motor mount from 2mm plasticard and once eveything was aligned correctly using my solid dummy coupling, everything was glued in place with triangular supports for and aft of the motor mount. Its all nice and solid, nicely aligned and free running 👍. also completed today after adding a second bead of glue last night was to fill the sponson joint with a little P38 filler were need and sand back. The hull should be now completly water tight!
I then started to fashion some more exterior hull details. using Dougs reference pics, I managed to make some details for the transom from scratch. Also started to add some of the many sponson details, here I managed to use 4 of the vacform parts for the rear stowage bins and rope guides that were included in the kit.
Last thing today, although ive acutually been building it from this morning, was to make and complete the fore stowage bucket that will sit tight up against the front of the sponson.
Yesterday I was intouch with Dave "Mastman" Watts who is producing copies of the dummy outboard motors. Hopefully he will be sending in the next day or 2 and has kindly said that I can pay once recived and that im happy with them, what a guy! although weve not discussed price yet!
One point I would like to mention with regards the seller selling these on eBay. Im afraid to say hes on my "Dog Poo" list at the moment, ive emailed him twice as he promissed me some extra plans and I also asked him for some more info on the dummy motors, sizes ect, alas no answer?? I apreciate I paid well over the odds for this part kit, especially as I will only be using half the parts supplied as the rest is either not usable of just complete junk. Word to the wise, dont be so hasty in the future Simon, a fool and his money are soon parted! Still, once finished I think it will look the "mutts nuts"!
Next update at the weekend unfortunatly ....!
▲
⟩⟩
MouldBuilder
Inkoust
Colin H
mturpin013
jbkiwi
RNinMunich
Rookysailor
robbob
Martin555
|
💬 Re: Electrics and more detailing....!
4 years ago by 🇩🇪 RNinMunich (
Fleet Admiral)✧ 6 Views · 1 Like
Flag
Needs must when the devil drives Sy🤔
Looking forward to your next project/tutorial very much👍 So much to learn, so much to do, So little time 😭 Happy and Peaceful Guarding Sy👍 Cheers, Doug 😎 ▲
⟩⟩
Martin555
|
|
Login To
Remove Ads 💬 Re: Electrics and more detailing....!
4 years ago by 🇬🇧 Skydive130 (
Rear Admiral)✧ 8 Views · 3 Likes
Flag
I’ve now got 4 days off Doug, I’ve gotta work to fund future projects 😂😂😂
▲
⟩⟩
RNinMunich
mturpin013
Martin555
|
|
💬 Re: Electrics and more detailing....!
4 years ago by 🇬🇧 Skydive130 (
Rear Admiral)✧ 7 Views · 2 Likes
Flag
Hi Rob, I am going to go the lead and former route, easier than trying to source springs that will fit the tube 👍
▲
⟩⟩
mturpin013
Martin555
|
|
💬 Re: Electrics and more detailing....!
4 years ago by 🇩🇪 RNinMunich (
Fleet Admiral)✧ 6 Views · 2 Likes
Flag
Totally agree with every word Robbob👍
Sy's work rate, especially considering the quality of the results, takes my breath away😮 which these days I don't have as much of as I used to🤔 I used the changeover switch idea in my 1/72 destroyer many years ago, switching between two hefty 6V SLAs. A 1.35m hull needs a fair bit of ballast anyway!😊 And I always prefer to put in 'useful' ballast rather than 'dead lead'. As she's now in for a (lengthy!) major refit I'm planning on fitting a changeover relay (encapsulated type) operated by an ON/OFF switch on the TX, e.g. the 'Gear' switch. Keep up the great work Sy👍👍 Cheers, Doug 😎 ▲
⟩⟩
Martin555
Skydive130
|
|
💬 Re: Electrics and more detailing....!
4 years ago by 🇬🇧 robbob (
Admiral)✧ 8 Views · 4 Likes
Flag
Hi Sy.
Sounds like you have a case of 'Buyers Remorse' but I know you'll make a terrific job of it despite that. Re: Bending brass tube. I think Mike Turpin's suggestion is likely to be the most successful. I've used internal and external bending springs with success if the bend radius isn't too severe, and also tightly packed sand but I suspect you need a fairly small radius bend so I'd try a test with the 'lead fill and wood formers' method and judge the results. BTW. I've been so busy with other domestic responsibilities the boat building has taken second priority but I'm back to the Pilot Boat now and will be posting updates shortly. Rob. ▲
⟩⟩
hmsnostalgia
Martin555
Skydive130
RNinMunich
|
|
💬 Re: Electrics and more detailing....!
4 years ago by 🇬🇧 Skydive130 (
Rear Admiral)✧ 9 Views · 4 Likes
Flag
Cheers as always for the fine Comments and suggestions Rob. Battery wise, I’ve ordered a 1300mah 25-50c 2s Airsoft lipo from my friends at Hobbyking which should be here tomorrow along with some extra goodies! It’s long and slim so should be a perfect fit Down the side? I was planning on adding a little lead to counter Balance laterally, but potential I could add another lipo and switch over as suggested?
This model is now basically an “Airfix kit” less the kit parts as the remainder of the detailing and I plan on adding as much detail as I can cram in Will all need to be scratch built. But that’s the fun stuff that I enjoy most, it’s amazing what can be made from plastic sheet, strip, tube and odds n ends from the spares box. Doug sent me a fab folio of pictures that show every angle, lump and bump, On a boat that was being sold after it’s R.N.L.I. career ended. If I can get the brass tube frame right, the rest should be easy in comparison 😂 Very much looking forward to your next update on your Pilot boat 👍 ▲
⟩⟩
mturpin013
RNinMunich
robbob
Martin555
|
|
💬 Re: Electrics and more detailing....!
4 years ago by 🇬🇧 robbob (
Admiral)✧ 8 Views · 4 Likes
Flag
Hi Sy.
I'm full of admiration of you work rate, so much progress in so little time!! (I'm still plodding away with my Pilots Boat, and getting bogged down with fine detailing). Have you figured out your battery conundrum yet? As a suggestion, could you use two long and slim battery packs either side of the motor/electrics and put in a changeover switch so when the first is showing signs of low capacity you could bring the boat in, switch to battery number two and continue running on that. The advantage being that battery locations don't upset the balance of the boat as they act as reciprocal ballast. The only disadvantage is that there's an extra switch to find room for and your running session will be split in two sessions. You could fit a separate battery alarm unit for each too, they're cheap enough ! Just a mad idea 😉 Keep up the great work. Rob. ▲
⟩⟩
hmsnostalgia
RNinMunich
Martin555
Skydive130
|
|
💬 Re: Electrics and more detailing....!
4 years ago by 🇨🇦 Newby7 (
Fleet Admiral)✧ 6 Views · 2 Likes
Flag
At least you have the boat so not a fool maybe over spent.
Rick ▲
⟩⟩
Martin555
Skydive130
|
|
💬 Re: Electrics and more detailing....!
4 years ago by 🇬🇧 Skydive130 (
Rear Admiral)✧ 7 Views · 2 Likes
Flag
I reckon making some standoffs will be the solution Martin. I shall leave it until I’ve cut the deck out for the centre console Frame and modify then 👍
▲
⟩⟩
mturpin013
Martin555
|
|
💬 Re: Electrics and more detailing....!
4 years ago by 🇬🇧 Martin555 (
Fleet Admiral)✧ 5 Views · 1 Like
Flag
Hi Sy,
Might be worth having an air gap under the ESC. (or on small pillars) Martin555. ▲
⟩⟩
Skydive130
|
|
💬 Re: Electrics and more detailing....!
4 years ago by 🇬🇧 Skydive130 (
Rear Admiral)✧ 6 Views · 1 Like
Flag
Hi Martin, I’ve put the Tamiya caution stickers on because I like them lol. Yes, it is a water cooled ESC, but I’m only planning on running this on a 2S Airsoft 1300mah lipo And probably not much on full throttle so I’m taking a punt that It won’t get too hot. The esc is sitting on a plasticard box which will hopefully succumb before the main hull if we do have a heat issue, but I shall test it in the wife’s hot tub before I send it to the lake. Fingers crossed it won’t end up as molten lump at the bottom of the tub 😂
▲
⟩⟩
Martin555
|
|
💬 Re: Electrics and more detailing....!
4 years ago by 🇬🇧 Martin555 (
Fleet Admiral)✧ 5 Views · 1 Like
Flag
Hi Sy,
I noticed you have notices saying "caution Hot" and you seem to have water cooling on the ESC. What is the ESC mounted on. ? Having a plastic hull/boat are you sure that the motor and ESC combo will not over heat and distort/melt the hull. It is probably me being thick as i have no knowledge about brushless rc equipment. Martin555. ▲
⟩⟩
Skydive130
|
📝 Lipo battery
4 years ago by 🇬🇧 Skydive130 ( Rear Admiral)
Rear Admiral)✧ 11 Views · 6 Likes
Flag
💬 Add Comment
The 1300mah 2S 25-50C Lipo arrived today from Hobbyking and at £6.50p cheap as chips! Of course to justify the postage of a fiver I ordered a load of other non essentials, but all things that will come in handy one day! The Lipo is sold as used by those guys who fire plastic airsoft guns (not like us ex-soldiers who only ever fired the real thing!). However, size and shape wise, it could have been made to measure this model! I will of course need to swap the Mickey Mouse plug off the Lipo and replace with a ubiqitous XT60.
Im not sure what the run time will be like, but I will plonk it in the hot tub at the weekend and give it a run (good chance to test the watts too) to see what we could get until the lipo alarm kicks in. The battery only weighs 70g, so I will make up a little plasticard box and put some counter ballast lead in it for latteral ballance and maybe get a second battery when i put another order in with HK.
Im not sure what the run time will be like, but I will plonk it in the hot tub at the weekend and give it a run (good chance to test the watts too) to see what we could get until the lipo alarm kicks in. The battery only weighs 70g, so I will make up a little plasticard box and put some counter ballast lead in it for latteral ballance and maybe get a second battery when i put another order in with HK.
▲
⟩⟩
MouldBuilder
Colin H
mturpin013
Martin555
Rookysailor
robbob
📝 It’s the little things ....!
4 years ago by 🇬🇧 Skydive130 ( Rear Admiral)
Rear Admiral)✧ 17 Views · 12 Likes · 17 Comments
Flag
💬 Add Comment
After much studying of all the google related reference pictures, I made a list of every detail I wanted to add to this little model, all to be scratch built. The plan is to add every scale detail I possibly can, onwards....!
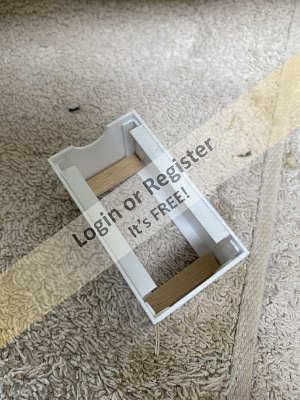
The only kit parts I could use on the sponsons are the vacform bits And the grab handles that came as a long piece of formed plastic needing cutting into individual handles. , everything else is or has been scratch made from various sizes of plastic tube, sheets, rod ect. I’ve got to the point of only having a few grab handles to fit tomorrow and that will be the hull and sponsons complete less some metal D-rings that I will add after painting.
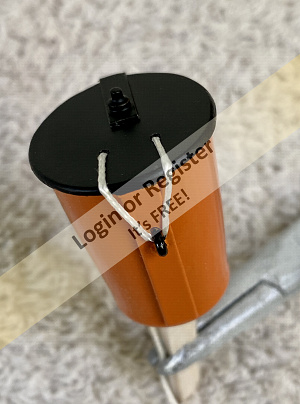
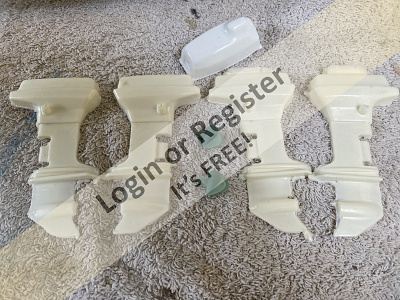
The kit supplied injection moulded centre console will go in the bin once I’ve used it to rough size a new one which I will start building tomorrow. Also pictured are the newly arrived resin outboards from Dave Mastman Watts. These will need a fair bit of work to clean up, glue, fill and sand, but better than @nything I could make.
I used the opportunity to give the model a dunk in the hot tub Whilst the “Mrs” was Soaking! I’ve added a ballast box to counter the lipo and the lateral ballance is perfect. On the watt meter on 2s I got 11amps on a 35mm prop and there’s more than enough grunt for this to shift at speed. No need for a 3S, it would take off! The ESC didn’t need any form of programming, forward and reverse out of the box, love it!


The only kit parts I could use on the sponsons are the vacform bits And the grab handles that came as a long piece of formed plastic needing cutting into individual handles. , everything else is or has been scratch made from various sizes of plastic tube, sheets, rod ect. I’ve got to the point of only having a few grab handles to fit tomorrow and that will be the hull and sponsons complete less some metal D-rings that I will add after painting.
The kit supplied injection moulded centre console will go in the bin once I’ve used it to rough size a new one which I will start building tomorrow. Also pictured are the newly arrived resin outboards from Dave Mastman Watts. These will need a fair bit of work to clean up, glue, fill and sand, but better than @nything I could make.
I used the opportunity to give the model a dunk in the hot tub Whilst the “Mrs” was Soaking! I’ve added a ballast box to counter the lipo and the lateral ballance is perfect. On the watt meter on 2s I got 11amps on a 35mm prop and there’s more than enough grunt for this to shift at speed. No need for a 3S, it would take off! The ESC didn’t need any form of programming, forward and reverse out of the box, love it!
▲
⟩⟩
MouldBuilder
Inkoust
hmsnostalgia
Colin H
jbkiwi
marky
ChrisB
RNinMunich
Scratchbuilder
robbob
Martin555
Ronald
|
💬 Re: It’s the little things ....!
4 years ago by 🇩🇪 RNinMunich (
Fleet Admiral)✧ 6 Views · 1 Like
Flag
"Is it a bird? Is it a plane?"
"NOOOH, it's SUPERSY" 😁 😎 ▲
⟩⟩
Martin555
|
|
Login To
Remove Ads 💬 Re: It’s the little things ....!
4 years ago by 🇨🇦 Newby7 (
Fleet Admiral)✧ 7 Views · 2 Likes
Flag
You will be able to jump other boats and fly like an Eagle.
Rick ▲
⟩⟩
Martin555
RNinMunich
|
|
💬 Re: It’s the little things ....!
4 years ago by 🇩🇪 RNinMunich (
Fleet Admiral)✧ 6 Views · 2 Likes
Flag
Sgt Wilson - Take that man's name!!😠
But Uncle Arthur already knows Cpl Jone's name Cap'n Mainwaring!? "Stupid boy"🙄 😁😎 ▲
⟩⟩
Martin555
Skydive130
|
|
💬 Re: It’s the little things ....!
4 years ago by 🇬🇧 Skydive130 (
Rear Admiral)✧ 7 Views · 2 Likes
Flag
I only ever got to staff sergeant Doug, no need to call me Sir ha ha!
▲
⟩⟩
Martin555
RNinMunich
|
|
💬 Re: It’s the little things ....!
4 years ago by 🇬🇧 robbob (
Admiral)✧ 8 Views · 3 Likes
Flag
😛
▲
⟩⟩
hmsnostalgia
Martin555
RNinMunich
|
|
💬 Re: It’s the little things ....!
4 years ago by 🇩🇪 RNinMunich (
Fleet Admiral)✧ 7 Views · 3 Likes
Flag
Yes Sir, Captain Mainwaring Sir!👍 Carrying on Sir👍
😎 ▲
⟩⟩
Martin555
Skydive130
robbob
|
|
💬 Re: It’s the little things ....!
4 years ago by 🇬🇧 robbob (
Admiral)✧ 8 Views · 4 Likes
Flag
Panic over...
As you were... Carry on............😉 ▲
⟩⟩
hmsnostalgia
Martin555
Skydive130
RNinMunich
|
|
💬 Re: It’s the little things ....!
4 years ago by 🇬🇧 Skydive130 (
Rear Admiral)✧ 7 Views · 2 Likes
Flag
No need to panic, the deck screws down with 6 tiny 3mm screws, so the gubbins inside are easily got at if and when maintenance is required 👍
▲
⟩⟩
Martin555
marky
|
|
💬 Re: It’s the little things ....!
4 years ago by 🇩🇪 RNinMunich (
Fleet Admiral)✧ 6 Views · 1 Like
Flag
Good thinking Batman👍😁
😮 ▲
⟩⟩
Martin555
|
|
💬 Re: It’s the little things ....!
4 years ago by 🇬🇧 robbob (
Admiral)✧ 8 Views · 4 Likes
Flag
Hi Sy.
Thinking ahead..... Perhaps it would be prudent to adjust the RX positioning now and re-make the wiring/switching loom to make provision for the second battery if access will be restricted after the deck is fixed down. Rob. ▲
⟩⟩
hmsnostalgia
Martin555
Skydive130
RNinMunich
|
|
💬 Re: It’s the little things ....!
4 years ago by 🇬🇧 Scratchbuilder (
Vice Admiral)✧ 6 Views · 2 Likes
Flag
Looking really good.
Coming along nicely. All the inner workings look neat and compact. Keep it up. Bill👍 ▲
⟩⟩
Martin555
Skydive130
|
|
Login To
Remove Ads 💬 Re: It’s the little things ....!
4 years ago by 🇬🇧 Skydive130 (
Rear Admiral)✧ 7 Views · 2 Likes
Flag
I shall certainly buy a second lipo in the future Rob, but once deck is in position, access is difficult.
▲
⟩⟩
robbob
Martin555
|
|
💬 Re: It’s the little things ....!
4 years ago by 🇬🇧 Skydive130 (
Rear Admiral)✧ 6 Views · 1 Like
Flag
It’s only because of the joy of detailing this little model that I can justify what I spent on it in the first place Martin 👍
▲
⟩⟩
Martin555
|
|
💬 Re: It’s the little things ....!
4 years ago by 🇬🇧 robbob (
Admiral)✧ 8 Views · 4 Likes
Flag
Hi Sy.
Good to see progress at your usual rate of knots! It looks like if you were to reposition the receiver there'd be plenty of room for a second LiPo 😉 Rob. ▲
⟩⟩
hmsnostalgia
RNinMunich
Martin555
Skydive130
|
|
💬 Re: It’s the little things ....!
4 years ago by 🇬🇧 Martin555 (
Fleet Admiral)✧ 5 Views · 1 Like
Flag
I really like this model Sy,
The detail work will really make this model stand out. You are doing a great job. Keep it up. Martin555. ▲
⟩⟩
Skydive130
|
|
💬 Re: It’s the little things ....!
4 years ago by 🇬🇧 Skydive130 (
Rear Admiral)✧ 7 Views · 2 Likes
Flag
It would on 3S Lipo Rick, Mach 1 easily!
▲
⟩⟩
RNinMunich
Martin555
|
|
💬 Re: It’s the little things ....!
4 years ago by 🇨🇦 Newby7 (
Fleet Admiral)✧ 6 Views · 2 Likes
Flag
That's a neat project it looks like it will fly on the water.
Rick ▲
⟩⟩
Martin555
Skydive130
|
📝 And some more bits ......
4 years ago by 🇬🇧 Skydive130 ( Rear Admiral)
Rear Admiral)✧ 14 Views · 9 Likes · 10 Comments
Flag
💬 Add Comment
I think I’ve done as much detailing to the sponsons as I possibly can, study pictures as I might, I can find nothing more to add!
Therefore it’s time to start the deck work (“work” is a word we shouldn’t use in this hobby, it’s unpaid and a labour of love lol). I cut a new deck 1mm over width of the original cut out so that the deck sits on top of the fixed deck, this was then packed from beneath to sit in the recess. The real thing seems to have the centre deck proud too. I then took measurements from the injection moulded kit console to use as reference for building a more scale like one. The deck was marked, cut out and reinforcement pieces fitted to the deck as a guide to build the removable console. I then made the aft tunnel which is on the real boat but smaller in real life, mine has to encompass the rudder pushrods so is slightly over scale. Last job of the day and until the weekend was to start cutting the console sides.
The inner deck will be held down by 6 x 3-4mm screws allowing access to the main radio compartment in the future, but for normal use access to battery will be via the lift off console.
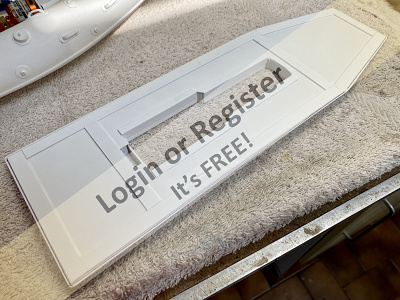
▲
⟩⟩
MouldBuilder
mturpin013
Inkoust
Colin H
Rookysailor
Scratchbuilder
Martin555
robbob
RNinMunich
|
💬 Re: And some more bits ......
4 years ago by 🇩🇪 RNinMunich (
Fleet Admiral)✧ 8 Views · 3 Likes
Flag
I know the feeling Sy🤔
'Stuff expands to fill the space available for it - and then some!'☹️ 😎 ▲
⟩⟩
hmsnostalgia
Ianh
Martin555
|
|
Login To
Remove Ads 💬 Re: And some more bits ......
4 years ago by 🇬🇧 Skydive130 (
Rear Admiral)✧ 7 Views · 2 Likes
Flag
Seriously Doug, the unused parts are big lumps of non descriptive plastic that are as much use as “ U-Boats with indicators”. My spares boxes of which I have several need nothing else added to them 😂😂😂
▲
⟩⟩
Martin555
RNinMunich
|
|
💬 Re: And some more bits ......
4 years ago by 🇩🇪 RNinMunich (
Fleet Admiral)✧ 7 Views · 3 Likes
Flag
"majority of the parts included in the part kit were rubbish and binned!"
Sy, Neffer frow nuffink away that 'might' come in handy for another project. You never know😉 German ship modellers have a motto (loosely translated) 'Never throw anything away that won't start to stink after a few weeks'🙊😉 As usual, great detailing from you👍 Look forward to the first Flight Trials Cheers, Doug 😎 ▲
⟩⟩
Ianh
Martin555
Skydive130
|
|
💬 Re: And some more bits ......
4 years ago by 🇬🇧 Skydive130 (
Rear Admiral)✧ 8 Views · 3 Likes
Flag
Hi Pete, the majority of the detailing is scratch built. The handles came as a strip of U-formed plastic strip that has to be cut into individual pieces before being stuck onto the hull with a 0.5mm packing piece underneath. Most of the detail is from 0.5, 1.0 mm plastic sheets, plastic tube and rod. The vacform Pouches on the stern of each sponson were included, but the majority of the parts included in the part kit were rubbish and binned!
Kind regards Sy ▲
⟩⟩
Martin555
Rookysailor
RNinMunich
|
|
💬 Re: And some more bits ......
4 years ago by 🇬🇧 Rookysailor (
Commodore)✧ 6 Views · 2 Likes
Flag
Like all the detail work you have done on the sponsons Sy, is that in the kit? or scratchbuilt, how did you do the handle/grips, brilliant stuff!😊
Cheers, Pete ▲
⟩⟩
Martin555
Skydive130
|
|
💬 Re: And some more bits ......
4 years ago by 🇬🇧 Scratchbuilder (
Vice Admiral)✧ 6 Views · 1 Like
Flag
Really coming along well.
The end result will be worth the effort. Keep it coming. Bill👍👍👍 ▲
⟩⟩
Martin555
|
|
💬 Re: And some more bits ......
4 years ago by 🇩🇪 RNinMunich (
Fleet Admiral)✧ 6 Views · 2 Likes
Flag
Happy licking Sy😝
Prefer an ice lolly meself😋 😁😁😎 ▲
⟩⟩
Skydive130
Martin555
|
|
💬 Re: And some more bits ......
4 years ago by 🇬🇧 Martin555 (
Fleet Admiral)✧ 5 Views · 1 Like
Flag
Very nice bit of "unpaid Labour of love" Sy LOL!!
Martin555. ▲
⟩⟩
Skydive130
|
|
💬 Re: And some more bits ......
4 years ago by 🇬🇧 Skydive130 (
Rear Admiral)✧ 7 Views · 2 Likes
Flag
Enjoying the build if truth be told Doug, will look the “Dogs Fluffies” once it’s had a lick of VW orange lol!
▲
⟩⟩
RNinMunich
Martin555
|
|
💬 Re: And some more bits ......
4 years ago by 🇩🇪 RNinMunich (
Fleet Admiral)✧ 7 Views · 3 Likes
Flag
Excellent stuff Sy👍
Looks like you're making a real nice 'silk purse' out of your expensive 'sow's ear'.😀 Cheers, Doug 😎 ▲
⟩⟩
Martin555
Skydive130
robbob
|


Login To
Remove Ads
Remove Ads