Join Us On Social Media!

|

|

|
Download The App!
Login To
Remove Ads
Remove Ads
Login To
Remove Ads
Remove Ads
Model Boats Website
Dumas Higgins PT boat
17 Posts · 11 Followers · 57 Photos · 111 Likes
Began 3 years ago by
 United States
Follow This Thread
Not currently following
> Click to follow
> Click to follow
Latest Post 3 years ago by
| Oldest posts shown first (Show Newest First) | (Print Booklet) |
📝 Dumas Higgins PT boat
3 years ago by 🇺🇸 Cashrc ( Vice Admiral)
Vice Admiral)✧ 148 Views · 10 Likes · 3 Comments
Flag
💬 Add Comment
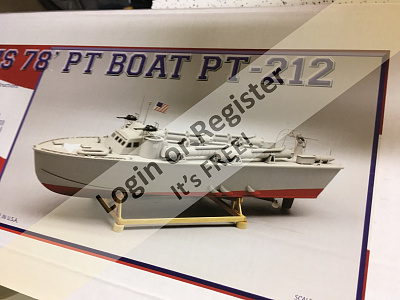
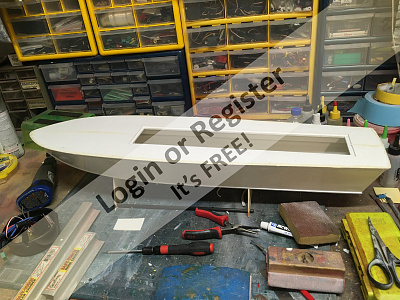
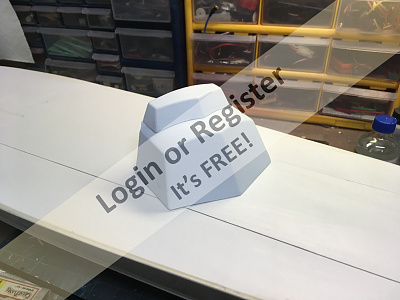
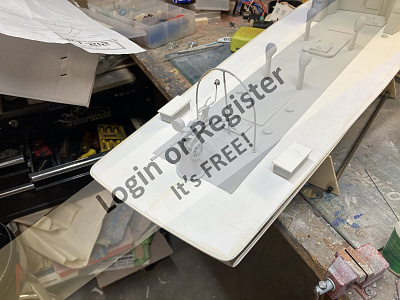
Hi y’all. I’ve decided to go ahead and start on my Christmas present, a Dumas Higgins PT boat. This kit has an abs hull, a plastic deck, vac formed cabin, and numerous wood and metal fittings. Like most Dumas kits it does NOT come with running gear, nor shaft tube or rudder. However, I have those things in my “stock”, plus I’ve decided on a 1700 kv 36mm o.d outrunner. I’ve used this particular size and power motor on several other boats of roughly the same size, so it should serve me well here.
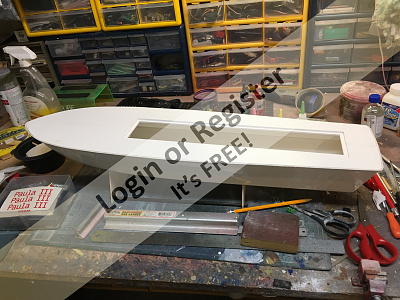
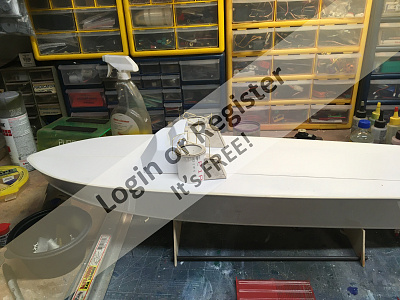
The hull needs to be trimmed, then the deck is assembled and installed. The deck is in 2 halves, split right down the middle. I glued it together, then added the reinforcements. The hull “droops” a few degrees from level around 1/3 baxk from, and to the bow, and the deck follows that. The reinforcements have that designed in, and when they are glued to the deck it builds that curve right in, and once trimmed, it fits almost perfectly. The deck was bonded to the hull with medium ca, and what little gaps I had were filled with ca and then top filled with putty.
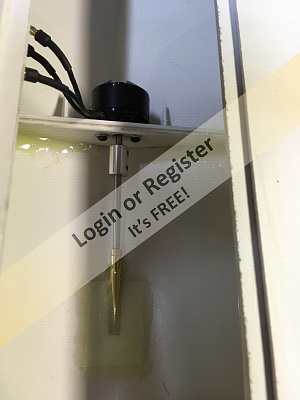
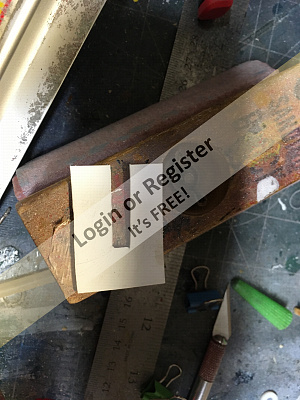
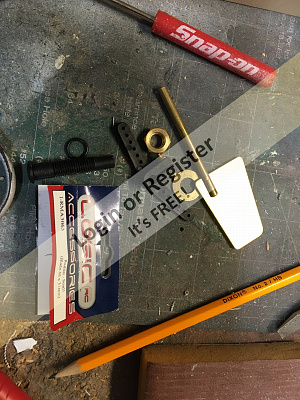
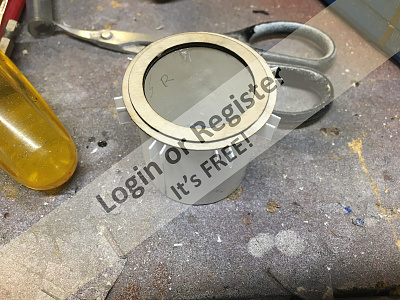
I used a rudder assembly and stuffing box from Cornwall models. The rudder is from Radioactive, the stuffing tube a Caldercraft Fineline unit. I used the kits pine rudder support block and drilled it for the rudder tube, once I had it all sorted out I installed the rudder tube and block, run the nut down on the tube till just snug, and once I had it all lined up I snugged the nut another quarter turn and epoxied it all in place.
I cut the slot for the tube just a wee bit oversized, but no problem there. I used the kits skew to get the angle right, tacked it in place, checked alignment then ca’d it all in place. I then made a scab plate to help cover the slot inside, and epoxied the plate and tube.
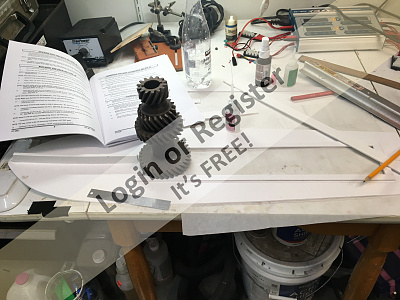
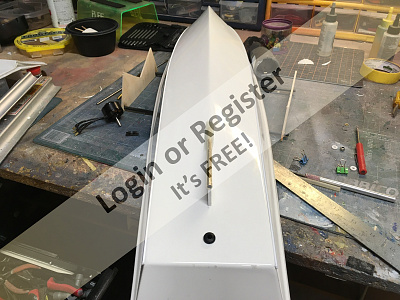
I made a bulkhead motor mount from scrap plastic sheet. I put the coupling on the shaft, and “painted” the motor end with a red marker, and used that to mark my center on the bulkhead. I then drilled that out, and used that to line up my motor mount holes. I went ahead and installed the motor, added a reinforcement to the bulkhead, and tacked it in place to check my alignment with the shaft. Once I was satisfied I ca’d it in place then coated the joints with filled epoxy. It lined up true, and when I test ran the motor it was very quiet, no vibrations nor binding. I also built up the hatch, and added the chine strakes.
Next up is a final sanding of the hull, then I’ll start building the above deck details and cabin.
Cash
The hull needs to be trimmed, then the deck is assembled and installed. The deck is in 2 halves, split right down the middle. I glued it together, then added the reinforcements. The hull “droops” a few degrees from level around 1/3 baxk from, and to the bow, and the deck follows that. The reinforcements have that designed in, and when they are glued to the deck it builds that curve right in, and once trimmed, it fits almost perfectly. The deck was bonded to the hull with medium ca, and what little gaps I had were filled with ca and then top filled with putty.
I used a rudder assembly and stuffing box from Cornwall models. The rudder is from Radioactive, the stuffing tube a Caldercraft Fineline unit. I used the kits pine rudder support block and drilled it for the rudder tube, once I had it all sorted out I installed the rudder tube and block, run the nut down on the tube till just snug, and once I had it all lined up I snugged the nut another quarter turn and epoxied it all in place.
I cut the slot for the tube just a wee bit oversized, but no problem there. I used the kits skew to get the angle right, tacked it in place, checked alignment then ca’d it all in place. I then made a scab plate to help cover the slot inside, and epoxied the plate and tube.
I made a bulkhead motor mount from scrap plastic sheet. I put the coupling on the shaft, and “painted” the motor end with a red marker, and used that to mark my center on the bulkhead. I then drilled that out, and used that to line up my motor mount holes. I went ahead and installed the motor, added a reinforcement to the bulkhead, and tacked it in place to check my alignment with the shaft. Once I was satisfied I ca’d it in place then coated the joints with filled epoxy. It lined up true, and when I test ran the motor it was very quiet, no vibrations nor binding. I also built up the hatch, and added the chine strakes.
Next up is a final sanding of the hull, then I’ll start building the above deck details and cabin.
Cash
▲
⟩⟩
Colin H
Rick Z
RNinMunich
Madwelshman
Scamp
jbkiwi
Martin555
Ianh
Seanympth
Fred
|
💬 Re: Dumas Higgins PT boat
3 years ago by 🇬🇧 Griss (
 Chief Petty Officer 2nd Class) Chief Petty Officer 2nd Class)✧ 125 Views · 2 Likes
Flag
Quality workmanship should run well.👍
▲
⟩⟩
Ianh
Martin555
|
|
Login To
Remove Ads 💬 Re: Dumas Higgins PT boat
3 years ago by 🇺🇸 Cashrc (
Vice Admiral)✧ 140 Views · 2 Likes
Flag
Martin, she’s a little over 31 inches long from bow to stern measured at the deck. The hatch looks a little narrow, but there’s plenty of room to work in. So far I really like it!
Cash ▲
⟩⟩
Ianh
Martin555
|
|
💬 Re: Dumas Higgins PT boat
3 years ago by 🇬🇧 Martin555 (
 Fleet Admiral) Fleet Admiral)✧ 146 Views · 0 Likes
Flag
Great start Cash,
Now you have the deck on will you be able to get everything through the deck opening without to much of a struggle. What dimensions is this PT Boat.? Martin555. ▲
⟩⟩
No likes yet
This member will receive 1 point for every like received |
Login To
Remove Ads
Remove Ads
📝 Cabin started.
3 years ago by 🇺🇸 Cashrc ( Vice Admiral)
Vice Admiral)✧ 132 Views · 6 Likes · 2 Comments
Flag
💬 Add Comment
Hi y’all. Started on the cabin a day or so ago, it’s really just 2 pieces of vac formed abs with some wood and brass for details, and pvc floor and aft wall. It looks very simple, and essentially it is, but it could be really easy to flub it. The only hitch I had was the way the aft wall went into place. It’s supposed to butt against the floor and glue to the upper, curved aft end of the main cabin molding. It’s shown that way on the plans, and called out in the instructions. Now, I cut the cabin out close, but not directly on the cut lines, that way I can have a little room for error, and once everything is in place I can sand flush. There was now way in hades that the cabin wall would fit as directed, as doing so would have the wall lean forward by 10 degrees or so, and you would have to press down on the cabin top to mate with the upper edge, deforming the cabin as a result. So, I did what “looked right” glued the cabin wall on the upper edge of the floor and it fit 90 degrees and up against the roof almost perfectly. I’m kinda wondering if there was a running change in the kit that wasn’t adressed in the plans or instructions. Anyway, it turned out pretty decent, needs a little filler and sanding and then it’s off to the gun turrets.
Cash
Cash
▲
⟩⟩
Colin H
mturpin013
jbkiwi
Ianh
RNinMunich
Martin555
|
💬 Re: Cabin started.
3 years ago by 🇿🇦 Ianh (
 Commander) Commander)✧ 134 Views · 2 Likes
Flag
Hi Cash
I look forward to seeing it run! Regards Ian😊😊 ▲
⟩⟩
Cashrc
Martin555
|
|
💬 Re: Cabin started.
3 years ago by 🇩🇪 RNinMunich (
Fleet Admiral)✧ 132 Views · 3 Likes
Flag
Good call Cash👍
To paraphrase Martin's signature- 'If it doesn't look right, it probably isn't!' Cheers, Doug 😎 ▲
⟩⟩
Cashrc
Ianh
Martin555
|
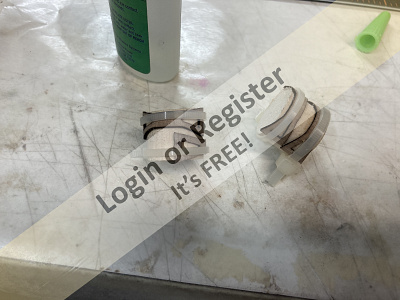
📝 Gun Turrets!! Or how I learned to hate tiny pieces of plasticard
3 years ago by 🇺🇸 Cashrc ( Vice Admiral)
Vice Admiral)✧ 131 Views · 8 Likes · 2 Comments
Flag
💬 Add Comment
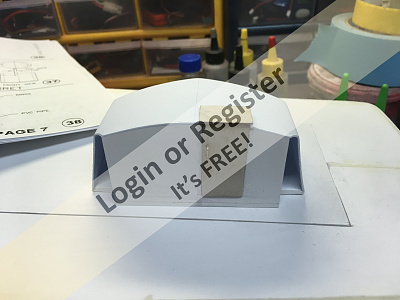
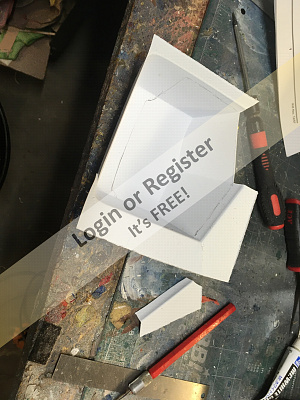
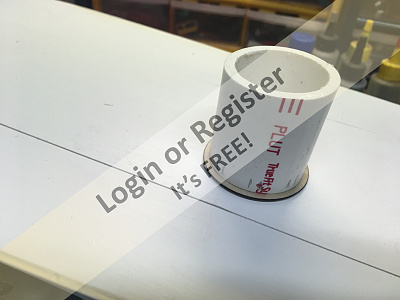
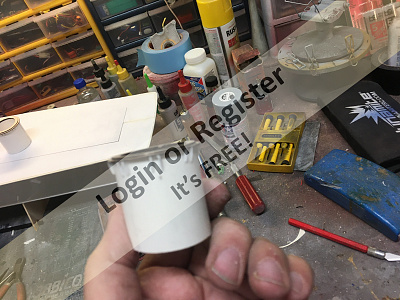
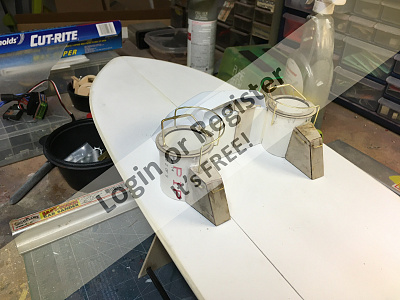
Hi y’all. Well, the next step in the construction of the cabin assembly is the gun turrets. They are cut from supplied pvc pipe, and the bottoms are sanded at an angle so they lean towards the bow a bit. This compensates for the slightly bow high attitude the boat has, especially under power.
The turrets look deceptively simple, which means they’re actually a pain in the rump. Let me explain...
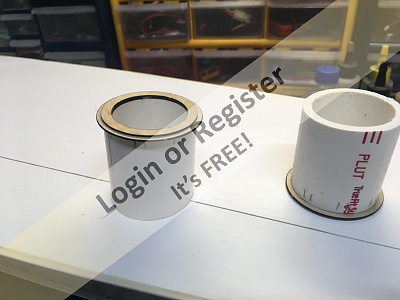
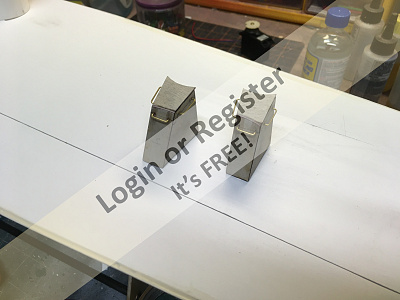
The turrets are cut and sanded , marked port and starboard, then 2 rings of plywood are glued on top. Simple, easy-peasy. Then the fun begins.
You see, there’s tiny triangular supports under the rings glued to the rings and the pipe. Now, there’s a template to mark the turret..oh look, it’s not one support in order, they are in PAIRS!! Now, it’s my boat, I could have left them off, most people wouldn’t miss them. But I would know, and I suspect some, if not most of y’all would catch it too.
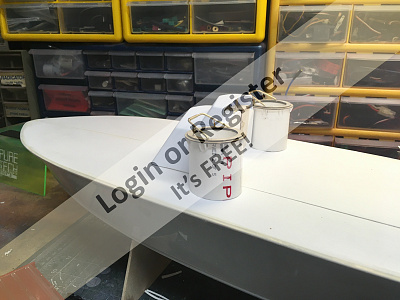
So..I hemmed and hawed and tried to think of an easier way to do this, then I had it. Instead of trying to cut matching triangular parts from .5 mm sheet, I decided to cut rectangular pieces, glue them in place, then cut and sand them to shape where they sit. It worked!! They’re not perfect, but good, I’m happy with the result. The tubes are then drilled for railings that will be installed later, and the gun mounts, which I bent, glued in place and soldered.
That’s all I have done this morning, took me about 4 hours to get from pvc pipe to gun turrets. I might be able to do a bit tomorrow, if I do I’ll post it that evening.
Cash
The turrets look deceptively simple, which means they’re actually a pain in the rump. Let me explain...
The turrets are cut and sanded , marked port and starboard, then 2 rings of plywood are glued on top. Simple, easy-peasy. Then the fun begins.
You see, there’s tiny triangular supports under the rings glued to the rings and the pipe. Now, there’s a template to mark the turret..oh look, it’s not one support in order, they are in PAIRS!! Now, it’s my boat, I could have left them off, most people wouldn’t miss them. But I would know, and I suspect some, if not most of y’all would catch it too.
So..I hemmed and hawed and tried to think of an easier way to do this, then I had it. Instead of trying to cut matching triangular parts from .5 mm sheet, I decided to cut rectangular pieces, glue them in place, then cut and sand them to shape where they sit. It worked!! They’re not perfect, but good, I’m happy with the result. The tubes are then drilled for railings that will be installed later, and the gun mounts, which I bent, glued in place and soldered.
That’s all I have done this morning, took me about 4 hours to get from pvc pipe to gun turrets. I might be able to do a bit tomorrow, if I do I’ll post it that evening.
Cash
▲
⟩⟩
Colin H
mturpin013
jbkiwi
Ianh
MouldBuilder
Martin555
Graham93
RNinMunich
|
💬 Re: Gun Turrets!! Or how I learned to hate tiny pieces of plasticard
3 years ago by 🇺🇸 Cashrc (
Vice Admiral)✧ 118 Views · 0 Likes
Flag
Hi Ian, sorry for the late reply. Dumas kits have a weird reputation here in the US. The materials they use are good, but the older kits did have some rough die cutting. A lot of their kits are laser cut now, and the fittings seem to be getting better. This kit is pretty well made and thought out, and the diagrams are helpful.
Cash ▲
⟩⟩
No likes yet
This member will receive 1 point for every like received |
|
💬 Re: Gun Turrets!! Or how I learned to hate tiny pieces of plasticard
3 years ago by 🇿🇦 Ianh (
Commander)✧ 130 Views · 1 Like
Flag
Hi Cash
Clever Idea. How are finding the kit quality? Dumas does not have a good reputation in South Africa. Reports of bad diecutting? ▲
⟩⟩
Martin555
|
📝 Cabin assembled
3 years ago by 🇺🇸 Cashrc ( Vice Admiral)
Vice Admiral)✧ 127 Views · 7 Likes · 6 Comments
Flag
💬 Add Comment
Hi y’all, I’ll keep this short. I built the final superstructure for the cabin assembly, they are made from laser cut thin ply and 1/8 stripwood, then handrails are made up and glued in place. Then, it’s...time..to..assemble the cabin. The cabin is located on the hull. The aft 1/4 inch of the cabin lays over the hatch, from what I understand the hatch is slid forward under the cabins aft edge and pressed into place. Anyway, once I had my cabin in place I drew location lines on the hull, reset the cabin and taped the fwd edge down..this allowed me to lift the cabin up and place wax paper between it and the deck without losing alignment. I then had to glue the turrets to the cabin, and the lockers to the turrets. I would love to say that everything fit perfectly, but not quite. In fact, once you have it all tacked together with CA, the instructions quite clearly state to “fill any ugly gaps” I had a couple😂
Anyway, it looks pretty decent, once I finish sand and primer she’ll look better and be ready for some details and paint. Then it’s off to the guns and torpedos..
Cash


Anyway, it looks pretty decent, once I finish sand and primer she’ll look better and be ready for some details and paint. Then it’s off to the guns and torpedos..
Cash
▲
⟩⟩
Colin H
mturpin013
RNinMunich
Griss
jbkiwi
Martin555
Ianh
|
💬 Re: Cabin assembled
3 years ago by 🇬🇧 marky (
 Commodore) Commodore)✧ 124 Views · 2 Likes
Flag
"fill in any ugly gaps" I think this must be the motto of all my builds 😂,your build is fairly coming on .
Cheers Marky👍 ▲
⟩⟩
Aerostar55
Martin555
|
|
Login To
Remove Ads 💬 Re: Cabin assembled
3 years ago by 🇺🇸 Cashrc (
Vice Admiral)✧ 118 Views · 1 Like
Flag
Hi Ian..I’ve them a while, they’re sturdy and comfortable to use. I think I’ve had them for 15 years or so, maybe longer.
Cash ▲
⟩⟩
Martin555
|
|
💬 Re: Cabin assembled
3 years ago by 🇺🇸 Cashrc (
Vice Admiral)✧ 118 Views · 1 Like
Flag
Hi Griss. It’s a good kit, there is a fair bit of work involved as it is a Dumas kit, and there’s more going on then first appears. Bear in mind it does not come with rudder, stuffing box/shaft or motor, you can buy that as a separate kit from Dumas or do what I did and supply your own. The hull is molded well, and the laser cut parts and fittings are of good quality.
Cash ▲
⟩⟩
Martin555
|
|
💬 Re: Cabin assembled
3 years ago by 🇬🇧 Griss (
Chief Petty Officer 2nd Class)✧ 130 Views · 2 Likes
Flag
Would you recommend this kit as i have been looking Thanks Griss.?👍
▲
⟩⟩
Cashrc
Martin555
|
|
💬 Re: Cabin assembled
3 years ago by 🇳🇿 jbkiwi (
Fleet Admiral)✧ 125 Views · 2 Likes
Flag
Looking good so far Cash
JB ▲
⟩⟩
Cashrc
Martin555
|
|
💬 Re: Cabin assembled
3 years ago by 🇿🇦 Ianh (
Commander)✧ 130 Views · 2 Likes
Flag
Glad to see you have a decent sanding bar Great Planes!
▲
⟩⟩
Cashrc
Martin555
|
📝 Cabin mostly done, guns built.
3 years ago by 🇺🇸 Cashrc ( Vice Admiral)
Vice Admiral)✧ 120 Views · 6 Likes · 2 Comments
Flag
💬 Add Comment
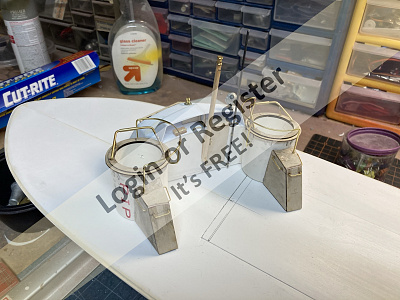
Hi y’all. Got the cabin for the Higgins mostly done. I added the mast, antenna, throttles, handrail and other details. I gave it a ligh coat of primer, which helps me find any gaps that need filling, and lo and behold there was a gap between the starlord gun turret and the aft locker that Errol could fit thru😂..so I filled that and set the cabin aside.
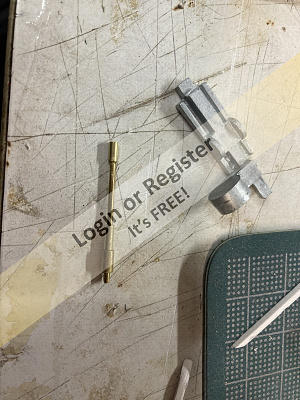
Then it was time for the gun turret guns, the twin .50 brownings that occupy the turrets either side of the cabin. The guns are built from cast metal fittings and brass tube and rod. One word about the fittings. The are not the usual soft whit metal fittings like you see in Deans kits, but they are cleanly cast with very little flashing and the are HARD. My usual drill bits just barely scratched the surface, so I had to go out and buy some cobalt bits. That did the trick! An hour or so later I had 2 guns assembled and ready to paint. I still have to build the torpedo tubes, aft gun, and assorted deck details.
Cash
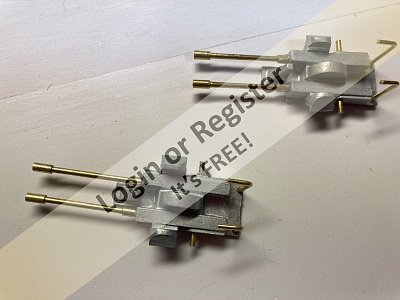
▲
⟩⟩
Colin H
RNinMunich
mturpin013
jbkiwi
Martin555
Ianh
|
💬 Re: Cabin mostly done, guns built.
3 years ago by 🇳🇿 jbkiwi (
Fleet Admiral)✧ 117 Views · 1 Like
Flag
Nice work Cash.
JB ▲
⟩⟩
Martin555
|
|
💬 Re: Cabin mostly done, guns built.
3 years ago by 🇬🇧 Martin555 (
Fleet Admiral)✧ 117 Views · 0 Likes
Flag
Keep up the good work Commander Cash.
Martin555. ▲
⟩⟩
No likes yet
This member will receive 1 point for every like received |
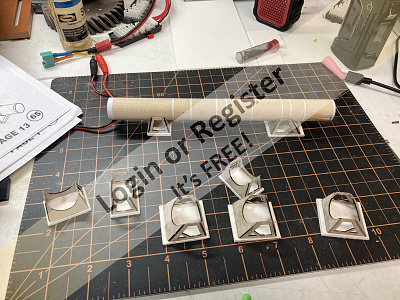
📝 D###! The torpedoes!!!!
3 years ago by 🇺🇸 Cashrc ( Vice Admiral)
Vice Admiral)✧ 118 Views · 7 Likes · 3 Comments
Flag
💬 Add Comment
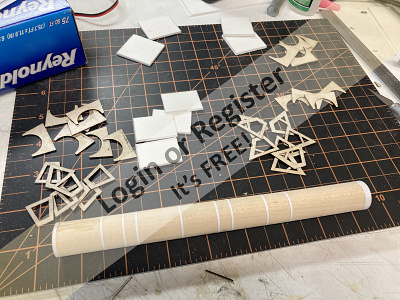
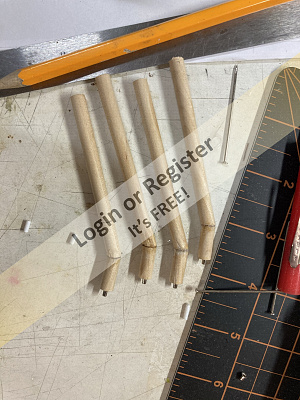
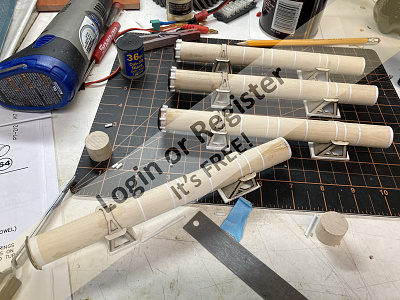
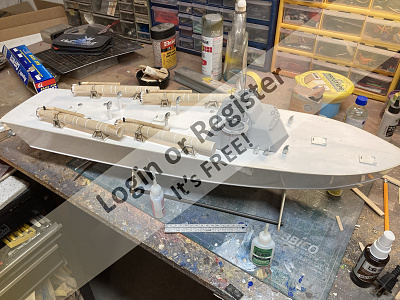
So...today was my birthday..I turned 60. I’m officially older than dirt. I splurged a bit, had saved up a bit and bought a new kit and radio, plus took the day off. I went out this morning, paid my property taxes👎😭, went to the grocery store, and then about 11 am set about to build the torpedo tubes. The tubes are built up from hardwood dowels that are just shy of an inch in diameter, some sticky back paper, die cut parts and assorted smaller bits. The first thing done is to shorten the dowels to the proper length. Then, the sticky back paper is cut in varying widths for the tube straps, then the mounts are built. Not really that hard just slow tedious work. I got all 4 tubes cut and strapped, and built all 8 mounts and called it a day. There’s a bit more to do, plus there’s 4 thin ply parts that wrap over the top of the tubes. It’s suggested to soak them in water and then wrap around the tube, or something similar and let dry overnight, that way theyll be formed to fit. I used the cut off from the tube body and used zip ties to secure them as they dry? I then shut down my shop, and made myself a dinner of “Spamen”, a James May recipe from his book “Oh Cook”. I substituted Panko crumbs for the crushed cornflakes, made the spam, ramen, and tossed the ramen with stir fried bok choy and onions. It was good!!
Cash

Cash
▲
⟩⟩
Colin H
redpmg
RNinMunich
MouldBuilder
TonyAsh
Martin555
Ianh
|
💬 Re: D###! The torpedoes!!!!
3 years ago by 🇿🇦 redpmg (
Commodore)✧ 118 Views · 2 Likes
Flag
Hi Cash - belated birthday wishes - a relative spring chicken compared to most of us. What did Errol give you ? Glad you treated yourself too.
Good to hear you enjoy cooking for yourself. As usual you are making a great job of building the boat - lucky you too - you should be able to complete your wishlist if you stop adding to it now.......... At 15 years older (nearer 16) find it would take at least another lifetime........... ▲
⟩⟩
Cashrc
Martin555
|
|
Login To
Remove Ads 💬 Re: D###! The torpedoes!!!!
3 years ago by 🇺🇸 Cashrc (
Vice Admiral)✧ 115 Views · 2 Likes
Flag
Thanks Martin!! To be honest, somdays I feel like a “sprung “ chicken😂
▲
⟩⟩
RNinMunich
Martin555
|
|
💬 Re: D###! The torpedoes!!!!
3 years ago by 🇬🇧 Martin555 (
Fleet Admiral)✧ 116 Views · 1 Like
Flag
Hi Cash,
Happy Birthday, still a spring chicken like me LOL!!. The Torpedo Tubes are coming along nicely. Keep it up. Martin555. ▲
⟩⟩
Cashrc
|
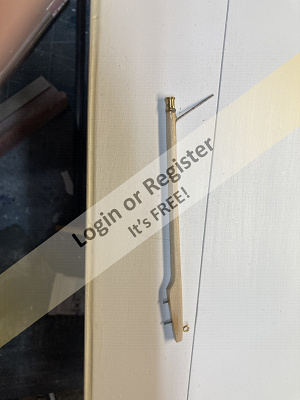
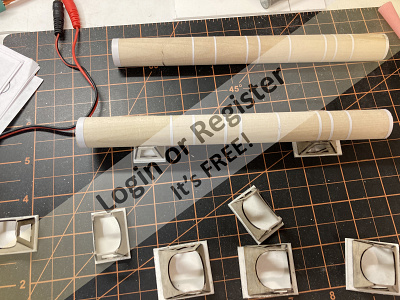
📝 Full Speed Ahead!!
3 years ago by 🇺🇸 Cashrc ( Vice Admiral)
Vice Admiral)✧ 113 Views · 9 Likes · 1 Comment
Flag
💬 Add Comment
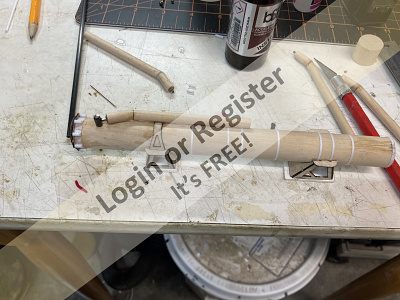
🤕I had a bit of time this morning so I did More work on the torpedo tubes. I’ll keep it short, but I added the mounts, clamps and details, and started the manifolds, and got 1 tube assembled. The aft of the tube has a plate to which 8 pieces of plastic rod are glued to. These are cut to 1/4 inch, I found it stair to cut a little long and trim in situ after the glue had dried hard. I think I may have found another error, however. There is a wood “clamp” that is glued to the tube and mount, it wraps over the tube. The plans and instructions call for it to be glued to the aft mount. In the RCGroups build log, I noticed the builder glued it to the front mount as this makes it easier to mount the manifold. I had already mounted the clamps as per the plans and instructions, so it is what it is. I did relive a spot on the clamp so the manifold would sit on the tube properly.
Cash

Cash
▲
⟩⟩
franky
Colin H
Peejay
mturpin013
RNinMunich
jbkiwi
Julio
robbob
Martin555
|
💬 Re: Full Speed Ahead!!
3 years ago by 🇬🇧 Martin555 (
Fleet Admiral)✧ 114 Views · 1 Like
Flag
Looking good Cash,
They will really come to life when you have paint on them. Martin555. ▲
⟩⟩
Peejay
|
📝 Baby it’s cold....in the garage!!
3 years ago by 🇺🇸 Cashrc ( Vice Admiral)
Vice Admiral)✧ 120 Views · 7 Likes · 1 Comment
Flag
💬 Add Comment
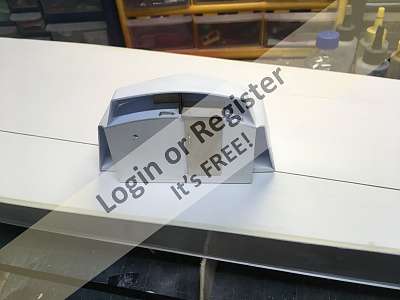
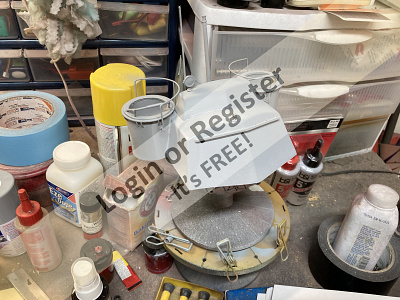
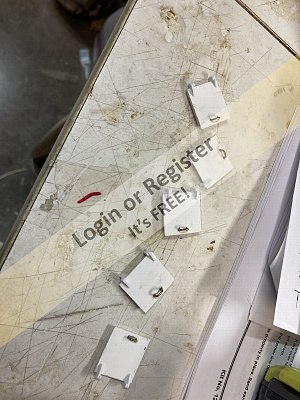
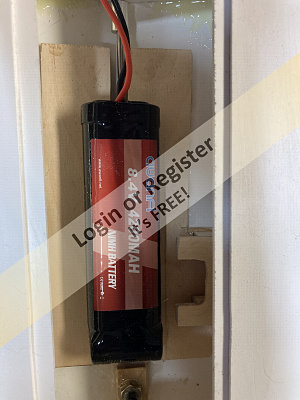
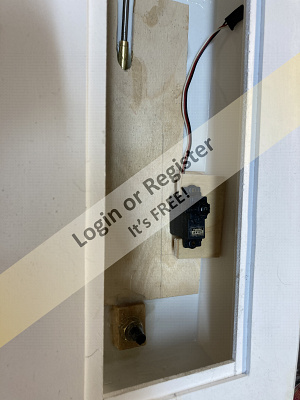
Hi y’all. It’s been a bit, but I’m still plugging away. Between work, life and the weather I’ve been a bit too tired to do much, and as of now we are looking at 3-8 inches of snow, freezing drizzle and lows tomorrow in the single digits...which means my little ceramic space heater is doing good to take the edge off the chill in the garage. However, I’ve been able to make and install the hatches on the PT. These are simple parts made up of 1 and 2 mm abs and pvc sheet, handles are brass wire and the hinges are cut and sanded 1x4 mm strip abs. I have them built up and installed. I also built up a floor for radio and battery install.
Cash

Cash
▲
⟩⟩
franky
Colin H
RNinMunich
redpmg
mturpin013
Martin555
jbkiwi
|
💬 Re: Baby it’s cold....in the garage!!
3 years ago by 🇿🇦 redpmg (
Commodore)✧ 129 Views · 3 Likes
Flag
At least that's one thing we don't have Cash - that white stuff only appears on the distant mountains for a very short while. Having said that it was sweltering weather of mid 30c followed a day later by an icy front from the Antartic...........
Detail coming along well as usual with your builds - good to watch ........... ▲
⟩⟩
franky
Cashrc
Martin555
|
📝 Did a little over the weekend
3 years ago by 🇺🇸 Cashrc ( Vice Admiral)
Vice Admiral)✧ 115 Views · 13 Likes · 2 Comments
Flag
💬 Add Comment
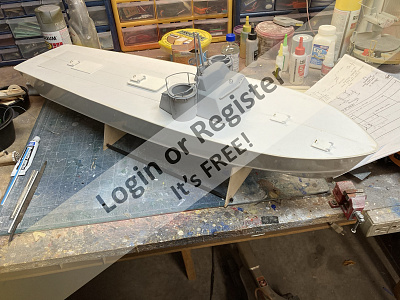
Got a bit more done before the storm hit. I did the vents and gas caps, the fwd vents are used as is, the rearwar are lengthened with a bit of plastic tube and supported by a dowel glued inside..it extends from the tube about 1/4 inch and is glued into holes drilled in the deck. I did a dry fit of the cabin and torpedoes to see how she’s going to look.rear gun and few other details and it’s time for paint!!

▲
⟩⟩
franky
Colin H
JOHN
Skydive130
mturpin013
Seanympth
Peejay
robbob
Joburg-sailor
redpmg
Martin555
jbkiwi
RNinMunich
|
💬 Re: Did a little over the weekend
3 years ago by 🇬🇧 Martin555 (
Fleet Admiral)✧ 119 Views · 1 Like
Flag
Good work Cash.
coming along nicely. Martin555. ▲
⟩⟩
Cashrc
|
|
💬 Re: Did a little over the weekend
3 years ago by 🇳🇿 jbkiwi (
Fleet Admiral)✧ 117 Views · 2 Likes
Flag
Looking good Cash👍
JB ▲
⟩⟩
Cashrc
Martin555
|
📝 Oerlikon gun and other things.
3 years ago by 🇺🇸 Cashrc ( Vice Admiral)
Vice Admiral)✧ 109 Views · 7 Likes · 3 Comments
Flag
💬 Add Comment
Hi y’all. The winter storm we had apparently put our dealership behind, so it has been decreed from on high that we are working Sunday😠 sine the dealership was without power the first of the week, I did my best to keep the house, the girls and the cats warm. My wife agreed that today was a “daddy” day, so I took advantage and got some more done on the PT.
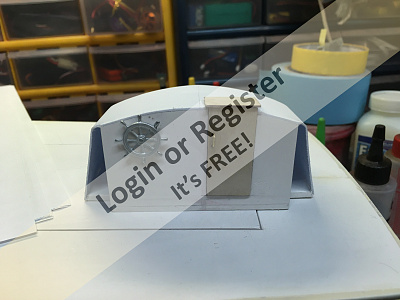
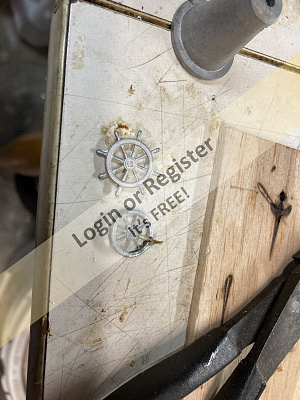
The aft Oerlikon gun is built up from metal castings and brass wire and tube. Only real spot that was really challenging was soldering on the shoulder supports so that they lined up. There’s supposed to be a cast metal crank handle for the gun, but my kit had 2 ships wheels, so I modified one into a crank. I added 2 screws to help hold the assembly in place on the hatch, got the holes a little too close to the base so the scre heads wouldn’t sit quite flush, so I Coates them with a little thick ca...I’ll add a little filler later and call it a rough weld😂
I also soldered up the aft guard that sits just fwd of the gun, and built up the ammo boxes using legos instead of the pine blocks that comes in the kit...just because I could.😀
A couple of stanchions, the smoke generator and a few cleats and she’s ready for paint!!
Cash
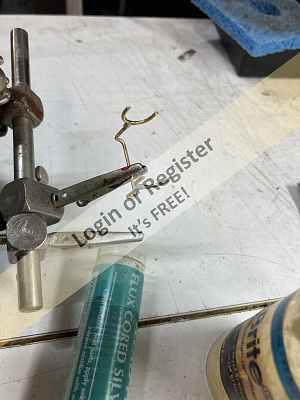
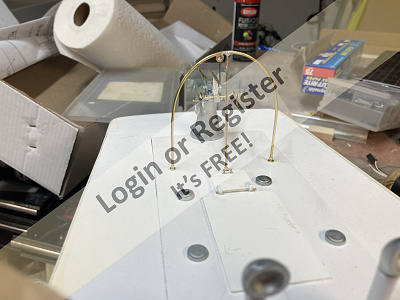
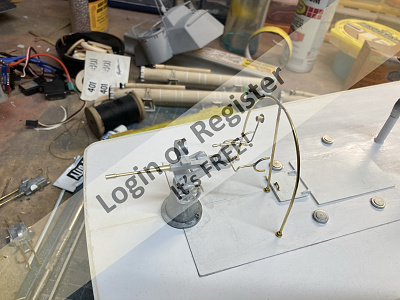
▲
⟩⟩
Martin555
franky
Colin H
jbkiwi
redpmg
RNinMunich
CaptLarry
|
💬 Re: Oerlikon gun and other things.
3 years ago by 🇺🇸 CaptLarry (
Chief Petty Officer 2nd Class)✧ 106 Views · 3 Likes
Flag
Cash,
The flux will clean a little as you solder, but it causes the solder to run where ever the flux flows to. A dry surface cleaned with Isopro will help you keep the solder where you want it.....experiment with it, and you will see that it takes less heat and solder for your application. Another thing that helps is to “shock” your iron tip each time before your next solder application. When it comes up to temperature, wipe the tip on a wet/damp sponge...this removes old flux residue and tired solder...gives you a fresh iron tip for a cleaner joint, and new solder flows smoother. Again, less heat and less solder. ▲
⟩⟩
Martin555
franky
RNinMunich
|
|
Login To
Remove Ads 💬 Re: Oerlikon gun and other things.
3 years ago by 🇺🇸 Cashrc (
Vice Admiral)✧ 105 Views · 2 Likes
Flag
Larry, I have a habit of just hitting the brass with StayBrite flux, the soldering it together. Probably if hadn’t been so cold in the garage I’d done a neater job😂.
I never knew about cleaning the brass with alcohol, thanks for the tip!! Cash ▲
⟩⟩
Martin555
franky
|
|
💬 Re: Oerlikon gun and other things.
3 years ago by 🇺🇸 CaptLarry (
Chief Petty Officer 2nd Class)✧ 109 Views · 4 Likes
Flag
Cash,
I was looking closely at your brass solder joints. Are you cleaning your brass tubing, and solder with isopropyl alcohol before you solder it together? It gets rid of oxidation, and makes a smoother solder joint. Just a hint... OW....PT lookin’ good! 👍 ▲
⟩⟩
Martin555
franky
Ianh
RNinMunich
|


Login To
Remove Ads
Remove Ads