Join Us On Social Media!

|

|

|
Download The App!
Login To
Remove Ads
Remove Ads
Login To
Remove Ads
Remove Ads
Model Boats Website
Lorelei
4 Posts · 4 Followers · 29 Photos · 19 Likes
Began 2 years ago by
 United States
Follow This Thread
Not currently following
> Click to follow
> Click to follow
Latest Post 2 years ago by
| Oldest posts shown first (Show Newest First) | (Print Booklet) |
📝 Lorelei
2 years ago by 🇺🇸 cjanik001 ( Chief Petty Officer 2nd Class)
Chief Petty Officer 2nd Class)✧ 113 Views · 9 Likes · 3 Comments
Flag
💬 Add Comment
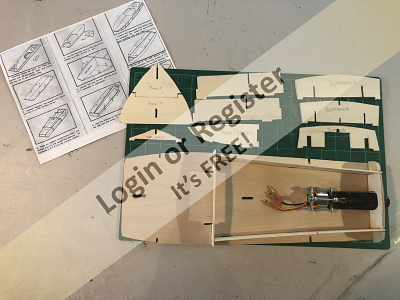
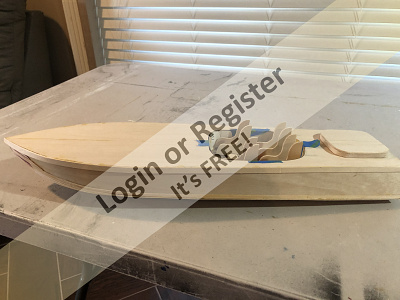
Started a new scratch build after getting interested in waterjet propulsion from articles by JBKiwi and Rowen. Didn't initially have a specific boat in mind at the start, just wanted to see if I can make the thing work. After looking at different hull designs, I elected to go with the Cresta which is on the KKEezebilt boat web site.
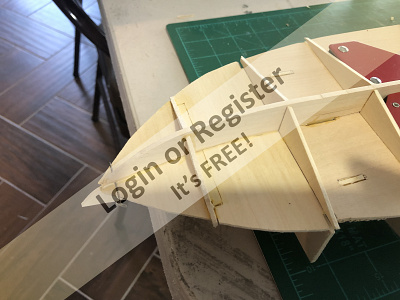
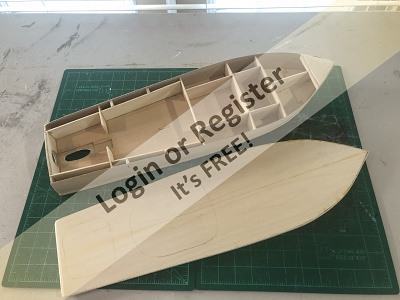
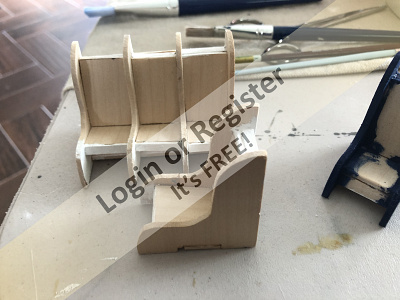
I know, I know, egg crate construction! not exactly the best, however, after getting into it, this has created quite a bit of room inside for the water thruster, and it also has a very flat "V" shape to center mount it . It also turned into a very easy build up to this point. The boat frame is made of 3/32" basswood, with 1/32" sides and bottom. There is also 1/32" ply for the thruster intake, and the exhaust nozzle in the transom. The chine is reinforced with basswood strips.
After downloading the Cresta Plans, I scaled up the prints to the length of 23", this seemed to be the best fit for the 16mm thruster purchased from Amazon. I initially purchased a 26mm unit complete with reversing bucket, however this one was way to big. Unfortunately, the 16mm unit does not have a reversing bucket, so it is forward only. (My ESC is a bidirectional unit which will reverse the brushless motor, so maybe it will have some sort of reverse🤞!)
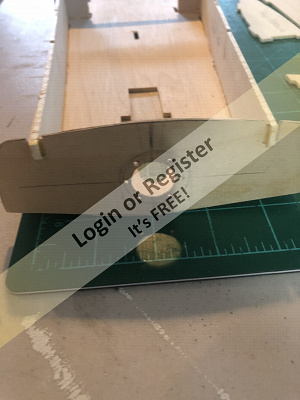
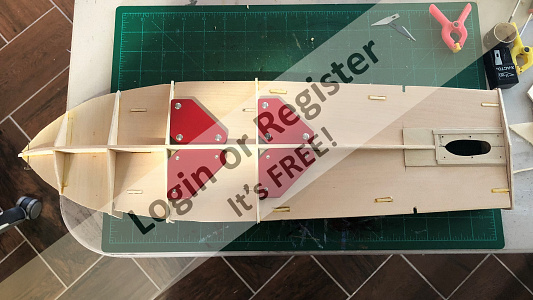
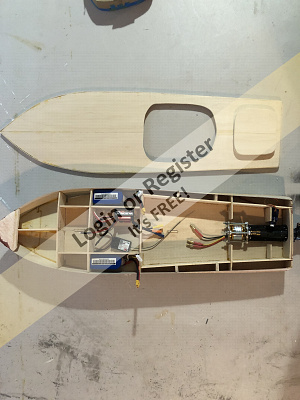
Modifications to the Cresta plans include adding extra angle bracing between the floor and the bottom, modifying the transom, and cutting down the beam for the thruster unit. I also made the top removable to access the internals. The cabin area cutout will have a fake bottom to allow for wiring and connections on the subfloor. Once I get the whole boat covered in fiberglass, a float test will determine the placement of the batteries and electronics, as well as look for leaks😐.
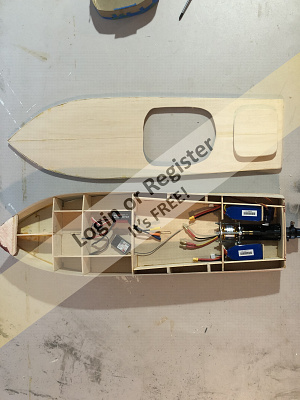
I know, I know, egg crate construction! not exactly the best, however, after getting into it, this has created quite a bit of room inside for the water thruster, and it also has a very flat "V" shape to center mount it . It also turned into a very easy build up to this point. The boat frame is made of 3/32" basswood, with 1/32" sides and bottom. There is also 1/32" ply for the thruster intake, and the exhaust nozzle in the transom. The chine is reinforced with basswood strips.
After downloading the Cresta Plans, I scaled up the prints to the length of 23", this seemed to be the best fit for the 16mm thruster purchased from Amazon. I initially purchased a 26mm unit complete with reversing bucket, however this one was way to big. Unfortunately, the 16mm unit does not have a reversing bucket, so it is forward only. (My ESC is a bidirectional unit which will reverse the brushless motor, so maybe it will have some sort of reverse🤞!)
Modifications to the Cresta plans include adding extra angle bracing between the floor and the bottom, modifying the transom, and cutting down the beam for the thruster unit. I also made the top removable to access the internals. The cabin area cutout will have a fake bottom to allow for wiring and connections on the subfloor. Once I get the whole boat covered in fiberglass, a float test will determine the placement of the batteries and electronics, as well as look for leaks😐.
▲
⟩⟩
taffy
stevedownunder
jbkiwi
Colin H
pressonreguardless
rolfman2000
Rookysailor
jacko
Peejay
|
💬 Re: Lorelei
2 years ago by 🇺🇸 cjanik001 (
Chief Petty Officer 2nd Class)✧ 73 Views · 0 Likes
Flag
Hi HAKits,
Would like to see a video of it on the water, as well as more of the internals. Thanks ▲
⟩⟩
No likes yet
This member will receive 1 point for every like received |
|
Login To
Remove Ads 💬 Re: Lorelei
2 years ago by 🇬🇧 HAKits (
 Petty Officer 1st Class) Petty Officer 1st Class)✧ 124 Views · 6 Likes
Flag
I put 2 jet drives in mine which gave good performance. from a 2s lipo


▲
⟩⟩
RNinMunich
taffy
jbkiwi
Rookysailor
Peejay
Colin H
|
|
💬 Re: Lorelei
2 years ago by 🇺🇸 Peejay (
 Midshipman) Midshipman)✧ 109 Views · 1 Like
Flag
Interesting project. Looking forward to progress reports!
▲
⟩⟩
cjanik001
|
Login To
Remove Ads
Remove Ads
📝 Lorelei... Detail view of Water Jet install
2 years ago by 🇺🇸 cjanik001 ( Chief Petty Officer 2nd Class)
Chief Petty Officer 2nd Class)✧ 91 Views · 6 Likes · 2 Comments
Flag
💬 Add Comment
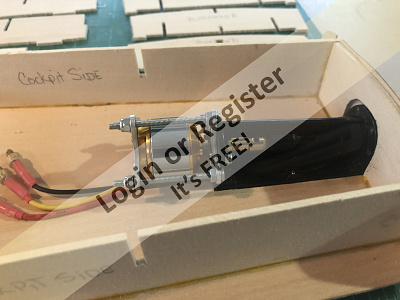
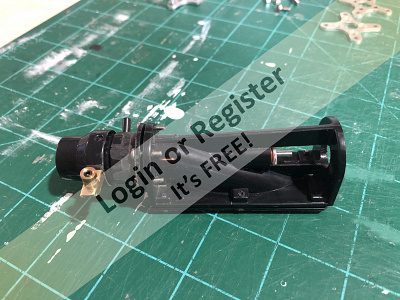
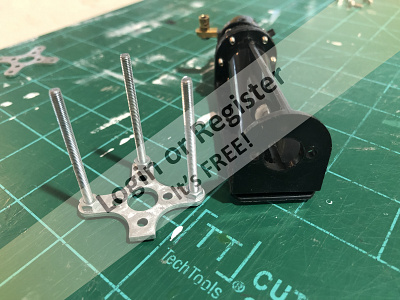
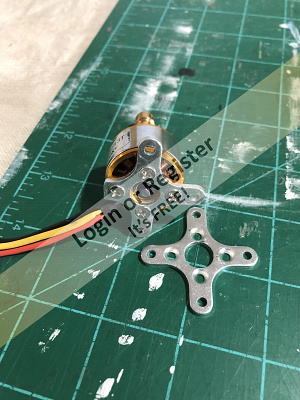
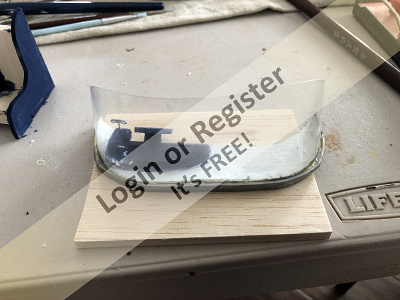
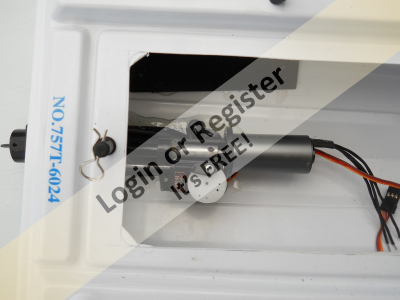
The first picture shows the water jet as purchased. I measured the gap between the exit nozzle and the input grill and the main body of the jet which came out to be about 0.040". This determined the 0.032" plywood to be used as the mounting sheet for the unit. This will also allow for a sealing gasket to be used between these parts.
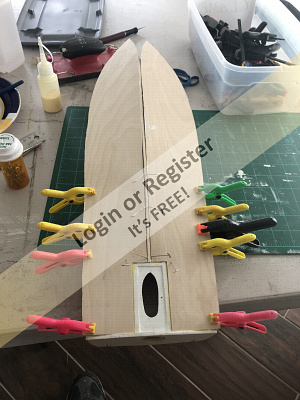
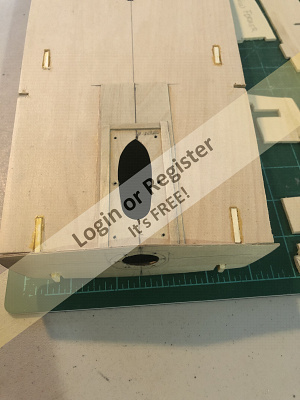
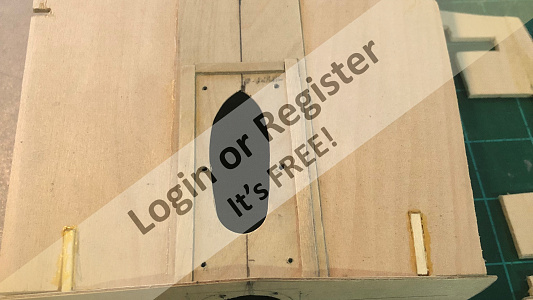
With the exhaust nozzle, prop shaft, and input grill removed, I placed the main body of the unit on the rear inside floor centerline, and drew around the body for the cutout. I also added a portion more to allow for the motor mounting. I cut this portion away and prepped the plywood for the input cutout by first drawing the same footprint of the body on paper, and cutting the input hole to use as a template. Once the plywood was cut, I glued it in place to the bottom of the floor.
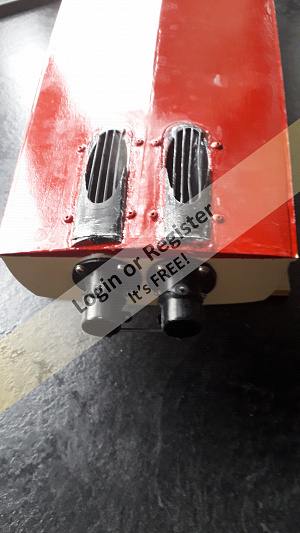
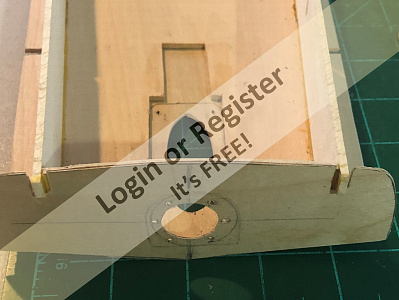
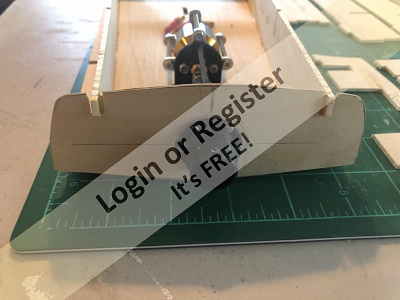
I tack glued the cockpit sides to the floor, and when dry, held the transom rear brace in place on the rear. I then place the body of the water thruster in place and traced around the rear for the cutout on the transom brace. Once glued in place, the waterjet housing fit firmly in place flush with the rear of the transom brace. The actual transom is made from 0.032" plywood, and then fits up against the brace. To determine where the hole cutout should be, I put a dab of graphite on the end of the prop shaft, which made a nice center mark for the hole. Using a hole template, I centered the dot and drew the hole cutout. The mounting holes were then drilled by marking the centerline of the exhaust nozzle on the centerline of the hole. To glue the transom in place, I mounted the waterjet body in place with the input screws, and placed the transom on the model and held it in place with the exhaust nozzle and a few screws. Once dried, the thicker transom piece was cut and fitted in a similar fashion. Glued and screwed for proper alignment.
I fitted the out-runner brushless motor to the waterjet unit using the standard
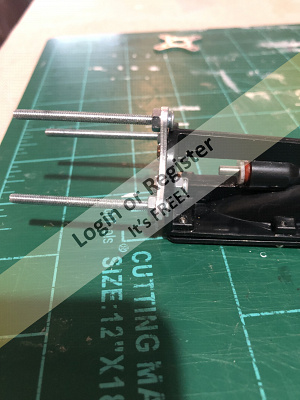
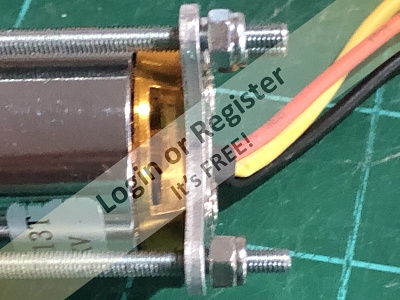
motor mounts. The two holes on the waterjet aligned with two of the holes on the mount. I fastened them with 3mm screws and locking nuts. The picture shows the modification to the metal mount for the bottom of the jet unit. I then mounted the motor to the mount in a similar fashion with 3 mm flat head screws. Again cutting the lower portion of the mount.
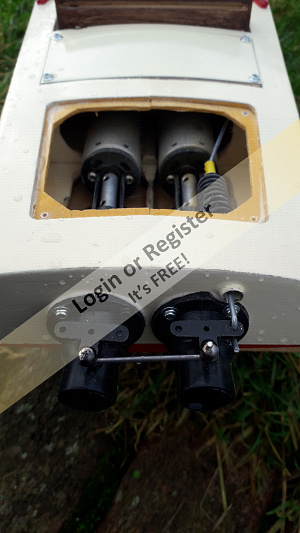
Coupling the motor with the jet unit was accomplished with 3 - 45mm long 3mm screws. The motor can then be slid in place and fastened to the coupler. The nuts at the water jet mount can then be tightened. The locking nuts at the motor end have a slight gap to allow the motor to move laterally back and forth a bit.
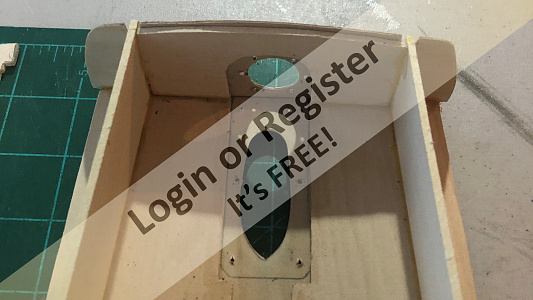

With the exhaust nozzle, prop shaft, and input grill removed, I placed the main body of the unit on the rear inside floor centerline, and drew around the body for the cutout. I also added a portion more to allow for the motor mounting. I cut this portion away and prepped the plywood for the input cutout by first drawing the same footprint of the body on paper, and cutting the input hole to use as a template. Once the plywood was cut, I glued it in place to the bottom of the floor.
I tack glued the cockpit sides to the floor, and when dry, held the transom rear brace in place on the rear. I then place the body of the water thruster in place and traced around the rear for the cutout on the transom brace. Once glued in place, the waterjet housing fit firmly in place flush with the rear of the transom brace. The actual transom is made from 0.032" plywood, and then fits up against the brace. To determine where the hole cutout should be, I put a dab of graphite on the end of the prop shaft, which made a nice center mark for the hole. Using a hole template, I centered the dot and drew the hole cutout. The mounting holes were then drilled by marking the centerline of the exhaust nozzle on the centerline of the hole. To glue the transom in place, I mounted the waterjet body in place with the input screws, and placed the transom on the model and held it in place with the exhaust nozzle and a few screws. Once dried, the thicker transom piece was cut and fitted in a similar fashion. Glued and screwed for proper alignment.
I fitted the out-runner brushless motor to the waterjet unit using the standard
motor mounts. The two holes on the waterjet aligned with two of the holes on the mount. I fastened them with 3mm screws and locking nuts. The picture shows the modification to the metal mount for the bottom of the jet unit. I then mounted the motor to the mount in a similar fashion with 3 mm flat head screws. Again cutting the lower portion of the mount.
Coupling the motor with the jet unit was accomplished with 3 - 45mm long 3mm screws. The motor can then be slid in place and fastened to the coupler. The nuts at the water jet mount can then be tightened. The locking nuts at the motor end have a slight gap to allow the motor to move laterally back and forth a bit.
▲
⟩⟩
taffy
Rowen
stevedownunder
jbkiwi
Rookysailor
Colin H
|
💬 Re: Lorelei... Detail view of Water Jet install
2 years ago by 🇺🇸 cjanik001 (
Chief Petty Officer 2nd Class)✧ 73 Views · 1 Like
Flag
Thanks all for the likes and comments so far.
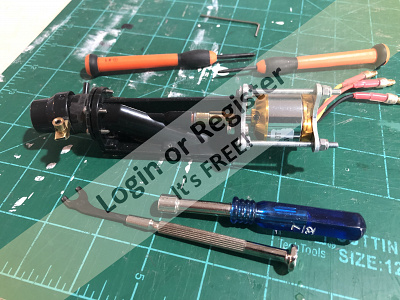
JB, I scanned your blog several times to see which motor you ended up with, but maybe I missed it. I think 11K RPM is all this one will be able to handle. The unit has only one brass bearing at the prop end. In fact I had to replace the stock shaft coupler because it was drilled off center and had a bad vibration. Good thing I tried it out before securely mounting the motor, as it would probably have warped the plastic housing. I will be happy if the boat get on a plane with some decent speed, not looking for it to be a racing boat by any means. I will probably write a blog next week, as the hobby room is being transformed to a party room for the U.S. Memorial Holiday. Need to clean up the desk and put away the tools so the grandkids won't get into them😊. ▲
⟩⟩
taffy
|
|
💬 Re: Lorelei... Detail view of Water Jet install
2 years ago by 🇳🇿 jbkiwi (
 Fleet Admiral) Fleet Admiral)✧ 79 Views · 3 Likes
Flag
Looking good CJ, I'll be interested to see how it works out. I ended up with a 3000 kv in-runner on 3s and a different prop, (modified to reduce the clearance, on the 26mm jet), to get a bit more performance, as the boat is quite heavy (about 6lbs) Try and make the intake as smooth a flow as possible also, helps to reduce cavitation. Depends how much speed you want. I was just going for a bit of a scale look.
JB ▲
⟩⟩
taffy
cjanik001
stevedownunder
|
📝 Lorelei... finishing touches
2 years ago by 🇺🇸 cjanik001 ( Chief Petty Officer 2nd Class)
Chief Petty Officer 2nd Class)✧ 58 Views · 2 Likes
Flag
💬 Add Comment
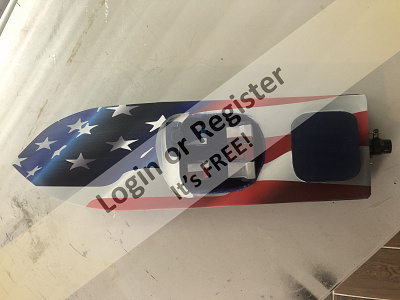
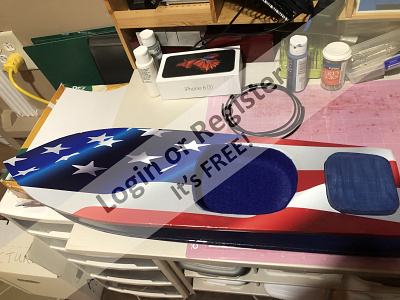
Initially I was undecided about paint scheme. Looking at different items on the internet, I came across vinyl wrap items for pinewood derby cars. This gave me the inspiration for a vinyl wrap flag scheme. The long flat surface of the top hull made this the ideal candidate for this procedure.
I ordered the vinyl from an internet vendor off of Etsy. Fairly inexpensive, only $8 for a 24"x12" sheet of peal and stick.
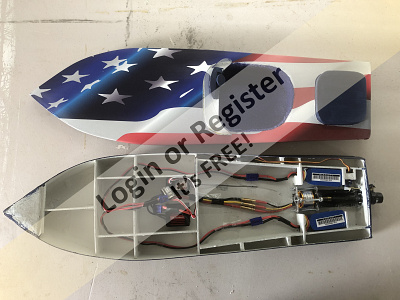
The whole model was painted with several coats of a dark navy blue, and when dry was then sprayed with several coats of gloss clear coat. I made a paper pattern of the top hull, adding extra for the curve down on the sides. i also made a cutout for the engine cover at the rear of the hull so this could be cut out in the correct position on the vinyl. With the paper pattern complete and fitted the way I wanted, the pattern was then drawn on the rear paper backing of the vinyl with the top down so that the top of the vinyl would be correctly positioned. After cutting out the hull shape and the engine cover, I peeled the paper backing from the rear to first expose the part for the engine cover and cut the backing so that I could position only the stern portion over the motor housing correctly. Once this was positioned correctly, I then slowly peal the backing and work my way to the bow working out any air bubbles along the way. The last was to slowly work the curve around the hull and trim off the excess.
I trimmed the cockpit with navy blue felt on the floor and around the sides to simulate waterproof carpeting. The seats were painted navy blue, and the seat portion covered with matching areas of vinyl, and glued down along with the dashboard, windshield combination.
The final step was to spray the top of the vinyl with several coats of clear for protection.

I ordered the vinyl from an internet vendor off of Etsy. Fairly inexpensive, only $8 for a 24"x12" sheet of peal and stick.
The whole model was painted with several coats of a dark navy blue, and when dry was then sprayed with several coats of gloss clear coat. I made a paper pattern of the top hull, adding extra for the curve down on the sides. i also made a cutout for the engine cover at the rear of the hull so this could be cut out in the correct position on the vinyl. With the paper pattern complete and fitted the way I wanted, the pattern was then drawn on the rear paper backing of the vinyl with the top down so that the top of the vinyl would be correctly positioned. After cutting out the hull shape and the engine cover, I peeled the paper backing from the rear to first expose the part for the engine cover and cut the backing so that I could position only the stern portion over the motor housing correctly. Once this was positioned correctly, I then slowly peal the backing and work my way to the bow working out any air bubbles along the way. The last was to slowly work the curve around the hull and trim off the excess.
I trimmed the cockpit with navy blue felt on the floor and around the sides to simulate waterproof carpeting. The seats were painted navy blue, and the seat portion covered with matching areas of vinyl, and glued down along with the dashboard, windshield combination.
The final step was to spray the top of the vinyl with several coats of clear for protection.
▲
⟩⟩
Colin H
Rookysailor
📝 Lorelei.... 1st pond trial
2 years ago by 🇺🇸 cjanik001 ( Chief Petty Officer 2nd Class)
Chief Petty Officer 2nd Class)✧ 52 Views · 2 Likes · 7 Comments
Flag
💬 Add Comment


▲
⟩⟩
RamseyA
Colin H
|
💬 Re: Lorelei.... 1st pond trial
2 years ago by 🇬🇧 CB90 (
 Commander) Commander)✧ 22 Views · 1 Like
Flag
I know this post is a few months old but I must say that the paintwork on this boat looks great.
On to its performance, I notice steering was difficult, I think this may be due to torque steer as out runner motors are prone to do, due to their large diameter. So a in-runner would be better, I used a 2040 for my NDK jetboat, the hull needs to be kept light as possible. Please check the inlet is shaped correctly, the water need to flow without much disturbance, no sharp edges to the inlet. Try to get the water level midway across the jet as this help it to start pumping water, otherwise it will just ventilate, (air and water) hence no thrust. Give the boat another look at, it would be a pity to leave it on the shelve.🤞 Regards Roy 

▲
⟩⟩
Colin H
|
|
Login To
Remove Ads 💬 Re: Lorelei.... 1st pond trial
2 years ago by 🇺🇸 cjanik001 (
Chief Petty Officer 2nd Class)✧ 46 Views · 1 Like
Flag
Thanks, we will see.
Anyway, it's another boat in my harbor, had fun building it, and will take her out again even if she is a poker😊. ▲
⟩⟩
RNinMunich
|
|
💬 Re: Lorelei.... 1st pond trial
2 years ago by 🇩🇪 RNinMunich (
Fleet Admiral)✧ 42 Views · 0 Likes
Flag
Hi CJ,
" I might try to add a little weight to drop the stern down further. " That may help a little perhaps to get at least the forefoot out of the water. But I still don't think that that 15mm prop can generate enough thrust. Would be happy for you if your next video report proves me wrong. Cheers, Doug 😎 ▲
⟩⟩
No likes yet
This member will receive 1 point for every like received |
|
💬 Re: Lorelei.... 1st pond trial
2 years ago by 🇺🇸 cjanik001 (
Chief Petty Officer 2nd Class)✧ 46 Views · 0 Likes
Flag
Thanks for the comments and suggestions. You are probably correct that the higher revs will not do anything, but at $16.00 U.S. gotta try it.
The larger jet was about twice the size, and yes possibly could be shoehorned into the hull, but that may be a later build. I just wanted to see if I could pull it off with the limited knowledge I have. One other thought I had was to extend the outlet of the jet further. Currently it sits just below the water surface. I might try to add a little weight to drop the stern down further. ▲
⟩⟩
No likes yet
This member will receive 1 point for every like received |
|
💬 Re: Lorelei.... 1st pond trial
2 years ago by 🇩🇪 RNinMunich (
Fleet Admiral)✧ 42 Views · 0 Likes
Flag
I'm with you Ramsey👍
Lotsa revs does not necessarily mean more thrust. Sometimes just the opposite. Cheers, Doug 😎 ▲
⟩⟩
No likes yet
This member will receive 1 point for every like received |
|
💬 Re: Lorelei.... 1st pond trial
2 years ago by 🇩🇪 RNinMunich (
Fleet Admiral)✧ 42 Views · 1 Like
Flag
Hmmm! Good luck with the 2200kV CJ🤞
You may well get fireworks, but maybe not those that you are hoping for. But frankly I don't think that kV rating of the motor is your real problem here. OK you will get roughly 2.2 times the rpm using the same battery but I'm not sure that will help much. (BTW: You could also achieve almost the same effect by doubling the battery voltage on the 1000kV motor. You did not mention what voltage LiPo you are using!?) No! I believe that you have two basic design problems here. 1. You have applied a great jazzy offshore power boat type colour scheme👍 but you actually have a relatively beamy hull more suited to a cruising type boat, with a roughly 3.5:1 length to beam ratio. Fast power boats and naval ships, e.g. destroyers, typically have l/b ratios of around 8 to 10. Reason: for the same power unit the higher the l/b ratio of the hull the faster the vessel can go. 2. The water jet! Here I admit I have no experience of water jets and do not know how their efficiency compares with a conventional prop. BUT! I think that your WJ is basically too small (15mm prop🤔) and more revs may not produce more thrust and speed, but possibly just more cavitation and disturbance of the jet flow. Your boat is 23" you say. A few years ago I restored an Aerokits Sea Scout, built by my Dad in the early sixties. She is 24" LOA and 8.25" beam. I.e. l/b ratio 2.9. She has virtually the same hull form as your boat and is fitted with a Propdrive 2830 1000kV brushless running off a 3S LiPo driving a 30mm 3 blade conventional prop. And frankly I reckon she would run rings round your Lorelei in her present state. See attached video (U-toob link) of her sea trials or my Gallery post here- 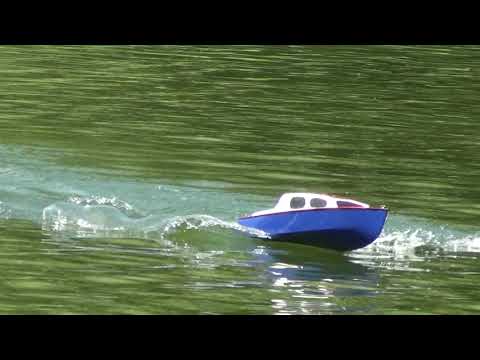

▲
⟩⟩
RamseyA
|
|
💬 Re: Lorelei.... 1st pond trial
2 years ago by 🇺🇸 RamseyA (
 Able Seaman) Able Seaman)✧ 45 Views · 1 Like
Flag
Looks great, all considered: scratch built; interested in your jet drive l believe you mentioned. Yeah, is a SPEED boat 🚤.
Me , I'm a TUG BOAT person; so I come from the Thrust, not so much RPM side of things. I'm learning 😌 ☺ 🙂 thanks 🤗 much to this group 👍. ▲
⟩⟩
RNinMunich
|


Login To
Remove Ads
Remove Ads