Join Us On Social Media!

|

|

|
Download The App!
Login To
Remove Ads
Remove Ads
Login To
Remove Ads
Remove Ads
Model Boats Website
Pride of Baltimore 1981
11 Posts · 12 Followers · 100 Photos · 63 Likes
Began 2 years ago by
 United States
Follow This Thread
Not currently following
> Click to follow
> Click to follow
Latest Post 3 months ago by
| Oldest posts shown first (Show Newest First) | (Print Booklet) |
📝 Pride of Baltimore 1981
2 years ago by 🇺🇸 Jerry Todd ( Midshipman)
Midshipman)✧ 109 Views · 11 Likes · 8 Comments
Flag
💬 Add Comment
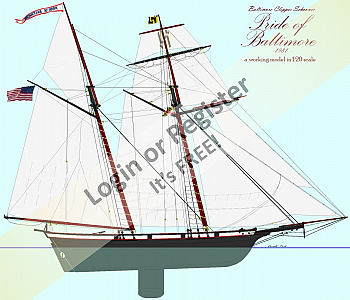
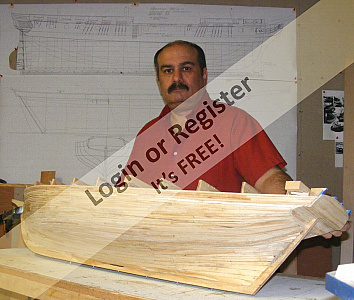
My first official job, when I was 16, was working on the construction of the Baltimore Clipper schooner Pride of Baltimore.
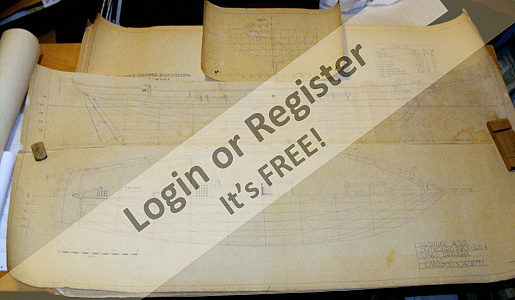
On my 21st birthday I reported on board as a member of the crew. After that I acquired the plans from Thomas Gilmer who designed the vessel, with the intent to build an RC model. After a false start then, I changed the scale and started again in September of 2010.
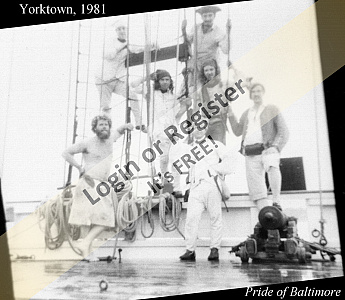
The model represents the boat as she was when I was crewing aboard her in September-October 1981. I had a certification from the National Park Service to handle black powder cannon, so I was put in charge of Pride's guns which was handy when we went to the bicentennial of the Siege of Yorktown, what it really meant is I slept with 25pds of black powder at the foot on my bunk.
I cooked right along with construction while also working on Constellation and starting a third model, until July of 2012. She was basically a static display model since then, with an attempt to work out her controls that didn't work out in 2015. Trying to set up her steering uncovered a design flaw that I resolved by moving the rudder servo forward. Life has a habit of getting in the way of my hobbies, and several changes in jobs and homes put a damper on all three models.
She's pretty much just sat till now, going on display a few times, getting floated in a pool in 2019 and capsizing, which was a bit eerie considering the fate of the original.
The model is 1:20 scale making her
Hull length: 54" (137.16cm)
Length on deck: 48" (121.9cm)
Length on waterline w/o rudder: 46.75" (118.75cm)
Length over the rig: 81.5" (207cm)
Beam: 13.625" (34.6cm)
Draft without ballast keel: 5.875" (14.9cm)
Total height (top of jack-yard to bottom of keel): 61.6" (156.5cm)
Total Sail area: 2,049.13 square inches in 7 sails as shown above, 2,205.13 with the flying jib.
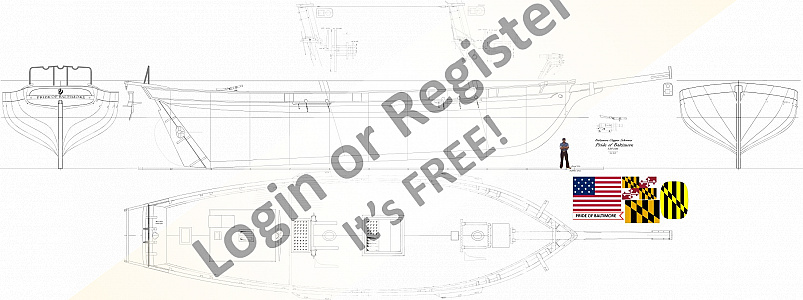
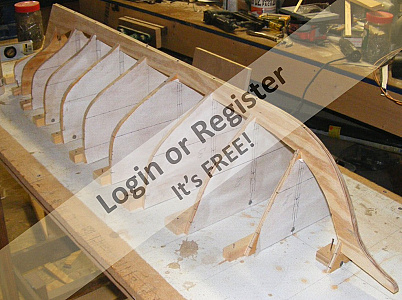
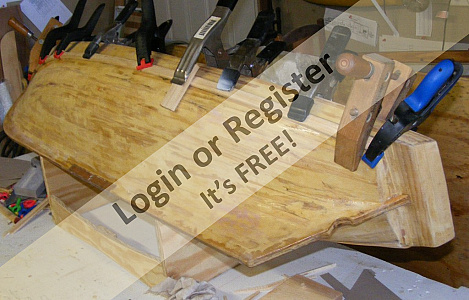
Her keel is plywood and she was planked with white pine strips over plywood forms, which were removed. The hull has a layer of 4oz glass cloth and poly resin outside, and several coats of just resin inside.
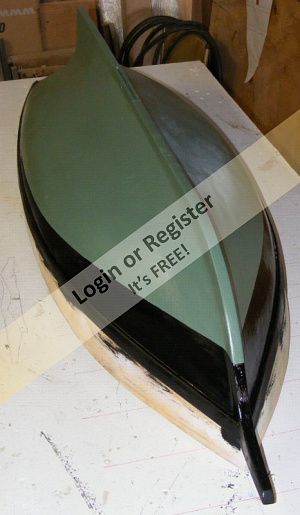
As mentions she capsized in the pool when a slight gust caught her, despite being weighted to the waterline. She's designed to have a removable fin with a lead bulb making up most of her ballast, but that hasn't been made yet, so it wasn't fitted in the pool that day.
Her lower masts are white pin made with the "birds-mouth" method so they're hollow and weigh next to nothing, but are strong.
Sails are made of a Dupont cloth called Supplex which is a polyester that makes excellent sails. All lines will be nylon or polyester Dacron walked up from thread acquired from a sail-maker's supplier. All the sails have bolt-ropes hand-sewn on. There's no stitching to represent seams because I think it looks like crap, and it's a lot of work to do to ruin your sails. The seam lines on Pride are drawn on on with an .005 permanent marker.
Originally her controls were going to be a Mega-arm sail servo and a winch servo, with the winch driving a loop. That was changed to two arm servo controlling my Semaphore-Sheeting system used successfully in Constellation for the over-lapping heads'ls. That wasn't going to work on Pride mostly because space limitations (vertically inside the hull).
A friend recently launched his four foot schooner in which he used two winch-driven loops to control the sails. It's success, especially with the over-lapping jib, got me re-thinking Pride controls and reverting to the loop-sail-control system, with changes.
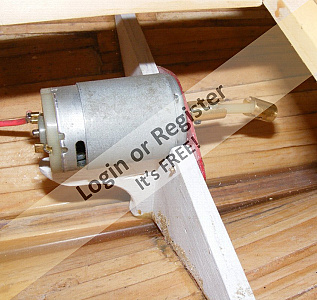
So I'm working on the model again, this time removing everything inside the hull. I removed the motor and my homemade 1 inch prop because there's no way that little prop can over-power all that sail in the lightest of wind. The rudder servo will be moved aft of where the motor was and be accessible through the cabin hatch. One winch will be mounted where the motor was, under the engine hatch, just aft of the mainmast, and another winch will be mounted just aft of the foremast and be accessible through the main hatch.
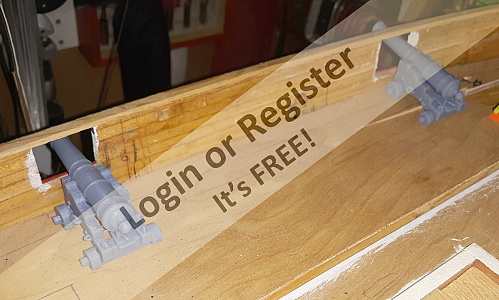
This is where things stand at the moment (June 25 2022). The pic with the gun is a 3D printed test of a gun for my Macedonian model (1:36 scale) which seems to be just right for the 1:20 scale Pride, which will benefit from 3D printing with guns, gunport lids, a much crisper name board on her stern, along with the Baltimore emblem that was back there.
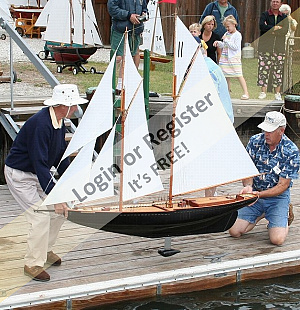
The last pic is the actual boat in the Pacific in 1982. I edited in the main tops'l to show the rig I plan to set. She also had a ringtail, stuns'ls, and a main topmast stays'l, none of which I plan to use.
Hopefully, this approach to her controls will work out and I can actually get her sailing at last.


On my 21st birthday I reported on board as a member of the crew. After that I acquired the plans from Thomas Gilmer who designed the vessel, with the intent to build an RC model. After a false start then, I changed the scale and started again in September of 2010.
The model represents the boat as she was when I was crewing aboard her in September-October 1981. I had a certification from the National Park Service to handle black powder cannon, so I was put in charge of Pride's guns which was handy when we went to the bicentennial of the Siege of Yorktown, what it really meant is I slept with 25pds of black powder at the foot on my bunk.
I cooked right along with construction while also working on Constellation and starting a third model, until July of 2012. She was basically a static display model since then, with an attempt to work out her controls that didn't work out in 2015. Trying to set up her steering uncovered a design flaw that I resolved by moving the rudder servo forward. Life has a habit of getting in the way of my hobbies, and several changes in jobs and homes put a damper on all three models.
She's pretty much just sat till now, going on display a few times, getting floated in a pool in 2019 and capsizing, which was a bit eerie considering the fate of the original.
The model is 1:20 scale making her
Hull length: 54" (137.16cm)
Length on deck: 48" (121.9cm)
Length on waterline w/o rudder: 46.75" (118.75cm)
Length over the rig: 81.5" (207cm)
Beam: 13.625" (34.6cm)
Draft without ballast keel: 5.875" (14.9cm)
Total height (top of jack-yard to bottom of keel): 61.6" (156.5cm)
Total Sail area: 2,049.13 square inches in 7 sails as shown above, 2,205.13 with the flying jib.
Her keel is plywood and she was planked with white pine strips over plywood forms, which were removed. The hull has a layer of 4oz glass cloth and poly resin outside, and several coats of just resin inside.
As mentions she capsized in the pool when a slight gust caught her, despite being weighted to the waterline. She's designed to have a removable fin with a lead bulb making up most of her ballast, but that hasn't been made yet, so it wasn't fitted in the pool that day.
Her lower masts are white pin made with the "birds-mouth" method so they're hollow and weigh next to nothing, but are strong.
Sails are made of a Dupont cloth called Supplex which is a polyester that makes excellent sails. All lines will be nylon or polyester Dacron walked up from thread acquired from a sail-maker's supplier. All the sails have bolt-ropes hand-sewn on. There's no stitching to represent seams because I think it looks like crap, and it's a lot of work to do to ruin your sails. The seam lines on Pride are drawn on on with an .005 permanent marker.
Originally her controls were going to be a Mega-arm sail servo and a winch servo, with the winch driving a loop. That was changed to two arm servo controlling my Semaphore-Sheeting system used successfully in Constellation for the over-lapping heads'ls. That wasn't going to work on Pride mostly because space limitations (vertically inside the hull).
A friend recently launched his four foot schooner in which he used two winch-driven loops to control the sails. It's success, especially with the over-lapping jib, got me re-thinking Pride controls and reverting to the loop-sail-control system, with changes.
So I'm working on the model again, this time removing everything inside the hull. I removed the motor and my homemade 1 inch prop because there's no way that little prop can over-power all that sail in the lightest of wind. The rudder servo will be moved aft of where the motor was and be accessible through the cabin hatch. One winch will be mounted where the motor was, under the engine hatch, just aft of the mainmast, and another winch will be mounted just aft of the foremast and be accessible through the main hatch.
This is where things stand at the moment (June 25 2022). The pic with the gun is a 3D printed test of a gun for my Macedonian model (1:36 scale) which seems to be just right for the 1:20 scale Pride, which will benefit from 3D printing with guns, gunport lids, a much crisper name board on her stern, along with the Baltimore emblem that was back there.
The last pic is the actual boat in the Pacific in 1982. I edited in the main tops'l to show the rig I plan to set. She also had a ringtail, stuns'ls, and a main topmast stays'l, none of which I plan to use.
Hopefully, this approach to her controls will work out and I can actually get her sailing at last.
▲
⟩⟩
AndyN
GaryLC
DuncanP
Newby7
pressonreguardless
Ronald
dave976
jbkiwi
roycv
Graham93
AndyB
|
💬 Re: Pride of Baltimore 1981
2 years ago by 🇺🇸 pressonreguardless (
 Rear Admiral) Rear Admiral)✧ 72 Views · 1 Like
Flag
Great Narrative as well as your Ship.
Life's setbacks, I know them well, they cost me my Elco (full sized boat). I admire your expertise with 3D printing👍👍👍 Trev ▲
⟩⟩
Jerry Todd
|
|
Login To
Remove Ads 💬 Re: Pride of Baltimore 1981
2 years ago by 🇺🇸 Jerry Todd (
Midshipman)✧ 96 Views · 1 Like
Flag
The tops'l yard will be actively braced and maybe the course yard as well. I only brace the tops'l yards on Constellation. I have a different plan for Macedonian (a British frigate) but I'll explain that at a later date.
▲
⟩⟩
watson220
|
|
💬 Re: Pride of Baltimore 1981
2 years ago by 🇺🇸 Jerry Todd (
Midshipman)✧ 94 Views · 0 Likes
Flag
I've only capsized a boat once, when I was learning to sail they had us capsize the boat, a little Turnabout cat boat that was hardly much more than a model itself, but I was 7 so it fit.
I've worked a long list of boats, yacht deliveries, and just goofing out, and been in some hair-raising situations, but we always managed to pull it back before it went over the edge. 😊 ▲
⟩⟩
No likes yet
This member will receive 1 point for every like received |
|
💬 Re: Pride of Baltimore 1981
2 years ago by 🇬🇧 DuncanP (
 Sub-Lieutenant) Sub-Lieutenant)✧ 104 Views · 1 Like
Flag
Fabulous! A boat to be very proud of!
😊 ▲
⟩⟩
Jerry Todd
|
|
💬 Re: Pride of Baltimore 1981
2 years ago by 🇨🇦 Newby7 (
 Fleet Admiral) Fleet Admiral)✧ 96 Views · 1 Like
Flag
Well done She's a beauty 👍👍👍👍👍 With building boats I'm sure most of us have had the joys LOL of watching a boat capsize on the water.
Rick ▲
⟩⟩
Jerry Todd
|
|
💬 Re: Pride of Baltimore 1981
2 years ago by 🇬🇧 dave976 (
 Captain) Captain)✧ 114 Views · 1 Like
Flag
Hi Jerry
Really well made and impressive model. I am not surprised she capsized carrying all that sail and no keel. I can sympathise as my small Three Brothers of Rye fishing boat recently suffered the same fate when I tried sailing without the keel. Recovered thanks to my son in his wetsuit. The on water pictures of your model are really nostalgic and really shows off her lines. The winch arrangements should work fine and I look forward to seeing more on water pics. dave976 ▲
⟩⟩
Jerry Todd
|
|
💬 Re: Pride of Baltimore 1981
2 years ago by 🇬🇧 TonyAsh (
 Chief Petty Officer 2nd Class) Chief Petty Officer 2nd Class)✧ 113 Views · 2 Likes
Flag
Impressive! With the dagger keel fitted it would be great to see a video of her. question -is the topsail sheet controlled?
▲
⟩⟩
Jerry Todd
dave976
|
|
💬 Re: Pride of Baltimore 1981
2 years ago by 🇬🇧 roycv (
Rear Admiral)✧ 108 Views · 2 Likes
Flag
She looks absolutely glorious under sail. Well done!
Roy ▲
⟩⟩
Jerry Todd
dave976
|
Login To
Remove Ads
Remove Ads
📝 Some pictures of the real Pride of Baltimore
2 years ago by 🇺🇸 Jerry Todd ( Midshipman)
Midshipman)✧ 116 Views · 4 Likes
Flag
💬 Add Comment
When I was on Pride it was 1981, I had just turned 21, poor as dirt. Some told me Pride was in need of crew, so I called the office and interviewed. I had sailed schooners and square-rig, could handle cannons (as mentioned), lived in Baltimore, had work on building the boat, and was available.
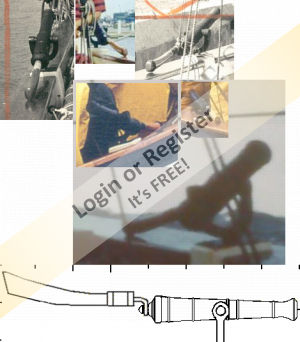
I had a little Pentax 110 SLR camera I got in a pawn shop, a two rolls of 12 exposure film. Already planning on building a model someday back then, I took a lot of pictures of details I would need later. The sailing pics are from a trip across the bay from Baltimore to Chestertown. The aerial photo was taken by Greg Pease as we were leaving Baltimore. The color image of the boat becalmed I took with the engineer from the Zodiac in the Chester River as were were headed back to Baltimore.
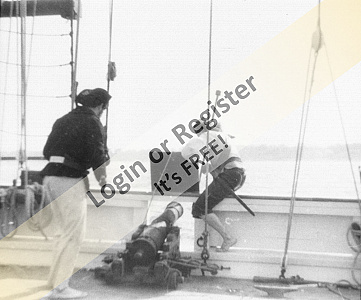
In October we went to Annapolis, then down to Yorktown Virginia for the Bicentennial of the Siege of Yorktown. The two newspaper picture are of us sailing into Yorktown, and the other B&W images are of my self, the bosun "Sugar" Flanagan, and reenactor friends of mine brought aboard to handle the guns - as the rest of the crew watched in abject horror from the taffrail.
I either didn't have film, or even a camera most of my time on the water. There's piles of photos others took that I've never seen. A whole life, mostly undocumented, now surrounded by people that take pictures of everything, all the time.


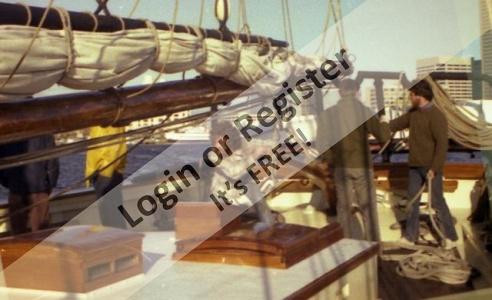


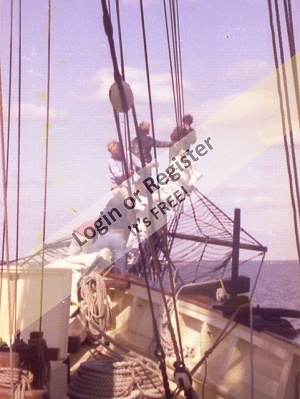

I had a little Pentax 110 SLR camera I got in a pawn shop, a two rolls of 12 exposure film. Already planning on building a model someday back then, I took a lot of pictures of details I would need later. The sailing pics are from a trip across the bay from Baltimore to Chestertown. The aerial photo was taken by Greg Pease as we were leaving Baltimore. The color image of the boat becalmed I took with the engineer from the Zodiac in the Chester River as were were headed back to Baltimore.
In October we went to Annapolis, then down to Yorktown Virginia for the Bicentennial of the Siege of Yorktown. The two newspaper picture are of us sailing into Yorktown, and the other B&W images are of my self, the bosun "Sugar" Flanagan, and reenactor friends of mine brought aboard to handle the guns - as the rest of the crew watched in abject horror from the taffrail.
I either didn't have film, or even a camera most of my time on the water. There's piles of photos others took that I've never seen. A whole life, mostly undocumented, now surrounded by people that take pictures of everything, all the time.
▲
⟩⟩
EdW
AndyN
jbkiwi
GaryLC
📝 Rudder Servo Reinstalled
2 years ago by 🇺🇸 Jerry Todd ( Midshipman)
Midshipman)✧ 115 Views · 2 Likes
Flag
💬 Add Comment
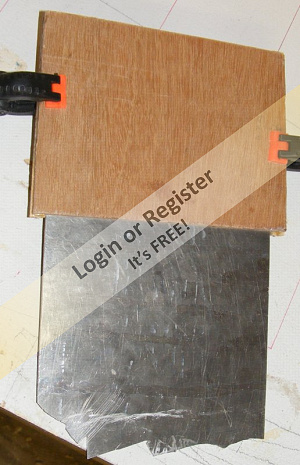
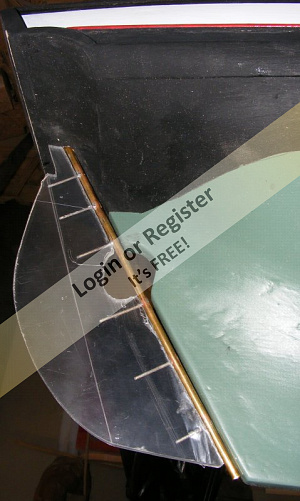
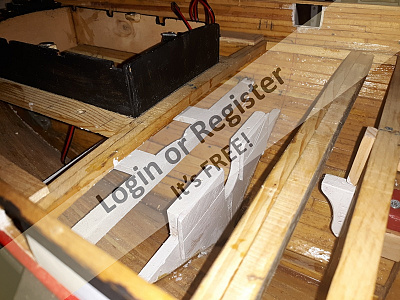
Took out the prop shaft and cut back the stuffing box/tube.
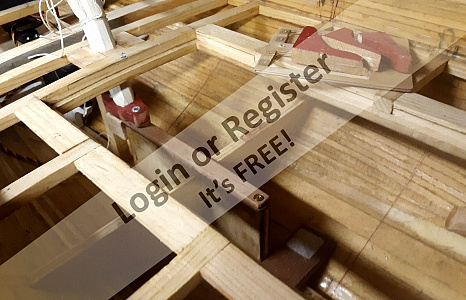
I fitted two beams to where the rudder servo was going to be, built them into a frame and epoxied it into the hull.
I sat two servos where the winches will get mounted to get a rough idea of how much length of draw I should get from the control loops, and it looks like I can expect at least 22 inches (56cm). The two sheaves at the other end of each loop (per the photo/drawing) will be 3D printed and about an inch in diameter. The aft winch will get mounted so the top of it's drum is about 1/4 inch (6mm) under the deck beams. The forward winch will get mounted maybe 1/4 inch lower than the aft winch so the loops won't interfere with each other.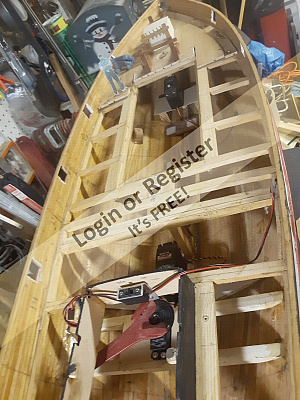
▲
⟩⟩
EdW
AndyB
📝 Setting up the Winches
2 years ago by 🇺🇸 Jerry Todd ( Midshipman)
Midshipman)✧ 105 Views · 5 Likes · 2 Comments
Flag
💬 Add Comment
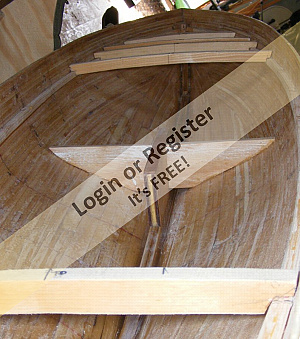
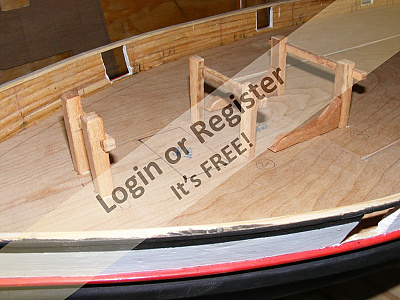
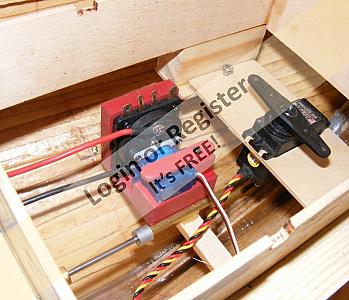
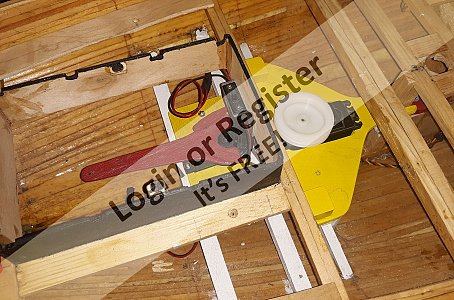
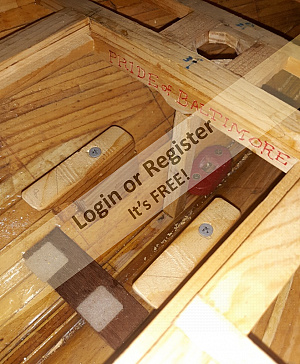
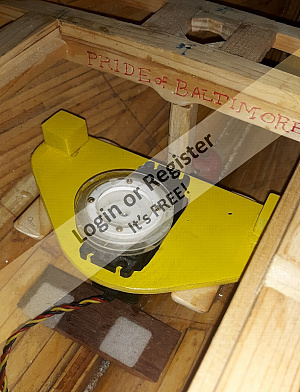
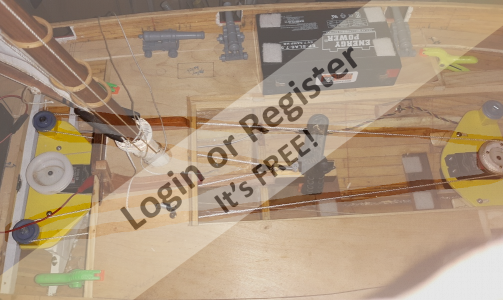
I removed the now unused servo tray that was mounted on the trunk for the fin, and reseated the main mast step a little higher 'cause the main mast sat too low.
I extended the old motor bulkhead up to support the winch tray, and painted all that.
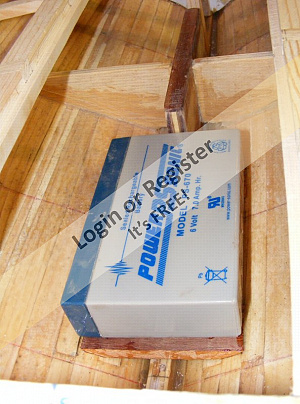
I made "trays" for both winches. The aft one is extended to notch around a compression post behind the trunk. I won't be able to access a fastener here once the decks on, so it fits into a slot of sorts made by block on that post above and below the tray. Two screws will hold the tray at the motor bulkhead. I don't remember ever buying yellow spray paint, but I can't paint everything red, so yellow it is. The rudder servo tray also got a spritz of yellow.
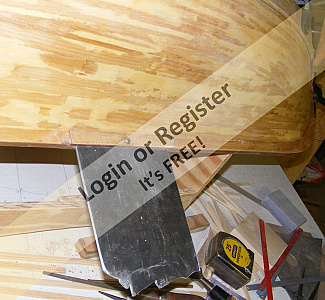
I left in the blocks for the old rudder servo set-up, but they needed to be taller and have a different angle, as well as being longer so the tray could be slid fore-and-aft so the tension on the loops could be adjusted. I added blocks cut like knees to overhang the battery without interfering with access to it. The blocks on the corners of the trays will hold the idler-pulleys level with the winch-drums.
The tray up here will have slots for the mounting screws to allow adjustments.
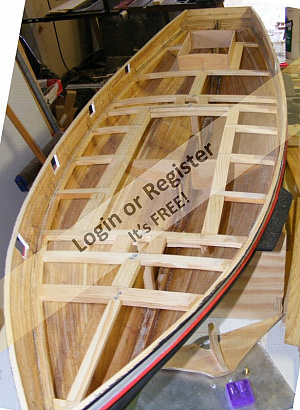
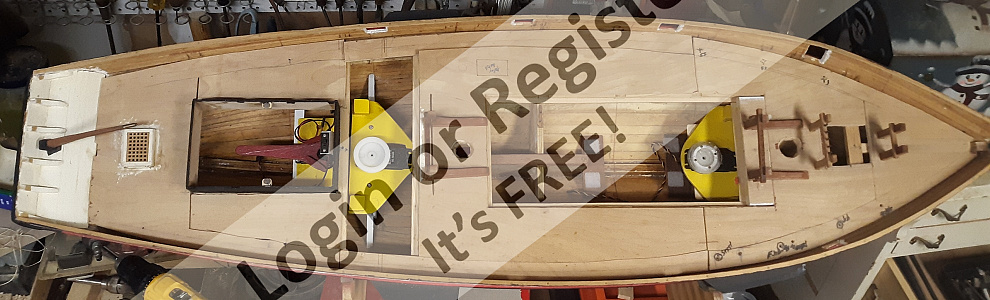
The deck-plan photo shows access with the deck on and the hatches open except that little hatch forward will get decked over as it's not needed.
I extended the old motor bulkhead up to support the winch tray, and painted all that.
I made "trays" for both winches. The aft one is extended to notch around a compression post behind the trunk. I won't be able to access a fastener here once the decks on, so it fits into a slot of sorts made by block on that post above and below the tray. Two screws will hold the tray at the motor bulkhead. I don't remember ever buying yellow spray paint, but I can't paint everything red, so yellow it is. The rudder servo tray also got a spritz of yellow.
I left in the blocks for the old rudder servo set-up, but they needed to be taller and have a different angle, as well as being longer so the tray could be slid fore-and-aft so the tension on the loops could be adjusted. I added blocks cut like knees to overhang the battery without interfering with access to it. The blocks on the corners of the trays will hold the idler-pulleys level with the winch-drums.
The tray up here will have slots for the mounting screws to allow adjustments.
The deck-plan photo shows access with the deck on and the hatches open except that little hatch forward will get decked over as it's not needed.
▲
⟩⟩
EdW
Colin H
jbkiwi
AndyB
Mike Stoney
|
💬 Re: Setting up the Winches
2 years ago by 🇺🇸 Jerry Todd (
Midshipman)✧ 101 Views · 1 Like
Flag
This system's pretty common I think. I know it's a similar set-up to what "SailTails" on YouTube uses in his "Bearospace" models, but I've seen it in various forms for a decade or three. I think when winch servos became available, it superseded a system that used a shuttle on a threaded rod. This was an erector-set gizmo with rods, and a motor, or two, micro-switches, etc. It would be hard to fit in a model of less than a meter. Now, I've seen micro-servos converted to winches running loops in Footies.
I went three rounds with this idea in this model years ago as my original plan see: ▲
⟩⟩
AndyN
|

|
💬 Re: Setting up the Winches
2 years ago by 🇨🇭 Mike Stoney (
 Commander) Commander)✧ 106 Views · 2 Likes
Flag
Hi Jerry
Your winch version is very interesting, I always find it motivating to get good ideas from other model builders. 👍👍👍👍 Hobbyist greetings Michel-Claude ▲
⟩⟩
jbkiwi
Jerry Todd
|
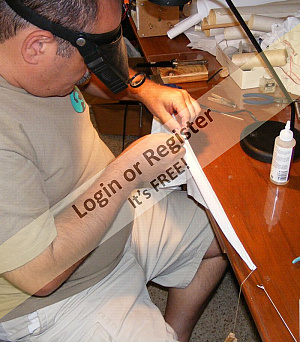
📝 Guns guns guns!
2 years ago by 🇺🇸 Jerry Todd ( Midshipman)
Midshipman)✧ 96 Views · 7 Likes · 4 Comments
Flag
💬 Add Comment
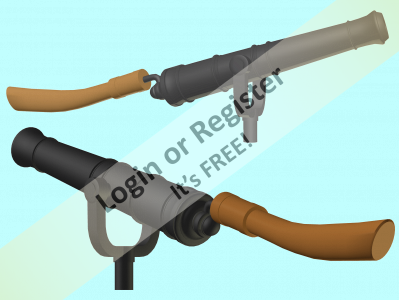
I sat down last night to modify a Blomefield 18 pdr barrel a friend gave me a while back, to fit Pride, but removing the cascable ring, ER cartouche, and rearranging the barrel bands was more work than starting from scratch, so I started from scratch. Making a gun barrel in 3D is generally pretty straight forward, make a cylinder with a lot of segments and resize and move each segment to create bands, slope, etc.
I made a new carriage for Macedonian's guns and rearranged it here for Pride. Since these guns are basically static displays, I modeled them in one piece, rather than print the parts and assemble them. I think I spent about 3 hours making the barrel, and another hour redoing the carriage.
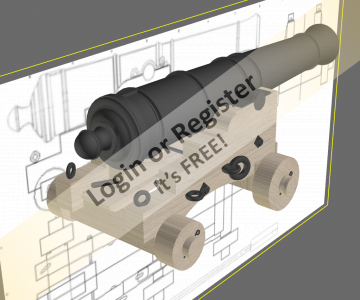
I saved the STL file, started the print, and went to bed. When I got up this morning I was actually surprised to find they printed great.
Cleaned them up and sat them on the boat to see how they look.
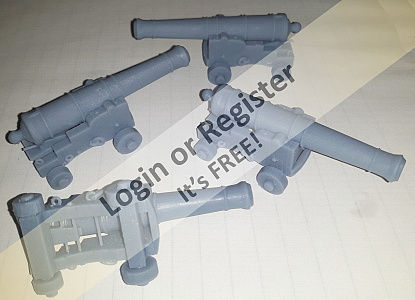
The great thing about 3D printing for me is I can make very detailed parts for a model that are repeatable. On a working model, If something happens to a gun, a figurehead, or any part that's difficult to make by hand, it's broken or lost, I can print another. It's still something I made from scratch, so I don't see it as "cheating" as far as modeling goes, probably less so than buying pre-made parts.
I hoped the rings would be loose, like the anchor chain I made for Constellation, but it wasn't, so I'll probably replace the eye and ring with brass.
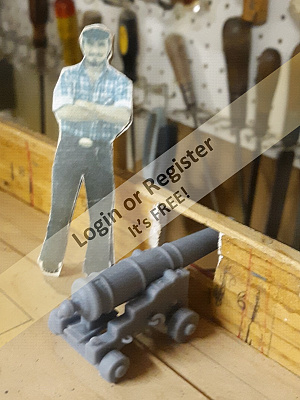
The fellow in the one pic is Mini-Me (a photo from 1980 scaled to 1:20) and one of my "babies." When I was on Pride, I was put in charge of her guns. I was told they were my "babies" and I should take care of them. My experience with black-powder cannon was one reason I was hired, because the Yorktown Bicentennial was coming up and Pride was going to attend.
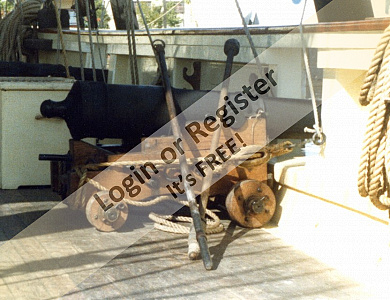
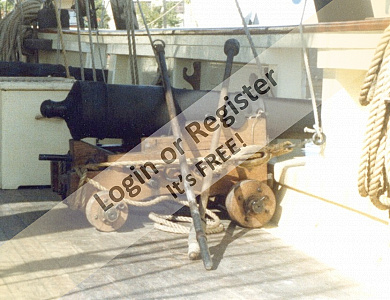
There's a pic of the real thing. This was all the rigging they had. No breaching, retrieving tackle, just training tackle. This is all the model will get as well, since it's a model of a particular boat as she was at a particular time, not how it was supposed to be.
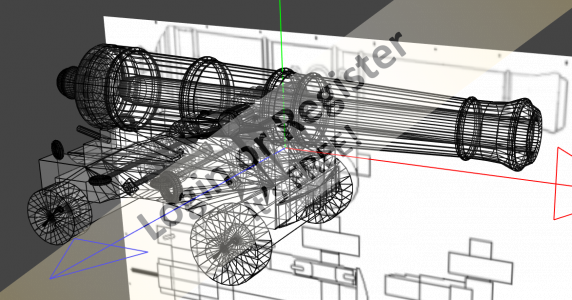

I made a new carriage for Macedonian's guns and rearranged it here for Pride. Since these guns are basically static displays, I modeled them in one piece, rather than print the parts and assemble them. I think I spent about 3 hours making the barrel, and another hour redoing the carriage.
I saved the STL file, started the print, and went to bed. When I got up this morning I was actually surprised to find they printed great.
Cleaned them up and sat them on the boat to see how they look.
The great thing about 3D printing for me is I can make very detailed parts for a model that are repeatable. On a working model, If something happens to a gun, a figurehead, or any part that's difficult to make by hand, it's broken or lost, I can print another. It's still something I made from scratch, so I don't see it as "cheating" as far as modeling goes, probably less so than buying pre-made parts.
I hoped the rings would be loose, like the anchor chain I made for Constellation, but it wasn't, so I'll probably replace the eye and ring with brass.
The fellow in the one pic is Mini-Me (a photo from 1980 scaled to 1:20) and one of my "babies." When I was on Pride, I was put in charge of her guns. I was told they were my "babies" and I should take care of them. My experience with black-powder cannon was one reason I was hired, because the Yorktown Bicentennial was coming up and Pride was going to attend.
There's a pic of the real thing. This was all the rigging they had. No breaching, retrieving tackle, just training tackle. This is all the model will get as well, since it's a model of a particular boat as she was at a particular time, not how it was supposed to be.
▲
⟩⟩
EdW
AndyN
Colin H
jbkiwi
AndyB
Rookysailor
pressonreguardless
|
💬 Re: Guns guns guns!
2 years ago by 🇺🇸 Jerry Todd (
Midshipman)✧ 95 Views · 1 Like
Flag
I have an Elegoo Mars printer that I upgraded to a Mars2 by replacing the LCD with a better one.
The resin is Siraya Tech, Build, Sonic Grey which has been working very well for me. Look at my build log for Constellation to see a LOT more 3D printed stuff for my models. 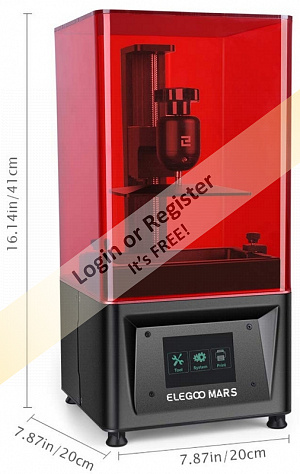
▲
⟩⟩
AndyN
|
|
Login To
Remove Ads 💬 Re: Guns guns guns!
2 years ago by 🇬🇧 Rookysailor (
 Commodore) Commodore)✧ 108 Views · 0 Likes
Flag
Really nice guns Jerry, fantastic finish on them, can I ask what 3D printer you are using and the resin you have used.
Cheers, Pete ▲
⟩⟩
No likes yet
This member will receive 1 point for every like received |
|
💬 Re: Guns guns guns!
2 years ago by 🇺🇸 Jerry Todd (
Midshipman)✧ 96 Views · 3 Likes
Flag
It's tedious to say the least. The software I use is basic at best, but I'm used to it for this sort of thing.
The thing I still haven't figured out is making other things I need like figures, figureheads, and decorative stuff like the vine-work on the trail-boards of ships and stern decorations, and so on. Raised lettering is easy, you type it, extrude it to the height you want, and still it on whatever, like in the picture. Lettering carved inward is a whole other can of worms, and, unfortunately, the more common. You're breaking the surface, so you have to rebuild the surface around the lettering, which my software doesn't do for you, you have to do it manually. I'm trying to learn Blender for this sort of thing, but being an old dog is making new tricks harder to pick up. 😊 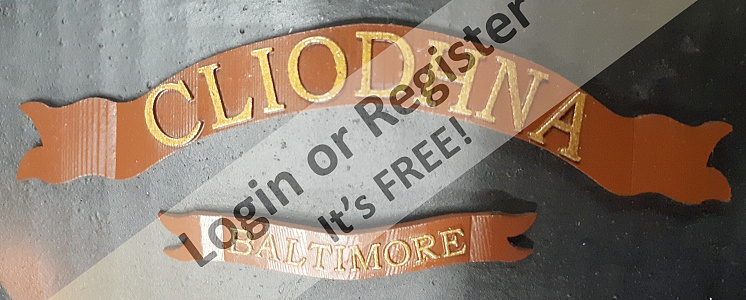
▲
⟩⟩
pressonreguardless
Colin H
jbkiwi
|
|
💬 Re: Guns guns guns!
2 years ago by 🇺🇸 pressonreguardless (
Rear Admiral)✧ 94 Views · 1 Like
Flag
Excellent work, Jerry.
I can't imagine what it took to design those cannons!! Trev ▲
⟩⟩
Jerry Todd
|
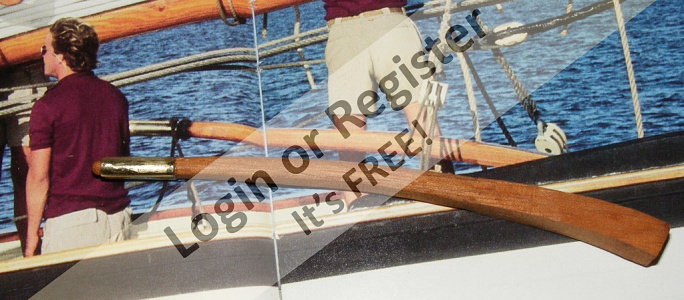
📝 Swivel Guns
2 years ago by 🇺🇸 Jerry Todd ( Midshipman)
Midshipman)✧ 88 Views · 4 Likes
Flag
💬 Add Comment
The truck guns made, I moved onto the swivel guns.
I scoured every photo I could find and couldn't come up with a good clear photo of one. (That's Captain Armin Elsaesser sitting on the rail next to a swivel.)
What I could gather was the gun was basically a scaled down version of the 6 pounder tube. So I scaled my 3D gun down the the right length and added the swivel's fittings.
I printed two of them in a fixed position, since I have no intention of making these things movable or functional.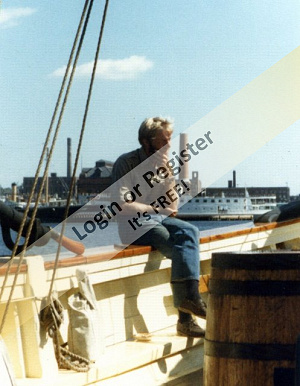
▲
⟩⟩
EdW
jbkiwi
pressonreguardless
Colin H
📝 Loop-de-loop
2 years ago by 🇺🇸 Jerry Todd ( Midshipman)
Midshipman)✧ 82 Views · 6 Likes · 2 Comments
Flag
💬 Add Comment
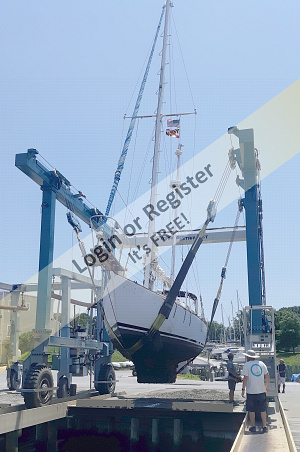
I've been helping a friend with a new acquisition in the form of a Mariner 32 ketch. Today we salied it to a boat-yard to have it hauled.
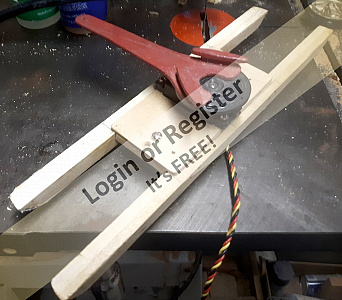
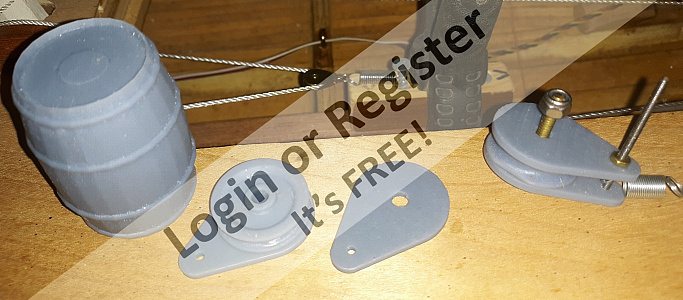
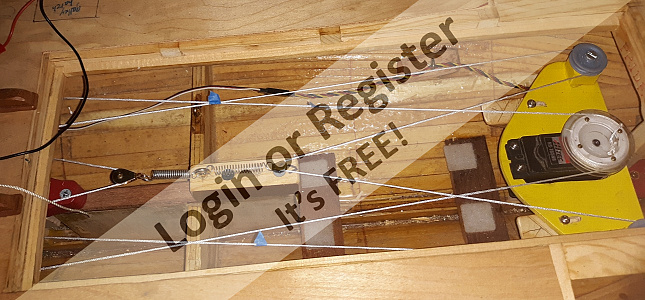
In between, I started playing with the idea of a tension spring in each of the control loops. I rigged one up and ran it back and forth, and I think It'll do the job.
I'm short a winch drum for my forward winch, and the homemade one I'm using seems to be a little shorter than standard. Buying a new drum costs $8 USD, plus shipping - for one little plastic pulley. I'm gonna print replacements with more vertical space on the drums and maybe a V-shape, after I fiddle around with getting the hole and splines right for that servo.
Added a pic of the tensioner pulleys. I'll mount a block on the fin trunk with a screw/port for the springs in the center. The pulleys will be a pair of those 1 inch ones I printed for the idlers, and some slab sides to turn them into functional blocks.
The parts printed, I need some screws to hold them together. And there's a test of a barrel, Pride had three of them in front of the house, blocking access to the hand pumps that were basically just decoration.
▲
⟩⟩
EdW
Colin H
AndyN
Ronald
jbkiwi
pressonreguardless
|
💬 Re: Loop-de-loop
2 years ago by 🇺🇸 Jerry Todd (
Midshipman)✧ 80 Views · 1 Like
Flag
In Maryland, USA. At the confluence of the Patapsco River and the Chesapeake Bay. Ended up at White Rocks Marina on Rock Creek (if you're Google mapping it).
▲
⟩⟩
Colin H
|
|
💬 Re: Loop-de-loop
2 years ago by 🇨🇦 Ronald (
 Admiral) Admiral)✧ 90 Views · 0 Likes
Flag
Where are you sailing here in your post?
▲
⟩⟩
No likes yet
This member will receive 1 point for every like received |
📝 Back into the sauna, I mean shop
2 years ago by 🇺🇸 Jerry Todd ( Midshipman)
Midshipman)✧ 73 Views · 5 Likes
Flag
💬 Add Comment
Been away a few days, and except for a couple of days when it rained it's been 30°c or above, mostly above. In the shop it's a chilly 27°, but so humid you're drenched from the exertion of picking up a pencil.
Pride had three barrels forward of the cabin trunk in '81. I reworked and re-scaled that barrel I found on Thingiverse and printed three of them which came out very nice except re-scaling them apparently made the end too thin and they didn't print.
I'm gonna use those as napkin holders. 😉
I tried to fix the 3D model, but it was easier to just start from scratch. These three came out fine. Along with them I printed a 25mm 2-blade prop. It'll just spin on a screw since there's no longer a motor in the model.
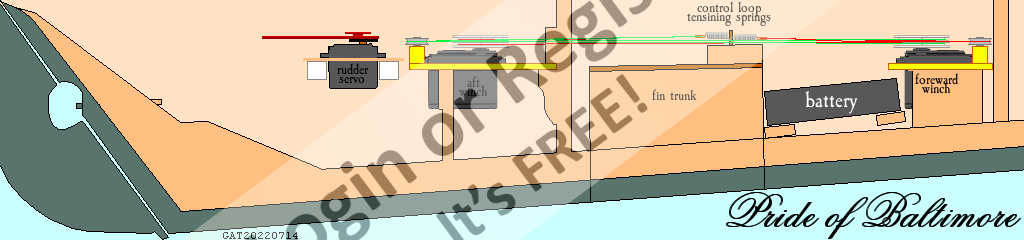
I updated the cutaway drawing to show the new servo layout.
Not having the screws to assemble the tensioning blocks I printed, I got some 1.5mm braided polyester cord for the control loops, and used a pair of brass blocks I got from RB Model a long time ago. These were attached to springs both mounted to a screw-eye in a wood block on the fin trunk. These blocks are obviously lighter than the 25mm printed ones, so won't weigh down the loops.
Rigged up the radio gear and ran them through some tests. Except for one channel needing some reprogramming to get it's full 3.5 turns, the whole thing worked as it should.
Now I need to work out how all the sheets and things that connect to the loops will be routed and go through the deck.
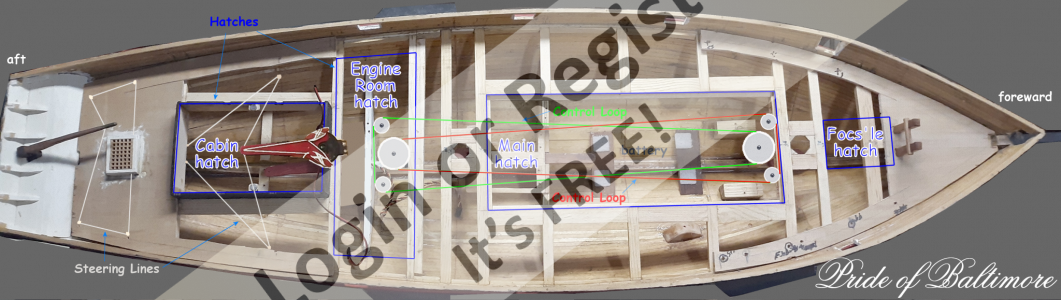
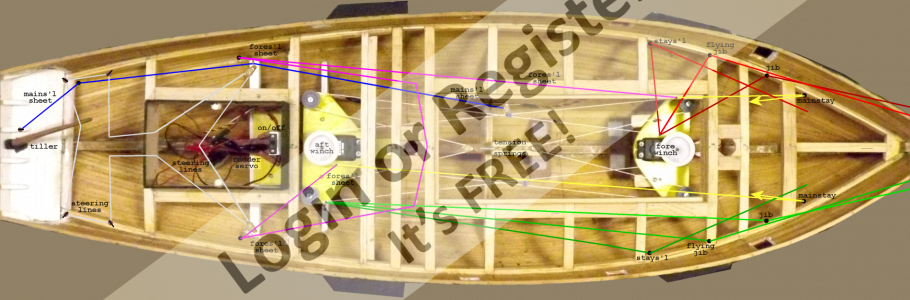
To help with that I made a diagram of the model to mark out what went where. The black spots are the thru-deck positions where I'll need to install some blocking and run a brass tube through. Not shown are the main top-mast running back stays and the braces for the squares. The main-stays shown are the running main-stays typical of Baltimore-Clippers and any boat with such raked masts.
When sailing, the windward one would be brought up taught, and the leeward one slacked, and usually tied to a main shroud out of the way. The model's mast are strong enough to be unstayed, but this set-up is a signature item on a Baltimore Clipper, and a big part of the tacking procedure when I was sailing aboard, so I want it to appear functional on my model.
I gave the steering some attention as well. A pair of blocks get mounted port and starboard of the rudder servo to turn the steering cables aft. Because rudder servo's arm travels in an arc, these blocks make the most use of that travel. Confirming the position of the blocks, which are another pair of brace blocks I cobbled together for Constellation back in '16, I'm going to use screw hook/eyes rather than the brass wire eyes shown in the picture, as they're stronger.
The above-deck portion of the steering has to wait till I can fasten down the aft section of sub-deck before I can install anything.

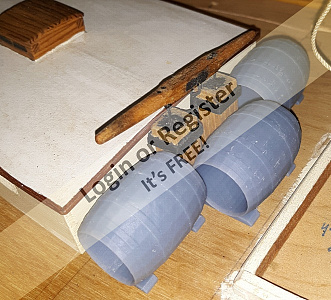
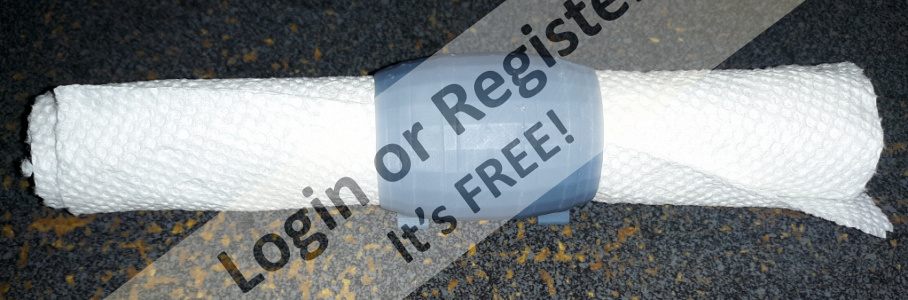

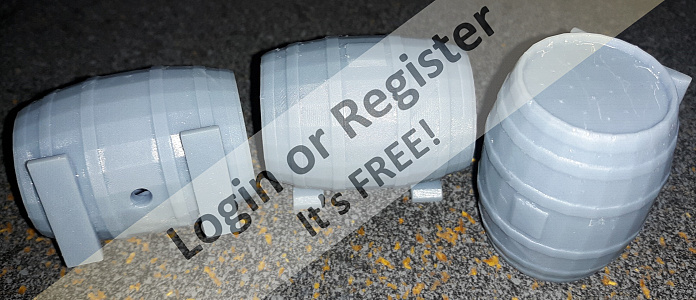


Pride had three barrels forward of the cabin trunk in '81. I reworked and re-scaled that barrel I found on Thingiverse and printed three of them which came out very nice except re-scaling them apparently made the end too thin and they didn't print.
I'm gonna use those as napkin holders. 😉
I tried to fix the 3D model, but it was easier to just start from scratch. These three came out fine. Along with them I printed a 25mm 2-blade prop. It'll just spin on a screw since there's no longer a motor in the model.
I updated the cutaway drawing to show the new servo layout.
Not having the screws to assemble the tensioning blocks I printed, I got some 1.5mm braided polyester cord for the control loops, and used a pair of brass blocks I got from RB Model a long time ago. These were attached to springs both mounted to a screw-eye in a wood block on the fin trunk. These blocks are obviously lighter than the 25mm printed ones, so won't weigh down the loops.
Rigged up the radio gear and ran them through some tests. Except for one channel needing some reprogramming to get it's full 3.5 turns, the whole thing worked as it should.
Now I need to work out how all the sheets and things that connect to the loops will be routed and go through the deck.
To help with that I made a diagram of the model to mark out what went where. The black spots are the thru-deck positions where I'll need to install some blocking and run a brass tube through. Not shown are the main top-mast running back stays and the braces for the squares. The main-stays shown are the running main-stays typical of Baltimore-Clippers and any boat with such raked masts.
When sailing, the windward one would be brought up taught, and the leeward one slacked, and usually tied to a main shroud out of the way. The model's mast are strong enough to be unstayed, but this set-up is a signature item on a Baltimore Clipper, and a big part of the tacking procedure when I was sailing aboard, so I want it to appear functional on my model.
I gave the steering some attention as well. A pair of blocks get mounted port and starboard of the rudder servo to turn the steering cables aft. Because rudder servo's arm travels in an arc, these blocks make the most use of that travel. Confirming the position of the blocks, which are another pair of brace blocks I cobbled together for Constellation back in '16, I'm going to use screw hook/eyes rather than the brass wire eyes shown in the picture, as they're stronger.
The above-deck portion of the steering has to wait till I can fasten down the aft section of sub-deck before I can install anything.
▲
⟩⟩
Colin H
AndyN
EdW
jbkiwi
AndyB
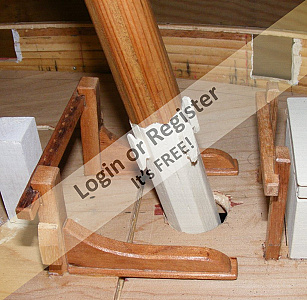
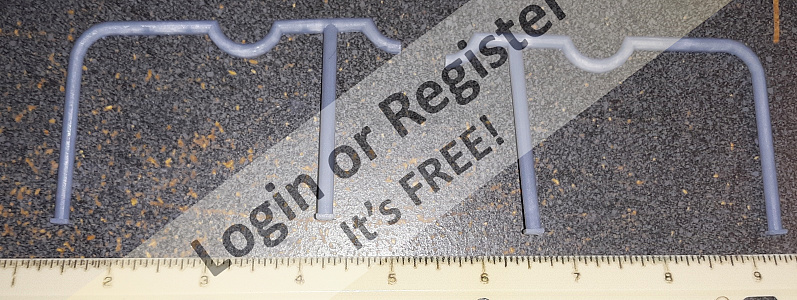
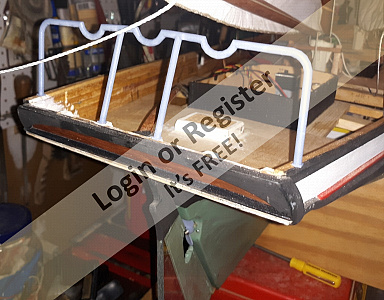
📝 The Roll Bar
2 years ago by 🇺🇸 Jerry Todd ( Midshipman)
Midshipman)✧ 68 Views · 3 Likes
Flag
💬 Add Comment
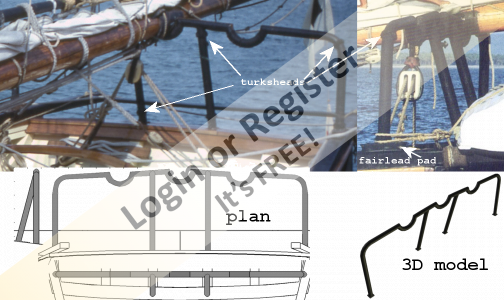
Early on in Pride's career, there apparently was concern about her main boom hanging from it's lifts when the sail was down. Swinging side to side, and the weight pulling at the mast head of that sharply raked mast, probably gave somebody bad dreams. Sometime in later 77 or early 78 they installed a welded steel tube frame for the boom to rest on when the mains'l wasn't set. Because of it's construction and appearance, it was always known as the "Roll Bar."
Any model of the first Pride of Baltimore isn't complete without this identifying piece of equipment.
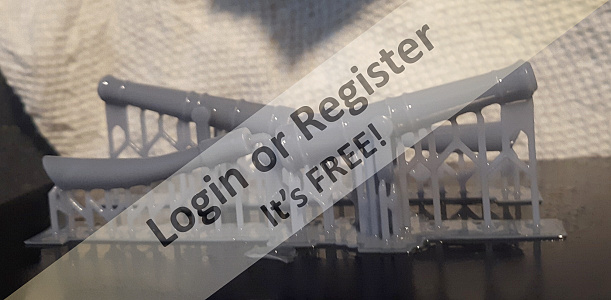
I originally intended to make it from brass rod (a lot easier than tubing to put together) and I may still, but I couldn't resist taking a shot at printing it in resin.
Comparing the two; brass would definitely be significantly stronger, but if it were bumped enough to be damaged, would probably do more damage to the model; rails, bulwarks, etc; than the roll-bar itself.
Resin will break with much less effort than the brass version would require, but the damage would probably be entirely taken by the resin part without much, or any, being imparted to the model. It would be easy to reprint and replace the roll-bar.
I'd probably be replacing the resin roll-bar more often than repairing the hull from the brass one taking a hit.
That said, I had to model and print a resin one, right? I made the model in two halves because it wouldn't fit in the printer in one piece. I "glued" the two halves together with some resin and a zap of UV light.
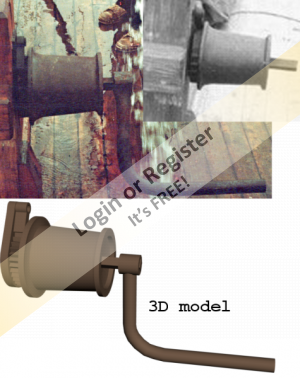
The bitts at the base of the main mast have had a rod installed for a long time intended for the winch. After printing a pair of winch drums for my friends schooner model, I thought I'd use those here, but they're a completely different style; so using photos, I model a winch drum and handle for Pride. These are nearly done printing as I type here, so I'll post those pictures in a little while.
Any model of the first Pride of Baltimore isn't complete without this identifying piece of equipment.
I originally intended to make it from brass rod (a lot easier than tubing to put together) and I may still, but I couldn't resist taking a shot at printing it in resin.
Comparing the two; brass would definitely be significantly stronger, but if it were bumped enough to be damaged, would probably do more damage to the model; rails, bulwarks, etc; than the roll-bar itself.
Resin will break with much less effort than the brass version would require, but the damage would probably be entirely taken by the resin part without much, or any, being imparted to the model. It would be easy to reprint and replace the roll-bar.
I'd probably be replacing the resin roll-bar more often than repairing the hull from the brass one taking a hit.
That said, I had to model and print a resin one, right? I made the model in two halves because it wouldn't fit in the printer in one piece. I "glued" the two halves together with some resin and a zap of UV light.
The bitts at the base of the main mast have had a rod installed for a long time intended for the winch. After printing a pair of winch drums for my friends schooner model, I thought I'd use those here, but they're a completely different style; so using photos, I model a winch drum and handle for Pride. These are nearly done printing as I type here, so I'll post those pictures in a little while.
▲
⟩⟩
EdW
Colin H
RonBMK2
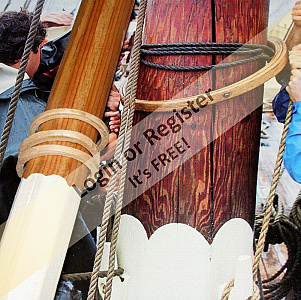
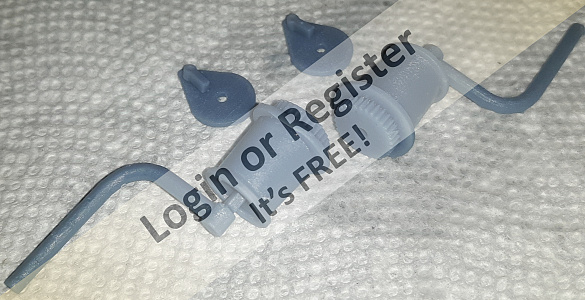
📝 Long time no see
7 months ago by 🇺🇸 Jerry Todd ( Midshipman)
Midshipman)✧ 57 Views · 8 Likes · 1 Comment
Flag
💬 Add Comment
I was going to slap together a temporary trough to float the model in to determine what the weight the bulb on her fin would need to be, but I'm either up to my neck with other stuff or too worn out to motivate myself through the shop door.
I finally put the model in the tub, in which she barely fit, and figured out the bulb will need to be 25 pounds (11kg) to sit about 1/2" below her painted water line. Adding the battery and some lead-shot bean-bags will trim her where I want her for sailing.
I'm still up in the air on how to make the bulb; whether to melt and cast the lead, or cast the lead in epoxy. I'm leaning toward the epoxy casting, and have ordered the epoxy to do the job (and to do some other jobs like repair the pram).
In either case it will be made in two halves and somewhat "wing" shaped; something like this model's, though Pride's fin is longer, wider?
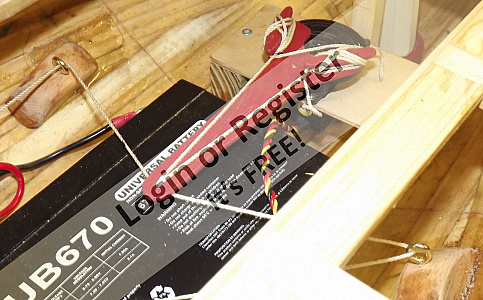
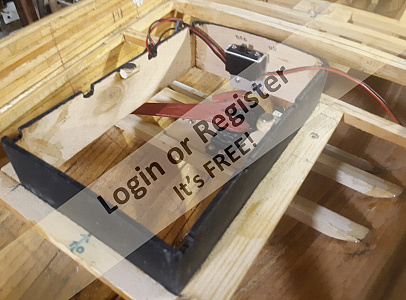
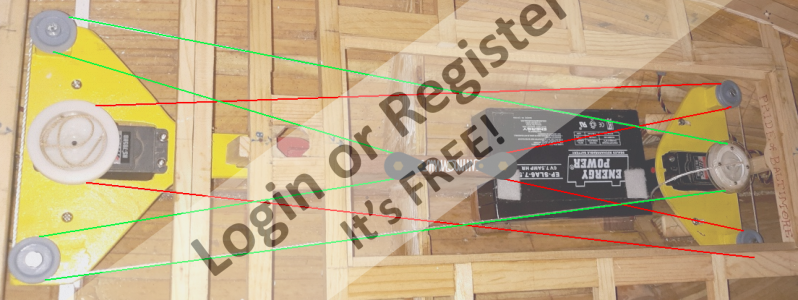
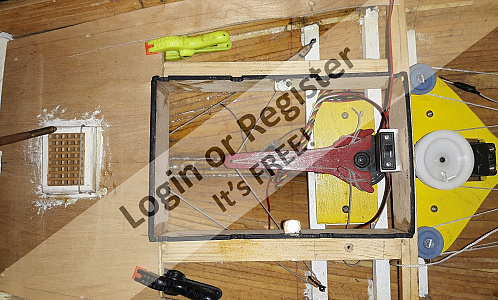
Meanwhile, the masts are back in and I've been playing with the sail controls again. I seized dress hook loops to the winch lines (red arrows) to attach the sheets and figure out how to keep everything neat and untangled.
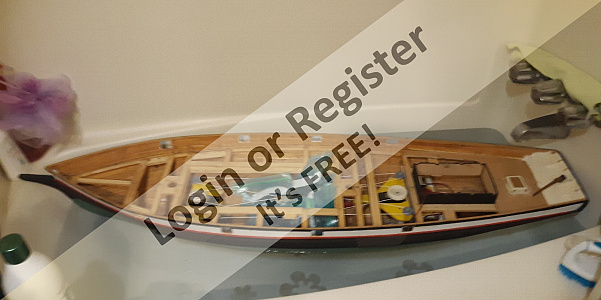
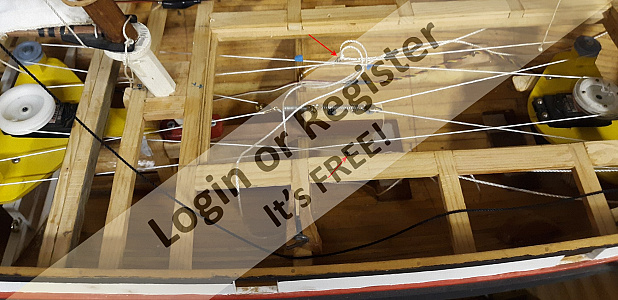
I finally put the model in the tub, in which she barely fit, and figured out the bulb will need to be 25 pounds (11kg) to sit about 1/2" below her painted water line. Adding the battery and some lead-shot bean-bags will trim her where I want her for sailing.
I'm still up in the air on how to make the bulb; whether to melt and cast the lead, or cast the lead in epoxy. I'm leaning toward the epoxy casting, and have ordered the epoxy to do the job (and to do some other jobs like repair the pram).
In either case it will be made in two halves and somewhat "wing" shaped; something like this model's, though Pride's fin is longer, wider?
Meanwhile, the masts are back in and I've been playing with the sail controls again. I seized dress hook loops to the winch lines (red arrows) to attach the sheets and figure out how to keep everything neat and untangled.
▲
⟩⟩
EdW
Colin H
AlessandroSPQR
AndyN
Len1
MartinW
TonyAsh
luckyduck
|
💬 Re: Long time no see
7 months ago by 🇮🇹 AlessandroSPQR (
Commodore)✧ 49 Views · 0 Likes
Flag
Salute Jerry.
Che spettacolo! Devo ancora guardarmi tutto questo lavoro fin dall'inizio con calma, ma sono rimasto affascinato dal sistema di comando delle vele. Non ci ho capito ancora niente in quell'intrigo di cavi, ma sono rimasto affascinato, troppo bello. Osservando piano piano, capirò. Almeno spero. Seguirò il tuo lavoro con molto piacere e curiosità. Hallo Jerry. What a show! I still have to watch all this work from the beginning calmly, but I was fascinated by the control system of the sails. I still didn't understand anything about that tangle of cables, but I was fascinated, too beautiful. By observing little by little, I will understand. At least I hope. I will follow your work with great pleasure and curiosity. ▲
⟩⟩
No likes yet
This member will receive 1 point for every like received |


Login To
Remove Ads
Remove Ads