Join Us On Social Media!

|

|

|
Download The App!
Login To
Remove Ads
Remove Ads
Login To
Remove Ads
Remove Ads
Model Boats Website
Restore or burn ?
7 Posts · 7 Followers · 42 Photos · 59 Likes
Began 1 year ago by
 United Kingdom
Follow This Thread
Not currently following
> Click to follow
> Click to follow
Latest Post 1 year ago by
| Oldest posts shown first (Show Newest First) | (Print Booklet) |
📝 Restore or burn ?
1 year ago by 🇬🇧 flaxbybuck ( Captain)
Captain)✧ 112 Views · 17 Likes · 4 Comments
Flag
💬 Add Comment
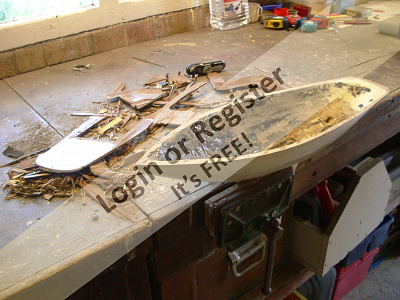
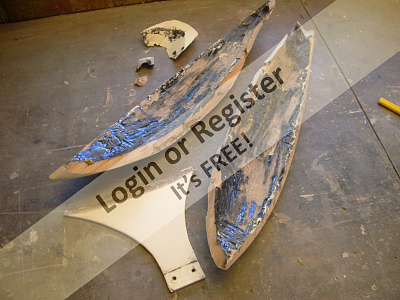
This is the story of Albert, a pond yacht made by an uncle in 1926 and given to me in 1959. The photos show how she looks now, and how it was in 2018 when I started a major restoration and rebuild.
You can imagine the language when suddenly my yacht morphed from a hull to a few bits of firewood. In coming posts I will describe and show the history of Albert. Keep watching.....

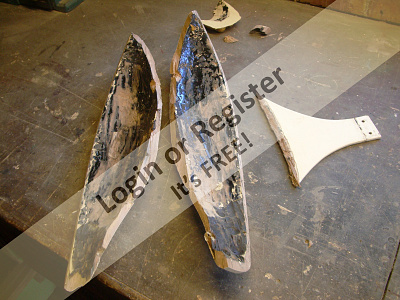
You can imagine the language when suddenly my yacht morphed from a hull to a few bits of firewood. In coming posts I will describe and show the history of Albert. Keep watching.....
▲
⟩⟩
RNinMunich
hermank
Madwelshman
jbkiwi
cdnfurball
dave976
ChrisG
pressonreguardless
DWBrinkman
MouldBuilder
River Rat
ToraDog
Newby7
Colin H
luckyduck
philcaretaker
RonBMK2
|
💬 Re: Restore or burn ?
1 year ago by 🇺🇸 ToraDog (
Captain)✧ 104 Views · 6 Likes
Flag
Wow,
Me thinks that your work rates a wee bit more than a "restoration" Beautifully done! Very pretty yacht. ▲
⟩⟩
hermank
Madwelshman
ChrisG
River Rat
Colin H
Newby7
|
|
Login To
Remove Ads 💬 Re: Restore or burn ?
1 year ago by 🇨🇦 Newby7 (
 Fleet Admiral) Fleet Admiral)✧ 109 Views · 5 Likes
Flag
Major restoration no doubt. I'm not sure looking at the pictures I would have even started in the first place.Your skills to visulize the boat go above most.I'm thinking it must have been a labor of love as a family member had built years ago.
Rick ▲
⟩⟩
hermank
ChrisG
pressonreguardless
River Rat
Colin H
|
|
💬 Re: Restore or burn ?
1 year ago by 🇬🇧 Colin H (
Fleet Admiral)✧ 106 Views · 5 Likes
Flag
That's a great restoration and it looks fantastic on the water.
Makes my restorations look simple. Great work shipmate, cheers Colin. ▲
⟩⟩
hermank
ChrisG
pressonreguardless
River Rat
Newby7
|
|
💬 Re: Restore or burn ?
1 year ago by 🇬🇧 RonBMK2 (
 Petty Officer 1st Class) Petty Officer 1st Class)✧ 117 Views · 4 Likes
Flag
Lovely restoration Sir ,well done many would of thrown her in the bin (or on the fire) . Just shows what people can do if they put there minds to it.
▲
⟩⟩
ChrisG
River Rat
Newby7
Colin H
|
Login To
Remove Ads
Remove Ads
📝 Albert
1 year ago by 🇬🇧 flaxbybuck ( Captain)
Captain)✧ 73 Views · 8 Likes · 1 Comment
Flag
💬 Add Comment
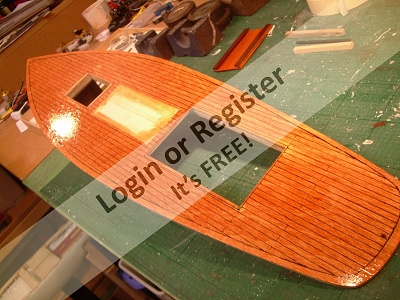
This is the first known picture of Albert (as I have called the pond yacht, after the uncle who made it).
The year is 1929 and the place is near Geldeston beach on the River Waveney, close to Beccles.
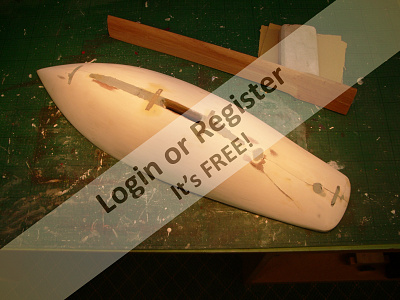
Regretably I have no more pictures of Albert until 2009 at which time it had already been restored once, and was on its second or third set of sails. I was encouraged by a neighbour to get the yacht back on the water so I embarked upon restoration number 2. The 1959 deck was removed and a separate rudder installed. The original sheet steel keel was removed and a new one fashioned from ply. At this point I was still planning on returning Albert to the water as a simple pond yacht but for reasons lost to my memory created a new deck with over-large hatches. By the time I had finished these it looked ridiculous, so after only a couple of appearances on the water I decided to embark on a completely new restoration and to install radio control. This is when things went a little awry.😮🤔🤕
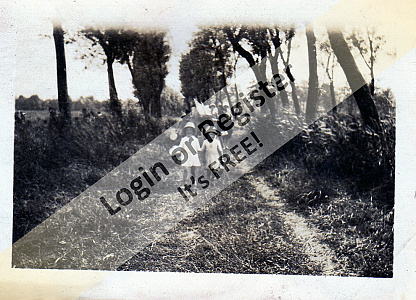
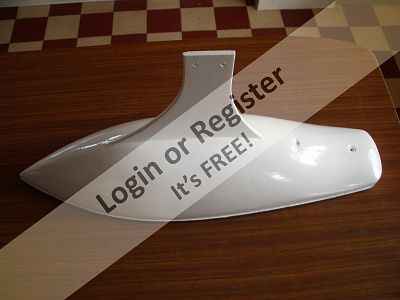
The year is 1929 and the place is near Geldeston beach on the River Waveney, close to Beccles.
Regretably I have no more pictures of Albert until 2009 at which time it had already been restored once, and was on its second or third set of sails. I was encouraged by a neighbour to get the yacht back on the water so I embarked upon restoration number 2. The 1959 deck was removed and a separate rudder installed. The original sheet steel keel was removed and a new one fashioned from ply. At this point I was still planning on returning Albert to the water as a simple pond yacht but for reasons lost to my memory created a new deck with over-large hatches. By the time I had finished these it looked ridiculous, so after only a couple of appearances on the water I decided to embark on a completely new restoration and to install radio control. This is when things went a little awry.😮🤔🤕
▲
⟩⟩
ChrisG
jbkiwi
AndyB
RNinMunich
hermank
dave976
Len1
Colin H
|
💬 Re: Albert
1 year ago by 🇬🇧 dave976 (
Captain)✧ 70 Views · 2 Likes
Flag
Great history and clearly a much loved model. I think I would have reached the same stage as you last pic as the model was clearly in need of a complete rebuild. The remaining pieces look nice and solid and with some sanding on the exposed inside should clean up well. The two halves will bond together well with a suitable adhesive. If you then apply some cloth and fibreglass layup resin the hull will be as good as new. If you are keeping the white hull you could also cover the outside. The keel looks like it fits in a slot in the hull. Should be relatively simple to make a deck following the original plan and you could should you choose to, step the mast at the keel. I do like the 1930's style fixings.
It would be a crime to even consider burning such a classic model and I look forward to seeing it restored. dave976 ▲
⟩⟩
hermank
Colin H
|
📝 Albert IV - Rebuilding Albert
1 year ago by 🇬🇧 flaxbybuck ( Captain)
Captain)✧ 62 Views · 6 Likes · 1 Comment
Flag
💬 Add Comment
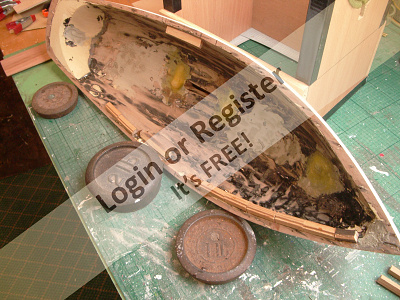
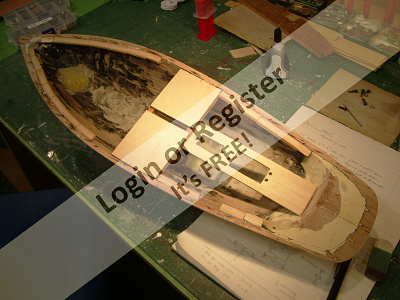
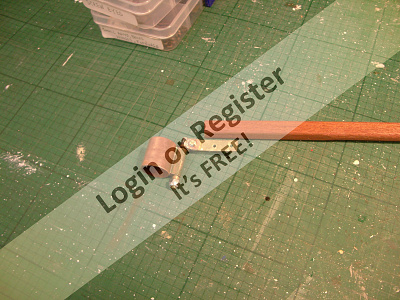
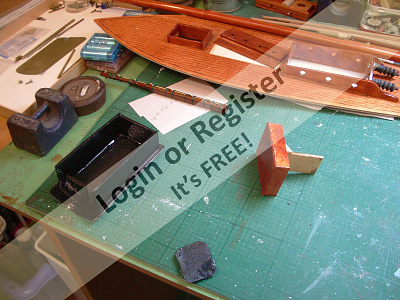
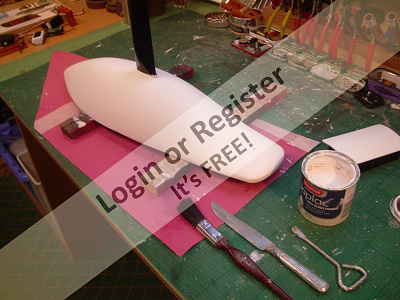
After the dust had settled, plus a reinforcing tot, I started the rebuild. Whilst there was plenty of wood surfaces for a successful glue up I nevertheless felt the need for additional reinforcement. I settled on using a number of cable ties, embedded beneath the surface and filled externally, but simply covered with glassfibre internally.
At this stage I transferred all the dimensions full size on to a drawing sheet and started to plan how I would build and fit out Albert. The keel design of my Dragon Force yacht influenced my decision as to the style and size of keel. Then I had to make a calculated guess as to where to position it. This led to constructing an internal frame into which the top of the keel would be glued. Once this was done I could then plan the layout of the proposed radio control. This was one of the most difficult parts of the build, having to position each component in such a way that it would be accessible but able to do its job, and fit in with a new superstructure.
After many days of experimentation I chose to mount the rudder servo and sail winch fore-and-aft within the cabin, whilst the receiver and battery were placed for'd of the mast on a removable 'hatch' cover. The size of the hatch gives barely 2mm allowance for inserting the receiver and battery, but enough is enough !
Attaching the deck to the hull was postponed for as long as possible, giving me time to build the superstructures and treat all the internal surfaces first. At this stage I sanded and varnished the deck, rubbed it down then drew on the planking lines with waterproof drawing ink. Several coats of varnish followed, rubbing down with wet and dry between coats.
By this time all the major headaches had been dealt with and I was able to enjoy planning the mast, sails and rigging.😉
▲
⟩⟩
ChrisG
jbkiwi
Colin H
RNinMunich
River Rat
hermank
|
💬 Re: Albert IV - Rebuilding Albert
1 year ago by 🇧🇪 hermank (
Captain)✧ 58 Views · 0 Likes
Flag
Your deck looks good and fits nicely
▲
⟩⟩
No likes yet
This member will receive 1 point for every like received |
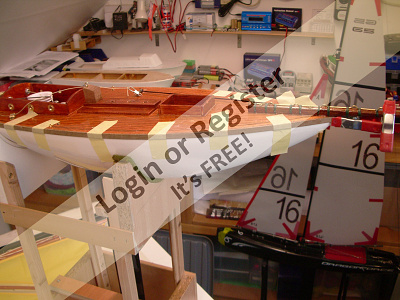
📝 Albert - mast fittings and sails
1 year ago by 🇬🇧 flaxbybuck ( Captain)
Captain)✧ 57 Views · 9 Likes · 2 Comments
Flag
💬 Add Comment
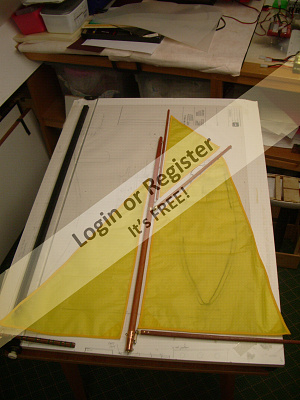
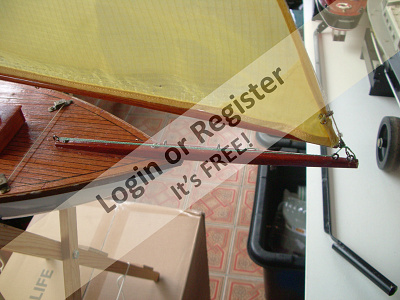
Albert's mast is stepped on a deck mounting in such a way it can be moved fore and aft. In theory this allows adjustments to be made to find the optimum position. In practice this is a bit more complicated because it can require sails that are smaller or larger, so I adopted one position and made my sails to suit. Six sails were made - one mainsail, one headsail, and four jibs. Thus I can vary the amount of sail carried according to wind and weather conditions. Experimentation showed the largest of the jibs (No.4) works most successfully, but in heavy weather I will remove the headsail and use No.3 jib.
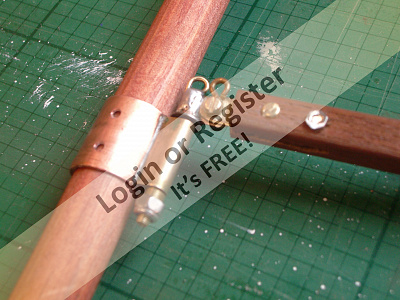
The fittings were made using copper and brass pieces soldered together. In most cases I made two or more before getting the desired result.
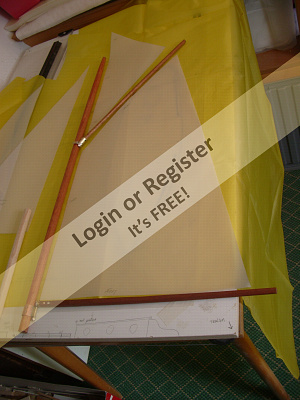
The mast, boom and gaff were laid out on a large drawing sheet to enable sail patterns to be made. These could then be adjusted prior to cutting out the sail material which is 2 oz ripstop nylon. Reinforcing corners were sewn into place prior to stitching bias binding onto all edges, using a normal home sewing machine. Here I would add a word of advice - do not rely on your spouse or friend to do the sewing. Learn to use the machine yourself - it is not difficult - you can then get the job done when YOU want it done, and to YOUR satisfaction !😉

The fittings were made using copper and brass pieces soldered together. In most cases I made two or more before getting the desired result.
The mast, boom and gaff were laid out on a large drawing sheet to enable sail patterns to be made. These could then be adjusted prior to cutting out the sail material which is 2 oz ripstop nylon. Reinforcing corners were sewn into place prior to stitching bias binding onto all edges, using a normal home sewing machine. Here I would add a word of advice - do not rely on your spouse or friend to do the sewing. Learn to use the machine yourself - it is not difficult - you can then get the job done when YOU want it done, and to YOUR satisfaction !😉
▲
⟩⟩
RossM
Mike Stoney
RNinMunich
jbkiwi
hermank
River Rat
luckyduck
Ronald
Colin H
|
💬 Re: Albert - mast fittings and sails
1 year ago by 🇧🇪 hermank (
Captain)✧ 58 Views · 0 Likes
Flag
Very Nice your fittings. You must be used to work with brass and copper. Or are you a pro?
▲
⟩⟩
No likes yet
This member will receive 1 point for every like received |
|
💬 Re: Albert - mast fittings and sails
1 year ago by 🇬🇧 johnf (
 Warrant Officer) Warrant Officer)✧ 58 Views · 2 Likes
Flag
A first class effort Buck. I was also most impressed by your use of MrsBuck's sewing machine - I would not dare!!
Dr. John F. Leeds and Bradford. MBC. 😊😊😊 ▲
⟩⟩
hermank
luckyduck
|
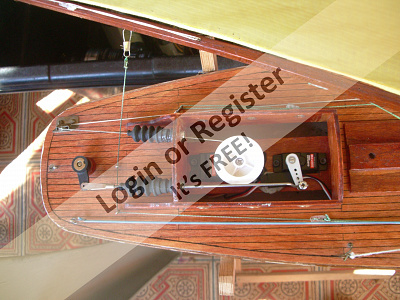
📝 Albert - fitting the electrics
1 year ago by 🇬🇧 flaxbybuck ( Captain)
Captain)✧ 53 Views · 8 Likes · 3 Comments
Flag
💬 Add Comment
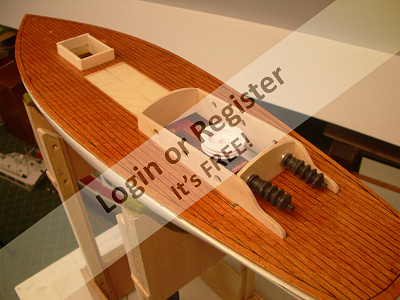
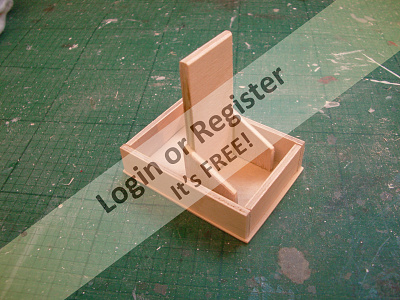
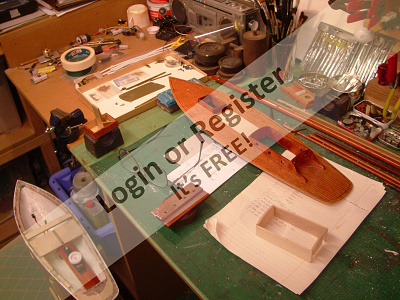
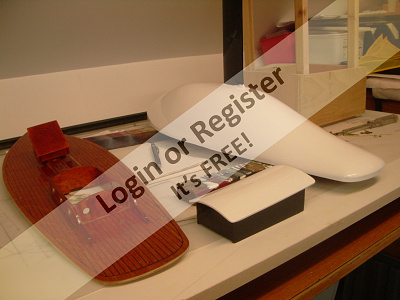
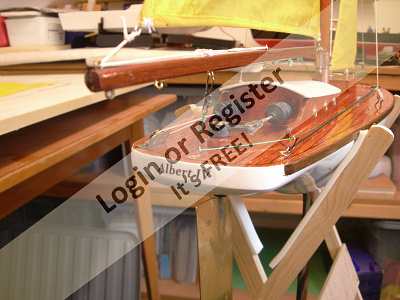
Note, at this stage the deck has not yet been attached to the hull. The sequence of pictures show
the cabin and for'd hatch being built
the hatch cover with flange to which receiver and battery will be attached
the cabin roof being made. Roof and hatch stained.
the yacht with keel in its temporary cradle
the upturned painted hull, with deck and cabin roof.
the underside of the hatch showing receiver and battery attached to the flange, and aerial attachment.
the hull and keel
Albert with mast and sails temporarily positioned
the large rudder installed
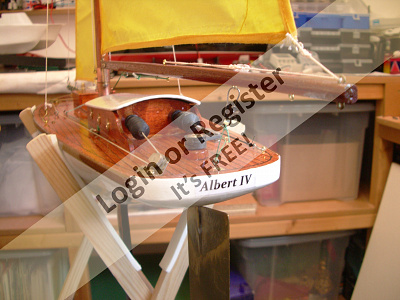
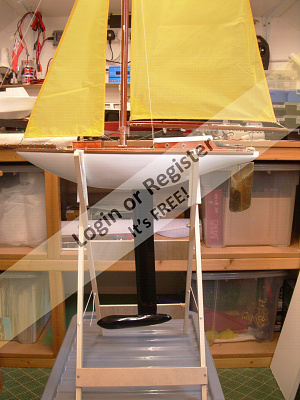
Albert in its stand showing lead keel bulb.
Planning ahead was the constant need. With a yacht there are so many items that have to be just right, and forgetting any one item was simply not an option.
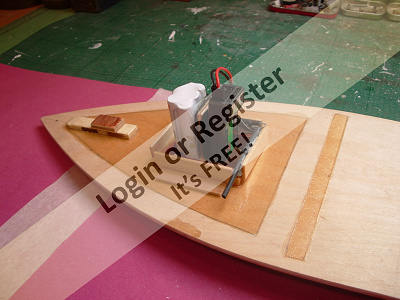
The sail winch and rudder servo are mounted in a narrow fore and aft frame in just sufficient space to permit removal / replacement. The for'd hatch is barely large enough for the receiver and battery pack to be attached with velcro, whilst the aerial wires are held in place in their pre planned location with bluetack. A simple home made switch is fitted to the hatch roof.
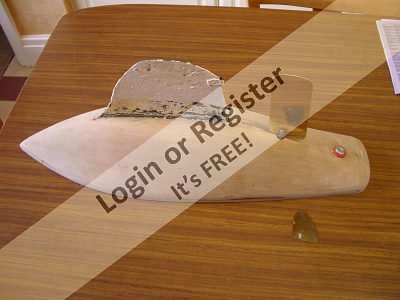
Some of you will have noticed the rather unusual shape of the lead bulb in the last photo. This was the only way of adjusting the trim of the boat to compensate for the keel being a bit too far aft. The alternative would have necessitated removing the keel, redesigning the keel support (immediately beneath the deck), enlarging the keel slot in the hull, re fixing the keel in its new location, making good the hull, preparing and repainting it. ie. it would have been a major job !
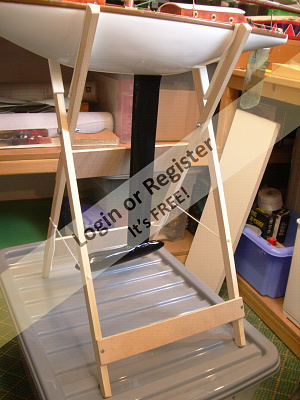
In the last couple of photos you can also see the folding stand/cradle I made. This is lightweight, stable and adaptable, being able to accept boat hulls of different shapes and sizes. It can also be easily pegged down to prevent the wind from blowing it over.
Next time - completing the build. Rigging. Testing.😉😉

the cabin and for'd hatch being built
the hatch cover with flange to which receiver and battery will be attached
the cabin roof being made. Roof and hatch stained.
the yacht with keel in its temporary cradle
the upturned painted hull, with deck and cabin roof.
the underside of the hatch showing receiver and battery attached to the flange, and aerial attachment.
the hull and keel
Albert with mast and sails temporarily positioned
the large rudder installed
Albert in its stand showing lead keel bulb.
Planning ahead was the constant need. With a yacht there are so many items that have to be just right, and forgetting any one item was simply not an option.
The sail winch and rudder servo are mounted in a narrow fore and aft frame in just sufficient space to permit removal / replacement. The for'd hatch is barely large enough for the receiver and battery pack to be attached with velcro, whilst the aerial wires are held in place in their pre planned location with bluetack. A simple home made switch is fitted to the hatch roof.
Some of you will have noticed the rather unusual shape of the lead bulb in the last photo. This was the only way of adjusting the trim of the boat to compensate for the keel being a bit too far aft. The alternative would have necessitated removing the keel, redesigning the keel support (immediately beneath the deck), enlarging the keel slot in the hull, re fixing the keel in its new location, making good the hull, preparing and repainting it. ie. it would have been a major job !
In the last couple of photos you can also see the folding stand/cradle I made. This is lightweight, stable and adaptable, being able to accept boat hulls of different shapes and sizes. It can also be easily pegged down to prevent the wind from blowing it over.
Next time - completing the build. Rigging. Testing.😉😉
▲
⟩⟩
ChrisG
RNinMunich
jbkiwi
hermank
neilw
River Rat
Colin H
johnf
|
💬 Re: Albert - fitting the electrics
1 year ago by 🇬🇧 flaxbybuck (
Captain)✧ 50 Views · 0 Likes
Flag
Thanks for your kind comments.
I based the keel design on that used by RG65 yachts. At our sailing base, Yeadon Tarn near Leeds Bradford airport, we have just sufficient depth for these keels, but when the water level drops, eg during dry weather, it can be quite tricky steering a course out of the harbour area into deeper water. Should I ever feel motivated to carry out yet another refurbishment I think I would use a removable keel. I would then have the ability to use keels of different lengths to suit the weather conditions, but also the advantage of easier transportation and storage.😉 ▲
⟩⟩
No likes yet
This member will receive 1 point for every like received |
|
Login To
Remove Ads 💬 Re: Albert - fitting the electrics
1 year ago by 🇺🇸 River Rat (
Captain)✧ 59 Views · 2 Likes
Flag
You have done an outstanding job on the restoration. Long way from the burn pile! Look forward to your completion and testing. Excellent work! RR
▲
⟩⟩
ChrisG
hermank
|
|
💬 Re: Albert - fitting the electrics
1 year ago by 🇬🇧 luckyduck (
 Midshipman) Midshipman)✧ 62 Views · 1 Like
Flag
That's one deep keel, hope your pond/lake is deep enough!🤔
▲
⟩⟩
hermank
|
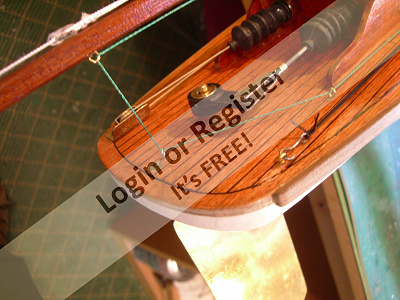
📝 Albert - electrics
1 year ago by 🇬🇧 flaxbybuck ( Captain)
Captain)✧ 42 Views · 4 Likes · 1 Comment
Flag
💬 Add Comment
My last entry said little if anything about the electrics, in spite of the title. Sorry about that.
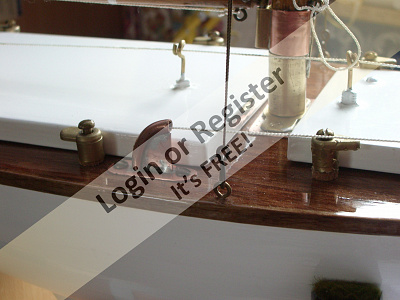
With only two controls required, rudder and sail sheets, I was able to install a very basic system comprising receiver, battery, sail winch and rudder servo. The receiver is a Flysky FS-1A6B, the battery pack is a 6v hump pack comprising 5 AAA NiMH cells, the sail winch a King Max SW4801-1.5PA, and the servo is a mini size S0017M.
The winch and servo arrangement can be seen in the attached photo. Also a plug and socket to an extension lead held in place with blue-tack.
The receiver and battery pack are secured to a deep web on the underside of the for'd hatch with velcro (see photos on last post). There was insufficient space for a switch to be housed on the hatch so I made a simple switch with brass studs and wire, and it has worked perfectly.
Small boats need a disproportianately large sized rudder, particularly on yachts where speed through the water can be quite slow. Once again I looked at my RG65 to get some clues as to rudder size, and settled on a rudder 110 x 50 mm. The boat hull is just 22" and not much less on the waterline, maybe 21".
Sealing the cabin and hatch roofs has been very effective using bluetack. This is waterproof, but also grips the surefaces together, so there is little or no chance of them coming off whilst sailing. I have only experienced the tiniest amount of water ingress, and never enough to touch or affect the electrics in any way.😉
▲
⟩⟩
hermank
RNinMunich
johnf
Colin H
|
💬 Re: Albert - electrics
1 year ago by 🇬🇧 johnf (
Warrant Officer)✧ 44 Views · 1 Like
Flag
Hi Buck,
Many thanks for an excellent tip for all readers regarding the waterproofing value of BluTac. Your Albert 1V yacht sits really low in the water - and I have not been alone in wondering if it would become our Club's very first wind-powered submarine!! The fact that you still often sail it proved beyond all doubt the value of BluTac! John. 😀😀😮😀 ▲
⟩⟩
hermank
|
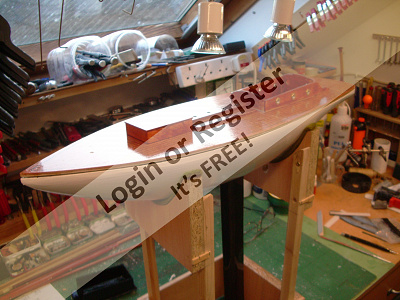
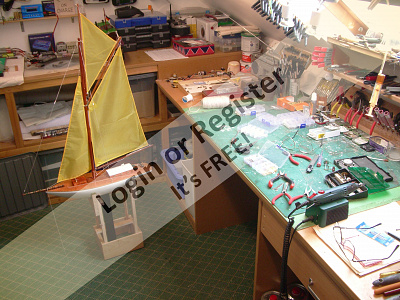
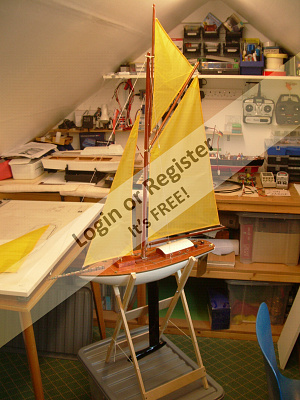
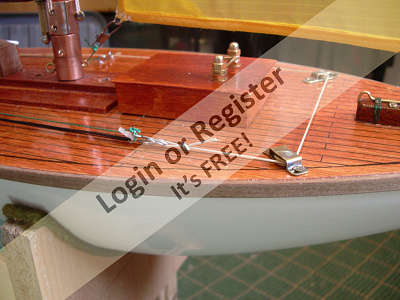
📝 Completion and trials
1 year ago by 🇬🇧 flaxbybuck ( Captain)
Captain)✧ 35 Views · 7 Likes
Flag
💬 Add Comment
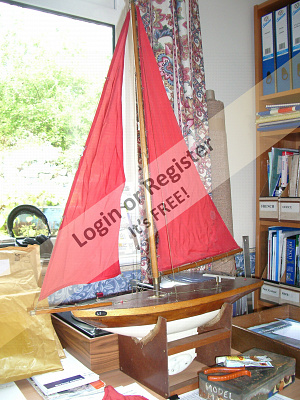
With the 'internals' all in place and the interior painted with white flow-coat, the deck was finally screwed and glued down, and the gunwhales attached. The picture of the stern arrangement shows the rudder yolk and operating arm, and to the left (port side) the winch line passing through a rather crude home-made pulley. This line goes forward, through two more pulleys and back towards the stern with a length of elastic cord to keep it taut. The main sheet is attached where the winch line and elastic cord meet and passes to the stern, through eyes and up to the boom where it is secured with the hook part of a fishing swivel. The jib sheet is attached to a ring on the pulley sheet (which is on the port side towards the stern), passes forward through eyes to the jib.
The name was printed on to transparent sheet and glued on to the stern, then given a couple of coats of varnish.
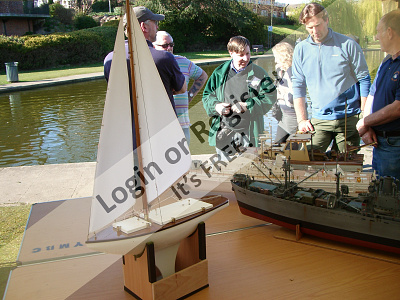
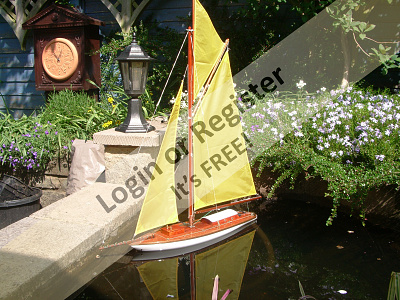
A side view of Albert shows the keel, and how I had to balance the weight to obtain the correct trim. In spite of all the float and balance tests carried out during the planning stage the keel is nevertheless in the wrong position. It should have been further forward, but too late, I'm not altering it now! The float test on my small pond shows how the trim is now.
One day at the pond a sudden gust of wind took Albert off its stand and broke the bowsprit (yes , these things happen) so the next picture shows the new bowsprit in place.
The sails are made from 2oz rip stop nylon and edged with colour matched bias binding, all run up on the home sewing machine. I like to be able to readily remove my sails, for example, to reduce sail on a windy day, or change sails. For this purpose I sew eyes into the sail corners so at each corner a sheet can be attached with a simple hook. Hooks are often made using paper clips; these are ideal being rust resistant and easily bent. Bowies are self made from sheet material. Screw eyes are always put into pre drilled holes, typically 0.5mm size. A sheet is attached to the leading corner of the jib, passed through an eye, taken back and slipped over a hook (an eye slightly opened up). This can be done by simply tying a slip knot in the sheet which is small enough to pass through the eye.
When Albert lV was first sailed at Yeadon Tarn someone called out "is that yacht sinking ?". It certainly looks like it because it is so low in the water. Next time I rebuild it I must add a bit more freeboard, use a removable keel and put it in the right place; possibly also move the mast further forward. But that won't be any time soon.
Fortunately she sails quite well in wind speeds up to 6 or 7 knots with the mainsail,headsail and No.4 jib. As the wind strengthens I have to remove the headsail, then change the jib for No.3 or No.2 .
It is very satisfying to have salvaged Albert, and now to be able to bring it back to the quayside thanks to the radio control. I'm sure my Uncle Albert would approve !😉😉

The name was printed on to transparent sheet and glued on to the stern, then given a couple of coats of varnish.
A side view of Albert shows the keel, and how I had to balance the weight to obtain the correct trim. In spite of all the float and balance tests carried out during the planning stage the keel is nevertheless in the wrong position. It should have been further forward, but too late, I'm not altering it now! The float test on my small pond shows how the trim is now.
One day at the pond a sudden gust of wind took Albert off its stand and broke the bowsprit (yes , these things happen) so the next picture shows the new bowsprit in place.
The sails are made from 2oz rip stop nylon and edged with colour matched bias binding, all run up on the home sewing machine. I like to be able to readily remove my sails, for example, to reduce sail on a windy day, or change sails. For this purpose I sew eyes into the sail corners so at each corner a sheet can be attached with a simple hook. Hooks are often made using paper clips; these are ideal being rust resistant and easily bent. Bowies are self made from sheet material. Screw eyes are always put into pre drilled holes, typically 0.5mm size. A sheet is attached to the leading corner of the jib, passed through an eye, taken back and slipped over a hook (an eye slightly opened up). This can be done by simply tying a slip knot in the sheet which is small enough to pass through the eye.
When Albert lV was first sailed at Yeadon Tarn someone called out "is that yacht sinking ?". It certainly looks like it because it is so low in the water. Next time I rebuild it I must add a bit more freeboard, use a removable keel and put it in the right place; possibly also move the mast further forward. But that won't be any time soon.
Fortunately she sails quite well in wind speeds up to 6 or 7 knots with the mainsail,headsail and No.4 jib. As the wind strengthens I have to remove the headsail, then change the jib for No.3 or No.2 .
It is very satisfying to have salvaged Albert, and now to be able to bring it back to the quayside thanks to the radio control. I'm sure my Uncle Albert would approve !😉😉
▲
⟩⟩
Mike Stoney
mturpin013
MouldBuilder
cdnfurball
ChrisG
Colin H
RNinMunich


Login To
Remove Ads
Remove Ads