Join Us On Social Media!

|

|

|
Download The App!
Login To
Remove Ads
Remove Ads
Login To
Remove Ads
Remove Ads
Model Boats Website
Ketch Barge "Pearl of Ipswich"
17 Posts · 11 Followers · 107 Photos · 78 Likes
Began 5 years ago by
 United States
Follow This Thread
Not currently following
> Click to follow
> Click to follow
Latest Post 4 years ago by
| Oldest posts shown first (Show Newest First) | (Print Booklet) |
📝 Ketch Barge "Pearl of Ipswich"
5 years ago by 🇺🇸 Joe727 ( Commander)
Commander)✧ 4 Views · 1 Like
Flag
💬 Add Comment
Hello,
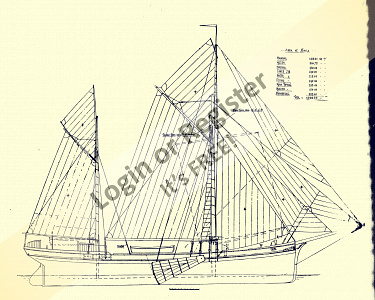
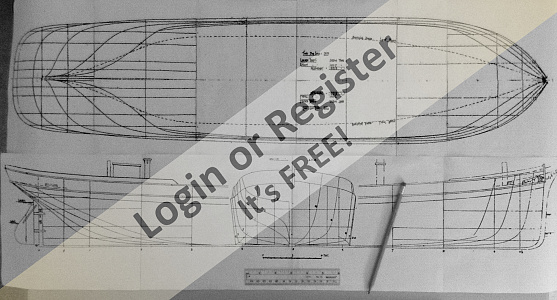
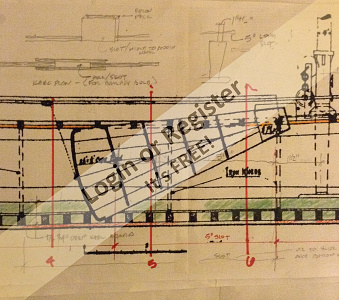
As I have mentioned before, I like the workboats from the age of sailing. The sailing barges caught my interest some time ago on one of my stays in the UK and I recently purchased a number of books on them. interesting history, more to it than I realized. Finally decided to build a Ketch Barge that is categorized as a Boomie as well. Several reasons; I wanted to model one of the larger ones, this one is 85', and I like gaff rigged boats with booms. Topsails a must as well and I like ketches. This one fits the bill and who could resist the chance to set 7 to 8 sails!
Frank Carr's book tells the story of the barge Pearl and included plan, elevation, lines and sail plans. Nice bit of information, I can build with that. See attached photos. This will probably be a lengthy build, my Falmouth Gaff-rigged Cutter took me two years. I built that one while on assignment in Grand Cayman using only my small kit OD hand tools. More to come, hope to start this week. Cheers, Joe
▲
⟩⟩
Martin555
Login To
Remove Ads
Remove Ads
📝 Determine Scale / Ribs / HELP with building board ideas?
5 years ago by 🇺🇸 Joe727 ( Commander)
Commander)✧ 9 Views · 6 Likes
Flag
💬 Add Comment
To clarify this build, it will be a RC Sailing Boat with full functioning rudder and sails. I say this as I am using the PEARL for its design overall, but as to detailed historical details it will have some, but be simplified.
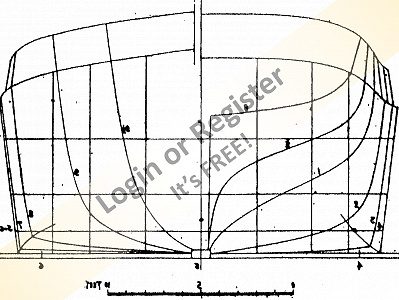
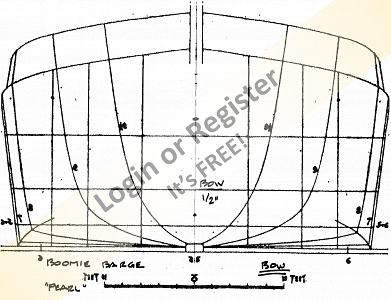
Boat's Dimnsions were shown in Imperial, 21' width x 85'-6" length. The bowsprit adds about another 25% in length. To determine what scale I wanted to build in I thought most about storage, weight to lift and how to transport to the pond. I like to keep things simple, I prefer to rig it and transport while assembled, with the topsail mast dropping and the bowsprit retracted. Have done this before and it has worked well for me.
Looking at potential scales and finished sizes.
* 3/4" or 1/18 scale would be 16" x 64"
* 1/2" or 1/24 scale equals 10.5" x 42.75"
* 3/8" equals 8" x 32"
I prefer a larger bout in length as it is easier to get to sail correctly, at least in my experience. Anything under 32" get tricky. I like the 64" size, but with bowsprit will be about 88" LOA. This will be a little too large for my vehicle. I decided to go with 1/2" scale as it will still be a good length hull.
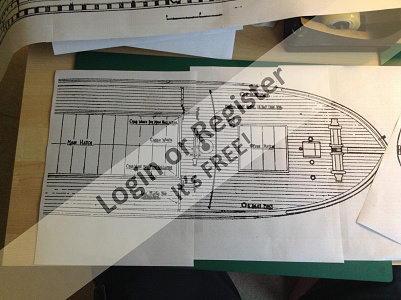
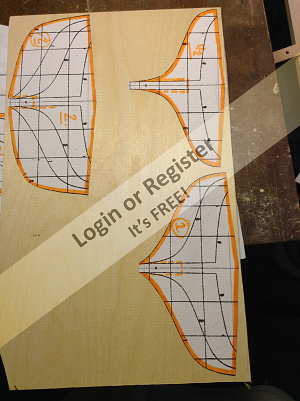
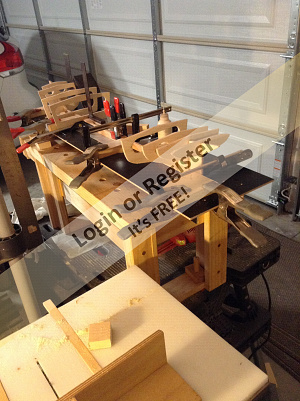
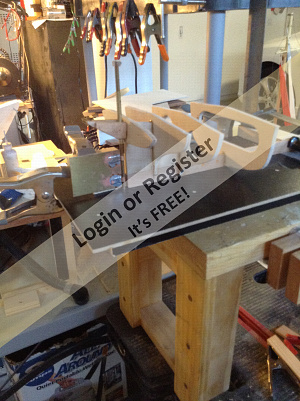
Ribs - I took the hull line drawings from the book, which were very small, just about an inch wide. I scanned the image and using the app "paint" on my laptop. I cropped it close around the hull rib drawing, I then enlarged it to 1/2" scale. Then I printed on standard letter sized paper, then mirrored the image cut them in two, pasted up as seen in the photos to show the completed rib sections.
Next I will put together a building board / hull jig. I want to build bottom up for planking. DO any of you have any good ideas for the best one to build? I have never done this except for tiny boats.
Ideas, Help would be appreciated. Joe

Boat's Dimnsions were shown in Imperial, 21' width x 85'-6" length. The bowsprit adds about another 25% in length. To determine what scale I wanted to build in I thought most about storage, weight to lift and how to transport to the pond. I like to keep things simple, I prefer to rig it and transport while assembled, with the topsail mast dropping and the bowsprit retracted. Have done this before and it has worked well for me.
Looking at potential scales and finished sizes.
* 3/4" or 1/18 scale would be 16" x 64"
* 1/2" or 1/24 scale equals 10.5" x 42.75"
* 3/8" equals 8" x 32"
I prefer a larger bout in length as it is easier to get to sail correctly, at least in my experience. Anything under 32" get tricky. I like the 64" size, but with bowsprit will be about 88" LOA. This will be a little too large for my vehicle. I decided to go with 1/2" scale as it will still be a good length hull.
Ribs - I took the hull line drawings from the book, which were very small, just about an inch wide. I scanned the image and using the app "paint" on my laptop. I cropped it close around the hull rib drawing, I then enlarged it to 1/2" scale. Then I printed on standard letter sized paper, then mirrored the image cut them in two, pasted up as seen in the photos to show the completed rib sections.
Next I will put together a building board / hull jig. I want to build bottom up for planking. DO any of you have any good ideas for the best one to build? I have never done this except for tiny boats.
Ideas, Help would be appreciated. Joe
▲
⟩⟩
Martin555
TOWN3810
mturpin013
Nerys
Donnieboy
cadal2
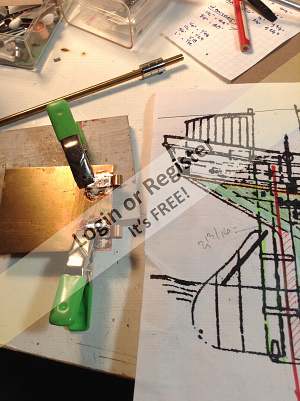
📝 Planning Ahead
5 years ago by 🇺🇸 Joe727 ( Commander)
Commander)✧ 9 Views · 6 Likes
Flag
💬 Add Comment
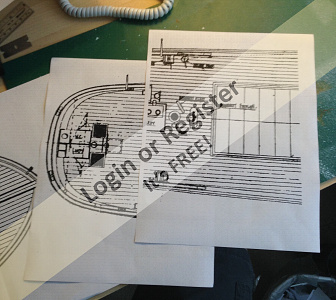
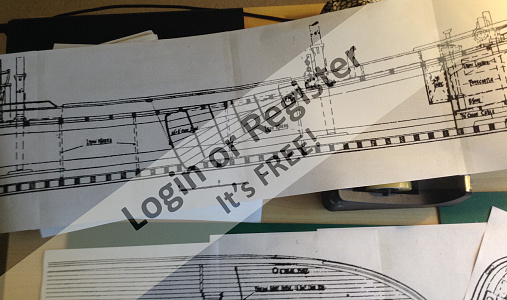
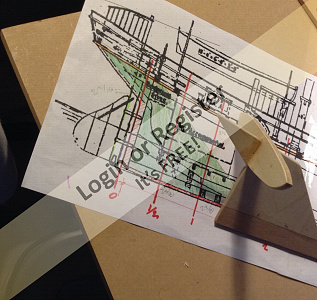
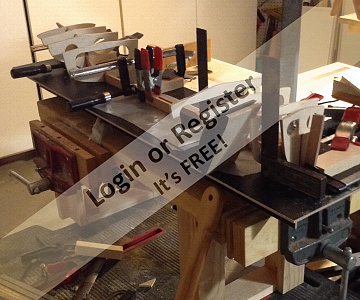
Spent the last two days studying the barge design and planning the build. First I scanned the small book-page size images, then with my laptop I cropped them into separate smaller images to my chosen scale. I cut, align and tape them, assemble an image that is to the size of the build. in the past I would use the local print shop and just enlarged on their large roll printer. it added up to a lot of money as they are about $7 a shot, with mistakes made it cost too much. Now that I am retired I pinch those pennies much tighter. This was more time consuming but is very accurate.
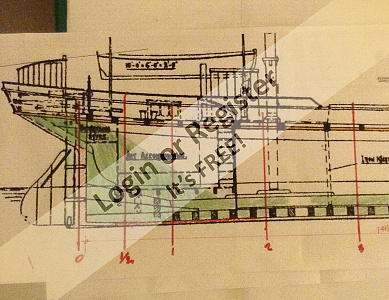
Next I sketched out the keel board shape, colored up as seen in the photos. Sketch out an idea to accommodate the bulb keel that I intend to add. This one is to sail on Sunday's at the pond, so I will do my best to engineer to sail well.
Cheers Joe

Next I sketched out the keel board shape, colored up as seen in the photos. Sketch out an idea to accommodate the bulb keel that I intend to add. This one is to sail on Sunday's at the pond, so I will do my best to engineer to sail well.
Cheers Joe
▲
⟩⟩
MouldBuilder
Martin555
TOWN3810
mturpin013
figtree7nts
Donnieboy
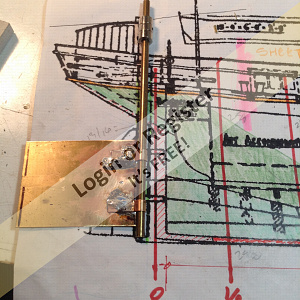
📝 Keel
5 years ago by 🇺🇸 Joe727 ( Commander)
Commander)✧ 10 Views · 7 Likes · 1 Comment
Flag
💬 Add Comment
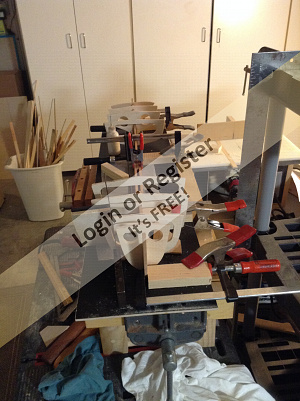
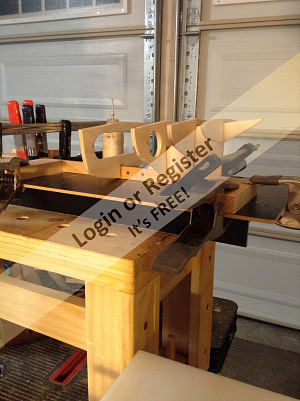
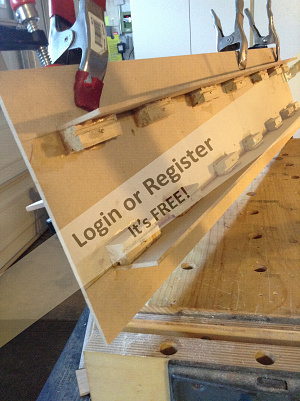
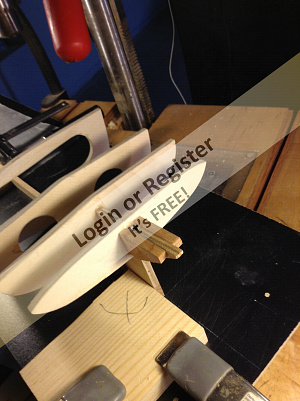
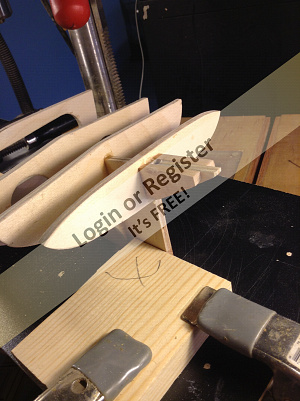
Printed out the frames /ribs drawings and outlined each in orange so I could easily see the correct lines. Cut those out and pasted to some plywood. The plywood is Baltic Birch 1/4" -5 ply, very nice quality that I get from a local woodworking supply store. it's a bit nicer than from the local warehouse hardware lumber yard, but that would work also. Used some spray rubber cement, sprayed only the paper back and stuck on the plywood. Spraying just one surface allows quick removal of the paper once cut.
I don't have a bandsaw of scroll saw, so I use a sabresaw/hand jigsaw mounted upside down on a surface that secures to my drill press. Works pretty good. My shop is so tiny that I just don't have a space for larger tools. Maybe someday.
Keel board was glued up, will show more tomorrow on that.
Joe


I don't have a bandsaw of scroll saw, so I use a sabresaw/hand jigsaw mounted upside down on a surface that secures to my drill press. Works pretty good. My shop is so tiny that I just don't have a space for larger tools. Maybe someday.
Keel board was glued up, will show more tomorrow on that.
Joe
▲
⟩⟩
Martin555
RNinMunich
TOWN3810
figtree7nts
mturpin013
marky
Donnieboy
|
💬 Keel
5 years ago by 🇬🇧 mturpin013 (
 Admiral) Admiral)✧ 5 Views · 2 Likes
Flag
Where there's a will there's a way Joe, Well done keep up the good work.
▲
⟩⟩
Martin555
Joe727
|
📝 Clamp Chaos
5 years ago by 🇺🇸 Joe727 ( Commander)
Commander)✧ 7 Views · 4 Likes · 2 Comments
Flag
💬 Add Comment
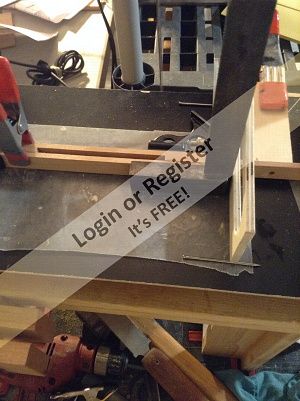
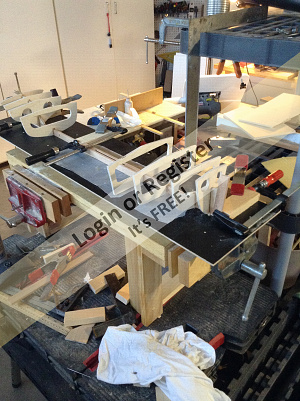
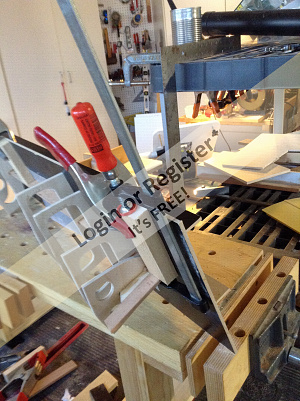
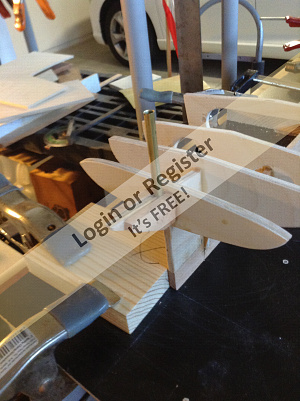
Hello, it's been a slow week as I started out having some teeth pulled, put me off track so I missed getting some photos. I will get some better shots of what the keel board looks like once I get some clamps out of the way. I will photo how I do the last four ribs as well. Photos show my makeshift board with clamps everywhere. Joe

▲
⟩⟩
MouldBuilder
Martin555
Colin H
figtree7nts
|
💬 Clamp Chaos
5 years ago by 🇺🇸 Joe727 (
Commander)✧ 4 Views · 1 Like
Flag
Steve,
You are quite right, I intend to flip it over, build some jigs, when it's time to do the hull "planking". My methods are to experiment along the way on a Build, try different ideas along the way. Decided that I first wanted to build a very straight, rigid keel with stern and bow ribs first. That's why the build board is just a lightweight flat straight surface, I figure out how to clamp it best as I go. Your interest and comments are appreciated, it made me think more about the planking, thanks! Joe ▲
⟩⟩
Martin555
|
|
💬 Clamp Chaos
5 years ago by 🇬🇧 steve-d (
 Warrant Officer) Warrant Officer)✧ 25 Views · 2 Likes
Flag
I'm assuming this will be a planked hull in which case would it not have been better to build the hull upside down?
Steve ▲
⟩⟩
Martin555
RNinMunich
|
📝 Simple Building board
5 years ago by 🇺🇸 Joe727 ( Commander)
Commander)✧ 9 Views · 6 Likes
Flag
💬 Add Comment
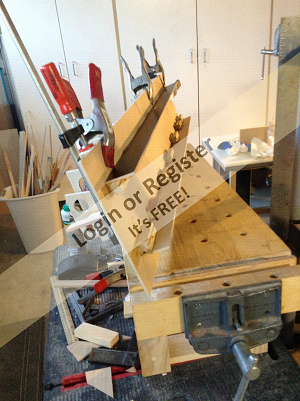
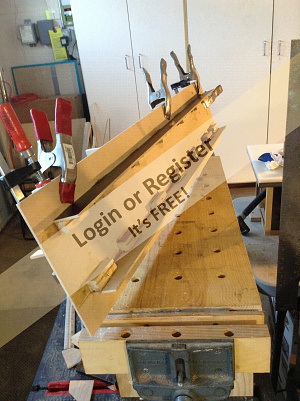
Hello, Photos attached show my quick inexpensive building board. All I needed was a lightweight, movable board that I could clamp to.
I had a scrap of tempered hardboard about 35" x 16, so I cut two strips from it at about 2" wide from it and used them as legs to keep the thin top flat and straight. Then took some scrap wood pieces as a method to glue and secure. Result was a little table that I could clamp to. Hope this makes sense, but point is work with what you have, I considered a trip to the lumber company for wood, glad I didn't.
Joe
▲
⟩⟩
MouldBuilder
Martin555
RNinMunich
Donnieboy
Colin H
TOWN3810
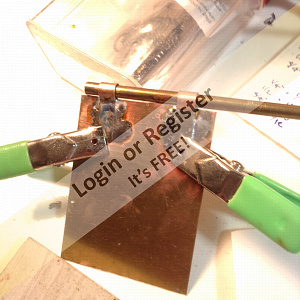
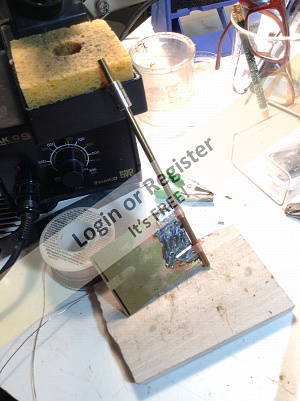
📝 Rudder location, blocking, fabrication
5 years ago by 🇺🇸 Joe727 ( Commander)
Commander)✧ 7 Views · 4 Likes
Flag
💬 Add Comment
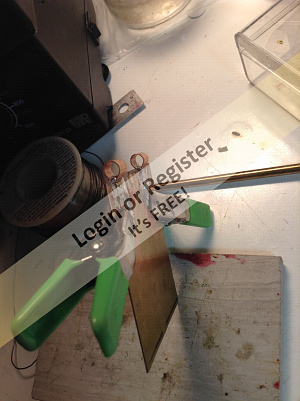
Looking at the proper rudder location, I added some 1/4 triangular hardwood blocking to both sides of the centerboard. Needed blocking to drill through. Was able to pickup the work board and all fit under my drill press to keep the hole plumb. Rudder post will be a 1/4 brass rod with brass tube as a bushing. See photo, brass tube in hull.
Next, I built a rudder substructure assembly which will be covered later with a wood or styrene full size rudder to fit the era. Took some very thin brass and formed it around the post, some brass plate and soldered as seen in photos. Brass heats up and solders well using my soldering station.

Next, I built a rudder substructure assembly which will be covered later with a wood or styrene full size rudder to fit the era. Took some very thin brass and formed it around the post, some brass plate and soldered as seen in photos. Brass heats up and solders well using my soldering station.
▲
⟩⟩
MouldBuilder
Martin555
Inkoust
Donnieboy
📝 Auxiliary motor, rudder servo, bowsprit bitts
5 years ago by 🇺🇸 Joe727 ( Commander)
Commander)✧ 9 Views · 4 Likes
Flag
💬 Add Comment
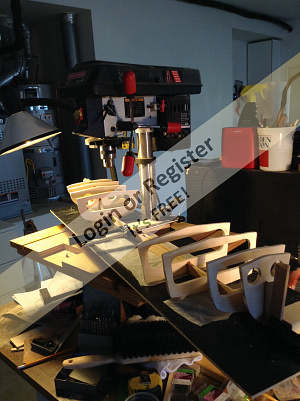
Back to posting again....I decided to added an auxiliary motor since I had several laying around and it will come in handy when I am tweaking the sailing setup in case I get stuck in the middle of the pond. Made a stuffing tube just like I did on my rescue tug build. Made a shaft from some 3/16" steel rod, threaded it and polished it up, works great.
Photo of the aft section shows continued hull framing and upside down mount of the rudder servo. I will enclose the servo with the small pilot house as is typical on the barge. This will make maintenance and adjustment access easy.
Yes, the build is wandering away from the true "Pearl" which I used the hull plans from. it will maintain the same sail plan, but I will modify some items for ease of RC use.
Bowsprit will be retractable, bitts are shown in progress. The bowsprit will be made from a carbon fiber "arrow shaft". Mast will be wood and I am shaping out of maple that I have.
Staring to plank the hull as well. More to come shortly,
Joe
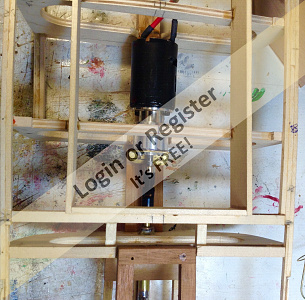
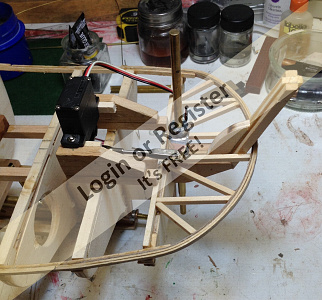
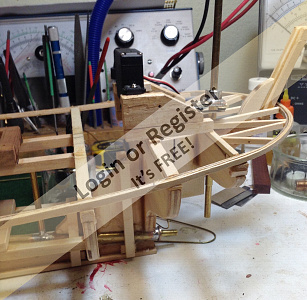
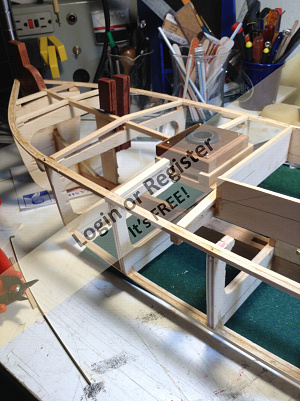
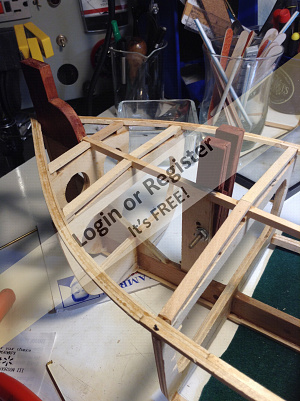
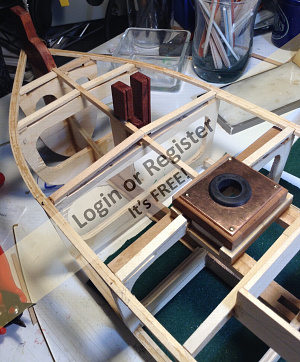
▲
⟩⟩
MouldBuilder
Martin555
Donnieboy
TOWN3810
📝 Update
5 years ago by 🇺🇸 Joe727 ( Commander)
Commander)✧ 11 Views · 3 Likes · 4 Comments
Flag
💬 Add Comment
Hello, I have not posted recently as this is my first planking and I am not proud of the results. As I have progressed in modeling I will redo things if I am not happy with the results...
Now debating whether to start over or continue. I always want to be proud of my results and craftsmanship, so the dilemma🙈😋🙄🐶🚤. My tendency is to start over, comments?
Joe
Now debating whether to start over or continue. I always want to be proud of my results and craftsmanship, so the dilemma🙈😋🙄🐶🚤. My tendency is to start over, comments?
Joe
▲
⟩⟩
MouldBuilder
Martin555
Radioray
|
💬 Re: Update
5 years ago by 🇨🇿 tomarack (
 Midshipman) Midshipman)✧ 5 Views · 0 Likes
Flag
Hi,
I can recommend this little booklet ▲
⟩⟩
No likes yet
This member will receive 1 point for every like received |


|
Login To
Remove Ads 💬 Re: Update
5 years ago by 🇬🇧 mturpin013 (
Admiral)✧ 6 Views · 1 Like
Flag
Don't despair Joe, be positive, how good is it?
▲
⟩⟩
Martin555
|
|
💬 Re: Update
5 years ago by 🇬🇧 Radioray (
 Leading Seaman) Leading Seaman)✧ 11 Views · 2 Likes
Flag
Oops couple of spelling errors. Planning should read planking ... filler was the other word spelt incorrectly.
▲
⟩⟩
Martin555
Joe727
|
|
💬 Re: Update
5 years ago by 🇬🇧 Radioray (
Leading Seaman)✧ 11 Views · 2 Likes
Flag
Hi Joe, My planning wasn't too good either. I used balsa strip to make it easier, filled in with filled and lined the interior with fine glass matt and resin. As I often become became in the lake I sail on in S.France I installed an on-board motor. I used part of a fiberglass fishing pole for the last and did away with the rigging to save time at the lake. It sails very well. Ra
▲
⟩⟩
figtree7nts
Joe727
|
📝 Sailing Barge- Build Blog resuming.....
4 years ago by 🇺🇸 Joe727 ( Commander)
Commander)✧ 8 Views · 3 Likes · 3 Comments
Flag
💬 Add Comment
Hello,
Pulling this Sailing Barge Build out of storage after being out of action for a year. Now if I can just find all of the parts that I was making....
Will continue this blog, thanks for your interest.
Joe
Pulling this Sailing Barge Build out of storage after being out of action for a year. Now if I can just find all of the parts that I was making....
Will continue this blog, thanks for your interest.
Joe
▲
⟩⟩
MouldBuilder
Martin555
Nerys
|
💬 Re: Sailing Barge- Build Blog resuming.....
4 years ago by 🇬🇧 Martin555 (
 Fleet Admiral) Fleet Admiral)✧ 6 Views · 1 Like
Flag
Hi Joe,
I have just read through your build log and i think you are doing a fantastic job. Keep up the good work. I will be following your build. Martin555. ▲
⟩⟩
Joe727
|
|
Login To
Remove Ads 💬 Re: Sailing Barge- Build Blog resuming.....
4 years ago by 🇺🇸 Joe727 (
Commander)✧ 7 Views · 2 Likes
Flag
Nerys,
Thank you for the note and words of encouragement. I have seen your contributions on the site so I am grateful that you will follow the blog. Intend to do photos of the decking tomorrow. Joe Joe ▲
⟩⟩
Martin555
Nerys
|
|
💬 Re: Sailing Barge- Build Blog resuming.....
4 years ago by 🇬🇧 Nerys (
Fleet Admiral)✧ 7 Views · 2 Likes
Flag
Pleased to hear that you have resumed work on your ketch rigged barge.You were getting on so well with her when we last saw photos of the framework. Really looking forward to seeing the completed model as these 'big' barges are somewhat overlooked by most model barge builders.
All the best, Nerys ▲
⟩⟩
Martin555
Joe727
|


Login To
Remove Ads
Remove Ads