Join Us On Social Media!

|

|

|
Download The App!
Login To
Remove Ads
Remove Ads
Login To
Remove Ads
Remove Ads
Model Boats Website
Osprey fishing boat
11 Posts · 11 Followers · 25 Photos · 92 Likes
Began 8 months ago by
 United Kingdom
Follow This Thread
Not currently following
> Click to follow
> Click to follow
Latest Post 6 months ago by
| Most recent posts shown first (Show Oldest First) | (Print Booklet) |
📝 Finished - I think?
6 months ago by 🇬🇧 Doogle ( Commodore)
Commodore)✧ 31 Views · 8 Likes
Flag
💬 Add Comment
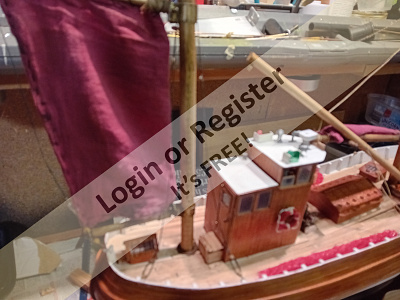
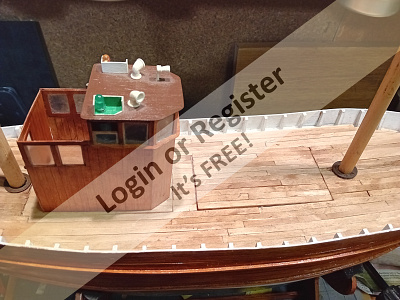
Final fixtures and fittings finished, I think. A couple of figures currently drying after a makeover will be added apart from that, I don't feel I need to add any more.

▲
⟩⟩
Commodore-H
Len1
ChrisG
River Rat
Rogal118
boatmam
EdW
Peejay
Login To
Remove Ads
Remove Ads
📝 Osprey masts
7 months ago by 🇬🇧 Doogle ( Commodore)
Commodore)✧ 46 Views · 1 Like
Flag
💬 Add Comment
Hi Ronald, sorry for the delay in replying, work pressure and home life 😅.
In answer to your question, the masts are 5/16 diameter and 12" high in old money according to the plans .
In answer to your question, the masts are 5/16 diameter and 12" high in old money according to the plans .
▲
⟩⟩
AlessandroSPQR
📝 Osprey updated
7 months ago by 🇬🇧 Doogle ( Commodore)
Commodore)✧ 59 Views · 7 Likes · 1 Comment
Flag
💬 Add Comment
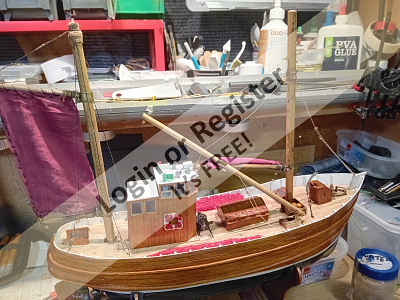
A few little extras, put in place, rear step for access into wheelhouse, boom in place on the stern, deck fittings and structures. Starting to look a bit more like a fishing trawler..
▲
⟩⟩
Rogal118
boatmam
EdW
Wolle
Colin H
AlessandroSPQR
Scratchbuilder
|
💬 Re: Osprey updated
7 months ago by 🇨🇦 Ronald (
 Admiral) Admiral)✧ 56 Views · 1 Like
Flag
Doogle, how thick are your masts?
▲
⟩⟩
AlessandroSPQR
|
📝 Deck stained and mast fitting
7 months ago by 🇬🇧 Doogle ( Commodore)
Commodore)✧ 75 Views · 8 Likes · 10 Comments
Flag
💬 Add Comment
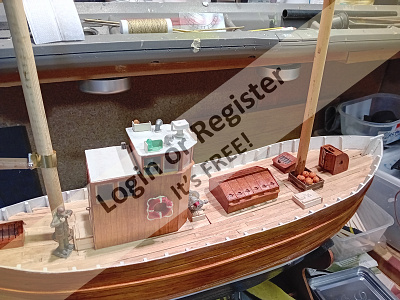
Given time between staining the deck comprising of a glass or three of Bailey's between each coat purely for medicinal purposes (it's cold out there) & a suitable amount of drying time. Pleased with the initial results, maybe a bit more drying and a few more Bailey's 😀.
Fore and aft masts are in place, now need to work out how to attach boom , the plans that came with the Osprey don't appear to show any method of fixing the boom to the masts, only line drawings of everything in place. If anyone has any suggestions, drawings or photos to help me with this part, most grateful as this is a new school 🏫 day.
Fore and aft masts are in place, now need to work out how to attach boom , the plans that came with the Osprey don't appear to show any method of fixing the boom to the masts, only line drawings of everything in place. If anyone has any suggestions, drawings or photos to help me with this part, most grateful as this is a new school 🏫 day.
▲
⟩⟩
Wolle
Mike W
Mike Stoney
hermank
roycv
Scratchbuilder
AlessandroSPQR
Colin H
|
💬 Re: Deck stained and mast fitting
7 months ago by 🇮🇹 AlessandroSPQR (
 Rear Admiral) Rear Admiral)✧ 65 Views · 0 Likes
Flag
Bravissimo RossM.
▲
⟩⟩
No likes yet
This member will receive 1 point for every like received |
|
Login To
Remove Ads 💬 Re: Deck stained and mast fitting
7 months ago by 🇨🇦 RossM (
 Lieutenant) Lieutenant)✧ 68 Views · 4 Likes
Flag
Like that? I got my BERTOCCI from an online bead site (I am learning Italian!!)

▲
⟩⟩
Peejay
AlessandroSPQR
Doogle
hermank
|
|
💬 Re: Deck stained and mast fitting
7 months ago by 🇮🇹 AlessandroSPQR (
Rear Admiral)✧ 70 Views · 4 Likes
Flag
Hi Doogle.
I attach other images. I don't give you advice because you don't need it. I just give an explanation of the photos and repeat the method I used. I would choose between two gooseneck boom systems, one older and one more modern. The first three images show the system similar to mine. It is the more modern of the two. I don't know exactly when it was introduced. At his time I did some research to understand which one suited my model chronologically (which is from the second half of the 19th century). I discovered that this was a transition period and therefore I could use either one or the other. In other words, one system was already in use but the other had not yet been completely abandoned. I used the more modern system for the boom (it also had to be functional being a sailing RC model) and the other for the peak (or spanker). The first system (the most modern) has small variations so you are very free in the construction. Just allow for sideways and upward movement. I made it in brass. I only used a file and hacksaw. If you have better tools available it will be better for you. You can carry out many tests and throw away the prototypes that don't satisfy you (the cost will be negligible, not like plexiglass ahahahahahah, one shot one kill). The fourth to ninth images illustrate the old system. The fork is a little wider than the mast and is therefore able to rotate on it. It is held by a rope on which a sort of holed balls are strung (which in Italy we call "bertocci"). They allow the boom or mast to slide up and down on the mast reducing friction. You can make the fork yourself out of wood. Model shops sell bertocci (it's also in the Amati catalogue). I had to make it with thin plastic shapes overlapped and glued (as you can see in the last four attached photos) because it had to be very resistant. In wood, if it moved continuously, it would have broken. Maybe you won't have this problem when working on a larger scale. I hope I helped you a little, but if you want more details, no problem. 


▲
⟩⟩
ChrisG
Peejay
Mike Stoney
Doogle
|
|
💬 Re: Deck stained and mast fitting
7 months ago by 🇬🇧 Doogle (
Commodore)✧ 72 Views · 4 Likes
Flag
With regards to the coffee ☕️ RossM, I don't remember exactly where I read the article, probably from one of those "wormholes "you can get into when you're researching something else on the "net". I knew that tea 🍵/coffee 🍵 can be used for staining/dyeing cloth but this was a new one on me. Plenty of used coffee pads which normally get composted, stuck them in a jar 🫙 with a little water 💧 and there's the result. I personally think it's OK and protected now with some matt lacquer via a rattle can. If all else fails in the future, just sand it down lightly and start again. Plus if you need an excuse, it's a great way of enjoying a Bailey's or anything else of that nature as a perfect accompaniment 😂😂
▲
⟩⟩
AlessandroSPQR
RNinMunich
Scratchbuilder
Colin H
|
|
💬 Re: Deck stained and mast fitting
7 months ago by 🇨🇦 RossM (
Lieutenant)✧ 71 Views · 3 Likes
Flag
For what I am building your deck staining is of interest, (break out the coffee!!)
▲
⟩⟩
AlessandroSPQR
Doogle
hermank
|
|
💬 Re: Deck stained and mast fitting
7 months ago by 🇬🇧 Doogle (
Commodore)✧ 75 Views · 3 Likes
Flag
Hi Alessandro, much appreciated. Funnily enough I was just out in the garage/workshop wondering if I could build something similar to your photos/drawings. Anything else you might have gratefully accepted 😉
▲
⟩⟩
AlessandroSPQR
Colin H
hermank
|
|
💬 Re: Deck stained and mast fitting
7 months ago by 🇮🇹 AlessandroSPQR (
Rear Admiral)✧ 74 Views · 6 Likes
Flag
Hi Doogle.
You could use this method to connect the boom to the mast. I'm attaching these photos but tonight I'll do a search on my folders on my PC and send you more images. 


▲
⟩⟩
Peejay
Colin H
RNinMunich
hermank
RossM
Mike Stoney
|
|
💬 Re: Deck stained and mast fitting
7 months ago by 🇬🇧 Doogle (
Commodore)✧ 75 Views · 4 Likes
Flag
Thanks Roy, now looking at gooseneck fittings, I've learnt something new today 😀
▲
⟩⟩
Peejay
Colin H
AlessandroSPQR
RossM
|
|
💬 Re: Deck stained and mast fitting
7 months ago by 🇬🇧 roycv (
Rear Admiral)✧ 73 Views · 3 Likes
Flag
Hi Dougal lovely job! Goosenecks, there are lots of pictures on-line. In practice many fishing boats had a small row-boat as well as a lot of untidy netting.
Most times being tidy was secondary being safe was more important and it probably was'nt their boat anyway! Hope you find some crew for her. regards Roy ▲
⟩⟩
Peejay
Doogle
Colin H
|
|
💬 Re: Deck stained and mast fitting
7 months ago by 🇬🇧 Scratchbuilder (
 Vice Admiral) Vice Admiral)✧ 93 Views · 2 Likes
Flag
Chris,
Looking really good. Enjoy the Bailey’s Regards Bill👍👍🎅 ▲
⟩⟩
Doogle
AlessandroSPQR
|
📝 Coffee stain
7 months ago by 🇬🇧 Doogle ( Commodore)
Commodore)✧ 92 Views · 12 Likes · 4 Comments
Flag
💬 Add Comment
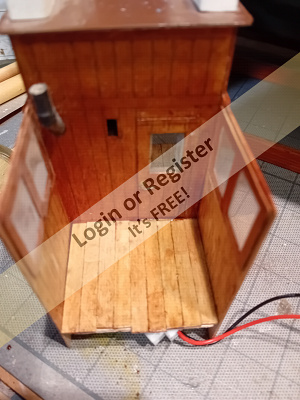
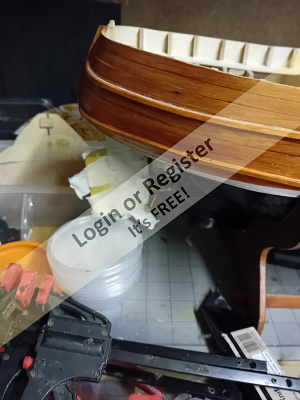
Tried the coffee ☕️ staining idea this afternoon inside the rear of the wheel house. 3 coats later and looking 👌. Will spray with a matt varnish to seal it in and then start on the deck.
▲
⟩⟩
DuncanP
hermank
Mike Stoney
Fred
Colin H
Len1
Wolle
Peejay
RossM
AlessandroSPQR
RNinMunich
Scratchbuilder
|
💬 Re: Coffee stain
7 months ago by 🇨🇦 Ronald (
Admiral)✧ 83 Views · 4 Likes
Flag
Mini-Wax stains come in various applications both gel and liquid.
The results will change depending upon the wood you are applying the product onto, balsa is very absorbent where as maple or oak will have a different result. Suggest you do testing prior to putting the product on your project. Yes, there’s the retired shop teacher part of me coming out from the woodwork. 
▲
⟩⟩
ChrisG
Doogle
Mike Stoney
AlessandroSPQR
|
|
Login To
Remove Ads 💬 Re: Coffee stain
7 months ago by 🇨🇦 Brightwork (
 Captain) Captain)✧ 86 Views · 4 Likes
Flag
What I have found that is closest to Mahogany is Minwax Sedona Red stain. When applied to balsa (couple coats) it looks great.
▲
⟩⟩
jumpugly
Doogle
Mike Stoney
Ronald
|
|
💬 Re: Coffee stain
7 months ago by 🇨🇦 RossM (
Lieutenant)✧ 85 Views · 3 Likes
Flag
One of those good ideas to keep in mind👍
▲
⟩⟩
Mike Stoney
Doogle
AlessandroSPQR
|
|
💬 Re: Coffee stain
7 months ago by 🇮🇹 AlessandroSPQR (
Rear Admiral)✧ 94 Views · 2 Likes
Flag
The coloring seems optimal to me.
▲
⟩⟩
Mike Stoney
Doogle
|
📝 And the winner is?
7 months ago by 🇬🇧 Doogle ( Commodore)
Commodore)✧ 103 Views · 11 Likes · 2 Comments
Flag
💬 Add Comment
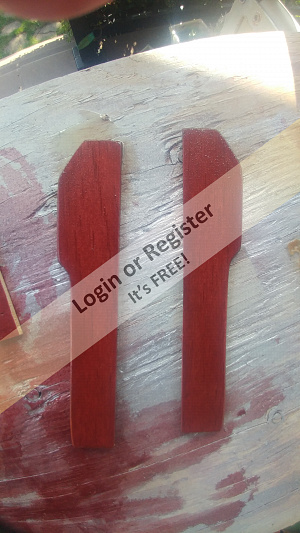
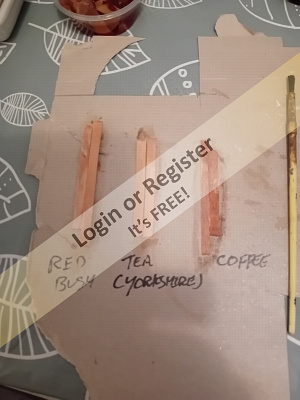
Well after drinking copius amounts of tea 🍵 and coffee ☕️, the results of my wood staining tests are in. Looking like the coffee has the most impact with staining the wood, followed by the redbush and finally Yorkshire tea. Will start the decking stain maybe tomorrow and if it goes wrong, I'll just sand down and start again. Looks like I'll be buzzing 🤪 from the coffee I'll have to drink so I can use the pads. Better not add tòo much brandy 😂
▲
⟩⟩
jumpugly
Colin H
Commodore-H
Wolle
RNinMunich
roycv
RossM
Mike Stoney
Scratchbuilder
AlessandroSPQR
RodC
|
💬 Re: And the winner is?
7 months ago by 🇨🇦 RossM (
Lieutenant)✧ 99 Views · 2 Likes
Flag
Why not?!? It's Christmas time
▲
⟩⟩
Doogle
AlessandroSPQR
|
|
💬 Re: And the winner is?
7 months ago by 🇨🇦 RodC (
Lieutenant)✧ 102 Views · 4 Likes
Flag
Back in the late 1960s and early 1970s we used to dye white T-shirts with tea or coffee, in the days b4 printed or dark-coloured T's became common. Of course Mom wud always want to bleach them !! 🤔
▲
⟩⟩
gunboat driver
Doogle
Mike Stoney
AlessandroSPQR
|
📝 Decking
7 months ago by 🇬🇧 Doogle ( Commodore)
Commodore)✧ 107 Views · 8 Likes · 5 Comments
Flag
💬 Add Comment
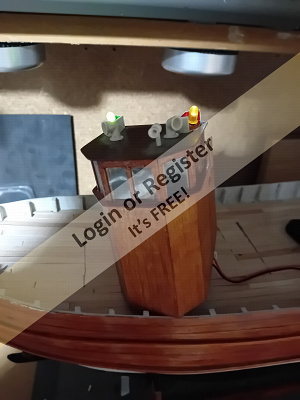
Finished the deck this afternoon, and then played with fitting navigation lights to the wheelhouse.
Next stage will be to stain the wood, I'm trying out an experiment after reading an article about using tea or coffee to stain the wood with. Currently soaking redbush/roobios tea bags to see what the colour looks like when applied to the wood. Update to follow 😊


Next stage will be to stain the wood, I'm trying out an experiment after reading an article about using tea or coffee to stain the wood with. Currently soaking redbush/roobios tea bags to see what the colour looks like when applied to the wood. Update to follow 😊
▲
⟩⟩
Len1
Commodore-H
RNinMunich
Mike Stoney
hermank
Scratchbuilder
AlessandroSPQR
Colin H
|
💬 Re: Decking
7 months ago by 🇬🇧 flaxbybuck (
Captain)✧ 101 Views · 2 Likes
Flag
Get some photos of real fishing boat decks and that will help you decide how you want yours to look, eh? 😉
▲
⟩⟩
Mike Stoney
AlessandroSPQR
|
|
Login To
Remove Ads 💬 Re: Decking
7 months ago by 🇮🇹 AlessandroSPQR (
Rear Admiral)✧ 105 Views · 2 Likes
Flag
Perfect Doogle, I'm curious to see the results.
You are right to be cautious. ▲
⟩⟩
Mike Stoney
Doogle
|
|
💬 Re: Decking
7 months ago by 🇬🇧 Doogle (
Commodore)✧ 106 Views · 3 Likes
Flag
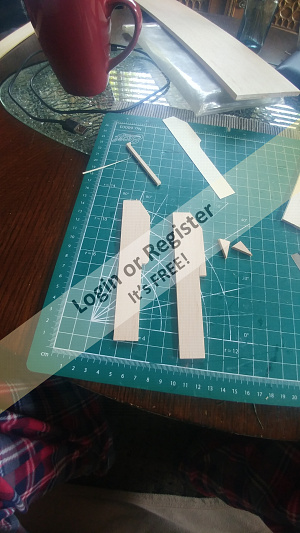
Thanks for the information Roycv, much appreciated. I've only got limited intel on the Osprey and have been doing a bit of research on Scottish fishing boats which I gather this model is based on. With regards to the deck staining Alessandro, I'm trying out 3 different types on some scrap decking - one being rooibos tea (red bush), Yorkshire tea (only the best in my humble opinion) and finally coffee . Once applied and dried, I can then decide which to use
▲
⟩⟩
PeterL3
AlessandroSPQR
Scratchbuilder
|
|
💬 Re: Decking
7 months ago by 🇮🇹 AlessandroSPQR (
Rear Admiral)✧ 104 Views · 3 Likes
Flag
Great work Doogle.
I've heard that many people use the tea method to give a more realistic ("lived-in") look to sails, but not on wood. You always learn something new. Will you carry out tests or apply the method directly to the deck? ▲
⟩⟩
PeterL3
Scratchbuilder
Doogle
|
|
💬 Re: Decking
7 months ago by 🇬🇧 roycv (
Rear Admiral)✧ 105 Views · 3 Likes
Flag
Hi you can go for pretty with a brownish woodstain or go for actual which looks greyish. If this were cleaned it would be a bit silvery if it was teak or possibly fish scales.
Fishing boats are notoriously untidy on deck with usually some dark coloured netting on board. Something that gets forgotten (I am sure not by your good self) is what the boat is set up to catch. With the smaller boats 70 - 90 feet they are mainly not far off the coast. They will follow the the various fish shoals that pass by during the year and the method of catching will vary accordingly. For instance with the Billing Mary Ann she is fishing in the North sea and what looks like a rescue beacon, the red buoy is part of the fishing method. It is dropped in first when the tide is high and it has one edge of the net attached and then the fishing boat sails away and round so that the open mouth of the net catches the fish (herring) coming past as the tide falls and flows into the net. The little staysail at the stern keeps the boat steady as they sit there for 4 hours or so waitng for the fish, then she completes the loop and the catch is hauled in. Note there are Trawl boards on one side of the boat only and these locate the net down low or on the bottom. If you copy the Mary Ann deck layout then the winch should be 90 degrees round from where it is so it can face where the net haul comes in. I found out too late for my 2 Mary Ann's! The Billing Cux 87 has identical hull construction but is set up for shrimping with the long trawl board under the net. Also bear in mind the shrimps are boiled on deck so quite different layout. Good luck with the build and final choice of deck colour. Roy ▲
⟩⟩
PeterL3
Doogle
Colin H
|
📝 Deck
8 months ago by 🇬🇧 Doogle ( Commodore)
Commodore)✧ 115 Views · 5 Likes
Flag
💬 Add Comment
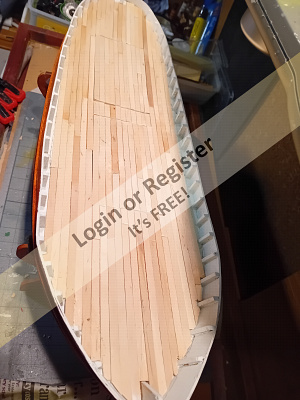
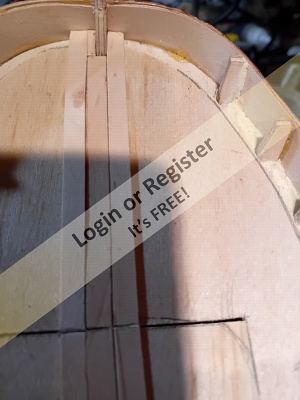
"Sub" deck is now in place and top deck started, think 🤔 it might take a while.
▲
⟩⟩
PeterL3
River Rat
Colin H
Scratchbuilder
AlessandroSPQR
📝 Rc in place
8 months ago by 🇬🇧 Doogle ( Commodore)
Commodore)✧ 122 Views · 7 Likes · 3 Comments
Flag
💬 Add Comment
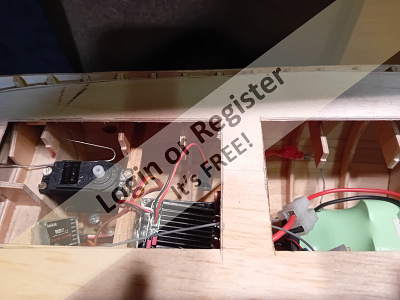
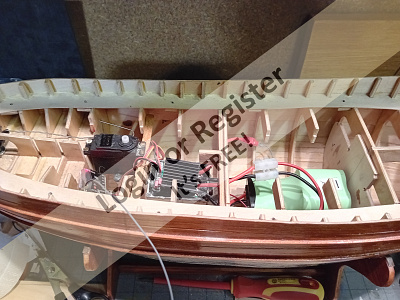
Not much room I discovered inside the Osprey, or maybe just me and my big hands. , a bit of thinking "outside the box " so to speak, I found a container/ battery box which would contain the esc and still allowing access to the motor, rudder servo and battery. All fired up and running nicely, rudder linkage to be set up and a dry fix of the sub deck with hatches/access panels cut out looking OK. Once the ballast is in place and the sub deck is fixed I can then start working on the deck.
▲
⟩⟩
PeterL3
Scratchbuilder
MouldBuilder
AlessandroSPQR
Wolle
AndyN
Colin H
|
💬 Re: Rc in place
8 months ago by 🇺🇸 LewZ (
Commodore)✧ 119 Views · 5 Likes
Flag
Often, what I do for the inside sealing (I use spar varnish) of the hull (wood hull and wood deck) is to brush on the sealer on all surfaces except where other wood items would need to be glued in place, especially where the joint where the deck is glued down.
Next is to seal the under side of the deck except where the glue will be placed to mate with the hull. This assures a bare wood to wood joint when using wood glue (I uses Titebond II). After the glue dries well I need to seal the deck/hull joint. If the deck opening is large enough I use a mirror and brush on the sealer. If I can't get to the joint, I will pour in the sealer, turn the boat on its side and rotate the boat so the sealer flows all around the seam. Set the boat on its bottom and remove any excess sealer (optional). This should completely seal the inside of the boat. Lew Florida ⛱️, USA ▲
⟩⟩
RodC
River Rat
Len1
RossM
Doogle
|
|
Login To
Remove Ads 💬 Re: Rc in place
8 months ago by 🇬🇧 Doogle (
Commodore)✧ 120 Views · 2 Likes
Flag
Flaxbybuck, thanks for the compliments, with regards to varnish on the inside, she's already been coated- but I'll be sure to double check for possible leaks when I'm trying her out for ballast 😊
▲
⟩⟩
Scratchbuilder
AlessandroSPQR
|
|
💬 Re: Rc in place
8 months ago by 🇬🇧 flaxbybuck (
Captain)✧ 121 Views · 3 Likes
Flag
That's a tidy looking interior Doogle. Don't forget to paint or varnish or resin the whole of the inside before it becomes inaccessible. 😉
▲
⟩⟩
Scratchbuilder
Doogle
AlessandroSPQR
|
📝 Rudder fixed
8 months ago by 🇬🇧 Doogle ( Commodore)
Commodore)✧ 129 Views · 8 Likes
Flag
💬 Add Comment
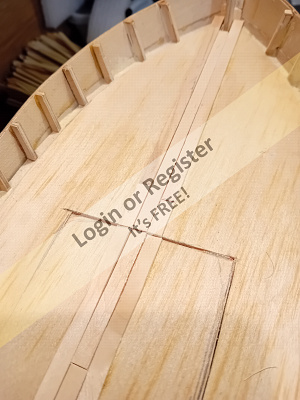
Managed to spend a bit of time and fixed rudder in position. First attempt at cutting the rudder from brass sheet and pleased with the result. Servo fixed in position and initial run with the motor in position is all smooth 👌.
ESC to be fixed and a battery tray to made and fixed. Ballast will be positioned and then I can look at starting the decking

ESC to be fixed and a battery tray to made and fixed. Ballast will be positioned and then I can look at starting the decking
▲
⟩⟩
PeterL3
Scratchbuilder
MouldBuilder
flaxbybuck
RodC
Wolle
Colin H
AlessandroSPQR


Login To
Remove Ads
Remove Ads