Join Us On Social Media!

|

|

|
Download The App!
Login To
Remove Ads
Remove Ads
Login To
Remove Ads
Remove Ads
Model Boats Website
Clinker built sailing dinghy
12 Posts · 15 Followers · 77 Photos · 214 Likes
Began 6 months ago by
 United Kingdom
Follow This Thread
Not currently following
> Click to follow
> Click to follow
Latest Post 2 months ago by
| Most recent posts shown first (Show Oldest First) | (Print Booklet) |
📝 Decking
2 months ago by 🇬🇧 Graham93 ( Vice Admiral)
Vice Admiral)✧ 34 Views · 17 Likes · 4 Comments
Flag
💬 Add Comment
Time to get back to the build!
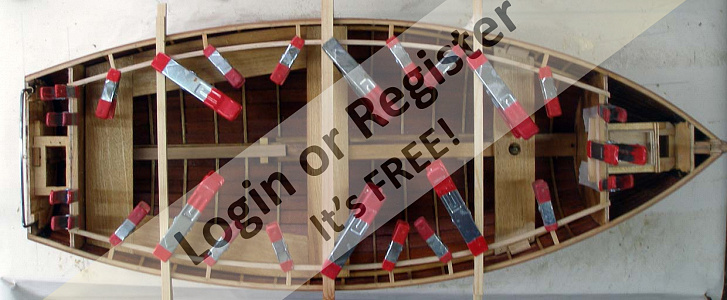
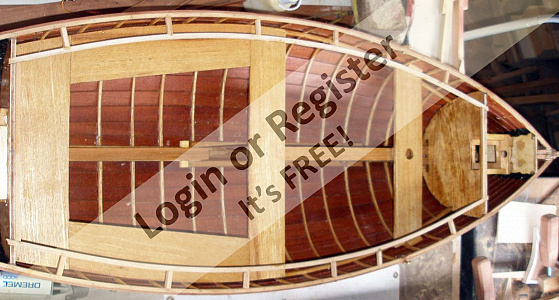
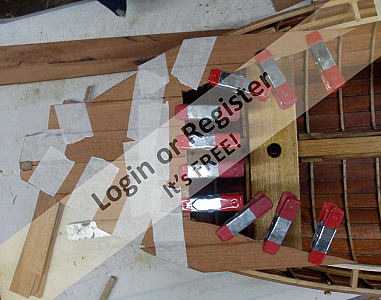
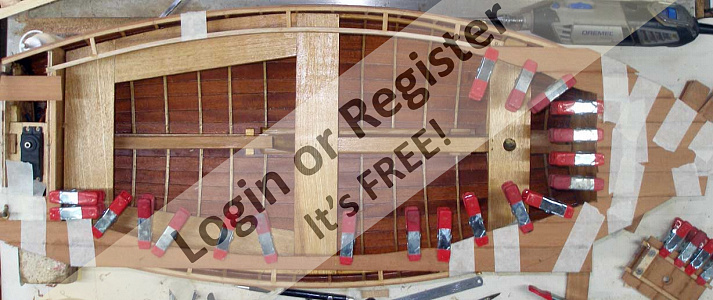
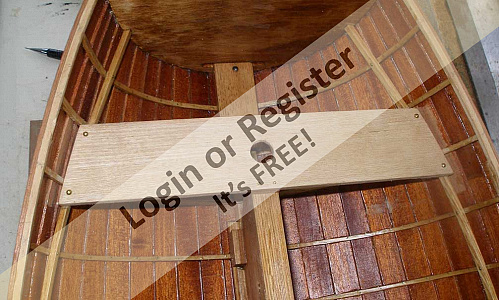
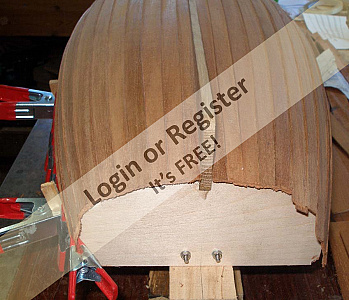
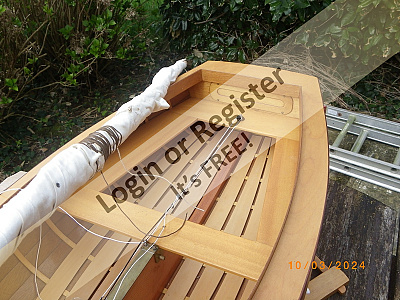
A support framework for the decking was glued in place. As the timber sections are quite small, this framework is not very strong, but it should be sufficient to support the deck planks. The strength will come from the glued on planking.
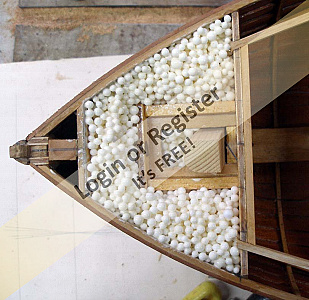
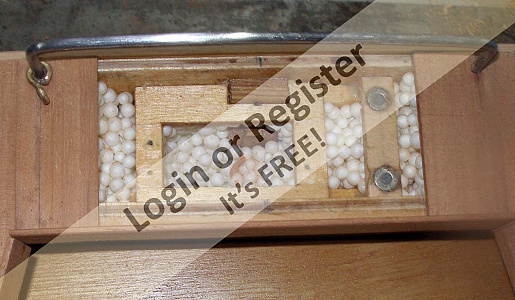
Before fitting the decking, the space between the forward bulkheads was filled with polystyrene beads coated with PVA glue. This is to provide some bouyancy in case of a capsize! The space between the bulkheads at the stern was filled in a similar way. Holes at the bottom of the bulkheads ensure that any water which does get into this space will be able to drain out.
The decking is constructed from offcuts of the mahogany hull planking. At the stern, a piece of the decking can be removed to provide access to the rudder servo.

A support framework for the decking was glued in place. As the timber sections are quite small, this framework is not very strong, but it should be sufficient to support the deck planks. The strength will come from the glued on planking.
Before fitting the decking, the space between the forward bulkheads was filled with polystyrene beads coated with PVA glue. This is to provide some bouyancy in case of a capsize! The space between the bulkheads at the stern was filled in a similar way. Holes at the bottom of the bulkheads ensure that any water which does get into this space will be able to drain out.
The decking is constructed from offcuts of the mahogany hull planking. At the stern, a piece of the decking can be removed to provide access to the rudder servo.
▲
⟩⟩
MartinH2
Commodore-H
PeterL3
Rockbag
MouldBuilder
EdW
stevedownunder
jbkiwi
River Rat
Peejay
AlessandroSPQR
flaxbybuck
Razor1955
Len1
GARTH
hermank
MartinW
|
💬 Re: Decking
2 months ago by 🇬🇧 Graham93 (
Vice Admiral)✧ 18 Views · 2 Likes
Flag
Hi Alessandro,
The space for the polystyrene is small, but it’s the only option to hide some buoyancy. I’m going to have to be careful when sailing this! ▲
⟩⟩
Len1
stevedownunder
|
|
Login To
Remove Ads 💬 Re: Decking
2 months ago by 🇮🇹 AlessandroSPQR (
 Rear Admiral) Rear Admiral)✧ 27 Views · 3 Likes
Flag
Hi Graham93, beautiful boat.
" Before fitting the decking, the space between the forward bulkheads was filled with polystyrene beads coated with PVA glue." Great idea, very good. Anyone who has unused space available should use this trick. However, the space occupied by the polystyrene still seems small to me (I'm certainly wrong though). To be sure we should know the submerged volume of your boat. Do you know him or did you make an eye estimate? ▲
⟩⟩
Len1
stevedownunder
Peejay
|
|
💬 Re: Decking
2 months ago by 🇬🇧 Razor1955 (
 Petty Officer 1st Class) Petty Officer 1st Class)✧ 37 Views · 5 Likes
Flag
Fine craftsmanship! She is looking good.
▲
⟩⟩
AlessandroSPQR
Len1
Graham93
stevedownunder
Peejay
|
|
💬 Re: Decking
2 months ago by 🇺🇸 Len1 (
 Lieutenant) Lieutenant)✧ 35 Views · 3 Likes
Flag
well done. Like the progress to date. Len
▲
⟩⟩
Graham93
stevedownunder
AlessandroSPQR
|
Login To
Remove Ads
Remove Ads
📝 Thwarts
4 months ago by 🇬🇧 Graham93 ( Vice Admiral)
Vice Admiral)✧ 56 Views · 13 Likes · 1 Comment
Flag
💬 Add Comment
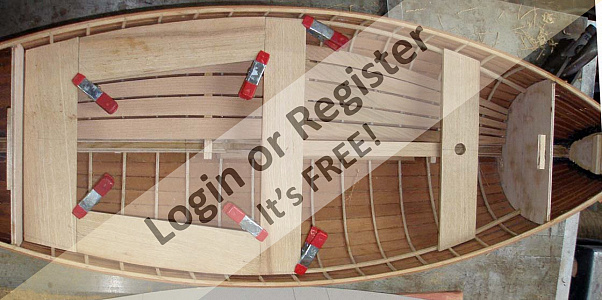
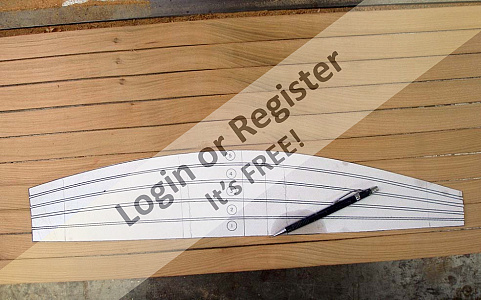
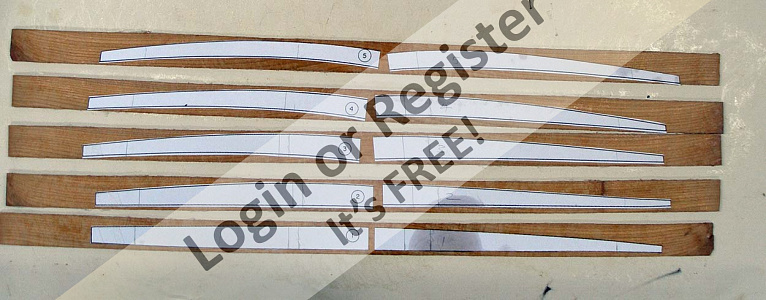
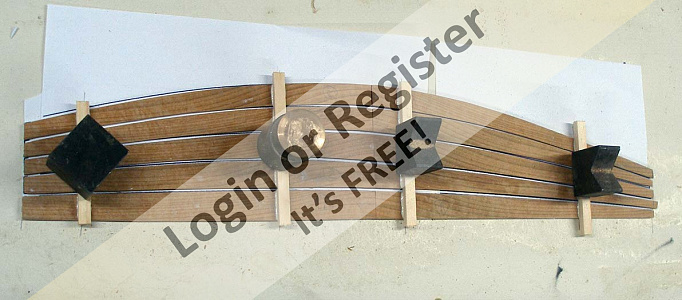
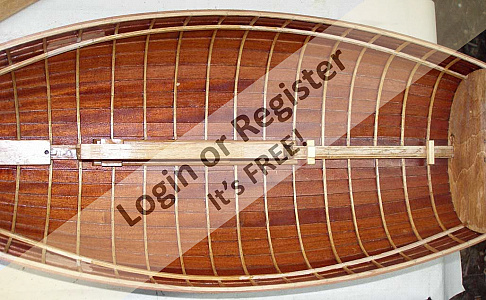
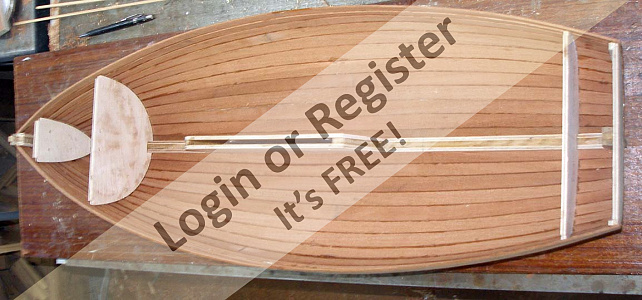
Two 4mm square oak risers were fitted along the length of the hull, one each side. These are to support the thwarts. They had to be fitted at the same height as the keel box. This took a lot of time measuring and adjusting the position before finally glueing and pinning them into position. In the end, they turned out to be slightly higher than they should have been, but that's much better than being too low resulting in the thwarts fouling the keel box!
A cardboard template was traced from the plan and then adjusted slightly to fit in place sitting on the risers. The template was then used to mark out the thwarts which were cut from more of the salvaged oak tabletop.
Finally the thwarts were glued together and then glued and pinned onto the risers. The forward thwart has a hole for the mast to pass through. As this thwart will take some strain from the mast it was glued and pinned to the risers and the keel box. Additional reinforcing oak blocks were added to strengthen the joints. The hull hadn't been varnished at the position of the thwart ends so the reinforcement block could be glued in position. Once the glue was set, the varnish was touched up.
▲
⟩⟩
MartinH2
PeterL3
EdW
jbkiwi
hermank
cenbeth
luckyduck
Peejay
mturpin013
AndyB2
River Rat
Len1
stevedownunder
|
💬 Re: Thwarts
3 months ago by 🇬🇧 AndyB2 (
 Master Seaman) Master Seaman)✧ 49 Views · 4 Likes
Flag
Sorry but I’ve not been on the forum for a while. But this a very impressive model, really quite exceptional and it sails ! Fantastic
▲
⟩⟩
Graham93
Len1
hermank
Peejay
|
📝 Mast Step
4 months ago by 🇬🇧 Graham93 ( Vice Admiral)
Vice Admiral)✧ 65 Views · 13 Likes · 4 Comments
Flag
💬 Add Comment
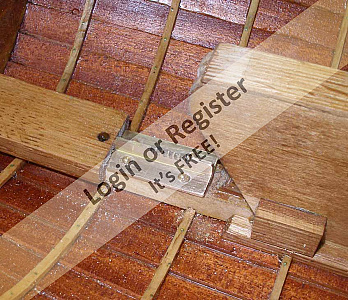
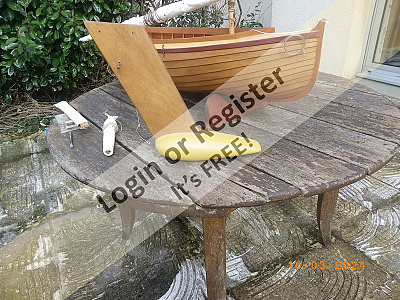
The mast passes through the forward thwart with the foot of the mast resting on the keel. There is no information on the plan detailing where exactly the mast rests on the keel so I decided to make an adjustable mast step so the position can be adjusted.
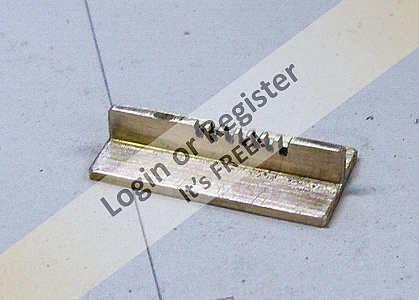
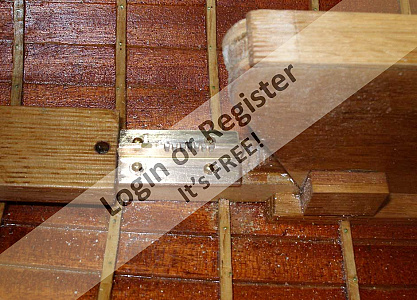
A short length of brass angle was marked and drilled with 1.5mm holes. The spacings are not as even as I would have liked, but the best I could do, and near enough. The angle was then cut down to leave a row of notches. An additional length of brass was silver soldered to the angle to produce a 'T' section.
For the foot of the mast, a fitting was made to push on to the end of the mast, with a slot which fits over the brass T section. A pin fixed across the slot (difficult to see in photo 3) engages with one of the notches in the T section.
Finally, the T section was glued and pinned in position on the keel.
▲
⟩⟩
MartinH2
EdW
hermank
cenbeth
Peejay
mturpin013
River Rat
stevedownunder
roycv
flaxbybuck
jbkiwi
Len1
RNinMunich
|
💬 Re: Mast Step
4 months ago by 🇬🇧 Graham93 (
Vice Admiral)✧ 56 Views · 3 Likes
Flag
Hi flaxbybuck,
You are probably right, I'll set it up for one position, and never change it, but it's nice to have the option just in case 😉 Not planning to enter any races with this build 😂 ▲
⟩⟩
hermank
Peejay
Len1
|
|
Login To
Remove Ads 💬 Re: Mast Step
4 months ago by 🇬🇧 Graham93 (
Vice Admiral)✧ 56 Views · 3 Likes
Flag
Hi Ron,
Thanks for the contact details for Paul. It's good to know there's someone I can get help from if I need it. I enjoy scratch building like this as it gives me plenty of challenges to solve which is a large part of the enjoyment with the build. By making the mast step adjustable, I'll be able to change the mast rake to try out the effect of different angles. If I had fixed it, I expect it would sail OK, but I'd never know if a different angle would have been better. ▲
⟩⟩
hermank
Peejay
Len1
|
|
💬 Re: Mast Step
4 months ago by 🇬🇧 flaxbybuck (
 Captain) Captain)✧ 63 Views · 4 Likes
Flag
I have used an adjustable mast step like this on a couple of boats, but having sailed them have come to the conclusion that it is only worth the effort on class racing boats where fine tuning can make a difference.
You're making a lovely job of this boat and I look forward to seeing it on the water. Good luck 😉 ▲
⟩⟩
hermank
Peejay
Len1
RNinMunich
|
|
💬 Re: Mast Step
4 months ago by 🇨🇦 Ronald (
 Admiral) Admiral)✧ 85 Views · 3 Likes
Flag
Have you asked Paul Gartside about the mast rake angle?
Try emailing him at: info@gartsideboats.com You should get a rapid response. ▲
⟩⟩
hermank
Peejay
Len1
|

📝 Radio Installation
4 months ago by 🇬🇧 Graham93 ( Vice Admiral)
Vice Admiral)✧ 89 Views · 17 Likes · 2 Comments
Flag
💬 Add Comment
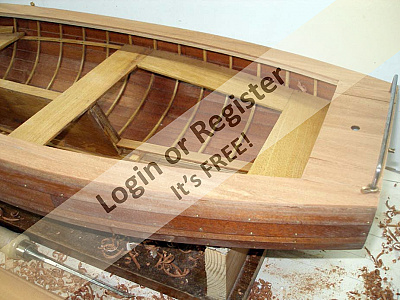
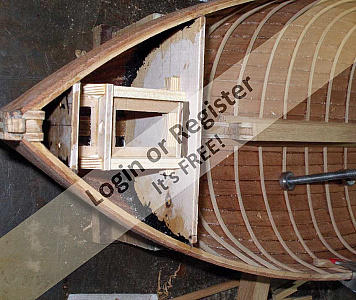
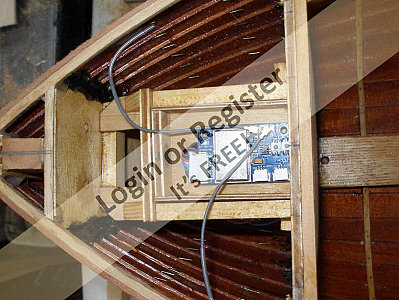
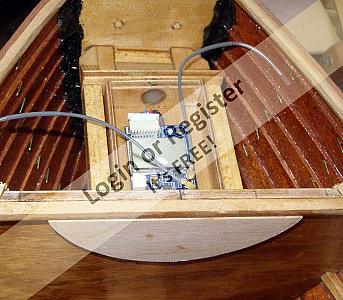
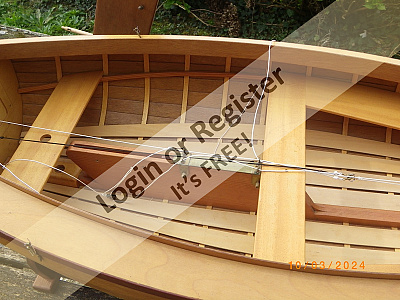
I want to hide the radio gear as far as is possible. Not easy with an open dinghy. There are two enclosed spaces, one at the bow, and one at the stern.
A wooden tray and support were added behind the forward bulkhead for the receiver. The tray slides out through the bulkhead and is held in the closed position with a magnet. This position keeps the receiver as high as possible for better reception and hopefully will avoid any water that might get into the boat.
The rudder servo is mounted between the rear bulkhead and the transom. Once the rear deck is in place only the servo shaft will be visible. The deck will need to be removable to allow access for servo maintenance.
There isn't anywhere to hide the sail winch so it is mounted as low as possible at the forward end, just behind the forward bulkhead. This will hide it from view when the boat is out on the water. A mounting bracket was made from a short length of aluminium angle.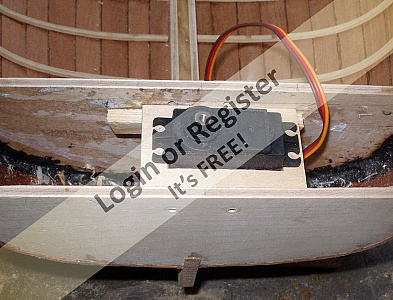
▲
⟩⟩
MartinH2
PeterL3
EdW
hermank
cenbeth
Peejay
AndyB2
roycv
Mike Stoney
philcaretaker
stevedownunder
RNinMunich
mturpin013
Len1
jbkiwi
flaxbybuck
Wolle
|
💬 Re: Radio Installation
4 months ago by 🇮🇹 AlessandroSPQR (
Rear Admiral)✧ 72 Views · 3 Likes
Flag
Hi Graham93 I observe this work with attention and admiration, thanks for the step by step details. They are essential for anyone who wants to learn.
▲
⟩⟩
hermank
Peejay
Len1
|
|
💬 Re: Radio Installation
4 months ago by 🇫🇷 stotty1111 (
 Warrant Officer) Warrant Officer)✧ 95 Views · 3 Likes
Flag
Mine being of larger scale, I was able to hide the mini rx, and sail winch in the forward compartment, the rudder servo is in the rear compartment, and when sailing a 5 'D' cell pack was mounted under the rear seat, cabling for the servo and power supply are hidden under the side decking.
All a little crude but it worked! ▲
⟩⟩
hermank
Peejay
Len1
|
📝 Floorboards
4 months ago by 🇬🇧 Graham93 ( Vice Admiral)
Vice Admiral)✧ 95 Views · 25 Likes · 5 Comments
Flag
💬 Add Comment
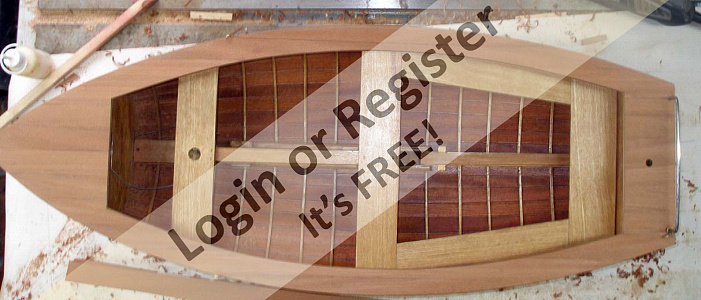
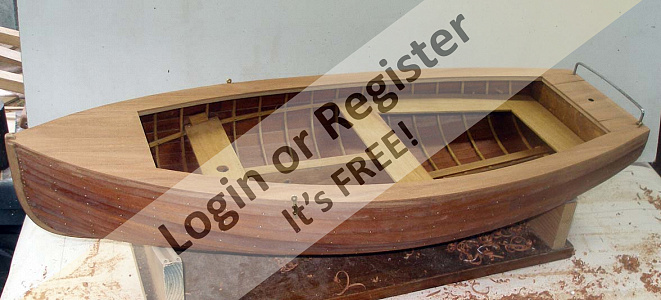
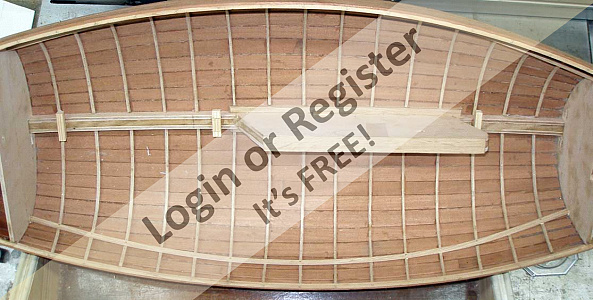
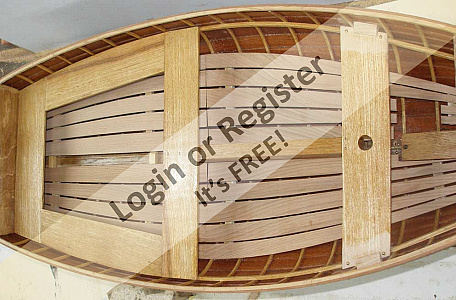
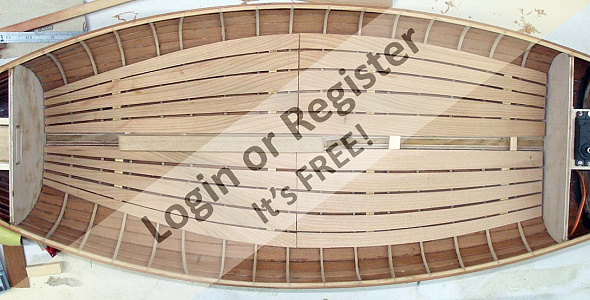
The plan includes templates for the floor boards. I decided to split the boards in half lengthways to make the completed floor easier to remove.
The templates were glued to some 3mm thick cherry planks, cut out with the bandsaw and then glued to support beams.
The completed floor panels fitted into the hull with very little adjustment needed. Much easier than the hull planking where the increase in model scale resulted in the templates becoming distorted.
At this stage, the hull was given several coats of yacht varnish inside and out because it will become more difficult to apply any finish to the inside as construction continues.
▲
⟩⟩
MartinH2
PeterL3
cenbeth
ARL58
Mike Stoney
sirscapa
RNinMunich
Len1
AndyN
flaxbybuck
BOATSHED
stevedownunder
philcaretaker
Peejay
EdW
mturpin013
roycv
Black Shoe
peterd
hermank
Ronald
GaryLC
BarryS
jbkiwi
robbob
|
💬 Re: Floorboards
4 months ago by 🇬🇧 Graham93 (
Vice Admiral)✧ 69 Views · 1 Like
Flag
Thanks Mike,
While I am in awe with what can be achieved with laser cutters and 3D printers these days, nothing beats the satisfaction of hand crafting something IMHO 😆 ▲
⟩⟩
Mike Stoney
|
|
Login To
Remove Ads 💬 Re: Floorboards
4 months ago by 🇨🇭 Mike Stoney (
 Commander) Commander)✧ 81 Views · 2 Likes
Flag
Hello Graham,
That's awesome . . . all handmade! Bravo! I would have made all this with a laser cutter. Hats off to you! Michel-C. ▲
⟩⟩
AlessandroSPQR
Graham93
|
|
💬 Re: Floorboards
4 months ago by 🇬🇧 flaxbybuck (
Captain)✧ 88 Views · 2 Likes
Flag
Well done Graham. You have real craftsmanship, and I guess, much patience. I love the attention to detail in the construction, eg. spacing of the pins, and spacing of the floorboards. All done with precision and care. Wonderful !😉
▲
⟩⟩
Graham93
Len1
|
|
💬 Re: Floorboards
4 months ago by 🇬🇧 Graham93 (
Vice Admiral)✧ 92 Views · 3 Likes
Flag
Hi Ronald,
I haven’t nailed the floorboards as I’ve run out of nails! Thanks for the link - interesting information. I’ve used cherry for the floorboards as I happened to have a few boards in my stock. It is very fine grained and looks ‘right’ for this application. Photo 4 shows it with it’s first coat of varnish. ▲
⟩⟩
Len1
BOATSHED
Peejay
|
|
💬 Re: Floorboards
4 months ago by 🇨🇦 Ronald (
Admiral)✧ 108 Views · 4 Likes
Flag
Looking forward to seeing what you do next. Are the floorboards also fastened with brass nails as you did on the planks? Be careful to choose tight grain wood especially if the finished model is left with natural wood which shows the grain. If you plan to paint the floor boards this is not as much of a visual issue.
Here is an excellent link that demonstrates what I am expressing. I know as model builders, finding the right wood to finish our model can be a challenge as the scale of the model is smaller than their full-sized counterpart. ▲
⟩⟩
Len1
BOATSHED
Black Shoe
hermank
|

📝 Nailing the Planks
4 months ago by 🇬🇧 Graham93 ( Vice Admiral)
Vice Admiral)✧ 107 Views · 22 Likes · 3 Comments
Flag
💬 Add Comment
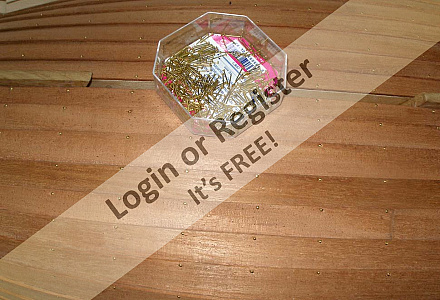
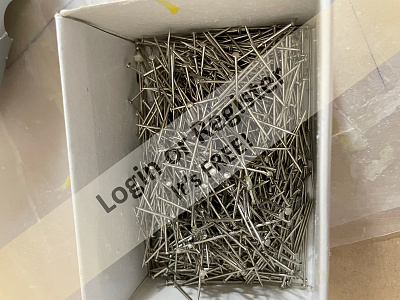
In traditional clinker built boats the planks are nailed together with square shank copper nails. These are clenched on rooves or copper washers in the inside. At 1/6th scale, this would be difficult to achieve (!) so I opted for a sipler approach of using 0.6mm dia brass pins.
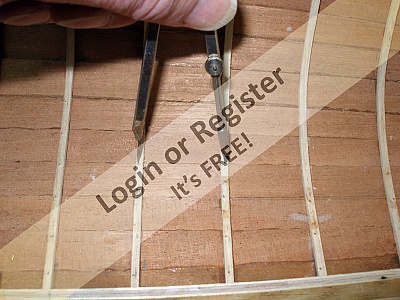
The pins for the first rib were fitted by drilling 0.4mm holes from the inside of the hull, through the ribs and planks. Once that datum had been established a compass was used to measure the distance between ribs on the inside of the hull. This dimension was then transferred to the outside so that the holes for the pins could be predrilled in the correct position at the edge of the planks. The occasional hole in the wrong position was redrilled. Those in the wrong position are not noticeable and will be sealed when the hull is varnished.
In total 550 nails were fitted!
▲
⟩⟩
MartinH2
PeterL3
cenbeth
ARL58
Mike Stoney
flaxbybuck
BOATSHED
Peejay
mturpin013
hermank
robbob
philcaretaker
roycv
Len1
River Rat
stevedownunder
RNinMunich
jbkiwi
Colin H
Ronald
EdW
JOHN
|
💬 Re: Nailing the Planks
4 months ago by 🇩🇪 RNinMunich (
 Fleet Admiral) Fleet Admiral)✧ 106 Views · 2 Likes
Flag
Well, I reckon you nailed her good Admiral👍
BRAVO ZULU. 😎 ▲
⟩⟩
BOATSHED
Len1
|
|
Login To
Remove Ads 💬 Re: Nailing the Planks
4 months ago by 🇨🇦 RossM (
Lieutenant)✧ 108 Views · 7 Likes
Flag
Graham:
On mine I pressed the pins in with slightly modified pliers, ( a groove cut in to jaw to accept the pin) and then pulled them snug from the inside 
▲
⟩⟩
Mike Stoney
flaxbybuck
BOATSHED
hermank
Len1
RNinMunich
Graham93
|
|
💬 Re: Nailing the Planks
4 months ago by 🇨🇦 Ronald (
Admiral)✧ 122 Views · 6 Likes
Flag
Amazing patience to stick with it! Very resourceful and skilled work. Well done! I hope the family will appreciate the work you put into this project and it will be passed along through the generations.
▲
⟩⟩
Mike Stoney
BOATSHED
PeterL3
Len1
Rudy-M
Graham93
|
📝 Ribs
4 months ago by 🇬🇧 Graham93 ( Vice Admiral)
Vice Admiral)✧ 112 Views · 15 Likes
Flag
💬 Add Comment
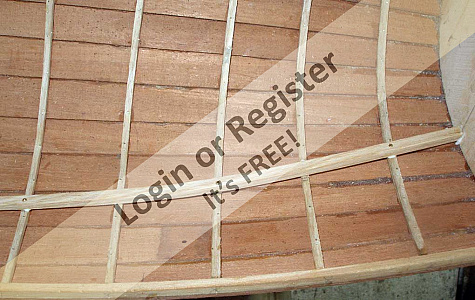
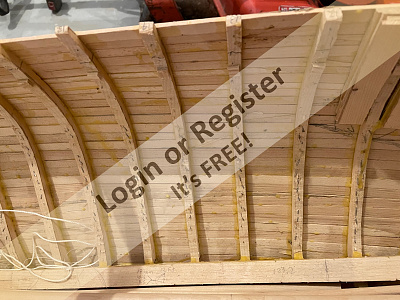
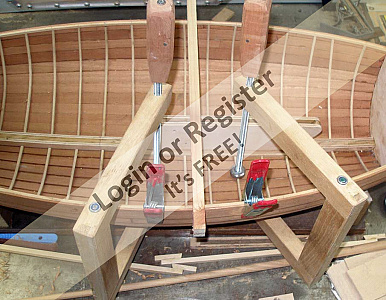
Before fitting the ribs, I cut gunwales from oak and glued and clamped them in position. These were flexible enough to bend into shape and clamp in position without steaming. Unfortunately, the ribs have a sharper bend and could not be bent dry without splitting.
A steamer was constructed using offcuts of plastic drainpipe (I knew it would come in one day!). Steam was generated using an electric wallpaper stripper. Strips of oak with a cross section of 25 x 4mm were steamed for 30 minutes and then clamped in a jig overnight. The bent strips were then cut using a bandsaw into 4 x 4 mm ribs.
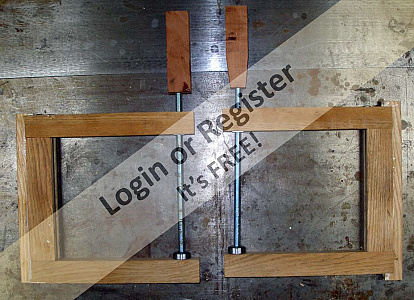
While I have a good collection of clamps, I didn't have any of a suitable size to allow the ribs to be clamped in place along the keel. So more of the oak (recycled tabletop) was used to make a couple of long reach clamps using 8mm threaded rod for the clamp screws and to reinforce the frame.
Finally, the ribs were glued into position, two at a time.


A steamer was constructed using offcuts of plastic drainpipe (I knew it would come in one day!). Steam was generated using an electric wallpaper stripper. Strips of oak with a cross section of 25 x 4mm were steamed for 30 minutes and then clamped in a jig overnight. The bent strips were then cut using a bandsaw into 4 x 4 mm ribs.
While I have a good collection of clamps, I didn't have any of a suitable size to allow the ribs to be clamped in place along the keel. So more of the oak (recycled tabletop) was used to make a couple of long reach clamps using 8mm threaded rod for the clamp screws and to reinforce the frame.
Finally, the ribs were glued into position, two at a time.
▲
⟩⟩
MartinH2
cenbeth
Mike Stoney
flaxbybuck
BOATSHED
mturpin013
hermank
philcaretaker
EdW
jbkiwi
stevedownunder
RNinMunich
Len1
luckyduck
Colin H
📝 More Planking
5 months ago by 🇬🇧 Graham93 ( Vice Admiral)
Vice Admiral)✧ 127 Views · 26 Likes · 14 Comments
Flag
💬 Add Comment
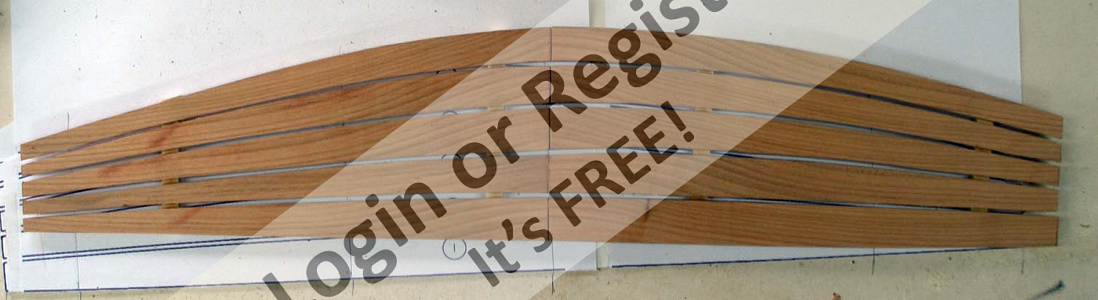
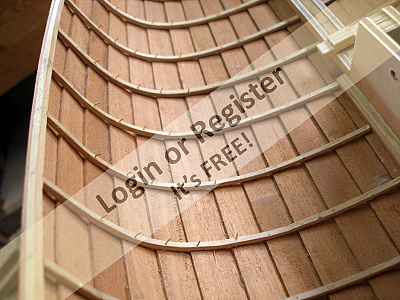
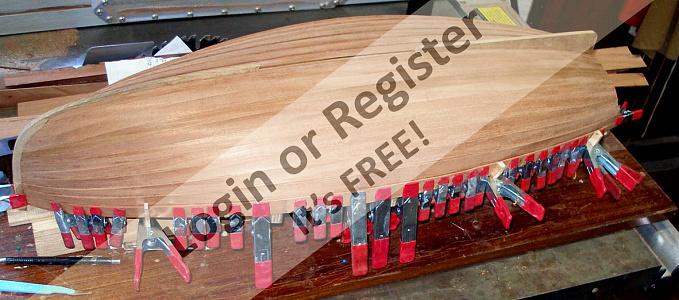
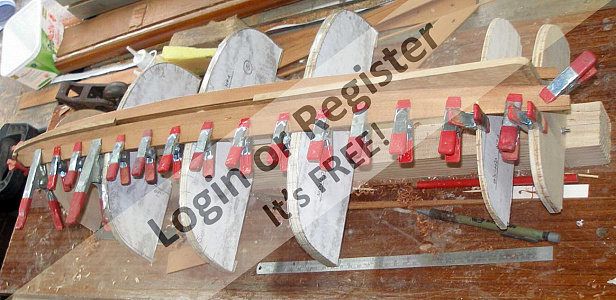
As the planking continues, the planks become more and more curved to the point where it is not possible to cut a plank from the 25mm wide mahogany strips. Curved blanks had to be made using two or even three pieces scarphed together. A curved plank, ready for fitting made from three pieces can be seen in the first photo.
A second problem that became apparent was that the templates included as part of the plan were not the right shape for the enlarged scale being used. The planks required more curvature than shown on the plan. I think this was caused by the change in scale rather than an inherent error in the original plans. Changing the scale of a 2D drawing of a plank which is going to be bent into a 3D object doesn't work.
The templates had to be dispensed with, and each plank marked and shaped to fit by trying it in place on the hull over and over again. It took around 2 hours to shape each plank before it was ready to glue and clamp into position.
Finally, all the planks were in place and the completed hull could be removed from the strongback. The three central formers were removed giving a clear open interior.
▲
⟩⟩
MartinH2
Mike Stoney
BOATSHED
mturpin013
philcaretaker
EdW
BarryS
Scratchbuilder
Trident73
JockScott
flaxbybuck
luckyduck
jbkiwi
Len1
AndyB2
hermank
Peejay
Ronald
stevedownunder
Rookysailor
RossM
GaryLC
River Rat
RNinMunich
Colin H
cenbeth
|
💬 Re: More Planking
5 months ago by 🇩🇪 RNinMunich (
Fleet Admiral)✧ 116 Views · 1 Like
Flag
Thank you Sub.
Just remember; "I'm Number One round here, and don't you forget it!" 'Grub's up ...' "Oh good oh! SNORKERS!"😋 😁😎 ▲
⟩⟩
BOATSHED
|
|
Login To
Remove Ads 💬 Re: More Planking
5 months ago by 🇨🇦 RossM (
Lieutenant)✧ 118 Views · 3 Likes
Flag
Scaling up or down can be cruel, or maybe that was the sea.
(over to you, Doug) ▲
⟩⟩
BOATSHED
Len1
RNinMunich
|
|
💬 Re: More Planking
5 months ago by 🇳🇿 jbkiwi (
Fleet Admiral)✧ 123 Views · 4 Likes
Flag
Hi Graham,
dinghy is looking great👍 I found the same thing -re scaling up- with my runabout from 18" to 32", puts all the dimensions out of whack. No doubt because you are producing an entirely different boat by just scaling up the length. You probably have to scale every other dimension by the same amount to keep things correct. I found things like framing became massive and had to reduce some by 50% in some cases. Had a similar problem with my seaplane tender, -bulkheads were ok, but I had to re-design all the framing as I went. JB ▲
⟩⟩
BOATSHED
Len1
Graham93
Colin H
|
|
💬 Re: More Planking
5 months ago by 🇬🇧 Graham93 (
Vice Admiral)✧ 120 Views · 2 Likes
Flag
Stotty,
Very nice build.👍 It looks to be based on the same plans I'm using. I like the way you have hidden the radio gear, that's something I'm currently thinking about a solution for. ▲
⟩⟩
BOATSHED
Colin H
|
|
💬 Re: More Planking
5 months ago by 🇬🇧 Graham93 (
Vice Admiral)✧ 120 Views · 2 Likes
Flag
Doug,
Roll on Feb 30th 😂🤣 ▲
⟩⟩
BOATSHED
RNinMunich
|
|
💬 Re: More Planking
5 months ago by 🇬🇧 Graham93 (
Vice Admiral)✧ 120 Views · 5 Likes
Flag
Hi Ross,
I didn't have to soak or steam the planks. I was surprised that they would bend easily to shape 'cold'. As you can see, I used plenty of clamps, but that was to ensure that the overlapping seams were tight while the glue dried. Very pleased with it so far, although there are always bits that could have been done better! ▲
⟩⟩
cenbeth
BOATSHED
Colin H
RNinMunich
RossM
|
|
💬 Re: More Planking
5 months ago by 🇫🇷 stotty1111 (
Warrant Officer)✧ 125 Views · 17 Likes
Flag
So have retrieved my 1:4 scale dinghy from my club premises here in Chateaulin!
I attach a set of views, the piece was built about 25 years ago, it sailed after a fashion, but I had problems finding sail materials, so set to one side, It did however win the gold award at a show held in Concarneau in late 2003! My intention was to convert the 'Bermudan' rig into a gaff sail etc, never got around to it as other things took over. The other problem associated with sailing was the overall weight, see photo of keel, which weighed in at 8.5kgs I suppose with the recent discussions about sail materials, it might be time to return to have another attempt with sail making and eventually sailing! 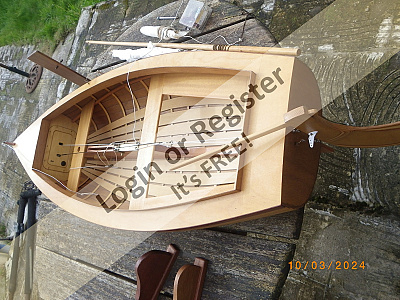


▲
⟩⟩
MartinH2
Mike Stoney
BOATSHED
philcaretaker
EdW
BarryS
Trident73
Colin H
flaxbybuck
hermank
jbkiwi
stevedownunder
boatmam
Graham93
Len1
cenbeth
RossM
|
|
💬 Re: More Planking
5 months ago by 🇨🇦 RossM (
Lieutenant)✧ 125 Views · 3 Likes
Flag
We could call the award PLANK'S CONSTANT. 😉
No eh? ▲
⟩⟩
BOATSHED
RNinMunich
Len1
|
|
💬 Re: More Planking
5 months ago by 🇩🇪 RNinMunich (
Fleet Admiral)✧ 124 Views · 4 Likes
Flag
"Give me excess of it, that, surfeiting, the hull may may be strong, and so float."
Twelfth Night, Act 1 Scene 1. Well😁 sort of😉 Apologies to Willy and Count Orsino. 😎 ▲
⟩⟩
BOATSHED
Len1
hermank
RossM
|
|
💬 Re: More Planking
5 months ago by 🇨🇦 RossM (
Lieutenant)✧ 124 Views · 5 Likes
Flag
Doug,
I'm not worthy to hold Graham's saw blades, but I am learning from here. Is one going to have to submit a masterpiece for adjudication to be allowed admission to the Guild? If wood be the food of boats, plank on! Ross ▲
⟩⟩
BOATSHED
Graham93
Len1
hermank
RNinMunich
|
|
💬 Re: More Planking
5 months ago by 🇩🇪 RNinMunich (
Fleet Admiral)✧ 125 Views · 4 Likes
Flag
Yes Ross I guess I am, in a highly complimentary sense of course.
BTW: If you feel you can match Graham's skill and magic with wood you may consider yourself a member of the newly founded (just dreamed it up😇😁) MB Website Honourable Guild of Worthy Plankers.😉 Presentation of the annual award of 'Planker of the Year' shall henceforth be made on the 30th February. So Carry On Planking folks.👍 😎 ▲
⟩⟩
BOATSHED
Graham93
Len1
hermank
|
|
Login To
Remove Ads 💬 Re: More Planking
5 months ago by 🇨🇦 RossM (
Lieutenant)✧ 125 Views · 4 Likes
Flag
Are you callin' us PLANKERS, Doug? owait we are😀
▲
⟩⟩
BOATSHED
Len1
hermank
RNinMunich
|
|
💬 Re: More Planking
5 months ago by 🇨🇦 RossM (
Lieutenant)✧ 125 Views · 4 Likes
Flag
I ran into the same issue with scaling up drawing, mostly with the framing. They don't seem to match up.
Did you soak/steam the planks? I used heavy straight pins with glue to glue & 'nail' the planks, instead of clamping the plank in place. I watched a video on the rebuilding of BLUENOSE II. They had as much trouble fitting planks as the rest of us☹️ It looks good, are you pleased with the results? ▲
⟩⟩
BOATSHED
Graham93
Len1
Peejay
|
|
💬 Re: More Planking
5 months ago by 🇩🇪 RNinMunich (
Fleet Admiral)✧ 126 Views · 4 Likes
Flag
Exquisite work Graham👍👍👍
To paraphrase 'Only Fools and Horses' ... What a planker! 😮 Cheers, Doug😎 ▲
⟩⟩
BOATSHED
Graham93
Len1
Ronald
|
📝 Planking
5 months ago by 🇬🇧 Graham93 ( Vice Admiral)
Vice Admiral)✧ 132 Views · 18 Likes · 1 Comment
Flag
💬 Add Comment
Before starting the planking, the location of the top edge of each plank was marked onto the edge of the bulkheads and forms. The edges of the three forms were also taped to avoid the risk of any of the planks sticking as the forms need to be removed once planking is complete.
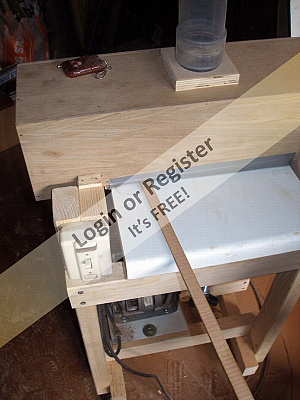
The planks are 2mm thick mahogany strips cut from some salvaged 25mm thick boards. They were cut over thickness and then sanded both sides using my homemade thickness sander.
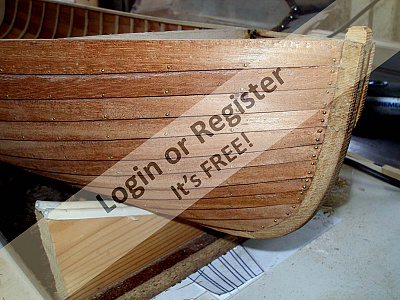
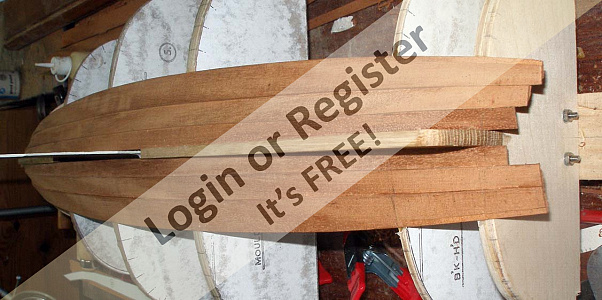
There are 24 planks required in total, 12 on each side. Each pair of planks (port and starboard) should be identical but are different from all the other 11 pairs. The plan includes full size templates for the planks so these were used to mark out the planks before cutting on the bandsaw. The ends of the planks need to have rebates planed along their edges (arrowed in photos 3 and 4) to overlap the previous plank. This gives a flush finish to the planking at the stem and transom.
Once shaped, each plank is glued into position along it's length and clamped until the glue has set. It is difficult to shape and fit more than one plank a day as the glue needs to set before the clamps can be removed for use with the next plank.


The planks are 2mm thick mahogany strips cut from some salvaged 25mm thick boards. They were cut over thickness and then sanded both sides using my homemade thickness sander.
There are 24 planks required in total, 12 on each side. Each pair of planks (port and starboard) should be identical but are different from all the other 11 pairs. The plan includes full size templates for the planks so these were used to mark out the planks before cutting on the bandsaw. The ends of the planks need to have rebates planed along their edges (arrowed in photos 3 and 4) to overlap the previous plank. This gives a flush finish to the planking at the stem and transom.
Once shaped, each plank is glued into position along it's length and clamped until the glue has set. It is difficult to shape and fit more than one plank a day as the glue needs to set before the clamps can be removed for use with the next plank.
▲
⟩⟩
BOATSHED
philcaretaker
jbkiwi
boatmam
Peejay
GaryLC
cenbeth
AndyB2
RossM
Len1
MartinH2
hermank
EdW
Colin H
stevedownunder
River Rat
MouldBuilder
RNinMunich
|
💬 Re: Planking
5 months ago by 🇩🇪 RNinMunich (
Fleet Admiral)✧ 131 Views · 8 Likes
Flag
Your usual 'Fantabuloso marquetry' work I see Graham👍👍
Pink mahogany, luv it😋😍 Found several rough sawn boards of it, about 10'x6"x1/2", in the garage of a house I bought many many moons ago. (About 50x365🤔). Made all sorts out of them, from book shelves to frames for pin boards. Comes up to a wonderful pink shine She is gonna look sooo bootiful when finished in your inimitably immaculate style. KUTGW Cheers, Doug😎 ▲
⟩⟩
BOATSHED
Peejay
philcaretaker
Len1
Graham93
hermank
Colin H
River Rat
|
📝 Formwork
5 months ago by 🇬🇧 Graham93 ( Vice Admiral)
Vice Admiral)✧ 133 Views · 12 Likes
Flag
💬 Add Comment
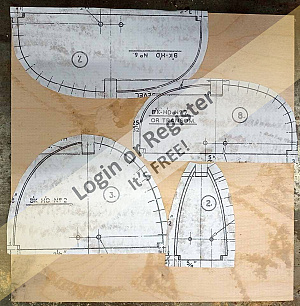
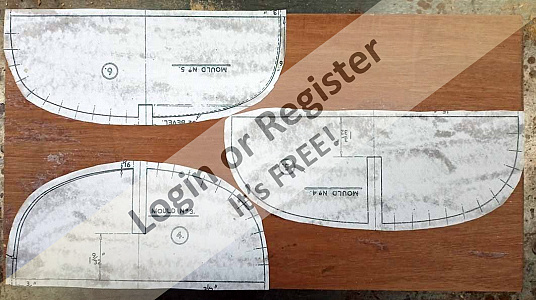
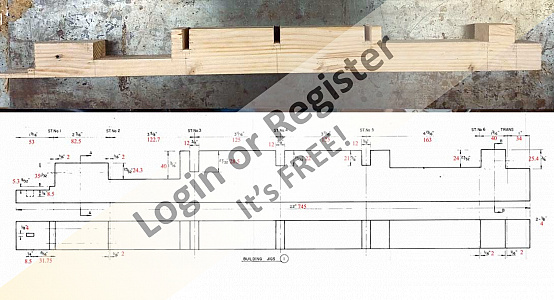
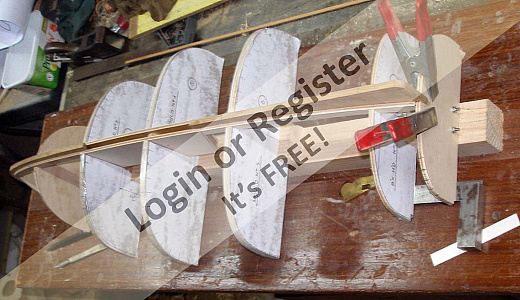
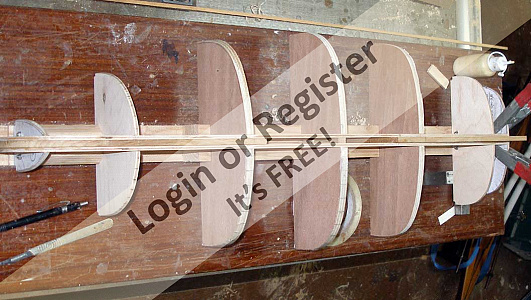
The hull is built inverted on a jig. There are four bulkheads which will form part of the completed hull, together with three temporary moulds which ensure that the planks are laid to the correct form.
The bulkhead shapes were printed and then glued to 4mm birch ply before cutting out. The same approach was used for the moulds although these were cut from 12mm construction ply.
The bulkheads and moulds all mount onto a timber strongback which was marked for cutting out using the scaled up dimensions from the plan.
The strongback was then screwed to a flat board and the bulkheads and moulds were fixed in position. The front pair of bulkheads are bolted together using two threaded rods which run through holes in the strongback. A similar arrangement is used to hold the rear pair of bulkheads in position.
Finally, the keel was fitted into the notches along the centreline of the bulkheads and moulds. It was glued to the bulkheads but not the three central moulds. Everything was checked for square before the glue dried. The complete assembly has turned out to be very rigid, which is probably going to be a good thing when it comes to fitting the planks.
▲
⟩⟩
BOATSHED
Peejay
cenbeth
philcaretaker
Len1
MartinH2
hermank
EdW
Colin H
RNinMunich
jbkiwi
stevedownunder


Login To
Remove Ads
Remove Ads