
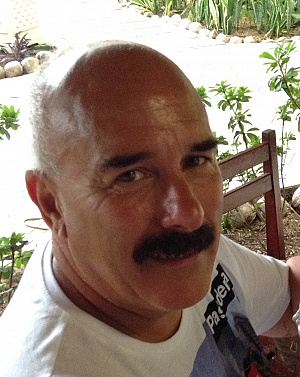
Good evening everyone, Here is my final summary for the creation of my Dutch crewman. Once again I will post the starting photo from the web that I will base my crewman on, as a reference to save looking back at part 1 for a reminder. Photo 1. Having got the figure to a good scale height of 120mm, I now decided to pose him in a sitting position to keep his centre of gravity low. I would have preferred him to be standing at the tiller, but there is not enough head room under the working main boom on this particular model. I have found with this type of play figures that the joints do not have full natural movements for some poses. This was the case with the limited hip movement, so using my mini grinder with drill bit attached, removed some of the plastic to enable a 90 deg hip bend. Photo 2,3,4. This completed the desired sitting pose position photo 5. The next task was to remove the wrist cuffs and convert into a tight fitting cuff around the wrist. I had not at this stage glued the various body parts up as it is easier to do these modifications while apart. Photo 6. I then at this stage supa glued all the joints together in my final required pose, when set I trimmed the joints with a sharp craft knife to remove the excess plastic and round off the joints into a more human form. Photo 7,8. When happy with the shape I filled all the joints with modelling putty. Photo 9. When dry I sanded the figure smooth, and made a small barrel for him to sit on. Photo 10, 11. Next I made out of card the waist coat and collar, a bit of trial and error before it was right. Photo 12, 13. The large baggy over trousers were the next task, for these I used modelling tissue, as in aeroplane wing covering. This is strong enough not to tear when spread with PVA glue. A couple of small squares were coated and wrapped around each leg then gathered at the waist and ankles. Using this tissue leaves nice folds and realistic creases, then left overnight to dry. In the meantime I cut the figures boots off and using modelling putty shaped a pair off clogs. also worked a neckachief into the V of the waist coat collar, photo 15,16. After a dry run to check the pose one last time, I dismantled the components and gave them a couple of coats of paint. Photo 16. When all was dry the Dutch man was glued together in his final sitting pose with his left hand resting on his left knee, his head slightly turned to one side, as he relaxed while smoking his now fitted in his right hand a new meerschaum pipe with smoky wisps emanating from the bowl top. Photo 17,18,19. Then finally I bonded the crewman and barrel using double sided tape to the deck of Karoline. Photo 20,21.
[{"id":"173310102275","url":"https:\/\/model-boats.com\/media\/173310102275\/l","thumbUrl":"https:\/\/model-boats.com\/media\/173310102275\/s","name":"173310102275","caption":""},{"id":"173310114912","url":"https:\/\/model-boats.com\/media\/173310114912\/l","thumbUrl":"https:\/\/model-boats.com\/media\/173310114912\/s","name":"173310114912","caption":""},{"id":"173310103150","url":"https:\/\/model-boats.com\/media\/173310103150\/l","thumbUrl":"https:\/\/model-boats.com\/media\/173310103150\/s","name":"173310103150","caption":""},{"id":"173310114989","url":"https:\/\/model-boats.com\/media\/173310114989\/l","thumbUrl":"https:\/\/model-boats.com\/media\/173310114989\/s","name":"173310114989","caption":""},{"id":"173310103129","url":"https:\/\/model-boats.com\/media\/173310103129\/l","thumbUrl":"https:\/\/model-boats.com\/media\/173310103129\/s","name":"173310103129","caption":""},{"id":"173310103166","url":"https:\/\/model-boats.com\/media\/173310103166\/l","thumbUrl":"https:\/\/model-boats.com\/media\/173310103166\/s","name":"173310103166","caption":""},{"id":"173310103160","url":"https:\/\/model-boats.com\/media\/173310103160\/l","thumbUrl":"https:\/\/model-boats.com\/media\/173310103160\/s","name":"173310103160","caption":""},{"id":"173310103190","url":"https:\/\/model-boats.com\/media\/173310103190\/l","thumbUrl":"https:\/\/model-boats.com\/media\/173310103190\/s","name":"173310103190","caption":""},{"id":"173310103232","url":"https:\/\/model-boats.com\/media\/173310103232\/l","thumbUrl":"https:\/\/model-boats.com\/media\/173310103232\/s","name":"173310103232","caption":""},{"id":"173310295374","url":"https:\/\/model-boats.com\/media\/173310295374\/l","thumbUrl":"https:\/\/model-boats.com\/media\/173310295374\/s","name":"173310295374","caption":""},{"id":"173310103373","url":"https:\/\/model-boats.com\/media\/173310103373\/l","thumbUrl":"https:\/\/model-boats.com\/media\/173310103373\/s","name":"173310103373","caption":""},{"id":"173310104367","url":"https:\/\/model-boats.com\/media\/173310104367\/l","thumbUrl":"https:\/\/model-boats.com\/media\/173310104367\/s","name":"173310104367","caption":""},{"id":"173310104052","url":"https:\/\/model-boats.com\/media\/173310104052\/l","thumbUrl":"https:\/\/model-boats.com\/media\/173310104052\/s","name":"173310104052","caption":""},{"id":"173310104012","url":"https:\/\/model-boats.com\/media\/173310104012\/l","thumbUrl":"https:\/\/model-boats.com\/media\/173310104012\/s","name":"173310104012","caption":""},{"id":"173310104151","url":"https:\/\/model-boats.com\/media\/173310104151\/l","thumbUrl":"https:\/\/model-boats.com\/media\/173310104151\/s","name":"173310104151","caption":""},{"id":"173310104350","url":"https:\/\/model-boats.com\/media\/173310104350\/l","thumbUrl":"https:\/\/model-boats.com\/media\/173310104350\/s","name":"173310104350","caption":""},{"id":"173310103931","url":"https:\/\/model-boats.com\/media\/173310103931\/l","thumbUrl":"https:\/\/model-boats.com\/media\/173310103931\/s","name":"173310103931","caption":""},{"id":"173310104128","url":"https:\/\/model-boats.com\/media\/173310104128\/l","thumbUrl":"https:\/\/model-boats.com\/media\/173310104128\/s","name":"173310104128","caption":""},{"id":"173310104175","url":"https:\/\/model-boats.com\/media\/173310104175\/l","thumbUrl":"https:\/\/model-boats.com\/media\/173310104175\/s","name":"173310104175","caption":""},{"id":"173310104432","url":"https:\/\/model-boats.com\/media\/173310104432\/l","thumbUrl":"https:\/\/model-boats.com\/media\/173310104432\/s","name":"173310104432","caption":""},{"id":"173310104640","url":"https:\/\/model-boats.com\/media\/173310104640\/l","thumbUrl":"https:\/\/model-boats.com\/media\/173310104640\/s","name":"173310104640","caption":""}]
Good evening everyone, Here is my final summary for the creation of my Dutch crewman. Once again I will post the starting photo from the web that I will base my crewman on, as a reference to save looking back at part 1 for a reminder. Photo 1. Having got the figure to a good scale height of 120mm, I now decided to pose him in a sitting position to keep his centre of gravity low. I would have preferred him to be standing at the tiller, but there is not enough head room under the working main boom on this particular model. I have found with this type of play figures that the joints do not have full natural movements for some poses. This was the case with the limited hip movement, so using my mini grinder with drill bit attached, removed some of the plastic to enable a 90 deg hip bend. Photo 2,3,4. This completed the desired sitting pose position photo 5. The next task was to remove the wrist cuffs and convert into a tight fitting cuff around the wrist. I had not at this stage glued the various body parts up as it is easier to do these modifications while apart. Photo 6. I then at this stage supa glued all the joints together in my final required pose, when set I trimmed the joints with a sharp craft knife to remove the excess plastic and round off the joints into a more human form. Photo 7,8. When happy with the shape I filled all the joints with modelling putty. Photo 9. When dry I sanded the figure smooth, and made a small barrel for him to sit on. Photo 10, 11. Next I made out of card the waist coat and collar, a bit of trial and error before it was right. Photo 12, 13. The large baggy over trousers were the next task, for these I used modelling tissue, as in aeroplane wing covering. This is strong enough not to tear when spread with PVA glue. A couple of small squares were coated and wrapped around each leg then gathered at the waist and ankles. Using this tissue leaves nice folds and realistic creases, then left overnight to dry. In the meantime I cut the figures boots off and using modelling putty shaped a pair off clogs. also worked a neckachief into the V of the waist coat collar, photo 15,16. After a dry run to check the pose one last time, I dismantled the components and gave them a couple of coats of paint. Photo 16. When all was dry the Dutch man was glued together in his final sitting pose with his left hand resting on his left knee, his head slightly turned to one side, as he relaxed while smoking his now fitted in his right hand a new meerschaum pipe with smoky wisps emanating from the bowl top. Photo 17,18,19. Then finally I bonded the crewman and barrel using double sided tape to the deck of Karoline. Photo 20,21.
😂
Brilliant workmanship on your figure.
👍😊