Join Us On Social Media!

|

|

|
Download The App!
Login To
Remove Ads
Remove Ads
Login To
Remove Ads
Remove Ads
Model Boats Website
39' Windboats of Wroxham 'Fairwind', built 1930s and 40s
19 Posts · 14 Followers · 222 Photos · 122 Likes
Began 3 years ago by
 United States
Follow This Thread
Not currently following
> Click to follow
> Click to follow
Latest Post 3 years ago by
| Oldest posts shown first (Show Newest First) | (Print Booklet) |
📝 39' Windboats of Wroxham 'Fairwind', built 1930s and 40s
3 years ago by 🇺🇸 EdH ( Midshipman)
Midshipman)✧ 157 Views · 10 Likes · 8 Comments
Flag
💬 Add Comment
Started another model boat project, but the grandkids will be disappointed as it doesn’t plane! It’s a 39” model of the 39’ Fairwind, built in the late 1930s, early 1940s by Windboats of Wroxham, on the Norfolk Broards, where speed is limited to 3-6 mph. Fellow modeler, Ron Wem knows a lot about these boats and got me interested. His advice and photographs have been really helpful, but there is also a surprising amount of information online. Have enjoyed researching it. My connection with the boat? I chartered one (Maid Rosalind) for a week on the Thames with school mates, when I graduated from High School aged 18 in 1966. How I persuaded them to rent it to us (3 guys, 4 girls) I will never know, but we had a blast! I had to travel up to London to visit the main base the day before (and last day of school) to prove I could handle a boat this size. Rosalind was probably 25 years old when we chartered her and she definitely wasn't modern but I remember lovely old fashioned paneling etc. She was perfect for us. We did a one way charter from Wallingford (just below Oxford) all the way to the outskirts of London. Would love to hear from anyone with an interest in these boats.
I always try to use a different construction method and this time, because the chine had the same profile as the waterline for most of the boat’s length, I used the chine lines to make a ‘floor’ exactly at the waterline. Everything will be built up from that.


I always try to use a different construction method and this time, because the chine had the same profile as the waterline for most of the boat’s length, I used the chine lines to make a ‘floor’ exactly at the waterline. Everything will be built up from that.
▲
⟩⟩
stevedownunder
Inkoust
jbkiwi
RNinMunich
MouldBuilder
Martin555
Colin H
Ianh
Nerys
Peejay
|
💬 Re: 39' Windboats of Wroxham 'Fairwind 39', built 1930s and 40s
3 years ago by 🇺🇸 EdH (
Midshipman)✧ 148 Views · 3 Likes
Flag
Hi Michael. No, this is scratch built. The only kit I have built in many, many years is the RAF tender from my childhood that I worked on last year, and your blog was an inspiration and an enormous help with this. I enjoy the planning, research and figuring out the best method to use. With this project, Ron Wem got me interested in these classic river cruisers. I drew the plans from many photographs and from a photograph of a plan Ron had used for a similar boat. He has been a huge help. The construction method seems to be working well, as in this case, the chine and waterline have virtually the same plan except for the bow, which is only different for the first few inches. By cutting out a flat base at the waterline, in the shape of the chine lines, it was simple to fill in the hull sides above and below the chine, using the profile. I'm working on the bow now and will post when I get it done, but so far this method has worked fine. EdH
▲
⟩⟩
stevedownunder
Martin555
Ianh
|
|
Login To
Remove Ads 💬 Re: 39' Windboats of Wroxham 'Fairwind 39', built 1930s and 40s
3 years ago by 🇬🇧 mturpin013 (
 Admiral) Admiral)✧ 151 Views · 3 Likes
Flag
Is this a currently available kit or plan?
▲
⟩⟩
stevedownunder
Martin555
Ianh
|
|
💬 Re: 39' Windboats of Wroxham 'Fairwind 39', built 1930s and 40s
3 years ago by 🇺🇸 EdH (
Midshipman)✧ 151 Views · 0 Likes
Flag
Ianh, that makes sense! They wouldn’t be so great in a sea! Edh
▲
⟩⟩
No likes yet
This member will receive 1 point for every like received |
|
💬 Re: 39' Windboats of Wroxham 'Fairwind 39', built 1930s and 40s
3 years ago by 🇬🇧 Martin555 (
 Fleet Admiral) Fleet Admiral)✧ 153 Views · 1 Like
Flag
Hi EdH,
You are off to a great start. I will be following this build. Martin555. ▲
⟩⟩
stevedownunder
|
|
💬 Re: 39' Windboats of Wroxham 'Fairwind 39', built 1930s and 40s
3 years ago by 🇿🇦 Ianh (
 Commander) Commander)✧ 156 Views · 1 Like
Flag
Hi EdH,
They were used on the River Torridge, they weren't allowed out past the the Bideford Longbrige if my senile memory re calls. It's 60 Years ago🚤🚤 ▲
⟩⟩
Martin555
|
|
💬 Re: 39' Windboats of Wroxham 'Fairwind 39', built 1930s and 40s
3 years ago by 🇺🇸 EdH (
Midshipman)✧ 153 Views · 2 Likes
Flag
Ianh, could have been. They have a similar profile. I grew up on Tresco, Isles of Scilly and I’m not sure I’d want to take Maid Rosalind into any of those Cornish harbours! She was perfect for the Thames though!
▲
⟩⟩
Martin555
Ianh
|
|
💬 Re: 39' Windboats of Wroxham 'Fairwind 39', built 1930s and 40s
3 years ago by 🇿🇦 Ianh (
Commander)✧ 155 Views · 2 Likes
Flag
I am pretty sure that this design gave Les Rowell the idea for Sea Queen and see Commander. Used to see boats like this a Bideford in Cornwall
▲
⟩⟩
Martin555
EdH
|
|
💬 Re: 39' Windboats of Wroxham 'Fairwind 39', built 1930s and 40s
3 years ago by 🇬🇧 Nerys (
Fleet Admiral)✧ 158 Views · 4 Likes
Flag
'Fairwind' - Lovely traditional Broads boat, I liked those varnished mahogany topsides. Should make a good model, a reminder of what cruisers used to be.
cheers, Nerys ▲
⟩⟩
stevedownunder
Martin555
Ianh
EdH
|
Login To
Remove Ads
Remove Ads
📝 39' Windboats Fairwind - Installing shaft and power unit
3 years ago by 🇺🇸 EdH ( Midshipman)
Midshipman)✧ 150 Views · 2 Likes
Flag
💬 Add Comment
I always try to install the shaft and power unit at the earliest point, as soon as the keel is done. It's so much easier to get everything lined up before planking the hull etc.. Once everything is perfect, I remove the motor from the mount and the shaft from its sleeve to avoid dust and damage. It's easy to reinstall everything, using the same screws, at a later date. Unlike my past boats with powerful Outrunner motors, this boat is not fast, so to produce a realistic speed, I used a Mack 1885 12v motor geared down 2.5 to 1, driving a three blade 1.48" x 1.33" Octura prop on a small 1/8" shaft.


▲
⟩⟩
Inkoust
Martin555
📝 39' Windboats Fairwind - finishing the chine
3 years ago by 🇺🇸 EdH ( Midshipman)
Midshipman)✧ 146 Views · 3 Likes
Flag
💬 Add Comment
Building the bow was the test for this construction method and it was easier than I expected. I had started with a base of 1/8” ply, shaped as the the cross section at the waterline. For most of its length, the chine was almost exactly the same profile as the waterline, so it was easy to add hull below this, but at the bow the chine of course came above the waterline. I added balsa block in the area, cutting it first vertically, getting the chine shape from the ply template, then horizontally following the line of the chine. It was then simple to cut the hull shape using the new chine and the keel/stem shape. These boats were almost always varnished above the waterline (as was Maid Rosalind), so I will have to plank the topsides, but below she’s painted with red antifouling, coming several inches above the waterline, so I could get away with using a conventional sheet of Bass Wood, which I bent into shape overnight with a wet paper towel and clamps. The area of the chine above this antifouling is so small I didn't bother switching to planking. So far this construction method has worked well and has been simple to do. In one old Fairwind photograph, it looks like the planking follows the chine rather than the sheer, curving up significantly all the way up the stem at the bow. Any thoughts on this? Also, the bottom will be fiberglassed in the normal way, but I am undecided on the very visible varnished topside planking. A thin layer of epoxy would probably be best, but it’s not always easy to get it perfectly flat, and any dips and imperfection will show in the shiny varnish. Planking will be 1/8 x 1/4 Bass.


▲
⟩⟩
Inkoust
Martin555
jbkiwi
📝 39' Windboats Fairwind - roughing out interior
3 years ago by 🇺🇸 EdH ( Midshipman)
Midshipman)✧ 151 Views · 4 Likes · 6 Comments
Flag
💬 Add Comment
Building up from the waterline. The bulkheads, cabins, bunks, galley and heads are roughed in. Each bulkhead and the floors will be paneled with 1/16” x 3/8” strips. I have 224 feet in 2’ lengths ordered. That’s a heck of a lot of tiny paneling! Painted the engine room. The hull has no solid bulkheads below the waterline, so could also paint most of the inside of the hull, fore and aft. The transom, though straight in plan view, curves backwards as was the fashion, so used 1/16" sheet laminated. The hull sides do the same, but these will be planked, so no problem there. I'm enjoying researching this old cruiser and reliving memories!


▲
⟩⟩
Seanympth
jbkiwi
RNinMunich
Martin555
|
💬 Re: 39' Windboats Fairwind - roughing out interior
3 years ago by 🇺🇸 EdH (
Midshipman)✧ 142 Views · 0 Likes
Flag
Hi Doug. In the past I have always glassed and painted a planked hull (and regular hulls) as you suggest, but the problem I have is these boats were almost always finished with a varnished hull and topsides (as was Rosalind), so I can't cover the glass with paint. I guess I will try to get the planks fitting as tightly as possible and then assess the situation! Thanks, Ed
▲
⟩⟩
No likes yet
This member will receive 1 point for every like received |
|
Login To
Remove Ads 💬 Re: 39' Windboats Fairwind - roughing out interior
3 years ago by 🇩🇪 RNinMunich (
Fleet Admiral)✧ 145 Views · 0 Likes
Flag
Hi Ed,
Mike and I were referring to the use of auto lacquer on the deck planking only, as a final finish after they have been sealed. For sealing / strengthening the hull itself, especially if planked or even skinned with thin ply, I use Deluxe Materials EzeKote with glass-fibre tissue on the inside and about 3 coats of EzeKote resin on the outside, after filling any gaps or depressions with an auto polyester filler, such as P38 or I believe 'Bondo' in your neck of the woods. That gives strength and a good base for the primer and final colour coats. Since you have so much interior decoration (not a problem I normally have!) I think the lacquer would be a quick and simple solution. For the hull itself I would use the EzeKote resin. It is a water based one part resin, i.e. no hardener needed, which sets in about 20 to 30 minutes and doesn't stink out the house 😉 For a working boat she sure has a lot of nice panelling inside! Cheers, Doug 😎 ▲
⟩⟩
No likes yet
This member will receive 1 point for every like received |
|
💬 Re: 39' Windboats Fairwind - roughing out interior
3 years ago by 🇺🇸 EdH (
Midshipman)✧ 143 Views · 1 Like
Flag
Doug, I'm going with lacquer inside and out but my big concern is using it on a planked hull which has to be watertight. I would normally fiberglass at least the inside as no matter how tight you get the planks there's always some leak, but that's not even possible as the planks are visible on the inside. This is a working river boat and doesn't have to have a mirror shine anywhere. What I particularly like about lacquer is the ability to add coats with little fuss, which will be helpful as I plan to paint the interior in overlapping sections at different times. Thanks for the support. Ed
▲
⟩⟩
RNinMunich
|
|
💬 Re: 39' Windboats Fairwind - roughing out interior
3 years ago by 🇩🇪 RNinMunich (
Fleet Admiral)✧ 145 Views · 2 Likes
Flag
"Finishing of the planking I would suggest automotive clear lacquer"
I heartily agree Mike👍 That's what I used on the decks of my Sea Scout restoration. Gives a real nice hard shine. I flatted off between coats with 3000 wet & dry with a drop of liquid soap. Final coat was then polished with auto fine cutting paste + anti hologram polish!! Details of materials used, and how, are in my Build Blog; Sea Scout 'Jessica' restoration. 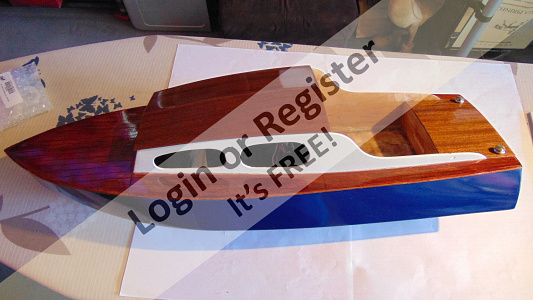
▲
⟩⟩
EdH
Seanympth
|
|
💬 Re: 39' Windboats Fairwind - roughing out interior
3 years ago by 🇺🇸 EdH (
Midshipman)✧ 149 Views · 1 Like
Flag
Hi Michael. If I can get away with lacquer, that would be my first choice. My problem is that unlike deck planking glued over solid wood, this is the hull topsides which will get wet and don't have a solid wood backing. However careful, it's hard to get every board fitting snuggly, especially when there's quite a curve involved. All but one of other hulls I've planked have been static models and the working one was painted so I glassed it. An additional problem is that the inside of the hull planking will be visible in parts, so I can't glass the inside. Depending on how well I think the planking turned out, I'm tempted to go the lacquer route!
Regarding the battery, there is more room than is evident in the photographs. A 5 1/2" LiPo fits and the 3S LiPos I use are smaller than that. It will go to one side of the motor, partially tucked under the bulkhead aft of the cockpit. There is actually also room above the opening as the cockpit floor will be level with the companionway openings. Ed ▲
⟩⟩
Martin555
|
|
💬 Re: 39' Windboats Fairwind - roughing out interior
3 years ago by 🇬🇧 mturpin013 (
Admiral)✧ 152 Views · 3 Likes
Flag
Finishing of the planking I would suggest automotive clear lacquer I used it on my Crash Tender and on the Freeman 22 broads cruiser I gave the decks 5 coats with rubbing down in between. The key to a flat surface is to make sure its flat before you start lacquering.
If it last on cars I'm sure it will last on our occasionally used boats by comparison. PS where do the batteries fit? ▲
⟩⟩
EdH
RNinMunich
Martin555
|
📝 39' Windboats Fairwind - lighting, paneling, electronics, sinks
3 years ago by 🇺🇸 EdH ( Midshipman)
Midshipman)✧ 144 Views · 9 Likes · 4 Comments
Flag
💬 Add Comment
Installed lighting. Used 5mm square Mega Chips from Evan Designs. By far the best LEDs I’ve used yet. The resistor is already incorporated so after specifying the voltage before ordering, they can be connected directly to the power source. Unlike past purchases also advertised as warm light, these ones really are! Because there are no solid bulkheads below the waterline, it was easy to run wires from the battery to any part of the boat, coming up at any bulkhead. Added the ESC, a terminal strip and a box for the battery. The battery snaps in, but is easily removed by depressing the brass clip. Once the topsides and decks are added, the access to this area will be more restricted, so I made sure everything can be easily removed. The ESC is held by velcro. The whole terminal strip is bolted rather than screwed and there’s enough slack in wiring, so the whole thing can be lifted out and worked on more easily. The washbasins and galley sink were made from epoxy filler pushed over clay molds. The outside of the relatively soft filler was then strengthened with a cover of clear epoxy. I could have used a 3D printer or bought something ready made and this most certainly would have been more realistic, but for me the challenge is to figure out how to make it from scratch! Now I have to think how I could make the cooker (with oven) and two heads! Have finished most of the (endless) paneling. I stained the wood before cutting, dipping the two foot lengths in a home made tube/stand. Pre-staining avoided glue marks appearing through final staining. I used Curly Maple veneer for the head and galley counter tops and will use Cherry veneer for the floor, neither of which Rosalind had, but I wanted to brighten the interior.


▲
⟩⟩
Martin555
Ianh
mturpin013
shamrok
jbkiwi
Rookysailor
Seanympth
RNinMunich
Graham93
|
💬 Re: 39' Windboats Fairwind - lighting, paneling, electronics, sinks
3 years ago by 🇬🇧 Martin555 (
Fleet Admiral)✧ 146 Views · 1 Like
Flag
You have been very busy there Ed.
Nice work, keep it up. ▲
⟩⟩
EdH
|
|
Login To
Remove Ads 💬 Re: 39' Windboats Fairwind - lighting, paneling, electronics, sinks
3 years ago by 🇩🇪 RNinMunich (
Fleet Admiral)✧ 146 Views · 2 Likes
Flag
Thanks for the link Ed👍 I'll be looking them up.
"I have a nasty habit of changing things!" That goes with the territory Ed, we ALL do that 😁 The lacquer shouldn't be a problem if you need to change something. Just check all connections for continuity with a multimeter set on Ohms with a beeper for continuity. Any problems just scrape off the lacquer with a scalpel blade. When all is OK and tightened down give it another quick blast of lacquer to seal it. WD40 is good but it stinks more and creeps around inside models 🤔 Bon chance mon ami👍 Doug 😎 ▲
⟩⟩
EdH
Martin555
|
|
💬 Re: 39' Windboats Fairwind - lighting, paneling, electronics, sinks
3 years ago by 🇺🇸 EdH (
Midshipman)✧ 144 Views · 2 Likes
Flag
Doug, the LEDs came from
▲
⟩⟩
Martin555
RNinMunich
|

|
💬 Re: 39' Windboats Fairwind - lighting, paneling, electronics, sinks
3 years ago by 🇩🇪 RNinMunich (
Fleet Admiral)✧ 146 Views · 2 Likes
Flag
Egad Sah, thou art truly a glutton for panelling!😉
Some excellent 'how to' tips here as well 👍 Everything including the kitchen sink!! Will help me to finish off the cockpit of my Sea Scout properly (at long long last 🙄) without the sink though. I like the sound of those Mega Chip LEDs, can you please post the link for where you bought 'em. I guess you'll also be fitting an RC switch for the pump / cistern for the head flushing 😁 or are they chemical heads?😮🙊 Nice tidy electrics installation as well, appeals to my engineering instinct 👍 One word to the wise; I've had those screw terminal connectors corrode after a while in a damp atmosphere. A quick blast of WD40 or better a conformal coating type lacquer, as used on military radio gear etc, solves the problem. The lacquer also helps prevent/delay the screws working loose over time. So far so very good, watching with interest and looking forward to the sea trials. Any thoughts on the crew yet? Cheers, Doug 😎 ▲
⟩⟩
Martin555
EdH
|
📝 39' Windboats Fairwind - faucets/taps, cooker, floor
3 years ago by 🇺🇸 EdH ( Midshipman)
Midshipman)✧ 146 Views · 7 Likes · 3 Comments
Flag
💬 Add Comment
Maid Rosalind, the Windboats Norfolk Broards/Thames cruiser. Made faucets/taps from brass tubing and rod. Baked a three sided rough cube of clay for the cooker, cutting it into shape with a razor saw, strengthening it with wood and glue from behind and adding details to the front. Cut the sheet of cherry veneer for the floor into 3/8" strips. Pre-stained the strips to avoid glue marks in the wood and to stop the very thin veneer from curling when the wood glue was applied (too intricate to use contact cement). Painted the bulkheads, floors etc with a coat of lacquer. I feel super shiny interiors look unrealistic so resisted the temptation of a second coat!


▲
⟩⟩
Martin555
jbkiwi
Ianh
mturpin013
Rookysailor
Graham93
RNinMunich
|
💬 Re: 39' Windboats Fairwind - faucets/taps, cooker, floor
3 years ago by 🇩🇪 RNinMunich (
Fleet Admiral)✧ 148 Views · 2 Likes
Flag
Why avoid it Ed?
I think it looks great as it is. Cutesville 😀 😎 Seems almost poetic, or do I mean procreative?, making a cooker by baking in a cooker! ▲
⟩⟩
Martin555
EdH
|
|
Login To
Remove Ads 💬 Re: 39' Windboats Fairwind - faucets/taps, cooker, floor
3 years ago by 🇺🇸 EdH (
Midshipman)✧ 146 Views · 3 Likes
Flag
Thank you Doug. I see what you mean about the cooker. Wish I'd painted the handle a metal light grey instead of black, which would have helped avoid the smiling face! Ed
▲
⟩⟩
Martin555
Ianh
RNinMunich
|
|
💬 Re: 39' Windboats Fairwind - faucets/taps, cooker, floor
3 years ago by 🇩🇪 RNinMunich (
Fleet Admiral)✧ 148 Views · 2 Likes
Flag
Brilliant work Ed 👍
The cooker looks very happy in his new home, wide eyed and a happy grin 😀 I've never seen so much detailed interior work in such a model before. (Possible exception; the 'ladies loo' in one of JB's boats!) Otherwise only in 'cut-a-ways', like Martin's U-Boat. Hat off Sir. She's gonna look glorious when all fettled up varnished and polished. Cheers, Doug 😎 ▲
⟩⟩
Martin555
EdH
|
📝 39' Windboats Fairwind - removable cockpit, hidden switches and heads
3 years ago by 🇺🇸 EdH ( Midshipman)
Midshipman)✧ 151 Views · 5 Likes · 1 Comment
Flag
💬 Add Comment
Maid Rosalind, the 1940 Thames cruiser.
Built the cockpit unit that slides between two bulkheads, covering and giving access to the electronics.
Placing the switches for operating the boat is always a challenge. I try to have them accessible without removing the cabin top.
Past boats I've hidden them in a top loading freezer and under a small removable bridge deck. This time they are supposed to look like the gear and throttle at the helm.
To do this, the switches are located on the fixed bulkhead but protrude through the helm console when the cockpit is dropped into place.
Also made the heads. In those days there were no holding tanks and waste could of course not be discharged into the Thames River, so I assumed they were old chemical toilets.
The brochures understandably didn't highlight this part of the ship and I don't remember what Rosalind had, so I had to guess.
Ended up with a cylinder shape, slightly fatter at the back, to fit the shape of the seat. The body was made in clay, roughly shaped before firing, then cut, ground and sanded to shape. Added a shower grate to the forward head. It's roughed in on the original brochure plan, but doesn't say if it's a shower or a tub.
A bath was preferred to a shower back then and many boats had tubs, but I went with a shower. Again, that's not something I remember! The tiny switches came from Evan Designs. So glad I found these people!
▲
⟩⟩
Martin555
jbkiwi
Ianh
RNinMunich
Graham93
|
💬 Re: 39' Windboats Fairwind - removable cockpit, hidden switches and heads
3 years ago by 🇩🇪 RNinMunich (
Fleet Admiral)✧ 151 Views · 1 Like
Flag
There's nowt like getting to grips with essentials Ed 😮
Good work 👍 Doug 😎 ▲
⟩⟩
Martin555
|
📝 39' Windboats Fairwind - planking and decking
3 years ago by 🇺🇸 EdH ( Midshipman)
Midshipman)✧ 150 Views · 8 Likes · 4 Comments
Flag
💬 Add Comment
Maid Rosalind, the 1940 Thames cruiser.
Pre-stained the planking as before, by dipping 2' lengths of 1/8" x 1/4" Bass wood in a tube filled with stain. This avoided the inevitable glue marks in the stain if done after construction. It also avoided having to stain planks on the inside, which would have been difficult. The exterior side of the planks was sanded smooth so no advantage there.
The bow planking was bent overnight with clamps and wet paper towels.
Built the inside supports for the decks and cabin sides. Fitted decks. Hung the boat for staining, first from the bow and then the stern.
▲
⟩⟩
Martin555
Seanympth
Peejay
jbkiwi
shamrok
CaptLarry
RNinMunich
Colin H
|
💬 Re: 39' Windboats Fairwind - planking and decking
3 years ago by 🇺🇸 EdH (
Midshipman)✧ 146 Views · 2 Likes
Flag
Thanks JB. The cabin sides, cockpit and cabin roof will come off as a single unit, so the interior will look the way it does now. Ed
▲
⟩⟩
Martin555
Peejay
|
|
Login To
Remove Ads 💬 Re: 39' Windboats Fairwind - planking and decking
3 years ago by 🇺🇸 EdH (
Midshipman)✧ 146 Views · 1 Like
Flag
Larry, I used a mixture of regular Minwax stains, but I let them really dry for several days before bending and glueing, and wiped the stain off very quickly after dipping. The glue was odorless thin CA (I’m allergic to the regular type) and I aggressively pre-bent the curved sections to minimize the strain on the bulkheads. CA thin also runs well between the planks so the end result was surprisingly strong, even with the widely spaced bulkheads. I think regular wood glue would be more affected by the Linseed oil in the stain, than the CA thin. I've used this method on quite a few models and all have survived grandchild use! I did actually remove one of these planks that I didn't like the next morning and the joints were very strong, splitting the wood before the joint! Ed
▲
⟩⟩
Martin555
|
|
💬 Re: 39' Windboats Fairwind - planking and decking
3 years ago by 🇳🇿 jbkiwi (
Fleet Admiral)✧ 148 Views · 1 Like
Flag
Looking nice so far Ed, like the interior look,- are you going to be able to see everything with the cabin on.?
JB ▲
⟩⟩
Martin555
|
|
💬 Re: 39' Windboats Fairwind - planking and decking
3 years ago by 🇺🇸 CaptLarry (
 Chief Petty Officer 2nd Class) Chief Petty Officer 2nd Class)✧ 152 Views · 1 Like
Flag
What sort of stain did you use so that the glue would adhere on assembly? And type of glue....
Quite detailed.....very nice👍 ▲
⟩⟩
Martin555
|
📝 Maid Rosalind, the 1940 Thames cruiser
3 years ago by 🇺🇸 EdH ( Midshipman)
Midshipman)✧ 140 Views · 9 Likes · 11 Comments
Flag
💬 Add Comment
Maid Rosalind, 1940 Thames cruiser. Applied three layers of West System epoxy to the hull, clear on the topsides where the planks have to show through, but plus fine fiberglass cloth below the waterline. Initial sanding was with a Fein sander and 40 grit paper (yes 40!), but a smooth epoxy finish can only really be achieved with days of hand sanding, finishing with 320 grit soaked in water! Added rails and finally a coat of lacquer to the topsides and red paint for the antifouling. I believe decks would have been canvas, covered with off-white paint back then. I can achieve this with textured spray paint under the finish coat. Any ideas from people familiar with these boats, before I start?
The close up picture of the hull, before the epoxy was coated with lacquer, shows the construction method pretty clearly. The project started with a sheet of ply at the actual waterline. Below this, the hull was built up using conventional sheets of Bass wood. The plywood served as the interior floor and the bulkheads were attached directly to it. The black line is the height of the antifouling, which was considerably above the waterline.


The close up picture of the hull, before the epoxy was coated with lacquer, shows the construction method pretty clearly. The project started with a sheet of ply at the actual waterline. Below this, the hull was built up using conventional sheets of Bass wood. The plywood served as the interior floor and the bulkheads were attached directly to it. The black line is the height of the antifouling, which was considerably above the waterline.
▲
⟩⟩
mturpin013
Martin555
bobslr
jbkiwi
Ianh
RNinMunich
Seanympth
Colin H
Peejay
|
💬 Re: Maid Rosalind, the 1940 Thames cruiser
3 years ago by 🇬🇧 Martin555 (
Fleet Admiral)✧ 97 Views · 0 Likes
Flag
Commodore Ron.
That is definitely a BLUE Print LOL!! Congratulations on your promotion. Martin555. ▲
⟩⟩
No likes yet
This member will receive 1 point for every like received |
|
Login To
Remove Ads 💬 Re: Maid Rosalind, the 1940 Thames cruiser
3 years ago by 🇨🇦 Ronald (
Admiral)✧ 96 Views · 1 Like
Flag
▲
⟩⟩
Martin555
|

|
💬 Re: Maid Rosalind, the 1940 Thames cruiser
3 years ago by 🇬🇧 Martin555 (
Fleet Admiral)✧ 131 Views · 1 Like
Flag
Very nice work indeed Ed,
I really love all the detailed fittings. I can just imagine the comments you will be getting when after lockdown she is at pool side topless. (I know what i meant LOL!!) Martin555. ▲
⟩⟩
jbkiwi
|
|
💬 Re: Maid Rosalind, the 1940 Thames cruiser
3 years ago by 🇳🇿 jbkiwi (
Fleet Admiral)✧ 133 Views · 2 Likes
Flag
Looking real nice Ed👍👍
JB ▲
⟩⟩
Martin555
EdH
|
|
💬 Re: Maid Rosalind, the 1940 Thames cruiser
3 years ago by 🇺🇸 EdH (
Midshipman)✧ 140 Views · 3 Likes
Flag
Hi Doug. Nice hulls! Because the topsides were varnished and the planks had to be visible, I couldn’t use fiberglass cloth and I was worried about strength. The individual planks also were not as strong as a sheet of wood and as hard as one tries, it’s impossible to get them really tight. I therefore used three layers of epoxy resin, ending up with around 1/8” thickness. I would suspect the West System epoxy is thicker than your epoxy. There therefore was no danger in attacking the hull(!), getting the inevitable mounds out by feel with the coarse stuff and later by sight as it started to shine. I wasn’t painting it so there was no really fine sandpaper between coats. I was very tempted to polish the epoxy with the gel coat compound I use to shine our real boat, instead of using lacquer (which wouldn’t have stuck to it). Wish I had now. Anyway I’ve ended up with an almost indestructible hull!
The Fein sander is indeed German. I destroyed the one I’ve had for over 20 years earlier this year, with one too many drops on the concrete floor and bought a new one. It’s a real credit to the manufacturer that unlike every other tool, the replacement was just as solidly built as the 20 year old one and actually was better! They are the best! Ed 
▲
⟩⟩
mturpin013
Martin555
RNinMunich
|
|
💬 Re: Maid Rosalind, the 1940 Thames cruiser
3 years ago by 🇩🇪 RNinMunich (
Fleet Admiral)✧ 138 Views · 2 Likes
Flag
Right on Nerys 👍
"We'd sing and dance forever and a day We'd live the life we choose We'd fight and never lose For we were young and sure to have our way" 😁😎 ▲
⟩⟩
Martin555
EdH
|
|
💬 Re: Maid Rosalind, the 1940 Thames cruiser
3 years ago by 🇩🇪 RNinMunich (
Fleet Admiral)✧ 138 Views · 2 Likes
Flag
"Initial sanding was with a Fein sander and 40 grit paper (yes 40!), but a smooth epoxy finish can only really be achieved with days of hand sanding, finishing with 320 grit soaked in water! "
40 grit! 😮 That sounds pretty violent Ed! "a smooth epoxy finish can only really be achieved with days of hand sanding" ... Agreed Ed, but ... With my Sea Scout, ELCO PTB and Danish fish cutter hulls I started with 180 grit and worked through to 3000 grit. 180/240 at the resin stage. I used Deluxe Materials EzeKote water based resin. 400, 600, 1000, 2000, 3000 between coats through the primer, colour coats and lacquer stages. Final finishing on the Sea Scout with auto polishing paste and then 'anti hologram' fine polishing paste. (Product details in my Sea Scout restoration and upgrade Blog). Like you say 'It takes days' 🤔 But it's worth it 😊 I'm sure it adds a knot or two to the boat's speed as well 😀 Cheers, Doug 😎 PS "Fein sander" A German product!? 😉 PPS Very pleased to see that you retained the Smiley cooker! 👍👍 


▲
⟩⟩
Martin555
EdH
|
|
💬 Re: Maid Rosalind, the 1940 Thames cruiser
3 years ago by 🇬🇧 Nerys (
Fleet Admiral)✧ 138 Views · 3 Likes
Flag
Those were the days my friend, We thought they'd never end.
cheers, Nerys ▲
⟩⟩
Martin555
EdH
RNinMunich
|
|
💬 Re: Maid Rosalind, the 1940 Thames cruiser
3 years ago by 🇩🇪 RNinMunich (
Fleet Admiral)✧ 138 Views · 3 Likes
Flag
"cucumber sandwiches and lemonade"
Lemonade!! 😮 Wot! No Muscadet or Sancerre! to wash down the sandwiches? 😮🤔 Or a Gordon's G&T for those who preferred the hard stuff 😁 Those were the days 'my friend we thought they'd never end' ... But I do believe that only Nerys amongst our most esteemed members actually experienced that decade, (I missed it by two years!), esp the first half!🤔 😎 
▲
⟩⟩
Martin555
EdH
Nerys
|
|
💬 Re: Maid Rosalind, the 1940 Thames cruiser
3 years ago by 🇺🇸 EdH (
Midshipman)✧ 142 Views · 1 Like
Flag
Thames cruising in a nutshell Nerys! Those were indeed good days! Ed
▲
⟩⟩
Martin555
|
|
💬 Re: Maid Rosalind, the 1940 Thames cruiser
3 years ago by 🇬🇧 Nerys (
Fleet Admiral)✧ 141 Views · 4 Likes
Flag
Beautifully detailed model, so many of us ignore the model below decks. I like the varnished topsides definitely dates her to the days of classic Thames cruising, picnics on the bank, gramophones, cucumber sandwiches and lemonade. Those were the days.
Cheers, Nerys ▲
⟩⟩
Martin555
RNinMunich
EdH
Peejay
|
📝 39' Windboats Fairwind. The beds are made
3 years ago by 🇺🇸 EdH ( Midshipman)
Midshipman)✧ 155 Views · 7 Likes · 2 Comments
Flag
💬 Add Comment
Maid Rosalind, 1940 Thames cruiser. The beds are made! Because they would be glued down I could get away with simple self hardening clay rather than stronger fired clay. My sculpture clay contains a lot of grog for texture, so I experimented with DAS modeling clay, from Italy, which is much finer. I would use it again for this type of project. It dried hard in 48 hours, with very little shrinkage. The mattress, pillows and turndowns were all made separately, dried and glued together, as wet clay does not stick well to other clay once dried. The turndowns were formed in place but with masking tape in between for simple removal before drying. The ‘mattress’ was sprayed with brown Rustoleum textured paint to give the feel of a blanket and covered with a thin layer of red. All exposed white clay was sprayed with a fixative used for setting charcoal drawings, as it’s very absorbent and stains easily. Wasn't sure what to do with the awkward corner of mattress in the aft double, so experimented with a checkered cushion, but the jury is still out on that one!


▲
⟩⟩
Brightwork
GaryLC
mturpin013
RNinMunich
Colin H
Graham93
Martin555
|
💬 Re: 39' Windboats Fairwind. The beds are made
3 years ago by 🇩🇪 RNinMunich (
Fleet Admiral)✧ 143 Views · 1 Like
Flag
Amazing stuff Ed 👍
I see you even thought of the Christmas stockings, GIANT size, very good 😉 When's the big trials day!?😀 Cheers, Doug 😎 ▲
⟩⟩
Martin555
|
|
💬 Re: 39' Windboats Fairwind. The beds are made
3 years ago by 🇬🇧 Martin555 (
Fleet Admiral)✧ 152 Views · 1 Like
Flag
Hi Ed,
excellent work. I would not of thought about using clay in that way. I like the way you are using different mediums in this project. Martin555. ▲
⟩⟩
EdH
|


Login To
Remove Ads
Remove Ads