Join Us On Social Media!

|

|

|
Download The App!
Login To
Remove Ads
Remove Ads
Login To
Remove Ads
Remove Ads
Model Boats Website
Modified Stiletto project
16 Posts · 11 Followers · 85 Photos · 132 Likes
Began 2 years ago by
 New Zealand
Follow This Thread
Not currently following
> Click to follow
> Click to follow
Latest Post 1 month ago by
| Oldest posts shown first (Show Newest First) | (Print Booklet) |
📝 Modified Stiletto project
2 years ago by 🇳🇿 jbkiwi ( Fleet Admiral)
Fleet Admiral)✧ 136 Views · 9 Likes · 5 Comments
Flag
💬 Add Comment
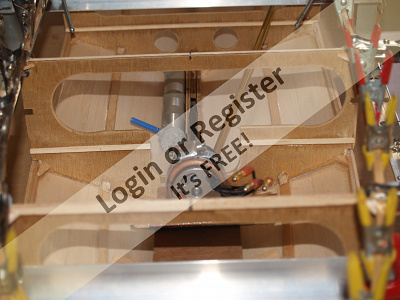
Making a bit of a start on my stretched Stiletto (more a Stilapier) at the moment, as it had been put aside while I had a play with a surface drive to fit to it, if I could get one working (see under surface drive experiment, in forum). I've shelved that idea till I can find a suitable universal for it, and have decided to use a modified cable drive instead (see under 'converting a cable drive to a standard drive', in forum) I wanted to settle on the drive type before starting fully, to make installation easier.
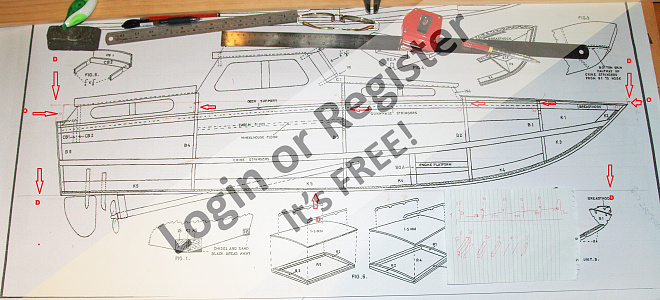
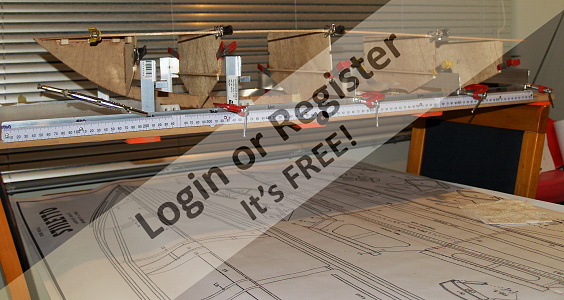
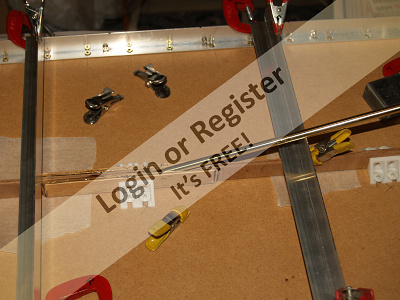
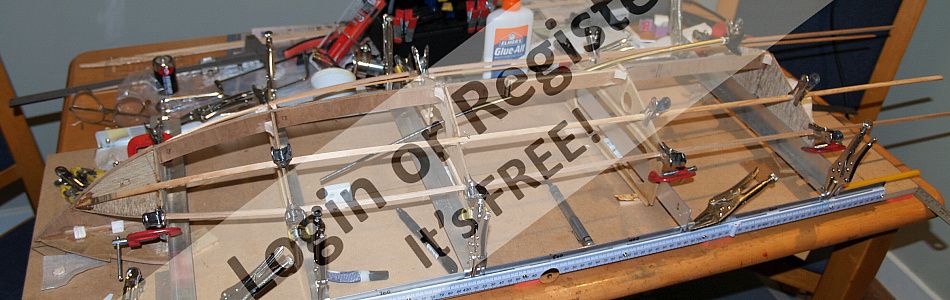
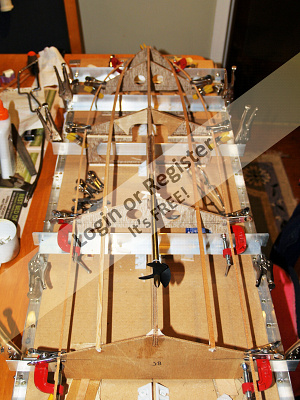
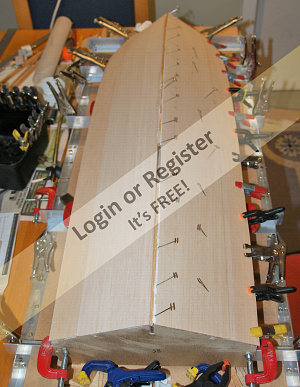
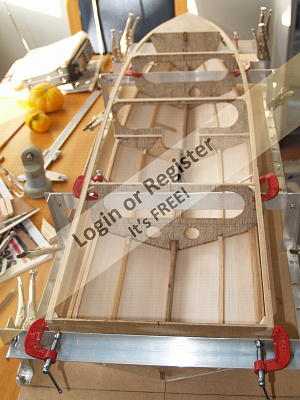
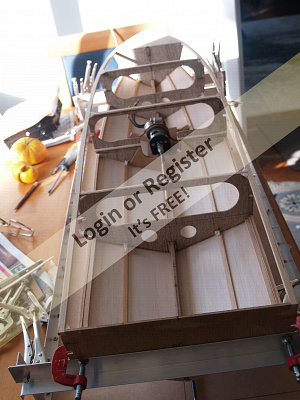
The Stiletto has been stretched to 38 1/2" by blowing the A4 sized drawings up to AO paper size. I've left out the usual internal locking structure so as to create more room and ease of access to the internals, instead, the whole cabin will lift off, rather than a few 'lids'. All the new positions have been worked out using top and bottom datum lines (pic 1). The deck camber has been changed but the deck sheer left in. A few other mods will be made as things progress.
I started by cutting out the keel, breast hook and new ply bulkheads, then cut the centers out of the bulkheads notched them for the stringers and reinforced them. I made a new universal building jig (under model framing jig, in forum) to hold everything in place, (right side up and upside down), and set everything up on it. Glued all the bulkheads bar the transom to the keel, (keel has shaft tube slot previously built in by cutting the keel on the appropriate angle, separating the 2 pieces by a shaft tube diam, trenching 2 side plates to suit the shaft tube angle and diam, and gluing/clamping them on using the building jig to hold them flat and straight.
I've made a cut-out for the motor in bulkhead 3, and bent the cable drive to suit. A motor mounting plate will be made later. Cable drive will have a V brace made to suit once the angle has been sorted for prop clearance etc.
Getting hard to find some modelling supplies (namely spruce strips for stringers and balsa) now so there might be some slow patches in the building.
▲
⟩⟩
MouldBuilder
Colin H
dave976
pressonreguardless
Graham93
stevedownunder
Madwelshman
Steveg171
Mike Stoney
|
💬 Re: Modified Stiletto project
2 years ago by 🇩🇪 Dampfgerd (
 Petty Officer 2nd Class) Petty Officer 2nd Class)✧ 111 Views · 1 Like
Flag
The Lesro Stillet and the Rapier are different kits.
I think Lesro uses several kits for the same Hull The Lesro Arrow has also the same Hull ▲
⟩⟩
jbkiwi
|
|
Login To
Remove Ads 💬 Re: Modified Stiletto project
2 years ago by 🇳🇿 jbkiwi (
Fleet Admiral)✧ 121 Views · 1 Like
Flag
Re -Rapier? Quite possibly, not too sure if the L to W is in the same proportions as the Stiletto, - the only visible difference looks to be in the cabin.
JB ▲
⟩⟩
Madwelshman
|
|
💬 Re: Modified Stiletto project
2 years ago by 🇬🇧 Steveg171 (
 Petty Officer 1st Class) Petty Officer 1st Class)✧ 144 Views · 2 Likes
Flag
It sure is. I wanted a Rapier, was directed to one for sale and was confused when a much smaller than expected crate arrived. The Rapier turned out to be a Stiletto lol. Size in this case did matter, always ask !!!!
▲
⟩⟩
RNinMunich
Madwelshman
|
|
💬 Re: Modified Stiletto project
2 years ago by 🇬🇧 jacko (
 Lieutenant Commander) Lieutenant Commander)✧ 134 Views · 1 Like
Flag
i'm liking the build board 👍👍
▲
⟩⟩
jbkiwi
|
|
💬 Re: Modified Stiletto project
2 years ago by 🇬🇧 200TDi (
Petty Officer 2nd Class)✧ 133 Views · 5 Likes
Flag
isn't a 39" Stiletto just a Rapier?
▲
⟩⟩
zooma
ChrisF
Dampfgerd
RNinMunich
Steveg171
|
Login To
Remove Ads
Remove Ads
📝 Modified Stiletto project
2 years ago by 🇳🇿 jbkiwi ( Fleet Admiral)
Fleet Admiral)✧ 121 Views · 7 Likes · 4 Comments
Flag
💬 Add Comment
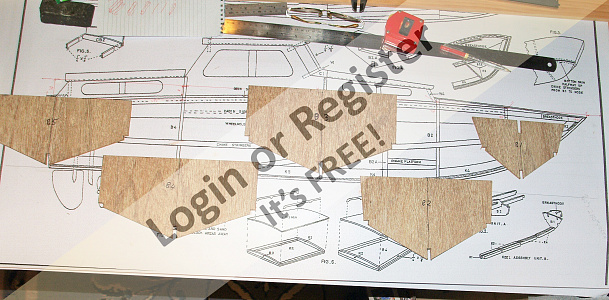
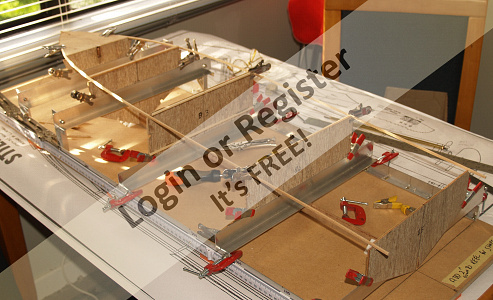
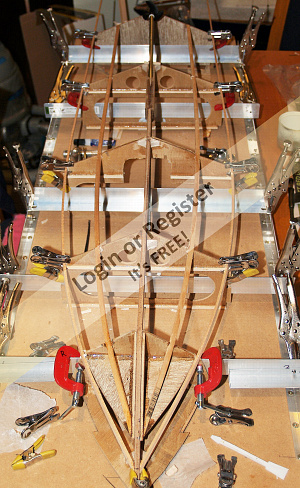
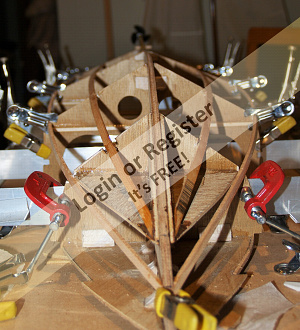
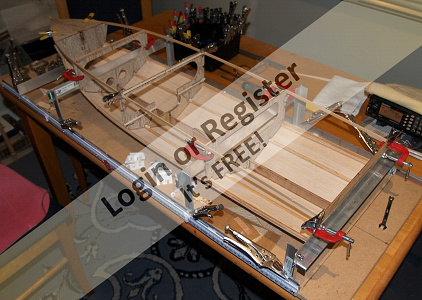
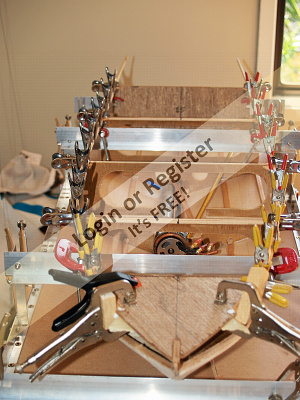
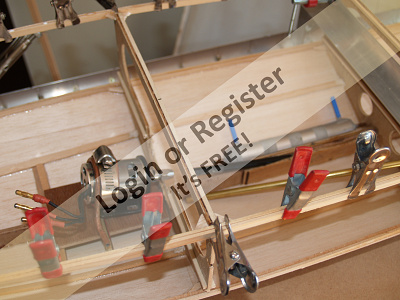
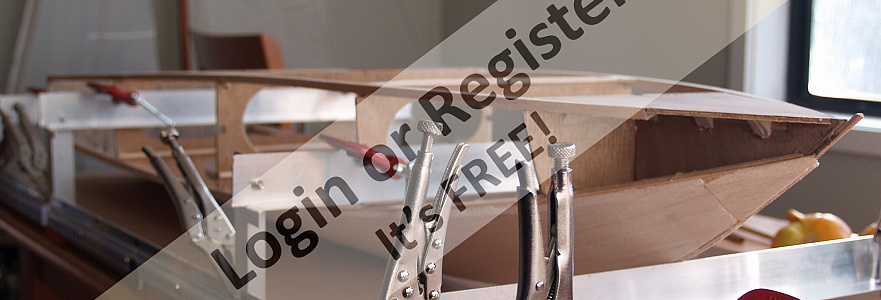
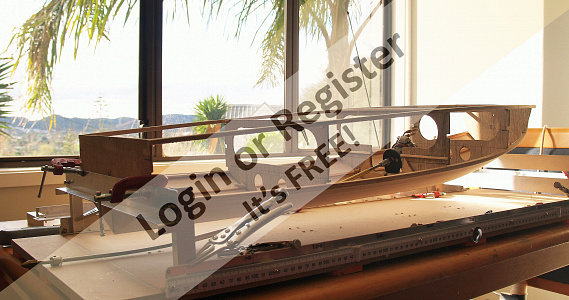
The basic frame (keel and bulkheads) now flipped over, lined up on the jig again, with the necessary bulkheads packed for the deck sheer to keep it all in shape. The bulkheads are clamped to the jig to keep it all solid. Started fitting the bottom stringers, which once planked will make the hull easier to work on while fitting certain internals. Side and gunwale stringers will be done once any internal work (motor, shaft, rudder, floors etc) is done.
The hull has been re designed, as balsa planks and f/glass will be used, rather than ply, making it lighter but needing stringers all round. The original only had chine and gunwale stringers, (the ply replacing the intermediate stringers.) Also, the cabin construction was part of the framing.

The hull has been re designed, as balsa planks and f/glass will be used, rather than ply, making it lighter but needing stringers all round. The original only had chine and gunwale stringers, (the ply replacing the intermediate stringers.) Also, the cabin construction was part of the framing.
▲
⟩⟩
MouldBuilder
EdW
Colin H
Madwelshman
stevedownunder
pressonreguardless
Graham93
|
💬 Re: Modified Stiletto project
2 years ago by 🇺🇸 pressonreguardless (
 Rear Admiral) Rear Admiral)✧ 120 Views · 3 Likes
Flag
Hi JB,
Thanks for the info on the glues and resin. I always like to learn what others are using. Who says you can't teach an old Dog New Tricks😂🤣😂. I have to construct a jig with yours as a guide for my next build, Thanks! Your Stiletto is coming along nicely👍👍 Trev ▲
⟩⟩
RonBMK2
stevedownunder
jbkiwi
|
|
Login To
Remove Ads 💬 Re: Modified Stiletto project
2 years ago by 🇳🇿 jbkiwi (
Fleet Admiral)✧ 119 Views · 4 Likes
Flag
Hi Trev, the jig makes things a piece of cake. I'm bound to find a snag somewhere, but so did the Wright brothers😁😁. I use a mixture of glues for different situations, but mainly Elmers 'Glue All' (sort of super PVA) 5 min epoxy and Loctite superglue gel. Once everything's done, I go round all the joints with either UHU or balsa glue to seal any gaps.
Elmers is not totally waterproof, but once the planking is done, the insides of all my boats have a timber preservative resin (International Everdure, or a local equivalent) poured in and painted around, which totally waterproofs everything. has the consistency of water, so gets in everywhere. ▲
⟩⟩
MouldBuilder
Len1
stevedownunder
pressonreguardless
|
|
💬 Re: Modified Stiletto project
2 years ago by 🇺🇸 pressonreguardless (
Rear Admiral)✧ 120 Views · 1 Like
Flag
Looking Good, JB
Your building jig certainty facilitates the build. What glue are you using? Trev ▲
⟩⟩
stevedownunder
|
|
💬 Re: Modified Stiletto project
2 years ago by 🇬🇧 Graham93 (
 Vice Admiral) Vice Admiral)✧ 129 Views · 2 Likes
Flag
Good progress JB 👍 It’s going to be interesting to see how the new building jig works out.
Graham93 ▲
⟩⟩
stevedownunder
jbkiwi
|
📝 Modified Stiletto project
2 years ago by 🇳🇿 jbkiwi ( Fleet Admiral)
Fleet Admiral)✧ 119 Views · 6 Likes · 1 Comment
Flag
💬 Add Comment
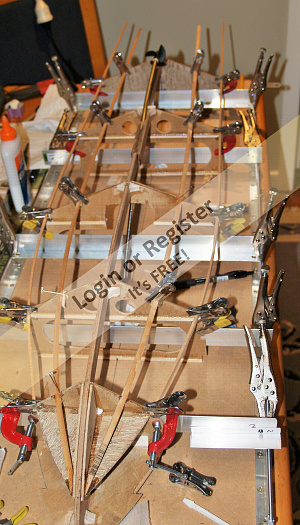
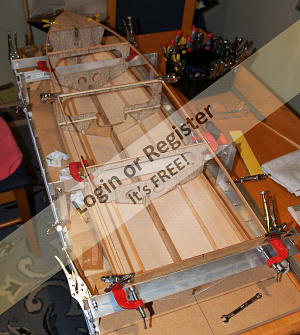
Chine stringers now glued in place. Will possibly have balsa top laminations for finishing if needed. I usually leave the stringer notches a bit larger in places to allow for 'flow' alignment. Usually get a few waves in the stringers when re-modelling a hull, (even doing them from a plan) I just pack the gaps later with balsa glued in and trimmed.
You can run the stringers over the frames/bulkheads which will allow water to drain easier (no need for limbers) - runs straight to the transom from anywhere. Good method for open boats with frames, which will be subjected to water inside, as you can leave floorboards in and just tip the boat up to drain. Notching stringers is a probably a bit easier for models, as they don't usually get any water ingress.

You can run the stringers over the frames/bulkheads which will allow water to drain easier (no need for limbers) - runs straight to the transom from anywhere. Good method for open boats with frames, which will be subjected to water inside, as you can leave floorboards in and just tip the boat up to drain. Notching stringers is a probably a bit easier for models, as they don't usually get any water ingress.
▲
⟩⟩
EdW
Colin H
Madwelshman
Len1
stevedownunder
pressonreguardless
|
💬 Re: Modified Stiletto project
2 years ago by 🇺🇸 pressonreguardless (
Rear Admiral)✧ 119 Views · 2 Likes
Flag
Thans for mentioning limber holes.
I cut them in on my Typhoon but forgot on my 44. You made some very good points. Trev ▲
⟩⟩
jbkiwi
stevedownunder
|
📝 Modified Stiletto project
2 years ago by 🇳🇿 jbkiwi ( Fleet Admiral)
Fleet Admiral)✧ 119 Views · 9 Likes · 7 Comments
Flag
💬 Add Comment
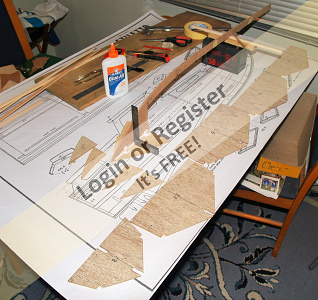
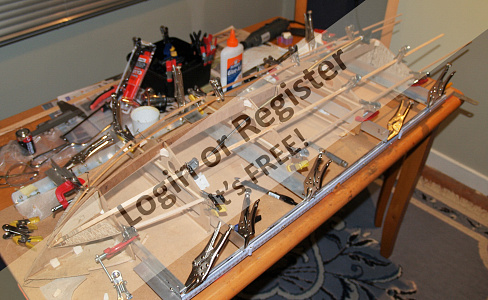
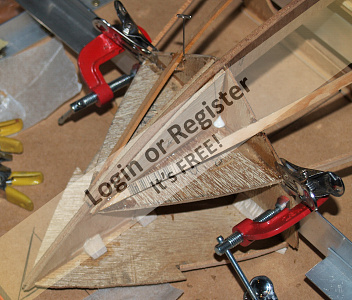
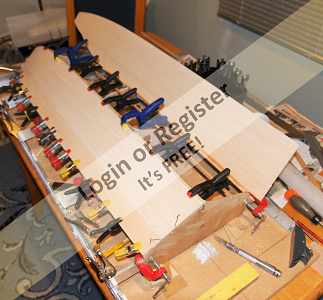
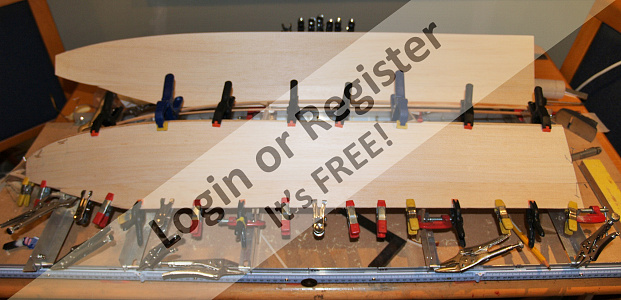
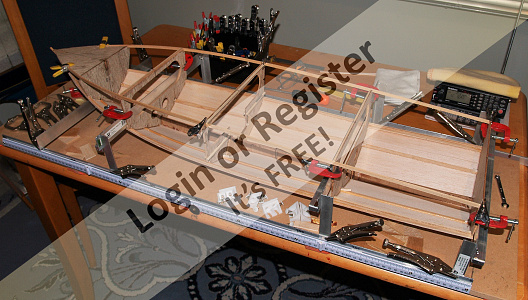
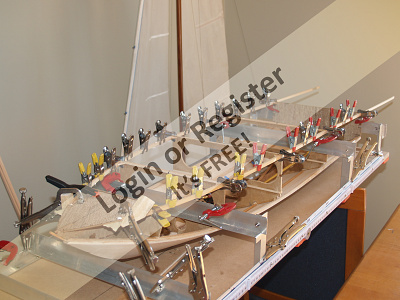
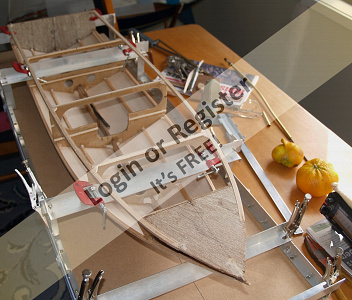
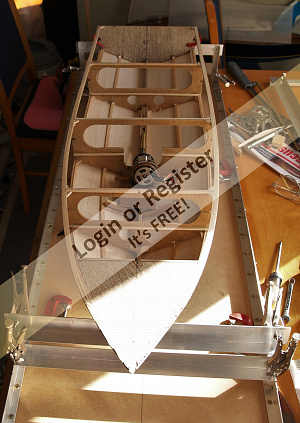
I've finished the framing for now, and have started the planking. Started by gluing a 3mmx3mm spruce strip down the center of the keel, to form the 'rebate' for the 2.5mm balsa planking. Next thing was to cut the 100mm wide balsa sheets roughly to shape, and butt join an extra 40mm on to cover the width. Chine stringers were also bevelled to suit the bulkhead/bottom angles
Airplane guys will probably know this, as it's usually a wing sheeting method.
Sheets were joined by 1. butting them up side to side tightly, 2. taping the joint with masking tape pressed down firmly, 3. opening the joint and filling the V with PVA glue, 4. closing it and placing the sheets tape down on a flat surface, 5. wiping off the excess with a damp sponge, 6. weighting the joint along the entire length and leaving it to set thoroughly for about 12 hrs. When dry (test with a sharp modelling knife pricked into the glue) remove the tape and you are ready. Be gentle with it though. Once applied to the frame/cabin etc, you can reinforce the join on the inside with thin ply, glass tape, or cross grain balsa strips. If you are glassing the hull, it's still a good idea to reinforce the join.
Using a liberal bead of balsa glue on all areas, the sheeting on the first side was applied and clamped, and a few pins used in un-clampable areas. Sitting quite nicely so far, (these hulls having developable surfaces, like a lot of older models- ie- no steaming required,) so will probably be attacking the other side tomorrow.
▲
⟩⟩
MouldBuilder
EdW
Colin H
Madwelshman
philcaretaker
pressonreguardless
dave976
Graham93
stevedownunder
|
💬 Re: Modified Stiletto project
2 years ago by 🇬🇧 philcaretaker (
 Commodore) Commodore)✧ 119 Views · 1 Like
Flag
Jees !- she look a real beast JB !!!
▲
⟩⟩
jbkiwi
|
|
Login To
Remove Ads 💬 Re: Modified Stiletto project
2 years ago by 🇳🇿 jbkiwi (
Fleet Admiral)✧ 118 Views · 2 Likes
Flag
True Graham 😁 If I want any more, I'll have to visit another Warehouse branch, as I've cleaned the local one out 😂 - lucky they don't have a 2 item limit lol. Only need to buy them once, and they are there for life.👍
JB 
▲
⟩⟩
philcaretaker
stevedownunder
|
|
💬 Re: Modified Stiletto project
2 years ago by 🇳🇿 jbkiwi (
Fleet Admiral)✧ 118 Views · 0 Likes
Flag
Hi Mike, -see reply to 200tdi
JB ▲
⟩⟩
No likes yet
This member will receive 1 point for every like received |
|
💬 Re: Modified Stiletto project
2 years ago by 🇳🇿 jbkiwi (
Fleet Admiral)✧ 118 Views · 7 Likes
Flag
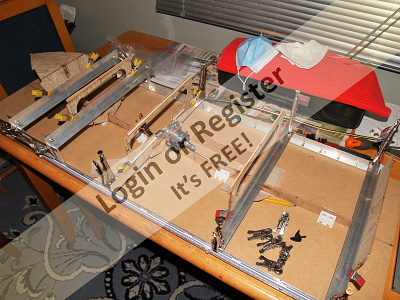
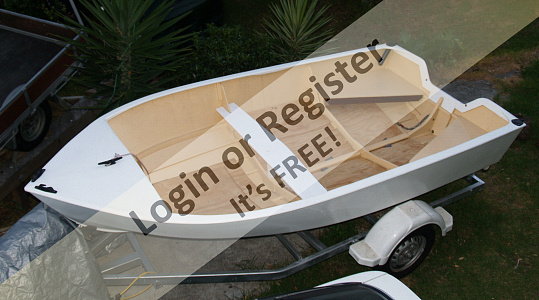
Re - why not ply, nothing wrong with balsa for sheeting/planking, as it's lighter, probably a lot cheaper than quality thin ply (aircraft grade is worth a kidney- if you could find it) bends in a uniform way, glues well and has room to sand out any irregularities. Once f/glassed, and sealed on the inside, it's as strong as it needs to be for a model. If you are glassing a model, the basic layer doesn't matter,- could even be thick stiff card, - the glass and frame is where the strength is. Unless you intend rock bashing, there's not much point building a brick, just needs more power to compensate.
The green boat in the pic was 2mm balsa with only glass tissue (deck as well), and with the necessary parts (motor mount area etc) strengthened with extra layers. Boat was built in the early 70s and had an O.S .40 motor, and was solid as a rock and quite light. I've never used ply for a hull,-only decks (not f/glassed). JB 

▲
⟩⟩
MouldBuilder
EdW
Colin H
Madwelshman
philcaretaker
stevedownunder
pressonreguardless
|
|
💬 Re: Modified Stiletto project
2 years ago by 🇬🇧 Graham93 (
Vice Admiral)✧ 127 Views · 3 Likes
Flag
Starting to take shape 👍. I pity other modellers in NZ, there must now be a shortage of clamps for sale in the shops! 😂😂
Graham93 ▲
⟩⟩
jbkiwi
stevedownunder
RNinMunich
|
|
💬 Re: Modified Stiletto project
2 years ago by 🇬🇧 mturpin013 (
 Admiral) Admiral)✧ 129 Views · 1 Like
Flag
As 200tdi why not ply and then glass ?
▲
⟩⟩
RNinMunich
|
|
💬 Re: Modified Stiletto project
2 years ago by 🇬🇧 200TDi (
Petty Officer 2nd Class)✧ 118 Views · 1 Like
Flag
Why balsa sheet instead of ply?
▲
⟩⟩
RNinMunich
|
📝 Modified Stiletto project
2 years ago by 🇳🇿 jbkiwi ( Fleet Admiral)
Fleet Admiral)✧ 126 Views · 7 Likes · 3 Comments
Flag
💬 Add Comment
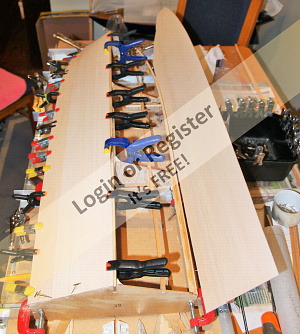
Second side on now,-once set it can be trimmed and flipped over on the jig. Might have to make a few mods to the jig to support it, now the sheets are on.
▲
⟩⟩
EdW
Aerostar55
Colin H
pressonreguardless
Madwelshman
stevedownunder
RonBMK2
|
💬 Re: Modified Stiletto project
2 years ago by 🇦🇺 stevedownunder (
 Captain) Captain)✧ 121 Views · 0 Likes
Flag
Hi JB,
I did wonder if the sheet was a bit short. 😁 Cheers, Stephen. ▲
⟩⟩
No likes yet
This member will receive 1 point for every like received |
|
Login To
Remove Ads 💬 Re: Modified Stiletto project
2 years ago by 🇳🇿 jbkiwi (
Fleet Admiral)✧ 119 Views · 1 Like
Flag
Hi Steve, gap's there because they were short on one end😁 - balsa sheets were only 3ft (US Bud Nosen models) as the model shop didn't have any 1m lengths, - (would have been ideal,- boat's 38-1/2". They are usually in 3ft or 900mm lengths for some reason, (OZ stuff is 900mm). There were a couple of 4ftx3" lengths which I grabbed, (seldom see them) but I would have needed more of those. I'll just fill the gap with a couple of scrap pieces,- easy to do.
Balsa gets scarce at times, between shipments, so you have to grab what you can when it's there. I never throw any balsa bits away. JB ▲
⟩⟩
stevedownunder
|
|
💬 Re: Modified Stiletto project
2 years ago by 🇦🇺 stevedownunder (
Captain)✧ 124 Views · 0 Likes
Flag
Making great progress JB,
I am wondering why is there a small area left open in the bow where the balsa doesn't quite go all the way forward? Cheers, Stephen. ▲
⟩⟩
No likes yet
This member will receive 1 point for every like received |
📝 Modified Stiletto project
2 years ago by 🇳🇿 jbkiwi ( Fleet Admiral)
Fleet Admiral)✧ 110 Views · 7 Likes
Flag
💬 Add Comment
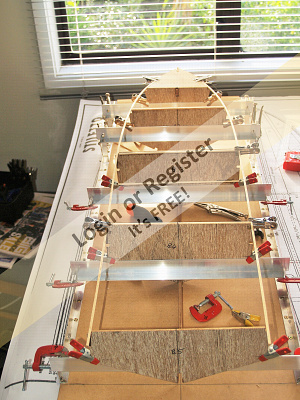
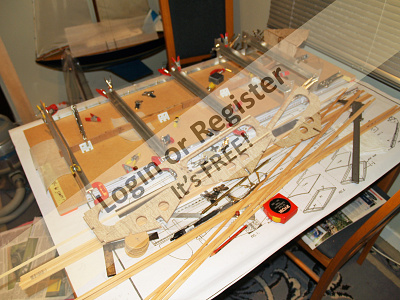
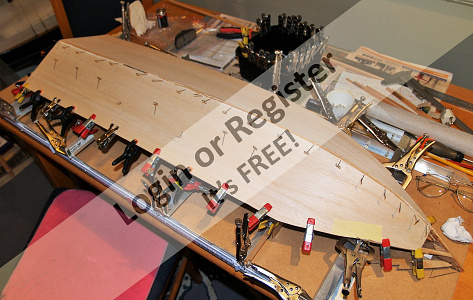
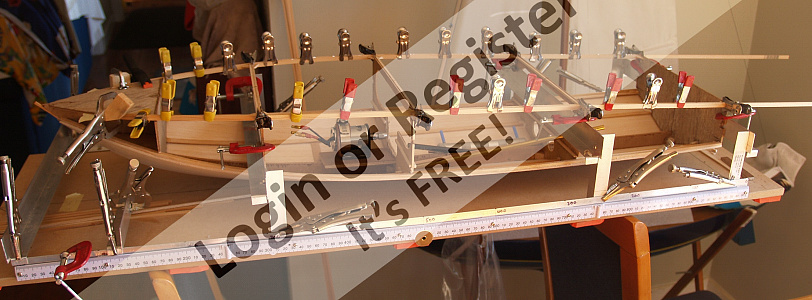
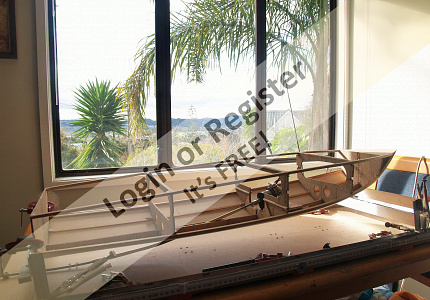
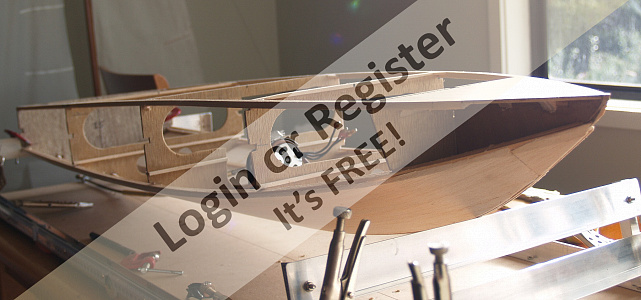
Hull is now flipped over, levelled and secured to the jig again, using the extension legs on the cross-bars. The keel locating angle blocks have been removed from the base board for the keel to sit flat. Because of the 'rocker' in the hull, a cross-bar is placed at the bow to keep it up.
In this configuration, I can do the chine and mid stringers and deck, but will be doing the motor mount and internal bits before any of that, as it's easier to get at the inside without framing in the way.

In this configuration, I can do the chine and mid stringers and deck, but will be doing the motor mount and internal bits before any of that, as it's easier to get at the inside without framing in the way.
▲
⟩⟩
EdW
Seaspray
Colin H
Madwelshman
Graham93
stevedownunder
pressonreguardless
📝 Modified Stiletto project
2 years ago by 🇳🇿 jbkiwi ( Fleet Admiral)
Fleet Admiral)✧ 105 Views · 7 Likes
Flag
💬 Add Comment
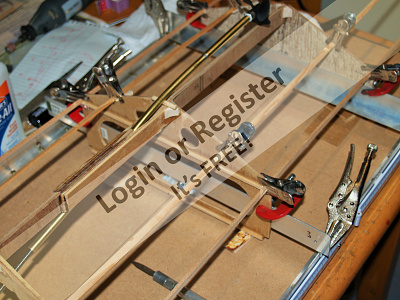
Decided to laminate the spruce gunwale stringers to give the frame a bit more stiffness, as it will need moving around a bit before the side center stringers and sheets are fitted later. Also cut a 4mm ply plate for the engine mount to be fitted later. Still easy to fit internal floors etc like it is.
▲
⟩⟩
EdW
Madwelshman
Aerostar55
stevedownunder
pressonreguardless
Seaspray
Colin H
📝 Modified Stiletto project
2 years ago by 🇳🇿 jbkiwi ( Fleet Admiral)
Fleet Admiral)✧ 101 Views · 7 Likes
Flag
💬 Add Comment
Gunwale stringer completed with 3 laminations of 5mm x 2mm spruce.
▲
⟩⟩
EdW
GaryLC
Madwelshman
Colin H
stevedownunder
pressonreguardless
Aerostar55
📝 Modified Stiletto project
2 years ago by 🇳🇿 jbkiwi ( Fleet Admiral)
Fleet Admiral)✧ 94 Views · 8 Likes
Flag
💬 Add Comment
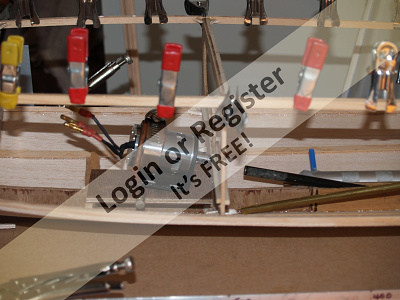
Removed the frame from the jig and re-mounted it using the transom clamped to hold it in place. Trimmed the laminated gunwale stringer with the belt sander to get the tops flush with the bulkheads. Trial fitted the shaft for position and glued in the motor mount plate. Also pre bent the side mid stringers (using boiling water run down them, a quick wipe to dry and clamping in place to set. These will be applied after the necessary internal work.

▲
⟩⟩
RNinMunich
EdW
GaryLC
pressonreguardless
Madwelshman
stevedownunder
Graham93
Colin H
📝 Modified Stiletto project
2 years ago by 🇳🇿 jbkiwi ( Fleet Admiral)
Fleet Admiral)✧ 89 Views · 9 Likes · 1 Comment
Flag
💬 Add Comment
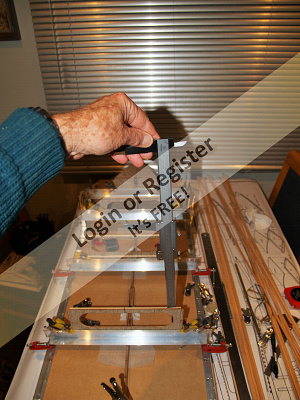
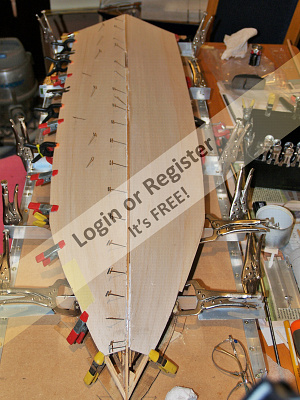
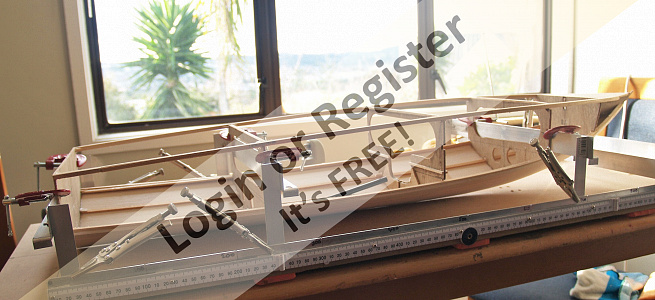
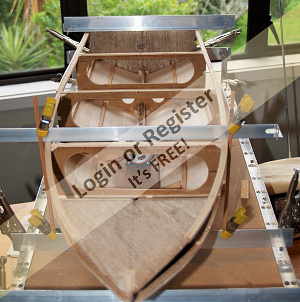
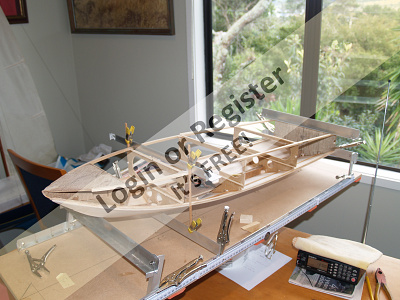
Finding new uses for the framing jig. Using this method to keep the frame from twisting while working on it right side up, and raised up for prop shaft/motor mount work, or while waiting for work to be done. Obviously it's a bit flexible still without the side sheets, and clamping it like this holds it in shape. Just levelled at the transom and clamped (as previously done) but with the addition of 2 front struts. Sighted across the 2 bars to get it all level.
I'm finding the jig is really useful, as you can clamp the model in almost any position, using a combination of the extension legs and cross bars, (also using cross bars for sighting level).
Not much progress at the moment as I've been busy elsewhere, but hopefully will be doing more soon.

I'm finding the jig is really useful, as you can clamp the model in almost any position, using a combination of the extension legs and cross bars, (also using cross bars for sighting level).
Not much progress at the moment as I've been busy elsewhere, but hopefully will be doing more soon.
▲
⟩⟩
RNinMunich
EdW
hermank
mturpin013
Norway
pressonreguardless
stevedownunder
Graham93
Colin H
|
💬 Re: Modified Stiletto project
2 years ago by 🇬🇧 Graham93 (
Vice Admiral)✧ 90 Views · 4 Likes
Flag
Hi JB,
The jig is proving to be very flexible ( or should that be rigid? 😀). Nice view out of the window too 👍 Graham93 ▲
⟩⟩
Madwelshman
Norway
jbkiwi
stevedownunder
|


Login To
Remove Ads
Remove Ads