Join Us On Social Media!

|

|

|
Download The App!
Login To
Remove Ads
Remove Ads
Login To
Remove Ads
Remove Ads
Model Boats Website
Crash Tender Restoration after Plywood Delimitation
10 Posts · 7 Followers · 16 Photos · 21 Likes
Began 9 years ago by
 United Kingdom
Follow This Thread
Not currently following
> Click to follow
> Click to follow
Latest Post 3 years ago by
| Oldest posts shown first (Show Newest First) | (Print Booklet) |
📝 Crash Tender Restoration after Plywood Delimitation
9 years ago by 🇬🇧 neilmc ( Warrant Officer)
Warrant Officer)✧ 40 Views · 0 Likes
Flag
💬 Add Comment
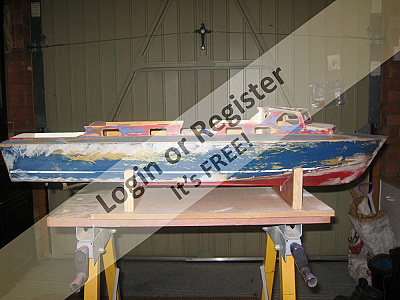
This has been a labour of love for some time now and some of you may remember helping me in the past - well Im back for more help 😉
I will post some photos of what I started with over 7years ago (eBay purchase) the stage I got to over a five year period (in the Armed Forces then) and the point of resurrecting the boat from a damp garage after at least two years and to date where the plywood elimination issue was found and the position I to last Saturday.
What are my intentions - well the plywood has been purchased ready to make replacement parts and the scroll saw (never used) has been tested and some practice is needed.
Also purchased some templates of a guy on eBAY which I have since been told they are not that great - will let you know when I get them.
▲
⟩⟩
No likes yet
This member will receive 1 point
for every like received
This member will receive 1 point
for every like received
Login To
Remove Ads
Remove Ads
📝 Delamination
9 years ago by 🇬🇧 neilmc ( Warrant Officer)
Warrant Officer)✧ 40 Views · 0 Likes
Flag
💬 Add Comment
You can also see the original engine mount which I have attempted to remove as I have issues with the motor alignment - still the case but I can't seem to remove the block without wrecking the hull. To be fair the hull is in a decent condition just needs gluing as the majority of glue has perished and become extremely brittle. Not complaining as this allowed the deck and superstructure to be removed quite easily.
The central piece of plywood fell out shortly after the picture 😰

The central piece of plywood fell out shortly after the picture 😰
▲
⟩⟩
No likes yet
This member will receive 1 point
for every like received
This member will receive 1 point
for every like received
📝 What Im Left With
9 years ago by 🇬🇧 neilmc ( Warrant Officer)
Warrant Officer)✧ 40 Views · 0 Likes · 2 Comments
Flag
💬 Add Comment
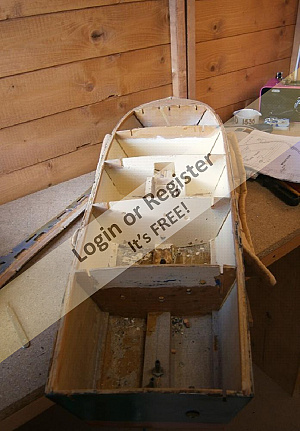
After the other weekends work stripping back the deck and superstructure this is what I'm left with. I think the glue removal is the next task and a check of the hull alignment. I'm not 100% sure whether simply scrapping off the glue will be enough to provide a suitable key when replacing the deck or whether I need to sand down as well?
I purchased the plans from the guy on eBAy for 15 pound and to be honest they're not that bad but I'm using the original superstructure as the template simply done the fact it was easier than cutting the paper ones.
Although the overall plan and original instructions are of good quality, I have found the templates not to be that great and have found myself redoing the wheelhouse front deck area twice now as they are not suited in either size or shape to my models super structure - not sure why though as would have expected all keilcraft models to be produced the same.
▲
⟩⟩
No likes yet
This member will receive 1 point
for every like received
This member will receive 1 point
for every like received
|
💬 What Im Left With
8 years ago by 🇬🇧 Westquay (
 Commander) Commander)✧ 40 Views · 0 Likes
Flag
All Aerokits were marketed by KeilKraft.
Mine came for Christmas 1963, complete with REP single channel radio and a Taycol Supermarine Special motor. I really must get round to finishing it one day! It goes with my 1959 Sea Urchin, which I restored last year! Both models have their original motors and running gear. Martin ▲
⟩⟩
No likes yet
This member will receive 1 point for every like received |
|
💬 What Im Left With
9 years ago by 🇬🇧 Aeronut1 (
 Leading Seaman) Leading Seaman)✧ 41 Views · 0 Likes
Flag
I don't know of a KeilCraft crash tender, the most popular production was the 34" version by Aerokits, long since departed. The model is well suited to modern electric propulsion because of great improvements in batteries and motors.
The number surviving show the popularity of the craft which was made for the emerging market of small Diesel engines in the early 1960's. Jim ▲
⟩⟩
No likes yet
This member will receive 1 point for every like received |
📝 Engine Mount Issues
9 years ago by 🇬🇧 neilmc ( Warrant Officer)
Warrant Officer)✧ 40 Views · 0 Likes · 10 Comments
Flag
💬 Add Comment
This little beast has given me so many problems over the years and still causing me concern now. The engine mount I am sure is the route of all my problems with engine alignment. I don't know what wood this thing is made from but I cannot separate it from the engine base mount. I have attacked it with a chisel in the past as you can probably see but nothing seems to separate it. With all the issues having had the boat in a damp garage and now the dried out glue, split plywood I am unsure whether to attack the mount with a chisel again.
Any good ideas out there?

Any good ideas out there?
▲
⟩⟩
No likes yet
This member will receive 1 point
for every like received
This member will receive 1 point
for every like received
|
💬 Engine Mount Issues
9 years ago by 🇬🇧 Aeronut1 (
Leading Seaman)✧ 41 Views · 0 Likes
Flag
Neil, The wattage of a model plane heat gun ranges between 300 - 1800w, most model shops have these but if in difficulty try
▲
⟩⟩
No likes yet
This member will receive 1 point for every like received |

|
Login To
Remove Ads 💬 Engine Mount Issues
9 years ago by 🇬🇧 Dave M (
 Vice Admiral) Vice Admiral)✧ 40 Views · 0 Likes
Flag
HI Neil
If this is an original Aerokits model from the early 1960's it's probable that the glue used was a hot melt glue that I used to use. I believe it was af animal origin and I used to have a glue pot that was heated over the paraffin stove. It was very good for wood joints and relatively quick setting compared to what was available. As the glue will now be rock hard I suspect you will need to have lots of heat available. The secret will be to get the block of wood up to heat and then work round the edges where it joins the hull. To prevent burning the hull make sure you keep the heat moving to avoid any hot spots. I have an adjustable heat gun with a quite low setting and believe careful adjustment would achieve the desired amount of heat. Be prepared for a slow process as the original glue used to take a while (1/2 hour) to melt. I wish I had tried this on my model. Good de gluing Dave 😀 ▲
⟩⟩
No likes yet
This member will receive 1 point for every like received |
|
💬 Engine Mount Issues
9 years ago by 🇬🇧 neilmc (
Warrant Officer)✧ 40 Views · 0 Likes
Flag
HI Jim
Good job you pointed that out as may have burnt through the hull as was going to borrow a Raychem Heat Gun used for making waterproof joints. What sort if wattage hot air gun should I be looking for and any sites you know of as never built a model plane. ▲
⟩⟩
No likes yet
This member will receive 1 point for every like received |
|
💬 Engine Mount Issues
9 years ago by 🇬🇧 Aeronut1 (
Leading Seaman)✧ 41 Views · 0 Likes
Flag
HI Neil,
A domestic hair drier is unlikely to provide enough heat, a DIY hot air gun will most likely give too much heat.... Best job is a hot air gun for use on model aircraft for shrinking coverings, they're not too expensive and will last for years, in fact it was one of my best buys. NB The 34" FB is just a bit too small for dolls house sized furniture whereas the 46" job being 1" to the foot is just right size. Press on, you're doing a great job. Jim ▲
⟩⟩
No likes yet
This member will receive 1 point for every like received |
|
💬 Engine Mount Issues
9 years ago by 🇬🇧 neilmc (
Warrant Officer)✧ 40 Views · 0 Likes
Flag
HI Jim
Thats an excellent tip and may just have to borrow one from work as I don't think the wives hairdryer will be man enough 😊 I must admit I didn't fancy attacking it with a chisel again especially since having issues with plywood falling apart. At least this will give me a potential solution as Ive been looking at it for a couple of weeks now and not really achieving much as unsure what to attack next - but you have provided the answer Thanks 😀 ▲
⟩⟩
No likes yet
This member will receive 1 point for every like received |
|
💬 Engine Mount Issues
9 years ago by 🇬🇧 Aeronut1 (
Leading Seaman)✧ 41 Views · 0 Likes
Flag
Removal of the engine block looks tricky if one thinks about chiseling it out but on my 34" that I originally built in 1963 and fitted an ED Sea Otter 3.46 diesel I found that a hot air gun set to V hot and waved around the block got it free within five minutes- without anymore bashing.
I've restored the boat and changed to electric propulsion using Johnson 980 motor... Boat comes 2/3rds out of water to amidships now. Actually I've restored two 34" fireboats and since scratch built the 46" FB but using a fibreglass hull, the 46" job has fitted out wheelhouse, ditto first aid room, working lights and monitors and is powered by two Johnson 980 motors. Jim ▲
⟩⟩
No likes yet
This member will receive 1 point for every like received |
|
💬 Engine Mount Issues
9 years ago by 🇬🇧 neilmc (
Warrant Officer)✧ 40 Views · 0 Likes
Flag
HI Dave
I had a look at the block today and decided its probably best well left alone. I will need to chisel some away from the sides as last time I tried the motor it seemed to be running better moved slightly further over to the left hand side. Restoration isn't going that bad at the moment just wish I had more time > 😟 ▲
⟩⟩
No likes yet
This member will receive 1 point for every like received |
|
💬 Engine Mount Issues
9 years ago by 🇬🇧 Dave M (
Vice Admiral)✧ 40 Views · 0 Likes
Flag
I left the big block of wood on my model. it makes a good solid mount for whatever engine you are fitting.
The block itself will probably be impregnated with years of diesel fuel and once dried it is like concrete. If you still want toI remove, drill into the block all over you should be able to use a chisel to split the block into small parts but I suspect the ply below will be damaged in the process. Restoration seem to be going well. Dave ▲
⟩⟩
No likes yet
This member will receive 1 point for every like received |
|
💬 Engine Mount Issues
9 years ago by 🇬🇧 neilmc (
Warrant Officer)✧ 40 Views · 0 Likes
Flag
As brutal as that might sound I'm thinking it could actually work but no sure how much pressure would be required to cause them to snap off! With things as they are at moment it may even move the bottom engine base plate. At least I've got loads of access to it now which I didn't before.
▲
⟩⟩
No likes yet
This member will receive 1 point for every like received |
|
💬 Engine Mount Issues
9 years ago by 🇬🇧 AlanP (
 Lieutenant) Lieutenant)✧ 40 Views · 1 Like
Flag
Get a pair of mole grips on the engine bearer and move from side to side, they will snap off, then clean up with a nice sharp chisel, job done 😁
Alan ▲
⟩⟩
neilmc
|
📝 Side Pieces Cut
9 years ago by 🇬🇧 neilmc ( Warrant Officer)
Warrant Officer)✧ 40 Views · 0 Likes · 11 Comments
Flag
💬 Add Comment
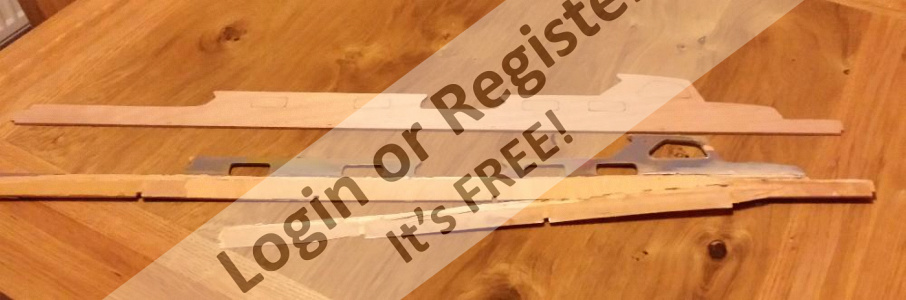
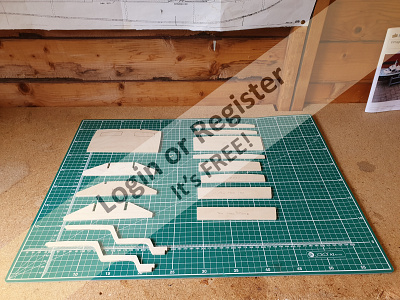
Well managed to master the scroll saw after snapping a few blades simply down to never having used one before and no instructions on how to fit the blade or use the tensioner (eBay's great)
I've managed to cut out the side pieces and slow and easy does it won the day. I've put both old and new in the photo just for comparison and also to show some of the delimitation issue I had.
Not looking forward to cutting out the window area though.
Another question for you all though - does anyone know how to manufacture the white window surrounds or even better anyone who's selling them for a 34" Crash Tender?
▲
⟩⟩
No likes yet
This member will receive 1 point
for every like received
This member will receive 1 point
for every like received
|
💬 Side Pieces Cut
8 years ago by 🇬🇧 Jimbo (
 Recruit) Recruit)✧ 40 Views · 0 Likes
Flag
Vintage model boat works at reasonable prices including fittings.
Jim ▲
⟩⟩
No likes yet
This member will receive 1 point for every like received |
|
Login To
Remove Ads 💬 Side Pieces Cut
9 years ago by 🇬🇧 bluestreak505 (
Leading Seaman)✧ 42 Views · 0 Likes
Flag
HI there. reference to window frames for fire boats, I have build 48' and 36" models and have had the frames cut in an aluminium effect self adhesive material by Yatton Model Engineering in Somerset. They will include the glazing if required. regards Peter.
▲
⟩⟩
No likes yet
This member will receive 1 point for every like received |
|
💬 Side Pieces Cut
9 years ago by 🇬🇧 neilmc (
Warrant Officer)✧ 40 Views · 0 Likes
Flag
HI Colin
Many thanks for the reply and just looked at their website but they don't list the crash tender boh how. However they have a section for window kits for lifeboats and a t 85pound at set I think I'll look at another option and just concentrate of the restoration for now which is still throwing up little gremlins - but putting that down to lack of experience. Cheers Neil ▲
⟩⟩
No likes yet
This member will receive 1 point for every like received |
|
💬 Side Pieces Cut
9 years ago by 🇬🇧 Colin H (
 Fleet Admiral) Fleet Admiral)✧ 40 Views · 0 Likes
Flag
I think it's Speedline Models now. Hope this helps .
Colin. ▲
⟩⟩
No likes yet
This member will receive 1 point for every like received |
|
💬 Side Pieces Cut
9 years ago by 🇬🇧 neilmc (
Warrant Officer)✧ 40 Views · 0 Likes
Flag
HI Roger
Tried looking for kitshack and looks like they went under some time ago amazing what you can find on good old Google. Couldn't find anything for speedwell or variations thereof. But did come across an old favourite Lesromodels and it would seem from their advert for the crash tender that windows are available separately so sent an email for further information - will let everyone know the outcome Cheers Neil ▲
⟩⟩
No likes yet
This member will receive 1 point for every like received |
|
💬 Side Pieces Cut
9 years ago by 🇬🇧 neilmc (
Warrant Officer)✧ 40 Views · 0 Likes
Flag
HI Roger
That's excellent news will have a look into and let you know how I get on. Thanks again excellent pointer Neil ▲
⟩⟩
No likes yet
This member will receive 1 point for every like received |
|
💬 Side Pieces Cut
9 years ago by 🇬🇧 shavings (
 Chief Petty Officer 2nd Class) Chief Petty Officer 2nd Class)✧ 40 Views · 0 Likes
Flag
A firm called speedwell or similar has taken over production of the kitshack model, mayme they would sell you a set of frames. Sorry I cant be more accurate on the name but I am sure someone on site of less years than me will remember!
Roger ▲
⟩⟩
No likes yet
This member will receive 1 point for every like received |
|
💬 Side Pieces Cut
9 years ago by 🇬🇧 neilmc (
Warrant Officer)✧ 40 Views · 0 Likes
Flag
HI
I think I'll give the plasticard a go but I can imagine it to be very tedious like you say. Probably best for me to take a couple of templates whilst the sides are off and try making them after I've got it looking like a boat again. I would have a go now but don't want to add more unknowns and give up like I've so many times to date he he. I'll give Stephen ago on the off chance though. Thanks Neil ▲
⟩⟩
No likes yet
This member will receive 1 point for every like received |
|
💬 Side Pieces Cut
9 years ago by 🇬🇧 neilmc (
Warrant Officer)✧ 40 Views · 0 Likes
Flag
HI Colin
I remember dbninja and have a mail from him saying he no longer did sometime after you must have got yours - so it shows how long this restoration has been going on. Just checked the members forum and he hasn't been on for some time now. I think I'm going to leave the engine mount in as don't want to replacing the hull as well - scroll saws are fun but I think it would be cheaper to buy a brand new boat in the end he he. I think I'll need loads of luck but there's plenty of help on here so fingers crossed. ▲
⟩⟩
No likes yet
This member will receive 1 point for every like received |
|
💬 Side Pieces Cut
9 years ago by 🇬🇧 pmdevlin (
Lieutenant)✧ 40 Views · 0 Likes
Flag
the window frames where not actually white, its just that most are made from white plastic, and they seem to remain unpainted. DbNinja is no longer making the frames, he did it as a favour to many some years ago. its very tedious, but you can make then from thin plasticard, by first cutting the inside out, then the outside of the frame, after first making a cardboard template.
Failing that, contact the siuite ownerm, Stephen, he manufactuered some laser 3 d parts, Im sute he hads windowe framers ▲
⟩⟩
No likes yet
This member will receive 1 point for every like received |
|
💬 Side Pieces Cut
9 years ago by 🇬🇧 Colin H (
Fleet Admiral)✧ 40 Views · 0 Likes
Flag
I like what you've achieved so far, back in 2011 I was restoring my 34" fire boat and needed windows and frames, these were supplied by a fellow member, dbninja, they were a great fit and are still in great shape. He may still have them on offer, they were laser cut including the rivet holes, which I used to pin them into the woodwork.
I also had to remove the old ic engine mounts, I used a minI drill with a 1/2" dia T slotting tool from my Unimat milling machine. I hope this helps. Looking forward to seeing the finished boat. Best of luck Colin. ▲
⟩⟩
No likes yet
This member will receive 1 point for every like received |
📝 Crash Tender Restoration after Plywood Delimitation
9 years ago by 🇬🇧 neilmc ( Warrant Officer)
Warrant Officer)✧ 42 Views · 2 Likes · 9 Comments
Flag
💬 Add Comment
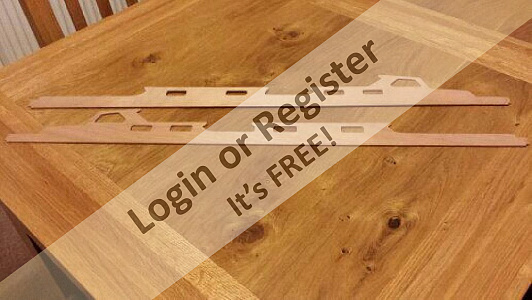
Well after some issues with the scroll saw not cutting straight lines I resulted to clamping the side pieces between two pieces of wood and using a fine file and sandpaper to attain a straight line - worked a treat to be honest.
The length of the side piece prevented using the scroll saw to cut out the windows so resulted to a coping saw (24tpI which was a bit rough) also some bauding and fine files to finish them off.
Spent the rest of the weekend removing old glue from the hull and slightly confused as to why random pins kept appearing along one of the deck supports. After removing a couple it became obvious what they were when the two pieces of wood separated. Should have used the plans I bought off eBay as they clearly showed that the deck/ hull support was made from two pieces of wood nailed together - looks like superglue may come in handy on this one.
Also noticed on the plans that there are four port holes fitted something my one didn't have fitted - does anyone know where I can these and what size they are?
▲
⟩⟩
Ygagnon
Colin H
|
💬 Windows Sorted
9 years ago by 🇬🇧 pmdevlin (
Lieutenant)✧ 40 Views · 0 Likes
Flag
Hi,
don't come on here too often, but I have been here for a long time! With regards to the windows, the side cabin etc do not have frames, its a misconception, they have eyebrows over them. 94 has one eyebrow covering both rear windows, and one over the front window, 93 had all separate. its only the wheel house that has separate frames. On my 4 foot I used a milling machine, on my 3 foot just did them by hand out of plastic card. Made a cardboard template first, then cut out the centre, finishing with a small file, then cut out the outside of the frame. Takes a lot of patience, but worth it in the end. Using the frames, you can now level out the holes for the windows as they where never straight! Check out my 4 foot build blog, ok its the bigger boat, but you will see a section about the frames. Paul ▲
⟩⟩
No likes yet
This member will receive 1 point for every like received |
|
Login To
Remove Ads 💬 Windows Sorted
9 years ago by 🇬🇧 shavings (
Chief Petty Officer 2nd Class)✧ 40 Views · 0 Likes
Flag
Its a pleasure, I have had lots of help from other boaties myself!
Please let me know if I can do anything else Roger ▲
⟩⟩
No likes yet
This member will receive 1 point for every like received |
|
💬 Windows Sorted
9 years ago by 🇬🇧 neilmc (
Warrant Officer)✧ 40 Views · 0 Likes
Flag
HI Roger
Portholes arrived today and will drilling holes in side pieces this weekend thanks for your help on this one. ▲
⟩⟩
No likes yet
This member will receive 1 point for every like received |
|
💬 Windows Sorted
9 years ago by 🇬🇧 shavings (
Chief Petty Officer 2nd Class)✧ 40 Views · 0 Likes
Flag
HI neil, just remembered if you go to plans and docs button on lefr side of page then photos you will find original pictures of fireboat showing porthole positions
Roger ▲
⟩⟩
No likes yet
This member will receive 1 point for every like received |
|
💬 Windows Sorted
9 years ago by 🇬🇧 shavings (
Chief Petty Officer 2nd Class)✧ 40 Views · 0 Likes
Flag
If its any help neil my fireboat has 4 portholes, will try and send pm with photo
Roger ▲
⟩⟩
No likes yet
This member will receive 1 point for every like received |
|
💬 Windows Sorted
9 years ago by 🇬🇧 neilmc (
Warrant Officer)✧ 40 Views · 0 Likes
Flag
HI Dave
After looking at some photos it looks like some have four and others have two portholes but I suppose this is personal preference? Looked on reademodels and they have two sizes 12 and 7.5 mm which ones do you recommend for a 34inch crash tender. I confuse myself with what scale mine is constantly lol. The panel pins caught me out good and proper didn't even think what they were for until the the two pieces separated but the hull sides fit better now with them removed. I concur with scroll saws not cutting straight on sone occasions I was feeding the panel at 30 degrees to get a semI decent line and then the depth of the bed plate stumped me on the windows so reason for coping saw and files. The saw did push some ply off the back as the blade was only 24tpI buy a small bit of filler should do the trick. Thanks again Neil ▲
⟩⟩
No likes yet
This member will receive 1 point for every like received |
|
💬 Windows Sorted
9 years ago by 🇬🇧 neilmc (
Warrant Officer)✧ 40 Views · 0 Likes
Flag
HI Roger
Must say I'm learning a lot this time round with you experts providing advice and encouragement - hopefully I'll stick at this time as every time I leave it alone for any period it's only worse when I come back to it! ▲
⟩⟩
No likes yet
This member will receive 1 point for every like received |
|
💬 Windows Sorted
9 years ago by 🇬🇧 shavings (
Chief Petty Officer 2nd Class)✧ 40 Views · 1 Like
Flag
Wow impressive woodwork, you must be proud
Roger ▲
⟩⟩
neilmc
|
|
💬 Windows Sorted
9 years ago by 🇬🇧 Dave M (
Vice Admiral)✧ 40 Views · 0 Likes
Flag
My model has two portholes. I sourced mine from
▲
⟩⟩
No likes yet
This member will receive 1 point for every like received |

📝 A New Start
4 years ago by 🇬🇧 neilmc ( Warrant Officer)
Warrant Officer)✧ 44 Views · 4 Likes · 7 Comments
Flag
💬 Add Comment
I cant believe its been 5 years since this project started all over again due to plywood delaminating...time flies!
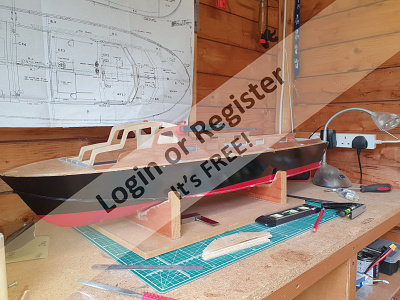
So things have moved on a little and issues with motor position and whine are pretty much sorted. So time to start the rebuild with today seeing some good progress as the scroll burst back to life with no major issues other a few broken blades 🙄
A few bad cuts but hopefully the rebuild won't need everything to be spot on. Just the windows on the wheelhouse rear bulkhead to cut out and I can get started.
▲
⟩⟩
MouldBuilder
Colin H
mturpin013
Martin555
|
💬 Re: A New Start
4 years ago by 🇩🇪 RNinMunich (
Fleet Admiral)✧ 43 Views · 3 Likes
Flag
"I see a booklet of my build blog just on edge of frame, I'm most flattered 🤗. Rob. "
And most rightly so Rob👍👍👍 😎 ▲
⟩⟩
marky
robbob
Martin555
|
|
Login To
Remove Ads 💬 Re: A New Start
4 years ago by 🇬🇧 robbob (
 Admiral) Admiral)✧ 43 Views · 4 Likes
Flag
Ah....yes I see a booklet of my build blog just on edge of frame, I'm most flattered 🤗. Rob.
▲
⟩⟩
marky
Martin555
RNinMunich
neilmc
|
|
💬 Re: A New Start
4 years ago by 🇬🇧 neilmc (
Warrant Officer)✧ 42 Views · 2 Likes
Flag
Very true Rob and thanks for the interest no doubt many questions to come 😀
Did you see the strategically placed booklet of a really good build guide 😂😂😂 ▲
⟩⟩
Martin555
robbob
|
|
💬 Re: A New Start
4 years ago by 🇬🇧 robbob (
Admiral)✧ 41 Views · 1 Like
Flag
Better late than never Neil.
I'm looking forward to seeing how you get on. Rob. ▲
⟩⟩
Martin555
|
|
💬 Re: A New Start
4 years ago by 🇨🇦 Newby7 (
Fleet Admiral)✧ 41 Views · 2 Likes
Flag
At least now after standing so long you can sit to build.
Rick ▲
⟩⟩
Martin555
neilmc
|
|
💬 Re: A New Start
4 years ago by 🇬🇧 neilmc (
Warrant Officer)✧ 43 Views · 3 Likes
Flag
😂😂🤣 my legs are killing me and the electricity bill is huge. Thanks for the good luck I think I'll need it 😁
▲
⟩⟩
marky
RNinMunich
Martin555
|
|
💬 Re: A New Start
4 years ago by 🇨🇦 Newby7 (
Fleet Admiral)✧ 42 Views · 3 Likes
Flag
Five years that's a long time to stand at the scroll saw LOL.
Good luck with the build. Rick ▲
⟩⟩
marky
Martin555
neilmc
|
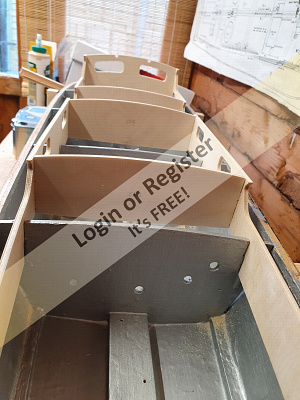
📝 Thought I was getting Started
4 years ago by 🇬🇧 neilmc ( Warrant Officer)
Warrant Officer)✧ 44 Views · 5 Likes · 2 Comments
Flag
💬 Add Comment
So after getting very happy on the fumes from Sanding Sealer last weekend I thought I'd have another go at dry fitting the cabin. I managed to cut another cabin top piece WF1 that was missing but the plans from ebay guy didn't work that well. It looked alright just needed some filing to get it to fit but there is something a miss with the supports. They were traced from originals but they are too short even with the back bulkhead being moved closer. No stable platform to work from makes it all a PITA.
I'm thinking emailong SLEC to see of they can make the cabin pieces on a single order as trying to fix errors is actually causing more lol.
I'm thinking emailong SLEC to see of they can make the cabin pieces on a single order as trying to fix errors is actually causing more lol.
▲
⟩⟩
MouldBuilder
jbkiwi
Martin555
Colin H
Scratchbuilder
|
💬 Re: Thought I was getting Started
4 years ago by 🇬🇧 neilmc (
Warrant Officer)✧ 44 Views · 2 Likes
Flag
Hi Bill
I think I'll give it a go as you never know unless you ask. Also if the price is right it could save me a whole lot of time and effort as I just want to crack on now. Cheers Neil ▲
⟩⟩
Martin555
Scratchbuilder
|
|
💬 Re: Thought I was getting Started
4 years ago by 🇬🇧 Scratchbuilder (
Vice Admiral)✧ 41 Views · 2 Likes
Flag
Hi Neil.
All looking good and progressing well👍. I have very recently been in email contact with SLEC concerning deck planking and they were really helpful in all respects. I rate them very highly. Regards Bill. ▲
⟩⟩
neilmc
Martin555
|
📝 SLEC CMC Cutting
4 years ago by 🇬🇧 neilmc ( Warrant Officer)
Warrant Officer)✧ 54 Views · 6 Likes · 10 Comments
Flag
💬 Add Comment
I took Scratchbuilder Bills advice and contacted SLEC for a quote on the wheelhouse parts and Chris at SLEC is really helpful. It would seem they have changed the old Aerokits part numbers to their own part numbers so my list made little sense at first. Chris figured it out but just in case he is sending a scanned copy of their catalogue for me to compare.
Would I be able to post the catalogue on here as unsure if it would break copyright?
Would I be able to post the catalogue on here as unsure if it would break copyright?
▲
⟩⟩
Ianh
MouldBuilder
dads boat
mturpin013
Scratchbuilder
Martin555
|
💬 Re: SLEC CMC Cutting
4 years ago by 🇿🇦 Ianh (
Commander)✧ 41 Views · 2 Likes
Flag
SLEC are a brilliant company to work with. They helped me out numerous times with my father's and my build on a 16' Lancaster. I no longer fly it unless asked as SA is full of noisy Jet models
▲
⟩⟩
neilmc
Martin555
|
|
Login To
Remove Ads 💬 Re: SLEC CMC Cutting
4 years ago by 🇩🇪 RNinMunich (
Fleet Admiral)✧ 42 Views · 3 Likes
Flag
Aha!
I thought you were talking about their general catalogue Neil. Not so sure they'd be too chuffed if we all started copying the templates for their kits.🤔 So perhaps best not! Cheers, Doug 😎 ▲
⟩⟩
Ianh
Martin555
neilmc
|
|
💬 Re: SLEC CMC Cutting
4 years ago by 🇬🇧 neilmc (
Warrant Officer)✧ 51 Views · 0 Likes
Flag
Hi Doug
I'll send them an email and ask if they would be happy for me to post the template catalogue on here. I'm sure it would be in their interest as no financial gain on my part. Cheers Neil ▲
⟩⟩
No likes yet
This member will receive 1 point for every like received |
|
💬 Re: SLEC CMC Cutting
4 years ago by 🇩🇪 RNinMunich (
Fleet Admiral)✧ 40 Views · 0 Likes
Flag
"Would I be able to post the catalogue on here as unsure if it would break copyright? "
I'm sure SLEC would be very pleased Neil. And as long as you have no financial interest in SLEC so would we👍 Cheers, Doug 😎 ▲
⟩⟩
No likes yet
This member will receive 1 point for every like received |
|
💬 Re: SLEC CMC Cutting
4 years ago by 🇬🇧 neilmc (
Warrant Officer)✧ 53 Views · 3 Likes
Flag
Well the DPD man delivered my bits and pieces from SLEC today and I'm pretty impressed for the price paid.
My initial intention was just to go for the main cabin pieces but this became a problem. SLECs ideal is to purchase sheets as opposed to bespoke runs on the laser cutter and to be honest it worked out cheaper in the end. Chris at SLEC is absolutely brilliant and provided a few options but the main ones were purchase the bespoke items at £26 plus postage or the items in the pictures for £32 plus postage. It was a no brainer in the end just hope it all fits as these are made for their version and not for the Aerokit version......hopefully they won't be to far off 🤞 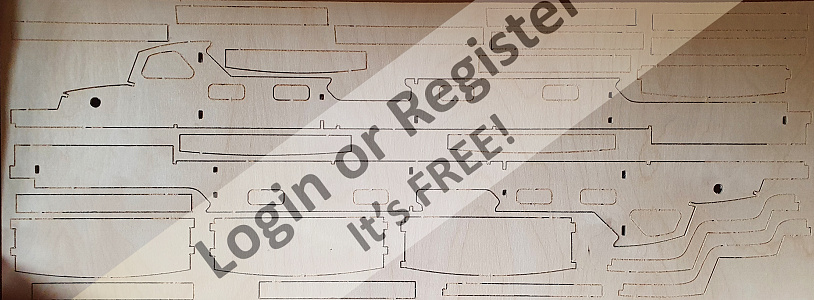

▲
⟩⟩
Martin555
Colin H
MouldBuilder
|
|
💬 Re: SLEC CMC Cutting
4 years ago by 🇬🇧 neilmc (
Warrant Officer)✧ 51 Views · 2 Likes
Flag
Cheers Bill if mines the same sort of turn around that would be ideal. Will see what comes in tomorrow from the catalogue they are sending through 👍
Many Thanks Neil ▲
⟩⟩
Scratchbuilder
Martin555
|
|
💬 Re: SLEC CMC Cutting
4 years ago by 🇬🇧 Scratchbuilder (
Vice Admiral)✧ 41 Views · 2 Likes
Flag
Hi Neil.
I ordered on a Saturday so forget the weekend but received the decking on the following Thursday.....so effectively 4 working days.Sent by TNT👍👍 Happy sailing. Regards Bill. ▲
⟩⟩
neilmc
Martin555
|
|
💬 Re: SLEC CMC Cutting
4 years ago by 🇨🇦 Newby7 (
Fleet Admiral)✧ 41 Views · 2 Likes
Flag
Again this site is great.Someone steps up with help and we all get the benefit of that help.
Rick ▲
⟩⟩
Scratchbuilder
Martin555
|
|
💬 Re: SLEC CMC Cutting
4 years ago by 🇬🇧 neilmc (
Warrant Officer)✧ 51 Views · 2 Likes
Flag
I haven't tried that one yet as the name scares me a little however really tempted at a bottle of 50th Anniversary celebrating Black Tot day ☹️. Too young to remember that though 😊
How long was the turn around for the decking you ordered? Cheers Neil ▲
⟩⟩
Scratchbuilder
Martin555
|
|
💬 Re: SLEC CMC Cutting
4 years ago by 🇬🇧 Scratchbuilder (
Vice Admiral)✧ 41 Views · 2 Likes
Flag
Hi Neil.
Really glad SLEC were of help. They were really helpful with me and provided just the decking I needed. Congrats on your latest promotion as well, perhaps a large “Gunpowder Proof” may go down well. Good old days.🥃🥃 Bill ▲
⟩⟩
Martin555
neilmc
|
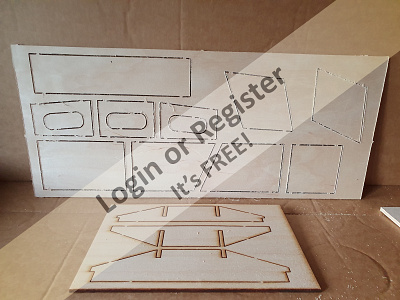
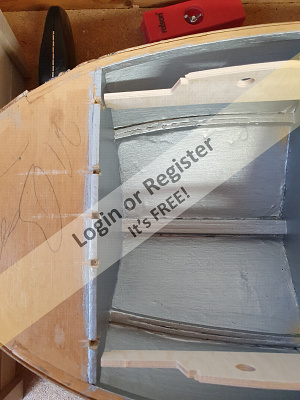
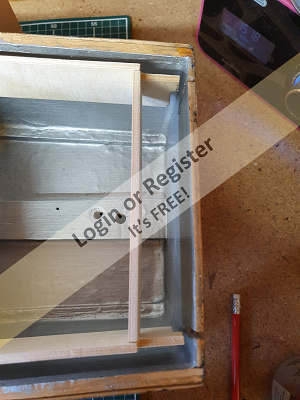
📝 SLEC Cabin Sides and Bulkheads
3 years ago by 🇬🇧 neilmc ( Warrant Officer)
Warrant Officer)✧ 54 Views · 4 Likes · 4 Comments
Flag
💬 Add Comment
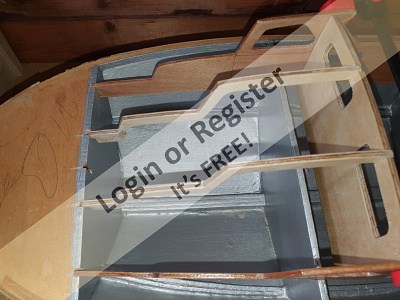
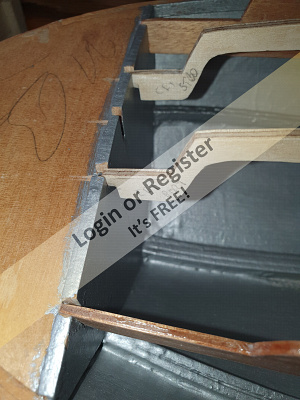
Well at last a little time to spend on my long protracted project. Although it was only for a couple of hours I'm sort of pleased with the outcome.
I knew buying bits from SLEC would need some adapting to fit an Aerokits model, but didn't cater for cabin sides being a shorter length. I was however impressed with the idea of slotting the bulkheads into the cabin sides makes the build very easy. Also had a go at the main cabin structure but the main supports were also to short.
Hopefully you clever guys will have an idea on how to overcome this new problem 😁
▲
⟩⟩
Inkoust
Scratchbuilder
Martin555
Colin H
|
💬 Re: SLEC Cabin Sides and Bulkheads
3 years ago by 🇬🇧 neilmc (
Warrant Officer)✧ 52 Views · 1 Like
Flag
Hi Bill
The guys at SLEC are really helpful and they've obviously thought about how to make their complete build user friendly. The tabs on the bulkheads simply slot into the cabin sides so no messing about with levels 😁. Just wish I'd done it months ago when it was warm weather as my shed is freezing now 🤣. As my poor little old heater has given up the ghost after tripping the house electrics 😂😂😂 Hope everything is OK and you manage to get back to it soon. ▲
⟩⟩
Martin555
|
|
Login To
Remove Ads 💬 Re: SLEC Cabin Sides and Bulkheads
3 years ago by 🇬🇧 neilmc (
Warrant Officer)✧ 52 Views · 1 Like
Flag
Hi Mike
Thanks for the solution which makes absolute sense. My concoction involved using ply to make the bulkheads bigger to provide a slot to hold the cabin sides. Yours makes much more sense and will achieve a better result. I'm presuming I dont need to cut back a huge amount and to use 4mm ply as well? Thanks again Neil ▲
⟩⟩
Martin555
|
|
💬 Re: SLEC Cabin Sides and Bulkheads
3 years ago by 🇬🇧 Scratchbuilder (
Vice Admiral)✧ 57 Views · 2 Likes
Flag
Hi Neil.
Well done re the renovation. I am glad that SLEC were able to come up trumps for you,albeit with some slight modifications. Circumstances have dictated virtually no project work for me of late so really looking forward to getting back into it. Regards Bill. ▲
⟩⟩
neilmc
Martin555
|
|
💬 Re: SLEC Cabin Sides and Bulkheads
3 years ago by 🇬🇧 mturpin013 (
Admiral)✧ 48 Views · 2 Likes
Flag
Hi Neil I would make a cut further back and discard the end and replace it with a longer piece and brace either side with additional ply stretchers and pin and glue together.
hope that helps ▲
⟩⟩
neilmc
Martin555
|


Login To
Remove Ads
Remove Ads