Join Us On Social Media!

|

|

|
Download The App!
Login To
Remove Ads
Remove Ads
Login To
Remove Ads
Remove Ads
Model Boats Website
Speedline Models RNLI Shannon Class Lifeboat 1:16 scale
31 Posts · 21 Followers · 226 Photos · 237 Likes
Began 3 years ago by
 United Kingdom
Follow This Thread
Not currently following
> Click to follow
> Click to follow
Latest Post 3 years ago by
| Oldest posts shown first (Show Newest First) | (Print Booklet) |
📝 Speedline Models RNLI Shannon Class Lifeboat 1:16 scale
3 years ago by 🇬🇧 Skydive130 ( Rear Admiral)
Rear Admiral)✧ 196 Views · 8 Likes · 12 Comments
Flag
💬 Add Comment
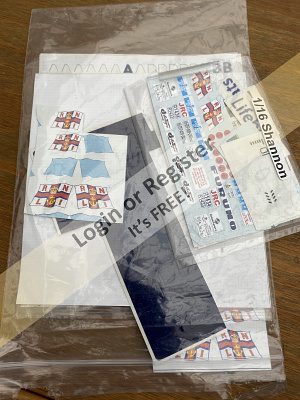
Here we go again! So, this years project and it could well take a while is the Shannon at 1:16th scale. As this is likely to be a considerable investment (the kit cost £850!) I want to get it right....
I am going to base this on the Lowestoft boat as its close by for photo reference (when lockdown ends) and I like the black hull version better than the white!
Hull length 81cm beam 26cm
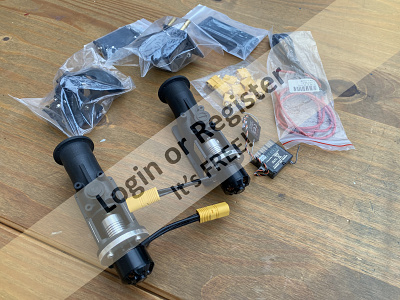
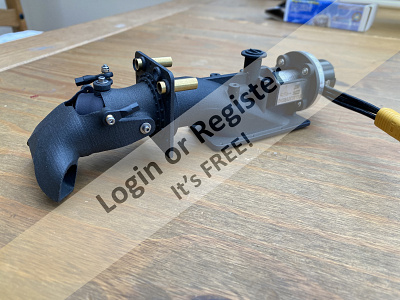
Once id sourced the kit, I set about reading as much as possible on the build and thankfully there is a dedicated page on facebook which Ive joined that has as much info as one can absorb by other owners and builders. The first thing to do was junk the included kit jet drives and invest in a pair of Oceanworks 24mm drives and motors from HK which duly arrived within 2 weeks of ordering.
I then set about sourcing all the other bits and pieces over the next couple of months less the batteries which I will get soon (stocks permitting)
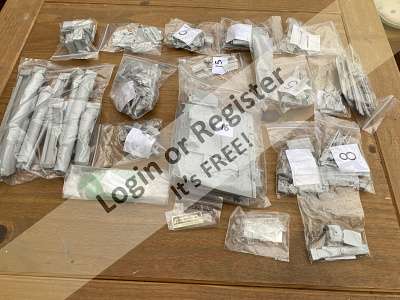
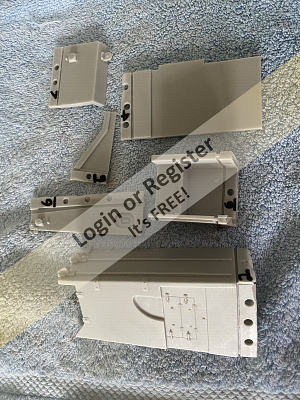
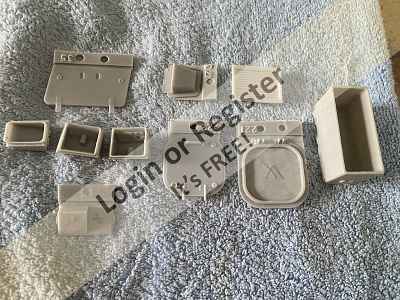
The kit has been reproduced from the orginial by Speedline Models who like alot of model companies sadly no longer exist. The kit comprises a GF hull, deck and cabin, bags n bags of resin parts, decals, windows, brass wire and other sundries!! The quality of everything is superb, first class job by Tony on ebay who is involved in the reproduction process.
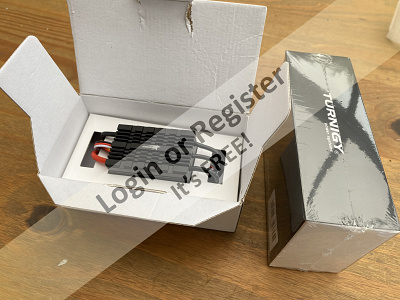
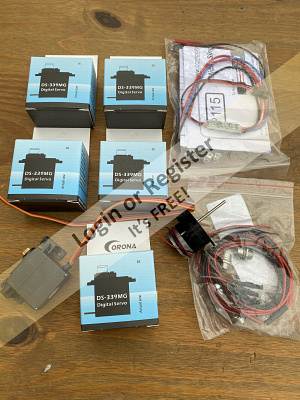
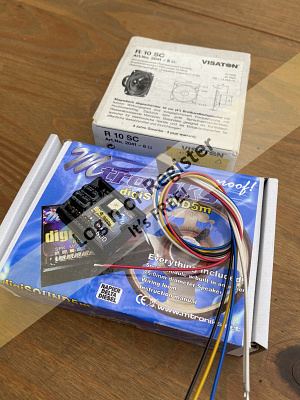
Apart from the Hamilton drives, ive bought 6 servos which are required for the reverse buckets, trim tabs and nozzels, Turnigy 40a ESC's, Mtroniks Napier diesel sound unit with better quality speaker, radar motor, blu flashing light, lights, switching unit and various other bits and pieces although I am sure there will other requirements as things progress.
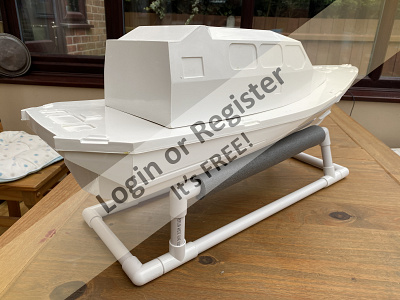
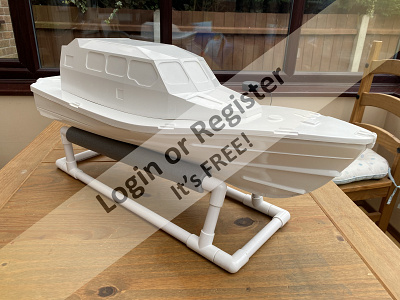
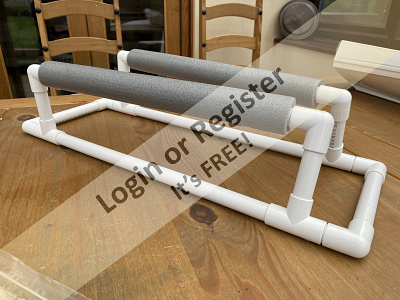
The first thing to build was a stand using B&Q PVC piping and lagging to sit the whole thing on ......

I am going to base this on the Lowestoft boat as its close by for photo reference (when lockdown ends) and I like the black hull version better than the white!
Hull length 81cm beam 26cm
Once id sourced the kit, I set about reading as much as possible on the build and thankfully there is a dedicated page on facebook which Ive joined that has as much info as one can absorb by other owners and builders. The first thing to do was junk the included kit jet drives and invest in a pair of Oceanworks 24mm drives and motors from HK which duly arrived within 2 weeks of ordering.
I then set about sourcing all the other bits and pieces over the next couple of months less the batteries which I will get soon (stocks permitting)
The kit has been reproduced from the orginial by Speedline Models who like alot of model companies sadly no longer exist. The kit comprises a GF hull, deck and cabin, bags n bags of resin parts, decals, windows, brass wire and other sundries!! The quality of everything is superb, first class job by Tony on ebay who is involved in the reproduction process.
Apart from the Hamilton drives, ive bought 6 servos which are required for the reverse buckets, trim tabs and nozzels, Turnigy 40a ESC's, Mtroniks Napier diesel sound unit with better quality speaker, radar motor, blu flashing light, lights, switching unit and various other bits and pieces although I am sure there will other requirements as things progress.
The first thing to build was a stand using B&Q PVC piping and lagging to sit the whole thing on ......
▲
⟩⟩
MouldBuilder
jbkiwi
Rookysailor
Scamp
Colin H
Ianh
robbob
Martin555
|
💬 Re: Speedline Models RNLI Shannon Class Lifeboat 1:16 scale
3 years ago by 🇬🇧 mturpin013 (
 Admiral) Admiral)✧ 185 Views · 1 Like
Flag
Looking forward to the build its a pity you had to sell that unique irreplaceable Rembrandt.
▲
⟩⟩
Martin555
|
|
Login To
Remove Ads 💬 Re: Speedline Models RNLI Shannon Class Lifeboat 1:16 scale
3 years ago by 🇳🇿 jbkiwi (
 Fleet Admiral) Fleet Admiral)✧ 186 Views · 1 Like
Flag
Hi Sy, re found the site , was 1:12 scale with 28mm jets, but info should still be helpful. At least you can check his findings before you cut. Might order one of their buckets for a gander to see if it will adapt to my 26mm jet. They look a bit neater than my effort at moulding and are probably more compact, (and work better in reverse😁)
JB ▲
⟩⟩
Martin555
|

|
💬 Re: Speedline Models RNLI Shannon Class Lifeboat 1:16 scale
3 years ago by 🇬🇧 Skydive130 (
Rear Admiral)✧ 186 Views · 2 Likes
Flag
JB, I’m delighted with the quality of the Oceanworks drives, they really are superbly engineered. the only hiccup was coping £17 import duty from FedEx by text 2 weeks after they arrived, was not happy!
If you have a link on the mayhem thread, would love to have a look before I fit mine. Many thanks 👍 ▲
⟩⟩
jbkiwi
Martin555
|
|
💬 Re: Speedline Models RNLI Shannon Class Lifeboat 1:16 scale
3 years ago by 🇬🇧 Skydive130 (
Rear Admiral)✧ 186 Views · 2 Likes
Flag
After the expense of this kit Martin, I dare not try and sneak anything else into the house in the near future, for fear of reaping the wrath of she who must be obeyed! The problem now is trying to sneak a Model Slipway Loyal Class fleet Tender into the house which after months of searching, I’ve managed to source from a lovely chap in France. Thankfully that won’t happen until late Feb or March, so hopefully the dust on this will have settled by then!
As for scraping some parts for scratch building fresh, hopefully not too much as the kit parts are so good! 👍 ▲
⟩⟩
MouldBuilder
Martin555
|
|
💬 Re: Speedline Models RNLI Shannon Class Lifeboat 1:16 scale
3 years ago by 🇳🇿 jbkiwi (
Fleet Admiral)✧ 187 Views · 2 Likes
Flag
Hi Sy, found Ocean Works last year while looking for a jet unit for my Hartley model. They look like a nice unit and not too bad a price. There are some flasher ones out there if you want to pay $3-500, but I wasn't about to get carried away to that extent. Hong Kong made stuff is usually pretty good, and this crowd are supposedly very helpful, and will apparently make mods for you by request. There's a good blog on Model Mayhem with someone fitting these to your very model.
JB ▲
⟩⟩
Martin555
Skydive130
|
|
💬 Re: Speedline Models RNLI Shannon Class Lifeboat 1:16 scale
3 years ago by 🇬🇧 Martin555 (
Fleet Admiral)✧ 187 Views · 1 Like
Flag
Hi Sy,
Re :- expensive Airfix kit. I would love to have a kit like this or even a slightly less expensive kit. Maybe when i win the lottery LOL!! Knowing you I bet you will scrap a lot of the kit parts and remake make them yourself. Martin555. ▲
⟩⟩
Skydive130
|
|
💬 Re: Speedline Models RNLI Shannon Class Lifeboat 1:16 scale
3 years ago by 🇬🇧 Skydive130 (
Rear Admiral)✧ 186 Views · 2 Likes
Flag
I think the hardest job will be all the internal electronics Pete, after that it’s just a very big and expensive Airfix kit! I did have to sell a couple of things to fund it, but I’m hoping the investment in this will be worthwhile 👍😂
▲
⟩⟩
Rookysailor
Martin555
|
|
💬 Re: Speedline Models RNLI Shannon Class Lifeboat 1:16 scale
3 years ago by 🇬🇧 Rookysailor (
 Commodore) Commodore)✧ 193 Views · 2 Likes
Flag
Looking forward to this build Sy, very pleased for you that your numbers finally came up on the lottery! that's a helluva lot of bits you've bought.😊
Cheers, Pete ▲
⟩⟩
Skydive130
Martin555
|
|
💬 Re: Speedline Models RNLI Shannon Class Lifeboat 1:16 scale
3 years ago by 🇬🇧 Skydive130 (
Rear Admiral)✧ 191 Views · 1 Like
Flag
That textured effect is deliberate by the looks of it, I’ve a feeling that’s a simulation of the full sized version as it’s uniform.
▲
⟩⟩
Martin555
|
|
💬 Re: Speedline Models RNLI Shannon Class Lifeboat 1:16 scale
3 years ago by 🇬🇧 Rallyst (
 Recruit) Recruit)✧ 194 Views · 2 Likes
Flag
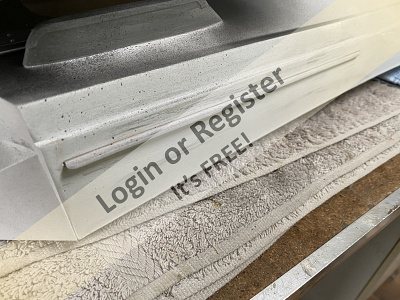
Looking forward to seeing your build progress Simon, just a question, what Is that textured effect along the keel in photo 4 of the second set of photos. Is it in the gel coat?
▲
⟩⟩
Skydive130
Martin555
|
|
💬 Re: Speedline Models RNLI Shannon Class Lifeboat 1:16 scale
3 years ago by 🇬🇧 Skydive130 (
Rear Admiral)✧ 196 Views · 1 Like
Flag
Hi martin, ive just modified the script, all dimensions and kit details now on, sit back and enjoy! 👍
▲
⟩⟩
Martin555
|
|
💬 Re: Speedline Models RNLI Shannon Class Lifeboat 1:16 scale
3 years ago by 🇬🇧 Martin555 (
Fleet Admiral)✧ 197 Views · 1 Like
Flag
Hi Sy,
I am looking forward to this build. Can you give us some dimensions and a little more information about this kit please ? Love the work stand. Martin555. ▲
⟩⟩
Skydive130
|
Login To
Remove Ads
Remove Ads
📝 Let’s get started .....
3 years ago by 🇬🇧 Skydive130 ( Rear Admiral)
Rear Admiral)✧ 202 Views · 4 Likes · 2 Comments
Flag
💬 Add Comment
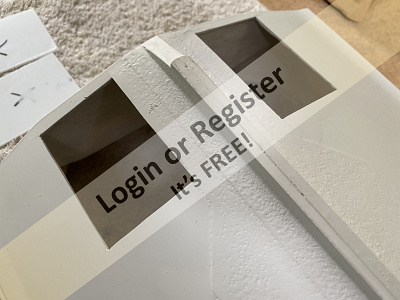
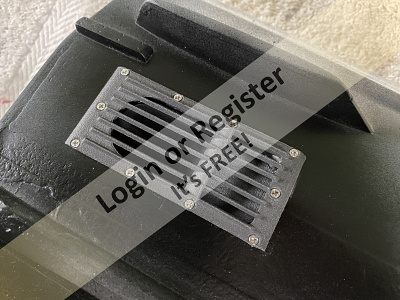
First job is to modify the hull to take the Oceanworks 24mm Hamilton Jet drives as they require a flat hull to sit on. The indents on the hull that are being removed are there for the kit drives which are supposedly rubbish.
After marking carefully the areas to be removed, I set about carefully pre-drilling followed by taking out the pice using my dremel cutting disk. Then using the dremel sanding drum, carefully took the edges almost to the line and finished it off with the file to give 2 neat areas ready to be filled. Point to note, GF generates just the worst dust ever, do it outside if warm enough, but ensure your wearing a good mask to protect the lungs!
Next job was to tape a piece of 2mm plasticard with the plastic covering still on over the area to be filled. I then set about putting a layer of 2 part gel coat on the inside which will hopefully not set onto the plastic covering. This gel coat should finish flush with the hull, and once set I will look to fill the remaining section with glass fibre cloth and resin and once set sand back to gicve a flush area for the drives to sit on. This process will take a few days with setting times ect, so bare with me ......
▲
⟩⟩
Ianh
Colin H
robbob
Martin555
|
💬 Re: Let’s get started .....
3 years ago by 🇬🇧 Skydive130 (
Rear Admiral)✧ 197 Views · 2 Likes
Flag
Hi Rob, the kit supplied drives were either cast or 3D printed, but these ones from Oceanworks are stunning and reek of quality, how their made I’ve no idea!. The kit ones have all sorts of problems with leaks ect, and really didn’t look very good quality compared. As this area of the Shannon is a key feature, I wanted the best drives available. The transmitter programming is an area I’m not looking forward to, some people are using Taranis tx with 2x8 ch rx combined for 16 channels and using most of those channels in the mixing! I shall worry about that at a later date as I’ll be using my Spektrum DX8 tx and a single 8 ch rx.
Don’t worry about the speed of the build Rob, this will take a while 😂👍 ▲
⟩⟩
Martin555
robbob
|
|
💬 Re: Let’s get started .....
3 years ago by 🇬🇧 robbob (
Admiral)✧ 198 Views · 3 Likes
Flag
Hi Sy.
Great to see that you have a new build on the slipway and it looks like you're very well prepared with all the required hardware already. Nice looking jet drives 👍👍...3D printed? This Speedline based model is clearly much higher quality that your previous model and I'm really looking forward to see how the build progresses. Not too fast though please...I'm hoping to finish my Pilots Boat before you finish this one 😆 Rob. ▲
⟩⟩
hmsnostalgia
Skydive130
Martin555
|
📝 Glass fibre jet drive mounts...
3 years ago by 🇬🇧 Skydive130 ( Rear Admiral)
Rear Admiral)✧ 195 Views · 4 Likes · 1 Comment
Flag
💬 Add Comment
Today’s sum total was cutting 3 laminations of glass matting to infill the pieces cut yesterday to raise it the same level as the surrounding GF. Once this had been well and truly stippled with GF resin, a rectangle of lightweight glass cloth was laminated over the whole area with a 15mm border to include the new area where the jet drive frame will sit. I’m hoping this extra thin layer will add strength to the join and in theory give a good stable base for the jet drives.
This will now all need to set solid, probably taking a minimum of 24-48hours in my freezing cold workshop! Oh well, back to work tomorrow anyway, so a good chance for Rob to move on with his pilot boat before I catch up next weekend! 😂😂


This will now all need to set solid, probably taking a minimum of 24-48hours in my freezing cold workshop! Oh well, back to work tomorrow anyway, so a good chance for Rob to move on with his pilot boat before I catch up next weekend! 😂😂
▲
⟩⟩
RNinMunich
Martin555
Ianh
robbob
|
💬 Re: Glass fibre jet drive mounts...
3 years ago by 🇬🇧 robbob (
Admiral)✧ 196 Views · 3 Likes
Flag
"good chance for Rob to move on with his pilot boat before I catch up next weekend! "
Very consideratate Sy. 👍😉 Rob. ▲
⟩⟩
hmsnostalgia
RNinMunich
Martin555
|
📝 Well that worked! 😂
3 years ago by 🇬🇧 Skydive130 ( Rear Admiral)
Rear Admiral)✧ 194 Views · 7 Likes · 7 Comments
Flag
💬 Add Comment
First moment of delight! Having left the GF resin a couple of hours to harden, I then removed the plasticard pieces that I had placed on to dam the gelcoat resin which just popped off no drama. What was left was a super smooth finish flush with the surrounding hull and will only require minimal wet n dry to totally blend in.
Next weekend I will flatten off any high spots on the inside in preparation for marking and fitting the drives, another key job that has to be right....


Next weekend I will flatten off any high spots on the inside in preparation for marking and fitting the drives, another key job that has to be right....
▲
⟩⟩
MouldBuilder
Colin H
RNinMunich
Scratchbuilder
Martin555
Ianh
robbob
|
💬 Re: Well that worked! 😂
3 years ago by 🇬🇧 Skydive130 (
Rear Admiral)✧ 193 Views · 2 Likes
Flag
Fingers crossed Doug for more silly grin moments and less moments of frustration and even anger! 😂👍
▲
⟩⟩
RNinMunich
Martin555
|
|
Login To
Remove Ads 💬 Re: Well that worked! 😂
3 years ago by 🇩🇪 RNinMunich (
Fleet Admiral)✧ 197 Views · 2 Likes
Flag
" silly grin" 😁
Had the same feeling Sy when the second stage of my lockdown mini build worked, keel, prop and shaft plus rudder and stock 😁 😎 ▲
⟩⟩
Martin555
Skydive130
|
|
💬 Re: Well that worked! 😂
3 years ago by 🇬🇧 mturpin013 (
Admiral)✧ 194 Views · 1 Like
Flag
I bet that was a hold your breath moment
▲
⟩⟩
Martin555
|
|
💬 Re: Well that worked! 😂
3 years ago by 🇬🇧 Skydive130 (
Rear Admiral)✧ 193 Views · 1 Like
Flag
Cheers Bill, good to see you and hope you are well 👍
▲
⟩⟩
Martin555
|
|
💬 Re: Well that worked! 😂
3 years ago by 🇬🇧 Scratchbuilder (
 Vice Admiral) Vice Admiral)✧ 201 Views · 3 Likes
Flag
Hi Sy.
Sorry,been out of touch for a while. The build is going well. Keep it up, . Regards Bill.👍🍷🍷 ▲
⟩⟩
Skydive130
Martin555
robbob
|
|
💬 Re: Well that worked! 😂
3 years ago by 🇬🇧 Skydive130 (
Rear Admiral)✧ 194 Views · 2 Likes
Flag
Certainly do Rob, I’m now walking around with a silly grin after that result, thing is once painted it will be hidden forever! Oh well, think I’ll go watch an episode of Vikings season 6 to celebrate 😂🎉
▲
⟩⟩
RNinMunich
Martin555
|
|
💬 Re: Well that worked! 😂
3 years ago by 🇬🇧 robbob (
Admiral)✧ 196 Views · 4 Likes
Flag
Don't you just love it when a plan comes together .......🤣
▲
⟩⟩
hmsnostalgia
Martin555
Ianh
Skydive130
|
📝 Jet drive and servo mount prep ....
3 years ago by 🇬🇧 Skydive130 ( Rear Admiral)
Rear Admiral)✧ 194 Views · 5 Likes · 5 Comments
Flag
💬 Add Comment
Had a little time after work, and it’s all the time I will have now until the weekend, however....
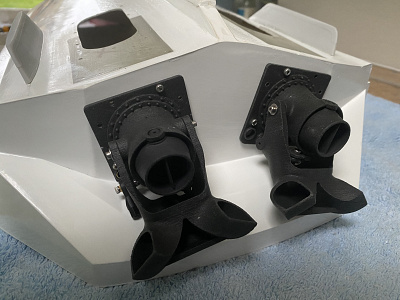
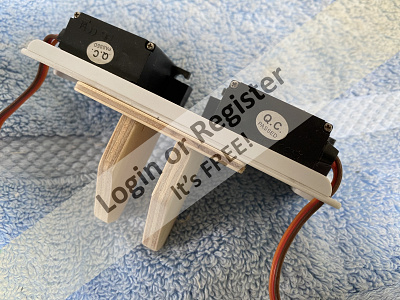
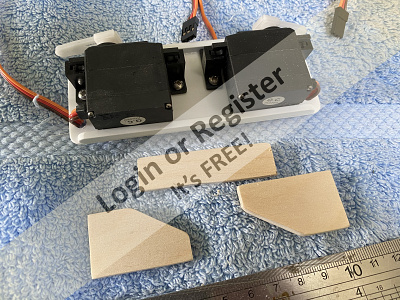
Having trawled through various forums, most builders have opted for mounting the jetdrive servos in the hull about half way down with upwards of 12 inches from servo horn to connection on the nozzles and buckets using m2 rods. This to me seems a long connection and is inviting slop if the m2 rods aren’t supported along the way? However, looking on top of the drive housings, there are 2 screw points either side and it figures in my brain that this is an ideal place to mount the servos. In fact, I found someone else had done that and can only guess this is the intention for these screw holes. Having fashioned a pair of mounts from 2mm plasticard with plastic rod supports underside for extra rigidity, the servos now sit no more than 3 inches from there connection points, reducing any chance of slop to nil, what we strived for in aircraft control surface connections!
Reading another post, there is a requirement to make a 1.5mm shim for the jetdrive output to butt up to the hull, as the gap between that and the nozzle bucket fitting has a gap thicker than the glass fibre it, easily fashioned from plasticard. Last job was to place some tape on the outside of the hull to prepare it for cutting out the hole to accept the drive from the inside and intake grill on the outside.
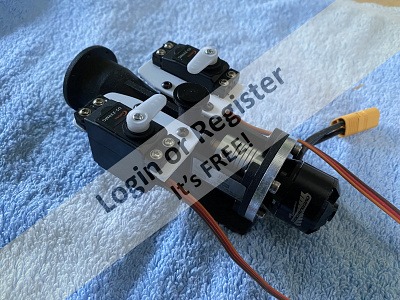
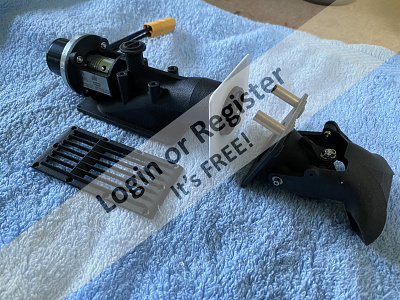
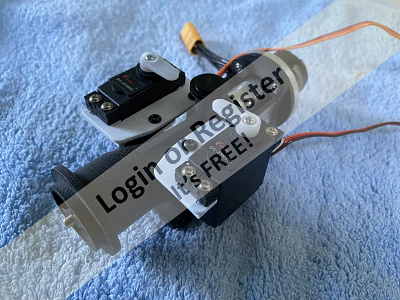
▲
⟩⟩
MouldBuilder
Colin H
RNinMunich
robbob
Martin555
|
💬 Re: Jet drive and servo mount prep ....
3 years ago by 🇬🇧 Drich91 (
 Able Seaman) Able Seaman)✧ 189 Views · 1 Like
Flag
Definitely the way forward this 👍
▲
⟩⟩
Martin555
|
|
Login To
Remove Ads 💬 Re: Jet drive and servo mount prep ....
3 years ago by 🇬🇧 Skydive130 (
Rear Admiral)✧ 190 Views · 2 Likes
Flag
Ha ha Doug, I remember a lot of the old ones, but best keep things on here reasonable clean 😂😂😂😂
▲
⟩⟩
RNinMunich
Martin555
|
|
💬 Re: Jet drive and servo mount prep ....
3 years ago by 🇩🇪 RNinMunich (
Fleet Admiral)✧ 195 Views · 3 Likes
Flag
Totally agree Sy 👍
Control rods as short as possible. If that's not possible, as in my U25, servos in the bow - dive planes and rudder in the stern, I resorted to a Bowden cable arrangement to ensure that the operating length remains the same. Got used to installing and adjusting these damn things during my Vespa GS160 tours around Europe!🙄 "Those were the days my friend ....."😉 Cheers, Doug 😎 PS Thought I was the only one here who remembered the old 'As the actress said to the Bishop ...' jokes !😁 ▲
⟩⟩
Martin555
Skydive130
Ianh
|
|
💬 Re: Jet drive and servo mount prep ....
3 years ago by 🇬🇧 Skydive130 (
Rear Admiral)✧ 192 Views · 3 Likes
Flag
“Said the actress to the bishop” mike 😂😂
▲
⟩⟩
Martin555
Ianh
RNinMunich
|
|
💬 Re: Jet drive and servo mount prep ....
3 years ago by 🇬🇧 mturpin013 (
Admiral)✧ 193 Views · 2 Likes
Flag
That looks to be a sensible solution, "Keep it tight"
▲
⟩⟩
Martin555
Skydive130
|
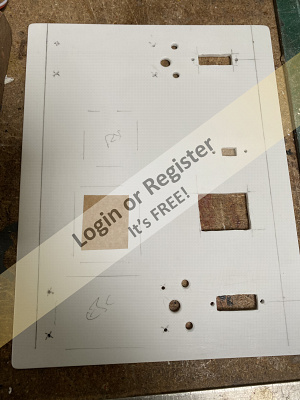
📝 Preparing mounting holes.....
3 years ago by 🇬🇧 Skydive130 ( Rear Admiral)
Rear Admiral)✧ 190 Views · 8 Likes · 7 Comments
Flag
💬 Add Comment
I don’t think I’ve measured so much for one component but I did .......!
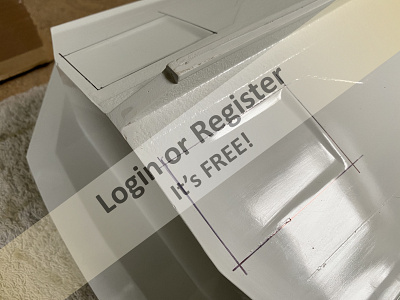
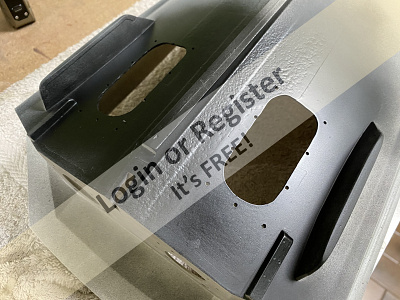
Today’s challenge was to mark up, measure, measure again and measure again the areas were the jetdrive housings would sit in the hull and exit holes on the transom in preparation to mount the jet drive nozzle and bucket housings. To make a template for the hole in the hull, I painted on a layer of black tamiya acrylic paint onto the base of the jet drive and whilst still wet used the jetdrive like a stamp to make a template on 0.5ml plasticard which was then transfered to the hull. Once I had confirmed the markings were in the correct place I cut the holes out with a drill bit and finished it up with the Dremel sanding drum and files to get a neat hole. Cutting the round hole in the transom again after confirming the correct position was easy enough using the same technique.
All the measuring and checking had paid off as all holes have been cut in the correct positions and potentially that’s the hardest part of the build done! The inside of the hull hole did require a little levelling with the dremel to ensure the housing sat fairly flush. My aim when fitting the drives hopefully tomorrow but no later than Monday is to put a thin bead of silicone sealant on the flange of the jetdrive housing and then the whole thing is fitted with the external grill clamping it all together for what needs to be a watertight seal as this area is obviously under water at all times in use. Once that has set, I will then be double sealing the inside mount with glass cloth and resin for belt and braces, all will be revealed in due course...
The jetdrive outlet will be sealed with the same method before the nozzle unit is fitted.
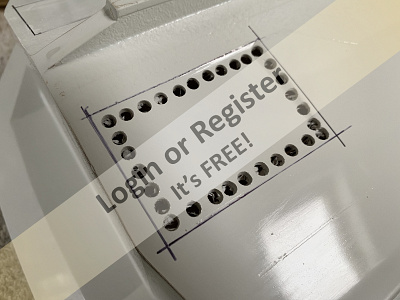
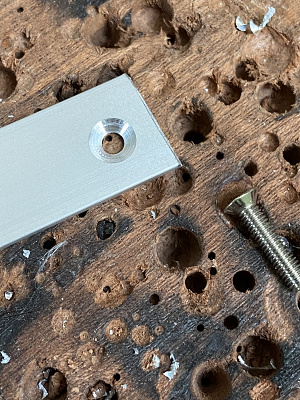
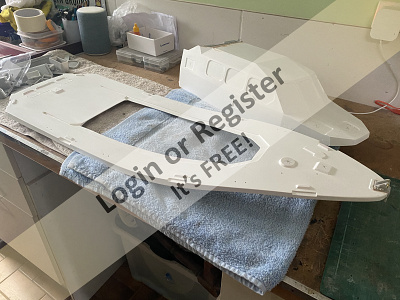
Last job of the day was to prepare the first 2 resin parts which are the hull skegs with the dremel and files to ensure a flush finish on the hull. After carefully Marking the positions for fitting on the hull (there is a line indent on the hull to aid this), I then drilled pilot holes in the hull and skeg to take a 2mm self tapping screw and also used a strip of obechi wood for the inside of the hull to add strength and spread the load of the screws to prevent cracking the gf. This was all epoxied in for a strong finish and the tiniest of gaps that can be seen between the skeg and hole will be filled and sanded before painting with a smear of P94 filler.


Today’s challenge was to mark up, measure, measure again and measure again the areas were the jetdrive housings would sit in the hull and exit holes on the transom in preparation to mount the jet drive nozzle and bucket housings. To make a template for the hole in the hull, I painted on a layer of black tamiya acrylic paint onto the base of the jet drive and whilst still wet used the jetdrive like a stamp to make a template on 0.5ml plasticard which was then transfered to the hull. Once I had confirmed the markings were in the correct place I cut the holes out with a drill bit and finished it up with the Dremel sanding drum and files to get a neat hole. Cutting the round hole in the transom again after confirming the correct position was easy enough using the same technique.
All the measuring and checking had paid off as all holes have been cut in the correct positions and potentially that’s the hardest part of the build done! The inside of the hull hole did require a little levelling with the dremel to ensure the housing sat fairly flush. My aim when fitting the drives hopefully tomorrow but no later than Monday is to put a thin bead of silicone sealant on the flange of the jetdrive housing and then the whole thing is fitted with the external grill clamping it all together for what needs to be a watertight seal as this area is obviously under water at all times in use. Once that has set, I will then be double sealing the inside mount with glass cloth and resin for belt and braces, all will be revealed in due course...
The jetdrive outlet will be sealed with the same method before the nozzle unit is fitted.
Last job of the day was to prepare the first 2 resin parts which are the hull skegs with the dremel and files to ensure a flush finish on the hull. After carefully Marking the positions for fitting on the hull (there is a line indent on the hull to aid this), I then drilled pilot holes in the hull and skeg to take a 2mm self tapping screw and also used a strip of obechi wood for the inside of the hull to add strength and spread the load of the screws to prevent cracking the gf. This was all epoxied in for a strong finish and the tiniest of gaps that can be seen between the skeg and hole will be filled and sanded before painting with a smear of P94 filler.
▲
⟩⟩
MouldBuilder
Colin H
Rookysailor
jacko
Scratchbuilder
Martin555
Ianh
robbob
|
💬 Re: Preparing mounting holes.....
3 years ago by 🇬🇧 robbob (
Admiral)✧ 190 Views · 4 Likes
Flag
Hi Sy.
Sounds like a safer plan...👍😉 Rob ▲
⟩⟩
hmsnostalgia
Martin555
Ianh
Skydive130
|
|
Login To
Remove Ads 💬 Re: Preparing mounting holes.....
3 years ago by 🇬🇧 Skydive130 (
Rear Admiral)✧ 188 Views · 3 Likes
Flag
Hi Rob, thinking of now not using silicone, as you say it’s horrendous stuff! What I will do is a bead of epoxy instead and the layer of glass cloth and a couple of layers of glass resin should be more than enough to seal it 👍
Kind regards sy ▲
⟩⟩
Martin555
Ianh
robbob
|
|
💬 Re: Preparing mounting holes.....
3 years ago by 🇬🇧 Skydive130 (
Rear Admiral)✧ 189 Views · 2 Likes
Flag
Good advice Ian 👍
▲
⟩⟩
Martin555
Ianh
|
|
💬 Re: Preparing mounting holes.....
3 years ago by 🇬🇧 Skydive130 (
Rear Admiral)✧ 189 Views · 2 Likes
Flag
Good advice Martin! As there is very little more to do on the hull exterior, I might just get it prepared for painting, paint and seal it before adding the drives. Will certainly make painting easier without having to mask round stuff!
Cheers Martin👍 ▲
⟩⟩
Martin555
Ianh
|
|
💬 Re: Preparing mounting holes.....
3 years ago by 🇬🇧 Martin555 (
Fleet Admiral)✧ 192 Views · 1 Like
Flag
Hi Sy,
A very tricky job successfully completed. Well done. You say :- My aim when fitting the drives hopefully tomorrow but no later than Monday is to a thin bead of silicone sealant on the flange of the jetdrive housing and then the whole thing is fitted with the external grill clamping it all together for what needs to be a watertight seal as this area is obviously under water at all times in use. I would of thought you would do that when the Hull is fully painted. Martin555. ▲
⟩⟩
Skydive130
|
|
💬 Re: Preparing mounting holes.....
3 years ago by 🇿🇦 Ianh (
 Commander) Commander)✧ 194 Views · 2 Likes
Flag
Hi Guys
Just remember their are silicones and sealants. Watch out for the white 'everyday' silicones as they contain acetic acid ▲
⟩⟩
Skydive130
Martin555
|
|
💬 Re: Preparing mounting holes.....
3 years ago by 🇬🇧 robbob (
Admiral)✧ 191 Views · 4 Likes
Flag
Hi Sy.
You can breathe a sigh of relief now that the jet drives are fitted successfully 😅. A word of caution when working with silicones, even the slightest residue on the hull surface will be like kryptonite to any paint so be very very careful when using it for sealing the jet drive inlets. Keep up the great work 👍👍. Rob. ▲
⟩⟩
hmsnostalgia
MouldBuilder
Skydive130
Martin555
|
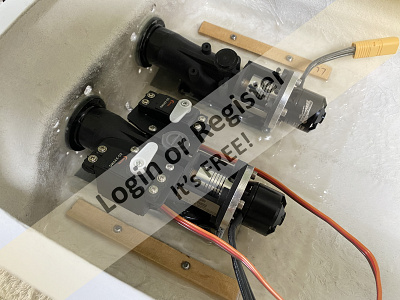
📝 Jet drives installed....
3 years ago by 🇬🇧 Skydive130 ( Rear Admiral)
Rear Admiral)✧ 187 Views · 5 Likes · 6 Comments
Flag
💬 Add Comment
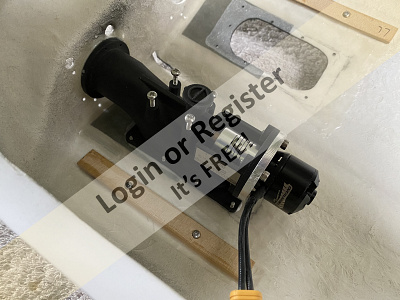
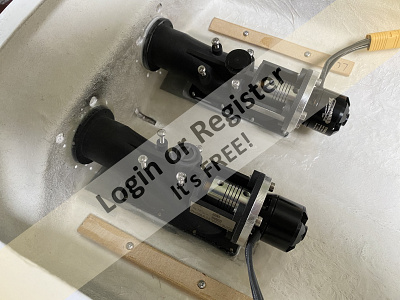
The last couple of days has seen good progress made. The build requires that the jet drives are installed early on, so as to give a neat finish under the external grills, I primed and sprayed the area black. Once the hull is ready to go in the paint shop proper, I shall mask the grills and the outputs on the transom and re-prime the hole hull. The nozzles, buckets and trim tab assemblies will remain off until all hull painting is complete. Also added was a rear rubbing strake either side into the slots provided in the hull (strakes not provided in the kit but easily made from 2.5mm plastic card). Any imperfections in the slot was hit with P94 filler and sanded back for a neat finish.
Next job was to install the drives. Instead of sealing with a bead of silicone where the drive housings meet the hull and transom, I ran a bead of epoxy thickened with micro beads, placed them in position and used the outside grills to tighten it all down and seal. Once this was all set and making should the motors rotated correctly, I then added a belt and braces glass cloth and glass resin seal around the drive mounts and after that was set, a second coat of glass resin. The hope is that I have created a completely watertight seal, to be confirmed........
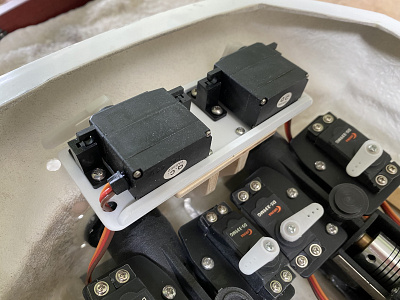
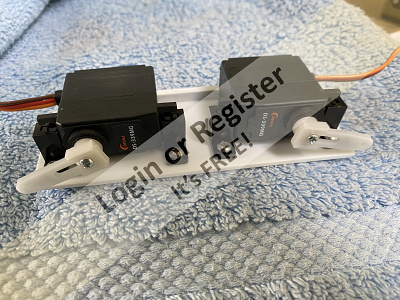
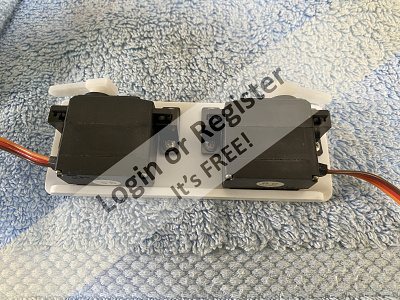
Last job today was to mount the first 4 servos on the drives that control the nozzles and reverse buckets. There are a further 2 servos to install on the transom roof that operate the trim tabs which will be the next job to plan, make and install followed by the radio tray made out of 4mm Perspex.
Next job was to install the drives. Instead of sealing with a bead of silicone where the drive housings meet the hull and transom, I ran a bead of epoxy thickened with micro beads, placed them in position and used the outside grills to tighten it all down and seal. Once this was all set and making should the motors rotated correctly, I then added a belt and braces glass cloth and glass resin seal around the drive mounts and after that was set, a second coat of glass resin. The hope is that I have created a completely watertight seal, to be confirmed........
Last job today was to mount the first 4 servos on the drives that control the nozzles and reverse buckets. There are a further 2 servos to install on the transom roof that operate the trim tabs which will be the next job to plan, make and install followed by the radio tray made out of 4mm Perspex.
▲
⟩⟩
MouldBuilder
robbob
jacko
Martin555
Colin H
|
💬 Re: Jet drives installed....
3 years ago by 🇬🇧 Skydive130 (
Rear Admiral)✧ 182 Views · 2 Likes
Flag
They are certainly something Mike! Makes a change from standard motors, couplings and props ect. You should see the power on the real thing, the Shannon is a beast at speed 😂
▲
⟩⟩
Martin555
robbob
|
|
Login To
Remove Ads 💬 Re: Jet drives installed....
3 years ago by 🇬🇧 mturpin013 (
Admiral)✧ 185 Views · 2 Likes
Flag
Those power units look as it will launch it to the moon, very impressive
▲
⟩⟩
Skydive130
Martin555
|
|
💬 Re: Jet drives installed....
3 years ago by 🇬🇧 Skydive130 (
Rear Admiral)✧ 185 Views · 1 Like
Flag
Patience Martin, something I have in abundance NOT haha
▲
⟩⟩
Martin555
|
|
💬 Re: Jet drives installed....
3 years ago by 🇬🇧 Martin555 (
Fleet Admiral)✧ 189 Views · 1 Like
Flag
Thank you Sy,
I should try and get in to the habit of waiting to see.LOL!! Martin555. ▲
⟩⟩
Skydive130
|
|
💬 Re: Jet drives installed....
3 years ago by 🇬🇧 Skydive130 (
Rear Admiral)✧ 186 Views · 1 Like
Flag
Hi Martin, there is a slipway skid that glues into that slot, the photo shows the 1:12 version, mine at 1:16 gets a resin and CF reinforced version supplied in the kit 👍
▲
⟩⟩
Martin555
|
|
💬 Re: Jet drives installed....
3 years ago by 🇬🇧 Martin555 (
Fleet Admiral)✧ 189 Views · 1 Like
Flag
Hi Sy,
In photo three (the black underneath) i can see what looks like a cut out slit at the rear end of the keel. What is that for ? Martin555. ▲
⟩⟩
Skydive130
|
📝 Trim tab servo tray
3 years ago by 🇬🇧 Skydive130 ( Rear Admiral)
Rear Admiral)✧ 187 Views · 6 Likes · 3 Comments
Flag
💬 Add Comment
Today’s project was to fashion the servo tray for the 2 trim tabs to be mounted on the transom shelf and wall. Having looked at a few other builds on the various forums, I decided on a plasticard tray mounted on ply. The tray was fashioned from 2.5mm plasticard with reinforcement strips to aid rigidity and some extra pieces underneath to give the screws more material to go into. I then fashioned a mounting point from 6mm ply on the scroll saw for the uprights and a small piece of 2mm ply for the shelf. Once all was made and assembled and checked for correctness using the 2 holes I’d drill for the output wire, the ply was epoxied onto the transom. I shall beef up the joint with some resin and cloth.
Having another hour before it was time to walk the dog I started to fashion the tray supports that will have the 3mm Perspex sheet mounted to for electronics. This was simply made from aluminium bar which was locked together with 3mm countersunk bolts and locking nuts.


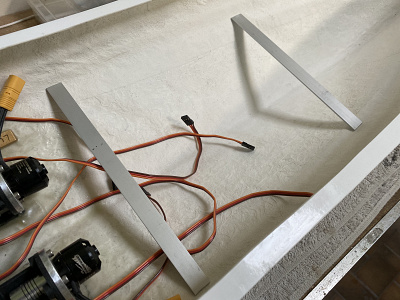
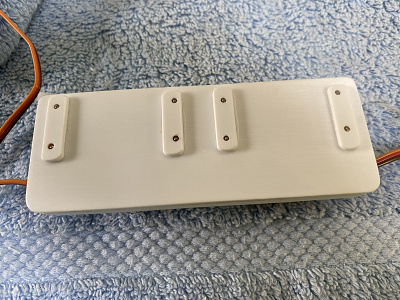
Having another hour before it was time to walk the dog I started to fashion the tray supports that will have the 3mm Perspex sheet mounted to for electronics. This was simply made from aluminium bar which was locked together with 3mm countersunk bolts and locking nuts.
▲
⟩⟩
mistyoptic
Rookysailor
stevedownunder
Martin555
robbob
Scratchbuilder
|
💬 Re: Trim tab servo tray
3 years ago by 🇬🇧 Martin555 (
Fleet Admiral)✧ 191 Views · 1 Like
Flag
Sy,
I agree with Bill and I really look forward to your updates. Martin555. ▲
⟩⟩
stevedownunder
|
|
Login To
Remove Ads 💬 Re: Trim tab servo tray
3 years ago by 🇬🇧 Skydive130 (
Rear Admiral)✧ 187 Views · 2 Likes
Flag
Many thanks Bill, kind regards Sy
▲
⟩⟩
stevedownunder
Martin555
|
|
💬 Re: Trim tab servo tray
3 years ago by 🇬🇧 Scratchbuilder (
Vice Admiral)✧ 193 Views · 3 Likes
Flag
Hi Sy.
As always excellent quality and high standards shown on all fronts. Always a pleasure to look at and read your updates. Regards Bill👍 ▲
⟩⟩
stevedownunder
Martin555
Skydive130
|
📝 Electronics installation continues....
3 years ago by 🇬🇧 Skydive130 ( Rear Admiral)
Rear Admiral)✧ 187 Views · 8 Likes · 20 Comments
Flag
💬 Add Comment
I found out on Monday that a family member had tested positive for the dreaded C19, therefore after calling work to tell them, I was instructed to self isolate for 10 days! That person has been banished to a room in the house away from other human beings! Oh well, suppose I’ll have to make models 😂😂😂
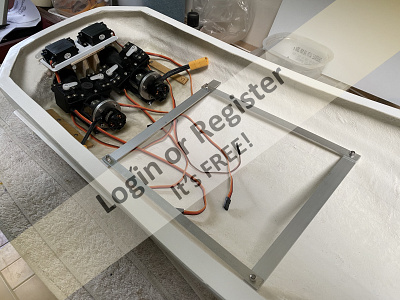
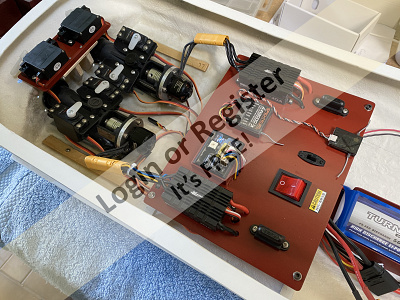
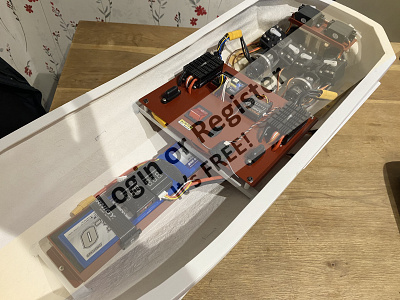
So, the past 4 days has seen most of the electronics installed. The main electronics board is 3mm plasticard which after placing all the items to be fitted, was drilled, cut and sanded ect before painting in red oxide spray just to hide the white plastic. Once lacquered and dry, it was mounted to the aluminium cross brace struts which will be bonded into the hull in due course. The tray is easily removable for any maintenance required. I’ve still to tidy all the wiring, but awaiting some nice eBay +able tidies before I do that. All the electronics have been hooked up and tested on the Tx for correct direction of travel ect.
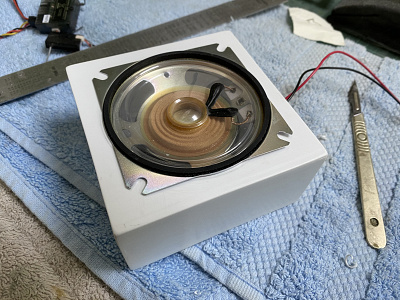
Also fashioned was a speaker box for the Mtroniks Napier sound module, this time from 2mm plasticard before hitting that with red oxide paint and lacquer. The sound module has been hooked up as per the instructions, and the sound coming from it is silly grin stuff, very satisfying and as loud as you want it! Whilst I was in red oxide mode, I also have the trim tab servo tray the same treatment!
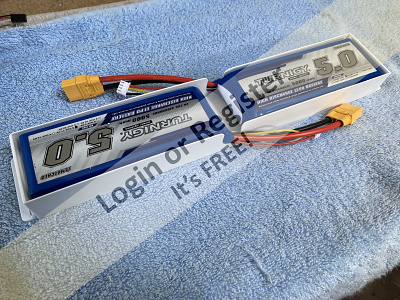
Last major component inside the hull was to make a battery box from a mix of 2mm and 3mm plasticard which will eventually fit under the main electronics tray and will be removable for safe charging the 2 x 3S 5000mah Lipo battery’s. Again, painted red for uniformity.
I prepared all the transom resin pieces and primed them in grey before hitting them with the same chrome paint that Rob used on his Pilot Boat bright work. As Rob correctly suggested, for the parts to remain Chrome, they haven’t been varnished or lacquered, the result again is very pleasing.
Tomorrow’s plan is final fit the electronics tray, battery box and speaker box, tidy the wiring
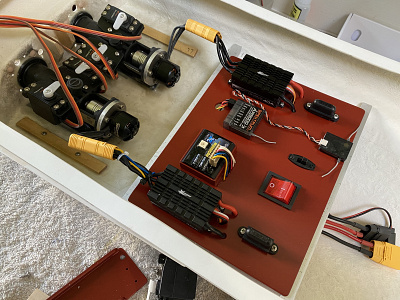

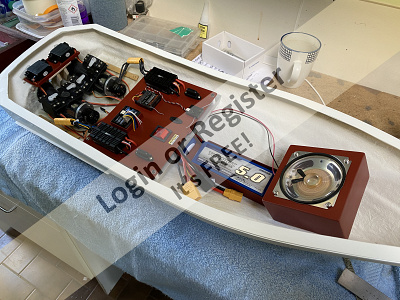
So, the past 4 days has seen most of the electronics installed. The main electronics board is 3mm plasticard which after placing all the items to be fitted, was drilled, cut and sanded ect before painting in red oxide spray just to hide the white plastic. Once lacquered and dry, it was mounted to the aluminium cross brace struts which will be bonded into the hull in due course. The tray is easily removable for any maintenance required. I’ve still to tidy all the wiring, but awaiting some nice eBay +able tidies before I do that. All the electronics have been hooked up and tested on the Tx for correct direction of travel ect.
Also fashioned was a speaker box for the Mtroniks Napier sound module, this time from 2mm plasticard before hitting that with red oxide paint and lacquer. The sound module has been hooked up as per the instructions, and the sound coming from it is silly grin stuff, very satisfying and as loud as you want it! Whilst I was in red oxide mode, I also have the trim tab servo tray the same treatment!
Last major component inside the hull was to make a battery box from a mix of 2mm and 3mm plasticard which will eventually fit under the main electronics tray and will be removable for safe charging the 2 x 3S 5000mah Lipo battery’s. Again, painted red for uniformity.
I prepared all the transom resin pieces and primed them in grey before hitting them with the same chrome paint that Rob used on his Pilot Boat bright work. As Rob correctly suggested, for the parts to remain Chrome, they haven’t been varnished or lacquered, the result again is very pleasing.
Tomorrow’s plan is final fit the electronics tray, battery box and speaker box, tidy the wiring
▲
⟩⟩
cjanik001
stevedownunder
MouldBuilder
Rookysailor
RNinMunich
Ianh
Martin555
robbob
|
💬 Re: Electronics installation continues....
3 years ago by 🇬🇧 Skydive130 (
Rear Admiral)✧ 174 Views · 1 Like
Flag
I’m off to Halfords myself on Tuesday for a click and collect for a total of 7 rattle cans to top up supplies!
▲
⟩⟩
Martin555
|
|
Login To
Remove Ads 💬 Re: Electronics installation continues....
3 years ago by 🇭🇺 MouldBuilder (
Vice Admiral)✧ 185 Views · 2 Likes
Flag
Thanks Sy. I really appreciate the help. A trip to Halfords for essential supplies for sanity is required.😊
▲
⟩⟩
Skydive130
Martin555
|
|
💬 Re: Electronics installation continues....
3 years ago by 🇺🇸 cjanik001 (
 Chief Petty Officer 2nd Class) Chief Petty Officer 2nd Class)✧ 184 Views · 2 Likes
Flag
Gees this is impressive.... gonna have to up my velcro game!👍
▲
⟩⟩
Martin555
Skydive130
|
|
💬 Re: Electronics installation continues....
3 years ago by 🇬🇧 Skydive130 (
Rear Admiral)✧ 178 Views · 3 Likes
Flag
Once I get the bit between the horns mike haha.
I think I’ve capitalised on having 10 days off and putting in 8 hours a day. Making lists of things to be done at each stage, thinking ahead ect ect. Also, being a kit like this, most of the detail parts are pre fabricated from resin, so that speeds things up. The hardest part of the build installing all the internal gubbins is near done now, but that did take quite a bit of mental planning, even going to bed your thinking how can I tackle that bit ect. Oh, and I’m a bit sufferer of impatience , which is a failing 😂 ▲
⟩⟩
MouldBuilder
Martin555
stevedownunder
|
|
💬 Re: Electronics installation continues....
3 years ago by 🇬🇧 mturpin013 (
Admiral)✧ 180 Views · 4 Likes
Flag
Great work as always Sy, You must be the fastest builder on this site without question
▲
⟩⟩
MouldBuilder
Martin555
stevedownunder
Skydive130
|
|
💬 Re: Electronics installation continues....
3 years ago by 🇬🇧 Skydive130 (
Rear Admiral)✧ 179 Views · 2 Likes
Flag
Hi there, paint choice for the Shannon is all Halfords rattle cans, VW brilliant orange (primed white not grey as it says on the tin!), Ford galaxy blue and a black lower hull. The blue and orange are considered the best match for RNLI colours. On your Tamar, if going for a red hull, VW Mars red is closest, otherwise you can go for white or black as I think Tamars come in all 3 colours depending on what one your building 👍
▲
⟩⟩
MouldBuilder
Martin555
|
|
💬 Re: Electronics installation continues....
3 years ago by 🇭🇺 MouldBuilder (
Vice Admiral)✧ 188 Views · 2 Likes
Flag
Very nice and Tidy Sy.
Have you decided on the manufacturer and colours for the main blue and orange. It would be very helpful if you have as I would like to buy the paint for my Tamar class before I leave for Hungary. Sorry that I rely on your experience but I am useless at paint selection and I really need to get the Lifeboat right. It might end up red else.😀😁 ▲
⟩⟩
Skydive130
Martin555
|
|
💬 Re: Electronics installation continues....
3 years ago by 🇬🇧 Skydive130 (
Rear Admiral)✧ 181 Views · 1 Like
Flag
Hi Rick, many thanks for your kind comments. I’ve added some more “never to be seen” inner fittings today, update later 👌
Kind regards Sy ▲
⟩⟩
Martin555
|
|
💬 Re: Electronics installation continues....
3 years ago by 🇨🇦 Newby7 (
Fleet Admiral)✧ 185 Views · 3 Likes
Flag
Stop it. What a great looking job. What a shame to be covered up.
Rick ▲
⟩⟩
Martin555
RNinMunich
Skydive130
|
|
💬 Re: Electronics installation continues....
3 years ago by 🇩🇪 RNinMunich (
Fleet Admiral)✧ 187 Views · 2 Likes
Flag
" Doug, you crack me up, where do you’d find your comedy 😂😂😂 "
From life Old Chap, from life!😉 Have knocked about a bit on this troubled ball and seen and learned summat along the way! And if you keep on giving me such superb 'feed lines' well .......... 😁 😎 Er ... good work by the way👍 Appeals to my electronic engineering instinct👍 ▲
⟩⟩
Skydive130
Martin555
|
|
💬 Re: Electronics installation continues....
3 years ago by 🇬🇧 Skydive130 (
Rear Admiral)✧ 185 Views · 3 Likes
Flag
Doug, you crack me up, where do you find your comedy 😂😂😂
▲
⟩⟩
RNinMunich
Martin555
robbob
|
|
Login To
Remove Ads 💬 Re: Electronics installation continues....
3 years ago by 🇩🇪 RNinMunich (
Fleet Admiral)✧ 187 Views · 4 Likes
Flag
Bravo Sy😀 (Clap clap clap😉)
Always a good idea to 'get the lead out'!! But of course an 'old' trooper will know that- from the drill Sar'nt Major!! 😁😎 "Am I 'urtin you soldier?" No Sar'nt Major. "WELL I OUGHTA BE! I'M STANDIN' ON YER 'AIR!" "GED IT CUT!!" ▲
⟩⟩
MouldBuilder
robbob
Skydive130
Martin555
|
|
💬 Re: Electronics installation continues....
3 years ago by 🇬🇧 Skydive130 (
Rear Admiral)✧ 186 Views · 2 Likes
Flag
If I was to remove the lead ballast Doug 😂😂😂😂
▲
⟩⟩
Martin555
RNinMunich
|
|
💬 Re: Electronics installation continues....
3 years ago by 🇩🇪 RNinMunich (
Fleet Admiral)✧ 188 Views · 2 Likes
Flag
"Looking at my Atlantic 21, I’m sure I could add more ha ha!"
Until .... Glug glug glug glug 😭😭😭 😎 ▲
⟩⟩
Skydive130
Martin555
|
|
💬 Re: Electronics installation continues....
3 years ago by 🇬🇧 Skydive130 (
Rear Admiral)✧ 187 Views · 2 Likes
Flag
The trouble is Rob is knowing when enough is enough, I like you are always looking for something else to add! Looking at my Atlantic 21, I’m sure I could add more ha ha!
▲
⟩⟩
robbob
Martin555
|
|
💬 Re: Electronics installation continues....
3 years ago by 🇬🇧 Skydive130 (
Rear Admiral)✧ 187 Views · 2 Likes
Flag
I think my obsession with neatness on wiring comes from my aircraft days Martin 😂😂😂
▲
⟩⟩
Ianh
Martin555
|
|
💬 Re: Electronics installation continues....
3 years ago by 🇬🇧 Martin555 (
Fleet Admiral)✧ 189 Views · 1 Like
Flag
Hi Sy,
I agree with Rob a very neat and tidy installation. Martin555. ▲
⟩⟩
Skydive130
|
|
💬 Re: Electronics installation continues....
3 years ago by 🇬🇧 robbob (
Admiral)✧ 189 Views · 3 Likes
Flag
Hi Sy.
I'm enjoying you build immensely so far, so the more you have to do the more I will have to enjoy 😁 Rob. ▲
⟩⟩
hmsnostalgia
Skydive130
Martin555
|
|
💬 Re: Electronics installation continues....
3 years ago by 🇬🇧 Skydive130 (
Rear Admiral)✧ 187 Views · 3 Likes
Flag
As for finishing before your Pilot Boat Rob, I don’t think you’ve any comprehension of the amount of resin parts ect that have to be prepared, painted and fitted to the superstructure 😂😂😂 along with railings, lightning, the list goes on ha ha !
▲
⟩⟩
RNinMunich
Martin555
robbob
|
|
💬 Re: Electronics installation continues....
3 years ago by 🇬🇧 robbob (
Admiral)✧ 189 Views · 5 Likes
Flag
Hi Sy.
Very neat and tidy electrics installation there 👍. The red oxide finish is very reminiscent of the 'Paxolin' board that I used to use as a lad for making up electronic circuits before I could afford to use Veroboard. Re: the chrome finish. It looks very effective if left unlacquered but beware that handling it too much can also dull the surface because of natural oils on the skin. The durability of the finish is very questionable in my view, that's why I sprayed silver and lacquer on the fittings on my boat. Great work.......plenty of time to get on with it now ! I still reckon you'll finish it before I finish my Pilot Boat 🤣 Rob. ▲
⟩⟩
hmsnostalgia
RNinMunich
Ianh
Martin555
Skydive130
|
📝 Hull internals about done, deck and cabin next...
3 years ago by 🇬🇧 Skydive130 ( Rear Admiral)
Rear Admiral)✧ 177 Views · 5 Likes · 5 Comments
Flag
💬 Add Comment
Another couple of days of good progress has seen the internal electrics bay nearing completion. Just the wire tidying to do and once fitted connect up the pushrods for all the control surfaces. The radio tray was bonded into the hull with epoxy to start with and then strengthened with “liquid metal” which is similar to P38 filler but when set is like solid rock, bonding really well to GF. The battery tray has a metal support fore and aft and is simply locked into place with a single screw for quick and easy removal for charging batteries in the safety of outside the boat. I’ve decided to mount the speaker box to the underside of the removable deck so that battery access remains easy.....
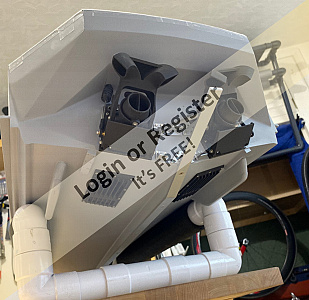
Next job was to start prepping the GF deck and cabin pieces. This started with rough shaping with a sanding drum on the dremel with a good mask on to prevent ingress of dust to lungs! Both pieces were then a rough finished with grades of sandpaper and final wet n dry for a nice pre-finish after which they were cleaned with panel prep spray to remove dust.
The original decks stemhead was cut out to prepare it for a better quality resin piece. This piece has had extra rivets added and a brass wire roller. Once prepared, it was then bonded to the hull and filled ready for sanding and filing at a later date.
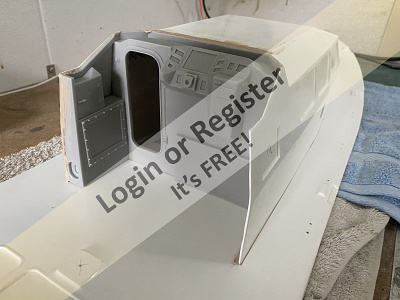
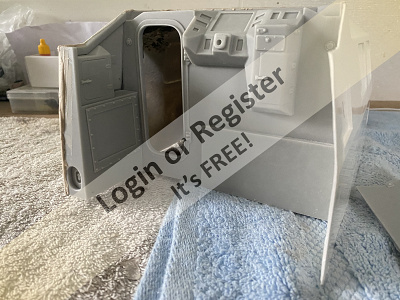
Next job was to prepare the cabin in the same way as the deck ready for fitting the resin parts aft. Using sandpaper bonded to strips of wood, it was essential to ensure the roof panels remained with there sharp edges instead of rounding them off, a similar feature to the Pilot Boats roof that Robs building. The rear of the cabin was then marked out and cut out ready to start receiving the resin back wall and other parts. Once satisfied with the fit, I bonded the rear cabin wall in with tack spots of CA, then again once happy, the whole thing was solidified with more liquid metal for a strong bond along with a bit of filler in any gaps. I also fitted the port side pieces and will fit the starboard pieces tomorrow. At that point, I shall not add anymore of the rear cabin pieces as painting and adding the detail painting will be a nightmare with all the nooks and crannies, instead those pieces will be be prepared for fitting and painted off boat before final assembly ....
Rob, please don’t panic! Although I’ve done a lot this week, there are literally hundreds of pieces to add to this build, it really is a huge Airfix kit, the sort we dreamed of as kids! It will not be finished before your beautiful Pilot Boat 😂😂😂😂

Next job was to start prepping the GF deck and cabin pieces. This started with rough shaping with a sanding drum on the dremel with a good mask on to prevent ingress of dust to lungs! Both pieces were then a rough finished with grades of sandpaper and final wet n dry for a nice pre-finish after which they were cleaned with panel prep spray to remove dust.
The original decks stemhead was cut out to prepare it for a better quality resin piece. This piece has had extra rivets added and a brass wire roller. Once prepared, it was then bonded to the hull and filled ready for sanding and filing at a later date.
Next job was to prepare the cabin in the same way as the deck ready for fitting the resin parts aft. Using sandpaper bonded to strips of wood, it was essential to ensure the roof panels remained with there sharp edges instead of rounding them off, a similar feature to the Pilot Boats roof that Robs building. The rear of the cabin was then marked out and cut out ready to start receiving the resin back wall and other parts. Once satisfied with the fit, I bonded the rear cabin wall in with tack spots of CA, then again once happy, the whole thing was solidified with more liquid metal for a strong bond along with a bit of filler in any gaps. I also fitted the port side pieces and will fit the starboard pieces tomorrow. At that point, I shall not add anymore of the rear cabin pieces as painting and adding the detail painting will be a nightmare with all the nooks and crannies, instead those pieces will be be prepared for fitting and painted off boat before final assembly ....
Rob, please don’t panic! Although I’ve done a lot this week, there are literally hundreds of pieces to add to this build, it really is a huge Airfix kit, the sort we dreamed of as kids! It will not be finished before your beautiful Pilot Boat 😂😂😂😂
▲
⟩⟩
RNinMunich
Scratchbuilder
Graham93
robbob
Martin555
|
💬 Re: Hull internals about done, deck and cabin next...
3 years ago by 🇩🇪 RNinMunich (
Fleet Admiral)✧ 174 Views · 2 Likes
Flag
"I’ll hold the last piece back until your final reveal 😂"
I'll believe you Sy👍 Thousands wouldn't!😁 😎 ▲
⟩⟩
Martin555
Skydive130
|
|
Login To
Remove Ads 💬 Re: Hull internals about done, deck and cabin next...
3 years ago by 🇬🇧 Skydive130 (
Rear Admiral)✧ 177 Views · 1 Like
Flag
Everything will come to a halt for a few day after Tuesday Martin as I’m back at work! I’ll need a rest to recharge at any rate 👍
▲
⟩⟩
Martin555
|
|
💬 Re: Hull internals about done, deck and cabin next...
3 years ago by 🇬🇧 Skydive130 (
Rear Admiral)✧ 177 Views · 3 Likes
Flag
Rob, if push comes to shove and your struggling to complete before me, I’ll hold the last piece back until your final reveal 😂😂
▲
⟩⟩
robbob
RNinMunich
Martin555
|
|
💬 Re: Hull internals about done, deck and cabin next...
3 years ago by 🇬🇧 robbob (
Admiral)✧ 179 Views · 4 Likes
Flag
More rapid progress Sy 👍👍
I'm much relieved that there's an outside chance I'll finish mine before yours is done 😅. Rob. ▲
⟩⟩
hmsnostalgia
RNinMunich
Martin555
Skydive130
|
|
💬 Re: Hull internals about done, deck and cabin next...
3 years ago by 🇬🇧 Martin555 (
Fleet Admiral)✧ 178 Views · 1 Like
Flag
Hi Sy,
You are definitely getting on with this build. Looking good so far. Keep it up. Martin555. ▲
⟩⟩
Skydive130
|


Login To
Remove Ads
Remove Ads