Join Us On Social Media!

|

|

|
Download The App!
Login To
Remove Ads
Remove Ads
Login To
Remove Ads
Remove Ads
Model Boats Website
Vosper MTB379
14 Posts · 16 Followers · 87 Photos · 118 Likes
Began 3 years ago by
 United Kingdom
Follow This Thread
Not currently following
> Click to follow
> Click to follow
Latest Post 2 years ago by
| Oldest posts shown first (Show Newest First) | (Print Booklet) |
📝 Vosper MTB379
3 years ago by 🇬🇧 mturpin013 ( Admiral)
Admiral)✧ 263 Views · 13 Likes · 4 Comments
Flag
💬 Add Comment
As did another member on the site succumb to the charm of a grandson, I too have fallen for it, again. The first one was a cabin cruiser but apparently it really doesn’t go fast enough despite an engine transplant and a bigger prop and larger capacity battery. So “what would you like” –“a Motor Torpedo Boat please grandad”
Enter the Vosper MTB379. My grandson trawled the plans service web sites and eventually settled on a 23”Vosper MTB, the plans were purchased and duly arrived a couple of days later, 3 sheets in all giving enough detail to build a nice example of the type.
My grandson was keen to be involved in all aspects of the build but as always with an 8 year old he expected things to happen somewhat faster than a human being could manage. The first job was to prepare a building board with appropriate brackets and 90 degree supports to ensure a symmetrical build.
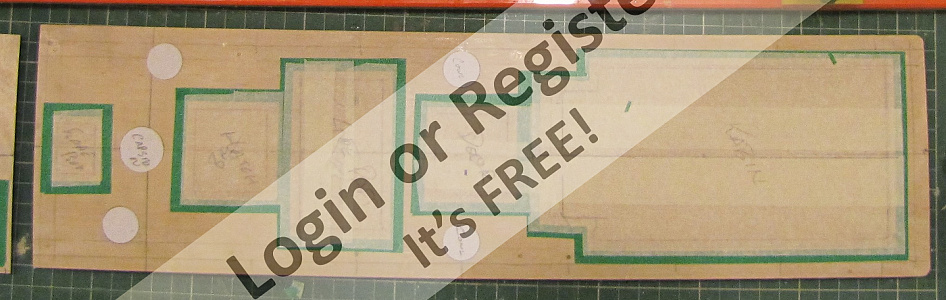
Next comes the transfer the bulkhead patterns onto the wood I find the easiest way to do this is to scan the bulkhead parts onto A4 sheets single sticky labels, these are easily applied to the wood and very easy to remove after cutting out the shape of each part.
The plans call for a number of the construction parts to be in balsa, however I’m not really keen on working in balsa so I decided to use “light ply” instead and using some thinner sections to compensate for any weight difference.
We worked on cutting out the paper plans together and placing them on the ply. Then next comes the "constant supervision" part – using the scroll saw, he has used it before and became quite good, keeping a straight line in the most part, the saw has a protective guard around the blade and a pressure foot so is really quite easy to use although any lack of concentration can lead to an interesting profile. The novelty doesn’t last long and it’s time for him to go home until next week leaving me to complete the task ready for next weeks instalment. However its really important to get youngsters interested in the hobby and so far he has proved to be interested and quite good at it.


Enter the Vosper MTB379. My grandson trawled the plans service web sites and eventually settled on a 23”Vosper MTB, the plans were purchased and duly arrived a couple of days later, 3 sheets in all giving enough detail to build a nice example of the type.
My grandson was keen to be involved in all aspects of the build but as always with an 8 year old he expected things to happen somewhat faster than a human being could manage. The first job was to prepare a building board with appropriate brackets and 90 degree supports to ensure a symmetrical build.
Next comes the transfer the bulkhead patterns onto the wood I find the easiest way to do this is to scan the bulkhead parts onto A4 sheets single sticky labels, these are easily applied to the wood and very easy to remove after cutting out the shape of each part.
The plans call for a number of the construction parts to be in balsa, however I’m not really keen on working in balsa so I decided to use “light ply” instead and using some thinner sections to compensate for any weight difference.
We worked on cutting out the paper plans together and placing them on the ply. Then next comes the "constant supervision" part – using the scroll saw, he has used it before and became quite good, keeping a straight line in the most part, the saw has a protective guard around the blade and a pressure foot so is really quite easy to use although any lack of concentration can lead to an interesting profile. The novelty doesn’t last long and it’s time for him to go home until next week leaving me to complete the task ready for next weeks instalment. However its really important to get youngsters interested in the hobby and so far he has proved to be interested and quite good at it.
▲
⟩⟩
robbob
Seanympth
Colin H
MouldBuilder
RNinMunich
Mike Stoney
Scratchbuilder
Graham93
Martin555
stevedownunder
GaryLC
jacko
Newby7
|
💬 Re: Vosper MTB379
2 years ago by 🇭🇺 MouldBuilder (
 Vice Admiral) Vice Admiral)✧ 232 Views · 1 Like
Flag
Great choice Mike. Looking forward to this build as I always learn a lot with the detail you supply on your logs.
Peter. ▲
⟩⟩
Martin555
|
|
Login To
Remove Ads 💬 Re: Vosper MTB379
3 years ago by 🇬🇧 Scratchbuilder (
Vice Admiral)✧ 266 Views · 1 Like
Flag
Good morning Mike.
A nice project.Looking forward to it. Especially glad to see that the project involves your Grandson. They are our future in the model world. My latest blog on the Corvette conversion is all centred around one of our Grandsons. Looking forward to the next instalment. Regards Bill. ▲
⟩⟩
Martin555
|
|
💬 Re: Vosper MTB379
3 years ago by 🇬🇧 Martin555 (
 Fleet Admiral) Fleet Admiral)✧ 262 Views · 1 Like
Flag
Hi Mike,
I am glad that your grandson has shown interest in this hobby and that he has chosen a subject that has a lot of technical bits and pieces that will keep you fully employed wile he is away. Please tell your grandson that i will be following his build log. Martin555. ▲
⟩⟩
Scratchbuilder
|
|
💬 Re: Vosper MTB379
3 years ago by 🇨🇦 Newby7 (
Fleet Admiral)✧ 266 Views · 3 Likes
Flag
Looks a good job with the scroll saw. I like that you went for ply instead of balsa .
Rick ▲
⟩⟩
Len1
Martin555
stevedownunder
|
Login To
Remove Ads
Remove Ads
📝 Bulk head assemblies
3 years ago by 🇬🇧 mturpin013 ( Admiral)
Admiral)✧ 263 Views · 13 Likes · 4 Comments
Flag
💬 Add Comment
Week two and it’s time to start assembling the components, the keel is clamped to the base board to ensure that it stays straight during the assembly. Each of the bulkheads has to be clamped whilst it’s glued to the keel and this is done using some 90 degree brackets, each bulkhead is prepared with epoxy (30 minute) and placed in position making sure they are butted up against the angle brackets and duly clamped in position. 30 minutes it says on the pack but we prefer to leave overnight when it’s properly cured and easily planed and sanded. At this point the two carlings are just dry fitted to give some alignment to the upper deck area of the bulkheads.
That’s it for today.


That’s it for today.
▲
⟩⟩
pressonreguardless
Seanympth
Colin H
MouldBuilder
Ygagnon
RNinMunich
Mike Stoney
dave976
Martin555
stevedownunder
GaryLC
jacko
Newby7
|
💬 Re: Bulk head assemblies
2 years ago by 🇺🇸 pressonreguardless (
 Rear Admiral) Rear Admiral)✧ 214 Views · 1 Like
Flag
It is so good to see the younger generation being involved in something other than an IPad.
Trev ▲
⟩⟩
RNinMunich
|
|
Login To
Remove Ads 💬 Re: Bulk head assemblies
3 years ago by 🇨🇭 Mike Stoney (
 Commander) Commander)✧ 260 Views · 1 Like
Flag
Hello young man !!
I already see you as a professional boat builder. . .keep it up!! Hobbyist greetings Michel-Claude 👍👍👍👍 ▲
⟩⟩
Martin555
|
|
💬 Re: Bulk head assemblies
3 years ago by 🇬🇧 Martin555 (
Fleet Admiral)✧ 261 Views · 0 Likes
Flag
Hi Mike,
It looks like he knows what he is doing. Please tell him to keep up the good work as i will be following his build log. Martin555. ▲
⟩⟩
No likes yet
This member will receive 1 point for every like received |
|
💬 Re: Bulk head assemblies
3 years ago by 🇨🇦 Newby7 (
Fleet Admiral)✧ 265 Views · 2 Likes
Flag
A new boat builder enjoying the build.
Rick ▲
⟩⟩
Martin555
stevedownunder
|
📝 Carlings and Stringers
2 years ago by 🇬🇧 mturpin013 ( Admiral)
Admiral)✧ 259 Views · 12 Likes · 5 Comments
Flag
💬 Add Comment
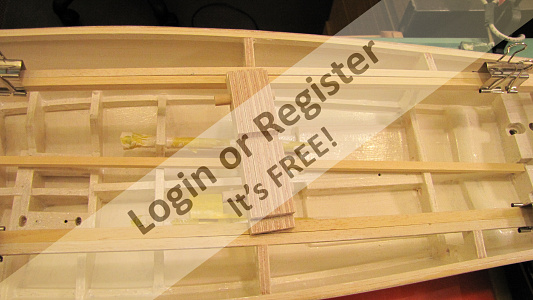
The first structural pieces to be fitted are the two carlings which are pieces of timber laid fore and aft under the deck and form the edges of the main opening in the deck; it’s important to make sure that the bulkheads are firmly set at 90 degrees in both the horizontal and vertical planes as they serve as the foundation for the whole body of the boat.
The next structural components are the stringers which are the part of the boats construction that gives it further strength and confirms its symmetry and rigidity, so it’s important to make sure that the bulkheads are still firmly set at 90 degrees in both the horizontal and vertical planes before the stringers are glued in place. The stringers in the plan call for balsa wood but again I’m going to change this to obeche to give more strength. They also suggest that the stringers are applied laminated to ease the bending however I’m not sure this is necessary if using balsa but with obeche it may ease the process so applying them in two strips is the way we applied.
The stringers now have to be planed and sanded to the form of the bulkheads, after initial planning I used a long piece of flat ply (19 mm thick 75mm wide and 300mm long) with abrasive paper bonded to it. This makes sure there are no low spots by removing the excess in the right places and forming them to the profile of the bulkhead sides.
A lot of help is required for this stage as my Grandson is learning on the job, he does as much as he can and I stand back and just direct and supervise.
▲
⟩⟩
Seanympth
Colin H
Rogal118
MouldBuilder
GaryLC
Graham93
dave976
Martin555
stevedownunder
Newby7
RNinMunich
Mike Stoney
|
💬 Re: Carlings and Stringers
2 years ago by 🇬🇧 mturpin013 (
Admiral)✧ 247 Views · 2 Likes
Flag
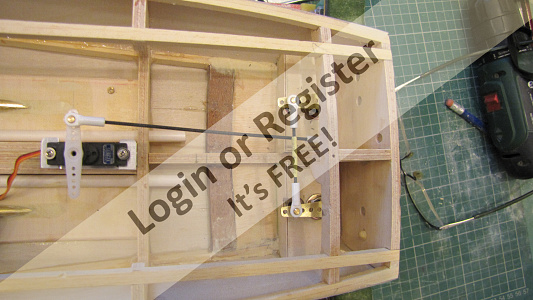
"I would have tipped 'to get cabling for servos etc through a watertight compartment'."
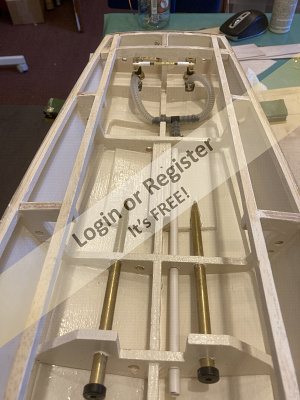
Doug, I did exactly that on the police boat but as I explained its to carry cooling water, however you may notice that all the bulkheads have four holes in each for the purpose of carrying wires to the appropriate places, I feel it makes for a neater finished boat these holes may end up with plastic pipes in them when I've confirmed the wiring requirements. ▲
⟩⟩
Martin555
stevedownunder
|
|
Login To
Remove Ads 💬 Re: Carlings and Stringers
2 years ago by 🇩🇪 RNinMunich (
Fleet Admiral)✧ 248 Views · 1 Like
Flag
"What are the 2 bits of plastic tube for?"
Steve; I would have tipped 'to get cabling for servos etc through a watertight compartment'. I did the same on my 1:72 destroyer, ca 1.4m, using 10mm ally toob for some additional screening from the 'dirty' wiring. Michael; that conforms to a German maxim- Warum einfach wenn es geht auch schwierig? Why simple when complex also works 😁 Cheers, 😎 ▲
⟩⟩
stevedownunder
|
|
💬 Re: Carlings and Stringers
2 years ago by 🇬🇧 mturpin013 (
Admiral)✧ 249 Views · 4 Likes
Flag
Its for cooling water from the prop scoops to the ESC. It will gather from two scoops (twin props) then into a "Y" connector to one pipe up to mid ship - round the ESC and back to the stern another "Y" connector to send the warm water out of two stern exits. It may seem a bit complex but I do like the difficult more interesting route. Wait while you see the drive train.
▲
⟩⟩
Seanympth
Martin555
RNinMunich
stevedownunder
|
|
💬 Re: Carlings and Stringers
2 years ago by 🇦🇺 stevedownunder (
 Captain) Captain)✧ 255 Views · 1 Like
Flag
Hi Mike,
Looking very clean, great work from you and your grandson. What are the 2 bits of plastic tube for? Cheers, Stephen. ▲
⟩⟩
Martin555
|
|
💬 Re: Carlings and Stringers
2 years ago by 🇨🇦 Newby7 (
Fleet Admiral)✧ 255 Views · 2 Likes
Flag
Mike Nothing like learning on the job. Good for him to be with you to build this boat.
Rick ▲
⟩⟩
Martin555
stevedownunder
|
📝 Power plant and propeller tubes
2 years ago by 🇬🇧 mturpin013 ( Admiral)
Admiral)✧ 241 Views · 9 Likes · 4 Comments
Flag
💬 Add Comment
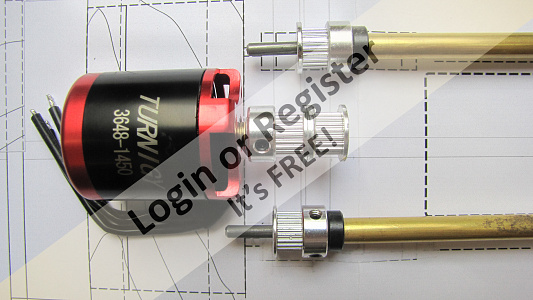
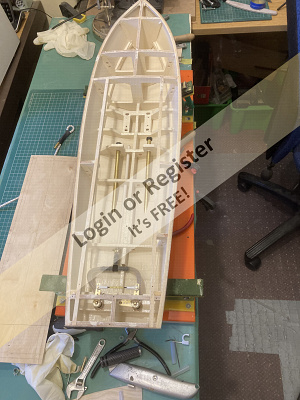
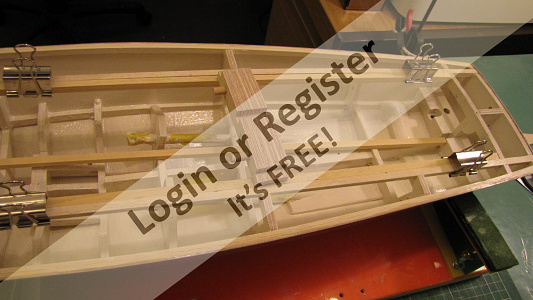
A few more basics had to be done with some assistance before we can go any further with the skins. The power unit is easiest fitted without the bottom and side skins. As this is a twin screw boat it’s most important that the prop shafts are perfectly parallel this most important when we consider the drive mechanism.
We all have bits under the bench that we over bought at some time so I decided to make use of some of them.
The motor is the first adaptation, it was bought for a much bigger boat but my idea was that it could be used to drive both props at once this is to be done with miniature timing belts hence the need for the shafts and pulleys to be perfectly in line to avoid any tendency for the belts to wander off the pulleys. You may notice that the shafts are different lengths; this is so the pulleys are supported to the maximum effect. I also had to put extra supports in place near the motor again to give extra support.
It will also be seen that an extra support is temporally in place at the stern end to ensure the dimensions between the shafts is maintained until the skins are in place and additional strengthening is placed where the shafts emerge and where a skeg can be fitted along with two water take ups and two rudders.
▲
⟩⟩
Seanympth
Colin H
MouldBuilder
RNinMunich
Ygagnon
Martin555
GaryLC
stevedownunder
Newby7
|
💬 Re: Power plant and propeller tubes
2 years ago by 🇬🇧 mturpin013 (
Admiral)✧ 212 Views · 1 Like
Flag
"With reference to turning in a circle". I made this power system to use up a motor (minimal cost) I'm sure that any turning effect due to the twin anti clock rotating props will be minimal and hopefully countered by a bias on the rudder.
The issue of any rotating effect on the hull at start up due to twin props (and usually twin motors) causing the stern to dip isn't an issue since we only have one motor centrally mounted so no different to a normal single prop set up. So since its nearly ready for sea trials we may as wet get it wet and see what happens. If we do end going in circles then plan 'B' will be to source two motors and ESCs and redesign the motor mountings. ▲
⟩⟩
stevedownunder
|
|
Login To
Remove Ads 💬 Re: Power plant and propeller tubes
2 years ago by 🇬🇧 Colin H (
Fleet Admiral)✧ 232 Views · 4 Likes
Flag
Good evening Mike, will you be changing your props, as if they are both running in the same rotation your model will be spinning like a whirlpool.
Cheers Colin. ▲
⟩⟩
MouldBuilder
RNinMunich
jonb
jbkiwi
|
|
💬 Re: Power plant and propeller tubes
2 years ago by 🇨🇦 Rowen (
Captain)✧ 236 Views · 2 Likes
Flag
Hi Mike,
Congratulations on your well deserved promotion. Quick question, your motor picture shows pulleys on the shafts and motor that will all rotate in the same direction. The screws are contra-rotating, is there a jockey pulley arrangement anywhere? Rowen ▲
⟩⟩
MouldBuilder
jbkiwi
|
|
💬 Re: Power plant and propeller tubes
2 years ago by 🇨🇦 Newby7 (
Fleet Admiral)✧ 243 Views · 1 Like
Flag
Great look for the power unit. Well engineered.
Rick ▲
⟩⟩
stevedownunder
|
📝 Skinning the hull
2 years ago by 🇬🇧 mturpin013 ( Admiral)
Admiral)✧ 250 Views · 7 Likes · 2 Comments
Flag
💬 Add Comment
The first job is to make sure that all the faces of the bulkheads and stringers are fully smoothed off and that the stringers are trimmed to align with the bulkhead angles. We did this firstly using a small block plane and then finally with a broad piece of MDF with an abrasive glued to it this ensures that any high spots are removed leaving the surface flat and ready to receive the skin. Skills like this take time to learn for an 8 yr old but he will get there eventually, practice makes perfect.
The first skin to be applied is a bottom one and the keel edge is trimmed to give a perfect fit/alignment along the full length of the keel, when this is achieved we use a 0.5 mm pin to hold the skin in place at the stern/keel end and also one at the bow bulkhead just before it bends around to the front, the whole skin is then clamped in position to make sure that it fits all around its edges. We can now remove all the clamps and pins and apply a bead of epoxy along all surfaces. The two location pins can now be inserted and the clamps applied along its length. Finally we drive home some 0.1mm brass pins at the base of each bulkhead/stringer and also at the top. This is then put aside to cure overnight. Having cured the skin is trimmed back to the stringers ready for the side skins to be applied.
The process is repeated on the other bottom skin.
Next we carry out a similar process on the side skins using the abrasive board to smooth any high spots we then pinned the skin using the brass location pins. The only difficult part to join is at the bow where the skins from the stern are overlapped until at the bow they have to change to a butt joint because of the angles. When the join is aligned dry it’s time to apply the epoxy.
▲
⟩⟩
Seanympth
MouldBuilder
stevedownunder
GaryLC
Graham93
RNinMunich
Colin H
|
💬 Re: Skinning the hull
2 years ago by 🇬🇧 mturpin013 (
Admiral)✧ 243 Views · 2 Likes
Flag
The pictures are with excess glue removed and plenty of disposable gloves in the bin.😊
▲
⟩⟩
stevedownunder
RNinMunich
|
|
💬 Re: Skinning the hull
2 years ago by 🇦🇺 stevedownunder (
Captain)✧ 247 Views · 2 Likes
Flag
Hi Mike,
I bet your grandson was really happy to see the bottom and sides go on. I hope he wasn't like me at that sort of age with more glue on me than the job. Great work. 👍👍 Cheers, Stephen. ▲
⟩⟩
GaryLC
xtramaths
|
📝 Fibre glassing the hull
2 years ago by 🇬🇧 mturpin013 ( Admiral)
Admiral)✧ 233 Views · 13 Likes · 14 Comments
Flag
💬 Add Comment
I use Deluxe Materials Fibreglass Cloth 34g-1oz. 1M.Sq and water based resin.
I used to use the polyester resin which is widely used in GRP (Glass fibre Reinforced Plastic), it is a viscous liquid which, when activated by a suitable catalyst (hardener) will set hard overnight giving a rock hard coating, however for a small model boat the water based resin system is far more suited to this type of work.
The first job is to give the whole hull a coat of resin which is diluted 50:50 with water; this allows the resin to soak into the wood giving a good bond, when dry after about an hour it can be lightly sanded with a 400 grit to remove any pips. It should be noted that before this process is done the hull must be as near perfect as if it were to be painted because after the glass coating we don’t want to use any filler.
I like to try and cover the hull in a single piece of glass cloth, which is a challenge even when you’re not trying to work around the already installed prop shafts, so we lay the cloth over the hull and lightly tape it at the bow and stern whilst the cloth is trimmed along the hull sides leaving a good amount spare, the prop shafts have to be accommodated so a cut from the stern to where the prop disappears into the hull is made. At the bow there will be an excess of cloth so again a cut is made to allow the excess to be removed when the resin is applied giving a slight overlap of the cloht but not enough to cause a ridge.
Now the cloth is draped and prepared we can start to apply the resin, I use a 30mm wide flat Camel Hair brushe which is really fine. We start mid ship along the keel, working out to the sides and back to the stern and forward to the bow cutting any excess away and getting a 3mm overlap along the bow. The resin is applied sparingly avoiding going over the same surface twice, we carry on down the sides carefully flattening any bubbles as you go, don’t be tempted to brush over the surface again a small amount of resin is better at this stage. Although the resin/cloth will be dry in about an hour I leave it to dry overnight before removing the excess cloth around the edges and giving a light sanding and then a second coat can be applied. I gave the hull five coats of resin in all until the weave of the cloth are fully covered rubbing it down between coats leaving the hull ready for painting.
▲
⟩⟩
Seanympth
MalcolmC
Bryan-the-pirate
Mike Stoney
Griss
ChrisG
GaryLC
Krampus
jimdogge
MouldBuilder
stevedownunder
pressonreguardless
Colin H
|
💬 Re: Fibre glassing the hull
2 years ago by 🇨🇭 Mike Stoney (
Commander)✧ 206 Views · 1 Like
Flag
Hello MTurpin!
Now everything is clear to me after your execution !! Thanks for the good explanation. Best regards Michel-Claude ▲
⟩⟩
Seanympth
|
|
Login To
Remove Ads 💬 Re: Fibre glassing the hull
2 years ago by 🇨🇦 Ronald (
Admiral)✧ 212 Views · 0 Likes
Flag
Eze-Kote is the same, in my opinion, as water-based Varathane, milky in colour, water n soap clean up, low odour, and a can like the one pictured, 946ml, is $18 in Canada. EZY Coat 500 ml, at the hobby store was $25 and not always available.
One more thought about the water based Varathane, it is available in Gloss, Semi-Gloss and Low Sheen. It is the only product allowed in many of our High School wood shops because of its low odour, it’s water cleaning capacity. Polyester products use Varsol cleaning of brushes, they create odours not always appreciated by other classrooms and some are allergic to these fumes. Plus it is a big No No to put these products down the sink drains into the sewer system! So, water based products have become the norm. They are more expensive, and in some applications, less durable, but far less of an environment issue. 

▲
⟩⟩
No likes yet
This member will receive 1 point for every like received |
|
💬 Re: Fibre glassing the hull
2 years ago by 🇺🇸 pressonreguardless (
Rear Admiral)✧ 216 Views · 0 Likes
Flag
Thank You!
In my years of working with full sized boats: Polyester for fiberglass, Epoxy for wood, This is a true revelation for me!! Trev ▲
⟩⟩
No likes yet
This member will receive 1 point for every like received |
|
💬 Re: Fibre glassing the hull
2 years ago by 🇬🇧 mturpin013 (
Admiral)✧ 219 Views · 1 Like
Flag
Hi Ron your right, with a keel I would go for a 2 piece covering if possible and a further stern piece. My thought being that as little overlap is the best method. Your comment about overlapping brought to mind using heavier stranded cloth when glassing into a mould, when it is the preferred method and the surface finish isn't a requirement as the mould gives the smooth finish.
▲
⟩⟩
stevedownunder
|
|
💬 Re: Fibre glassing the hull
2 years ago by 🇬🇧 mturpin013 (
Admiral)✧ 219 Views · 1 Like
Flag
Fibre glass by its very construction is a woven cloth and as such doesn't require to be overlapped since the weave gives it its strength, this of course may be necessary if you are working around a part that requires cutting or patching. You could if you wanted a stronger shell use a heavier cloth or give it a second covering but having to use filler on overlapped lips seems to be counter productive
▲
⟩⟩
stevedownunder
|
|
💬 Re: Fibre glassing the hull
2 years ago by 🇬🇧 mturpin013 (
Admiral)✧ 219 Views · 4 Likes
Flag
Deluxe Materials Eze Kote Finishing Resin 500ml S-SE51 £19.50
Laminating and finishing resin for balsa and foam models. Eze-Kote is a 1-part water based foam-safe, low odour, resin alternative to epoxy. Brush onto balsa and light glass cloth to create a tough, ding and fuel resistant film that can be sanded easily and painted after 20-30 mins. Features Easy sanding Low odour Foam safe Water clean-up Coverage: 75ml covers approx. 1m2 per coat 
▲
⟩⟩
MouldBuilder
pressonreguardless
stevedownunder
overthesea
|
|
💬 Re: Fibre glassing the hull
2 years ago by 🇨🇦 Ronald (
Admiral)✧ 226 Views · 1 Like
Flag
I can see trying to do the model in one piece of cloth as it has no raised keel, but another vessel with a keel would require a different method.


▲
⟩⟩
stevedownunder
|
|
💬 Re: Fibre glassing the hull
2 years ago by 🇺🇸 pressonreguardless (
Rear Admiral)✧ 224 Views · 1 Like
Flag
Hi Ron,
You set the cloth with the Varathane? Thanks, Trev ▲
⟩⟩
stevedownunder
|
|
💬 Re: Fibre glassing the hull
2 years ago by 🇨🇦 Ronald (
Admiral)✧ 225 Views · 2 Likes
Flag
Interesting how you take on the challenge of glassing the hull. When I do mine boats, it is done with multiple strips, overlapping, and when dry, lightly sanded. I use a auto body filler if needed which is how I was taught. Then sanded smooth, a couple more coats of clear before painting. I use the water-based product seen in photo, works very well and virtually no odour. Soap and water clean up too.

▲
⟩⟩
stevedownunder
pressonreguardless
|
|
💬 Re: Fibre glassing the hull
2 years ago by 🇬🇧 jimdogge (
 Warrant Officer) Warrant Officer)✧ 235 Views · 2 Likes
Flag
Hi Mturpin l did not know about a water based resin and have been very reluctant to use fiber glass or two part epoxy because they are so messy. Thank you for this.
Stay safe. Jim ▲
⟩⟩
stevedownunder
xtramaths
|
|
💬 Re: Fibre glassing the hull
2 years ago by 🇳🇿 Vanya (
 Leading Seaman) Leading Seaman)✧ 226 Views · 2 Likes
Flag
I would like to know more about this water based resin please. Can you provide a reference to the brand? I'm in New Zealand but obviously it is non hazardous Im thinking? Thanks.
▲
⟩⟩
stevedownunder
pressonreguardless
|
|
Login To
Remove Ads 💬 Re: Fibre glassing the hull
2 years ago by 🇬🇧 wunwinglo (
 Petty Officer 1st Class) Petty Officer 1st Class)✧ 233 Views · 2 Likes
Flag
I HAVE USED THIS RESIN AND FOUND IT TO BE EXCELLENT AND EASY TO USE. i had a tug that my father had made in 1953, on which the hull had gone porous. As it was a finished, detailed model , I did not fancy using polyester as it is so bloody messy. Instead , I first gave the hull two coats of resin, inside and out, the exterior well rubbed down. Then it was covered not in glass cloth but heavyweight model aircraft tissue. Suitably rubbed down, it worked a treat and the finished hull looks really good and has remained watertight ever since. The hull was bread and butter construction in obechi.
▲
⟩⟩
stevedownunder
pressonreguardless
|
|
💬 Re: Fibre glassing the hull
2 years ago by 🇦🇺 stevedownunder (
Captain)✧ 231 Views · 1 Like
Flag
Hi Mike,
Lovely explanation, I also haven't heard of a water based resin, good to learn something new. The water based resin would be much better to use with your apprentice, fumes from polyester are quite nasty. Cheers, Stephen. ▲
⟩⟩
pressonreguardless
|
|
💬 Re: Fibre glassing the hull
2 years ago by 🇺🇸 pressonreguardless (
Rear Admiral)✧ 234 Views · 1 Like
Flag
Nice Glassing job.
I am familiar with polyester and epoxy resins. What is water based resin? Thanks, Trev ▲
⟩⟩
stevedownunder
|
📝 Twin Rudders and water scoops
2 years ago by 🇬🇧 mturpin013 ( Admiral)
Admiral)✧ 183 Views · 9 Likes · 3 Comments
Flag
💬 Add Comment
Being twin props we have to have twin rudders and twin water scoops, I have decided in the absence of my grandson for a couple of weeks until Christmas I will take time out to manufacture the rudders, linkages and scoops from scratch.
This may be long winded to some but my enjoyment comes from making things even though they are relatively cheap however 2 sets of rudder and scoop will cost £30 which I can spend on things I can’t make like electrical/electronic items.
The rudders are very simple to make consisting of a shaped blade made from 1.0mm brass sheet and a piece of 5 mm brass rod. The rod has to have a slot made in the end about 15mm long so the blade can be slotted into it, this I did using a slitting saw in the milling machine but it can be done quite successfully with a new sharp junior hacksaw. The two pieces need to cleaned around the joint area using wire wool, I avoid using abrasive papers to clean before soldering as they tend to leave a residue from the adhesive used to bond the grit which sometimes can cause issues with solder adhesion. So the two parts are clean and a small amount of flux applied we can now apply some heat. For such small jobs I tend to use a small blow torch (the type you use in cooking) this is adequate and soon heats to the point where the solder will melt, it’s important to momentarily remove the heat from the part before you apply the solder, otherwise it melts in the flame and tends to apply too much solder, the solder should melt easily when touched on the joint and run along the joint, a little heat can be further applied to assist in making sure the joint has fully bonded. Hopefully a good joint has been achieved with very little cleaning required of excess solder.
Now to the plastic support tube, this is made from some black nylon, it consists of a piece of 10 mm bar turned down to 8mm leaving a 2mm shoulder at one end and threaded M8 for about 20 mm, a 5mm hole is then drilled through this little piece can be custom made to suit the boat being built.
Next I need to make the arms to carry movement from the servo to the rudders again some 1mm bras sheet was used to make 3 identical arms with the same set of holes in each, to make these I first cut three pieces of brass which are over size to finished dimensions, I then drill a single 4 mm hole in the end of each piece, I then put them together and insert a 4 mm drill through each piece, I can now drill the a 1.5mm hole through all the pieces at the other end together, putting a second drill in this hole the pieces can be shaped together, in my case I clamped them in the vice and milled them to size. Holding them together I can now drill the rest of the holes.
I need some sort of brass bush to include a grub screw for connection to the rudder shaft this is a relatively simple bush which can be soldered into the 4mm hole, one arm is soldered to a single arm using the process described before. The other bush is soldered into the other 2 arms which are set at 90 degrees to each other.
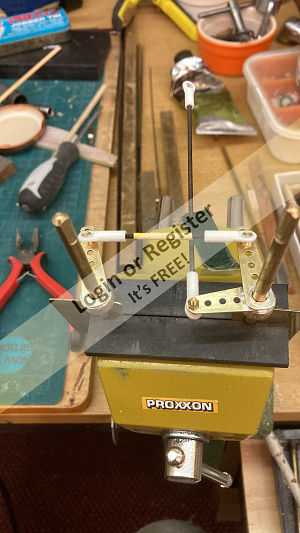
A trial set up in the bench vice with some connecting rods confirms the system will work. I then tried a mock set up of the water system connecting some of the pipework you may notice each of the silicon tubes have stainless steel spring inside this is so a much tighter curve can be made.
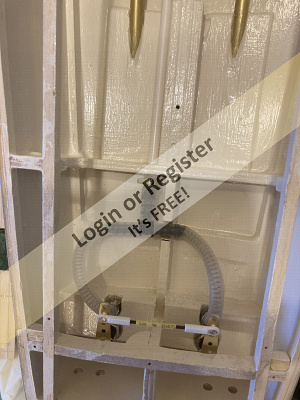
This may be long winded to some but my enjoyment comes from making things even though they are relatively cheap however 2 sets of rudder and scoop will cost £30 which I can spend on things I can’t make like electrical/electronic items.
The rudders are very simple to make consisting of a shaped blade made from 1.0mm brass sheet and a piece of 5 mm brass rod. The rod has to have a slot made in the end about 15mm long so the blade can be slotted into it, this I did using a slitting saw in the milling machine but it can be done quite successfully with a new sharp junior hacksaw. The two pieces need to cleaned around the joint area using wire wool, I avoid using abrasive papers to clean before soldering as they tend to leave a residue from the adhesive used to bond the grit which sometimes can cause issues with solder adhesion. So the two parts are clean and a small amount of flux applied we can now apply some heat. For such small jobs I tend to use a small blow torch (the type you use in cooking) this is adequate and soon heats to the point where the solder will melt, it’s important to momentarily remove the heat from the part before you apply the solder, otherwise it melts in the flame and tends to apply too much solder, the solder should melt easily when touched on the joint and run along the joint, a little heat can be further applied to assist in making sure the joint has fully bonded. Hopefully a good joint has been achieved with very little cleaning required of excess solder.
Now to the plastic support tube, this is made from some black nylon, it consists of a piece of 10 mm bar turned down to 8mm leaving a 2mm shoulder at one end and threaded M8 for about 20 mm, a 5mm hole is then drilled through this little piece can be custom made to suit the boat being built.
Next I need to make the arms to carry movement from the servo to the rudders again some 1mm bras sheet was used to make 3 identical arms with the same set of holes in each, to make these I first cut three pieces of brass which are over size to finished dimensions, I then drill a single 4 mm hole in the end of each piece, I then put them together and insert a 4 mm drill through each piece, I can now drill the a 1.5mm hole through all the pieces at the other end together, putting a second drill in this hole the pieces can be shaped together, in my case I clamped them in the vice and milled them to size. Holding them together I can now drill the rest of the holes.
I need some sort of brass bush to include a grub screw for connection to the rudder shaft this is a relatively simple bush which can be soldered into the 4mm hole, one arm is soldered to a single arm using the process described before. The other bush is soldered into the other 2 arms which are set at 90 degrees to each other.
A trial set up in the bench vice with some connecting rods confirms the system will work. I then tried a mock set up of the water system connecting some of the pipework you may notice each of the silicon tubes have stainless steel spring inside this is so a much tighter curve can be made.
▲
⟩⟩
hermank
BOATSHED
jbkiwi
Colin H
hibbard
RNinMunich
pressonreguardless
Seanympth
stevedownunder
|
💬 Re: Twin Rudders and water scoops
2 years ago by 🇬🇧 BOATSHED (
 Lieutenant) Lieutenant)✧ 91 Views · 0 Likes
Flag
Nice work, I like the stainless steel springs in the water coolinng scoop pipes. They can also be used as a filter for any weed or other debris that may get picked up in the cooling water. Great idea. I will have to try this myself.
▲
⟩⟩
No likes yet
This member will receive 1 point for every like received |
|
Login To
Remove Ads 💬 Re: Twin Rudders and water scoops
2 years ago by 🇺🇸 pressonreguardless (
Rear Admiral)✧ 176 Views · 0 Likes
Flag
Beautiful work!!
Very Clean Gives me something to strive for! Trev ▲
⟩⟩
No likes yet
This member will receive 1 point for every like received |
|
💬 Re: Twin Rudders and water scoops
2 years ago by 🇦🇺 stevedownunder (
Captain)✧ 182 Views · 2 Likes
Flag
Hi Mike,
Great description. Lovely home made components, as usual. Cheers, Stephen. ▲
⟩⟩
GaryLC
Seanympth
|
📝 Decking
2 years ago by 🇬🇧 mturpin013 ( Admiral)
Admiral)✧ 161 Views · 3 Likes · 1 Comment
Flag
💬 Add Comment
I forgot to mention in the last page that my grandson got the job of painting the inside of the hull. This is for me one of the most important steps in the build, it ensures the future integrity of the hull from ingress of water into the skins and bulkheads it’s really a preventative measure that will pay in the future. The second reason I have the internal hull painted is for purely the aesthetic look and the ease of finding things you subsequently drop into the hull during the continuing build, a light colour also helps in the search process. I usually give a couple of coats of Eze-Kote and then two coats of Hammarite.
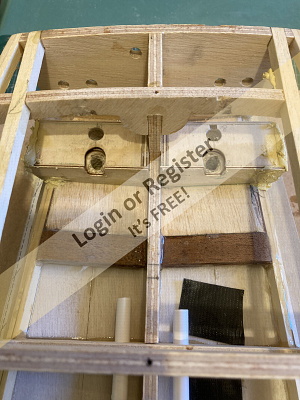
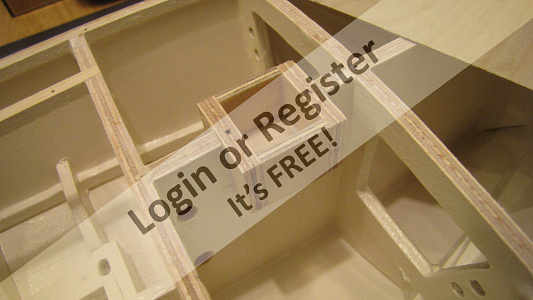
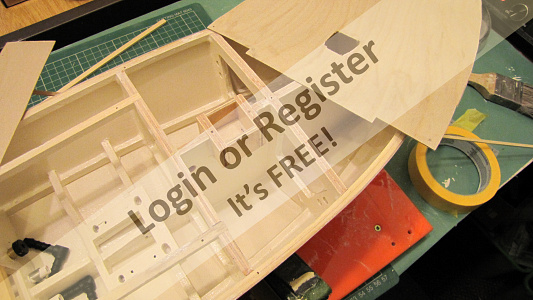
Now to the decking, a most important step in the build, make sure you have done all the things you need to do before the deck is finally secured. As well as the motor mounts I also wanted to put some additional blocks in the stern to support the water scoops and rudder posts, in addition I wanted the bow gun to rotate (a particular request by my grandson) so a mounting box was also built into the bow area to house a servo at deck level.
I used 0.8mm birch ply for the deck, first of all making a card template to cut an oversize piece of wood, I use 0.5 brass pins to initially pin the bow piece in place, then I did the same with the port and starboard sides, again using the brass pin to hold them in place and making sure the joints with the bow piece were a good fit. I initially made a stern piece but later decided that a removable hatch at the stern was needed as well as the massive hull hatch.
Now all three pieces are located buy pins I can remove them and mix up a batch of epoxy and start the sticking process, pressing the pins in first and then securing along the edges with further pins. Just a point I find that small gauge brass pins do not always readily stay straight when hit with a hammer so I always pre-drill the hole with a 0.3 mm drill. The whole assembly is left to set overnight.
(sorry don't know what's happened to the pictures
▲
⟩⟩
hermank
Colin H
stevedownunder
|
💬 Re: Decking
2 years ago by 🇦🇺 stevedownunder (
Captain)✧ 159 Views · 0 Likes
Flag
Great work Mike,
Looks like the photos have appeared, I also had problems loading photos last night, maybe there was a problem with the site. Cheers, Stephen. ▲
⟩⟩
No likes yet
This member will receive 1 point for every like received |
📝 removable deck
2 years ago by 🇬🇧 mturpin013 ( Admiral)
Admiral)✧ 155 Views · 4 Likes
Flag
💬 Add Comment
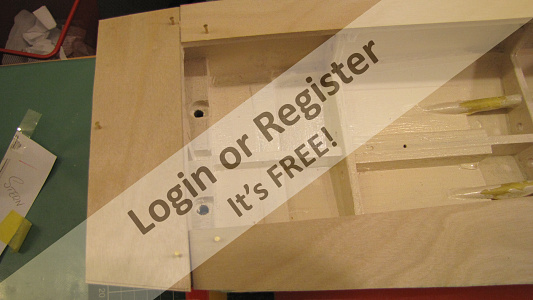
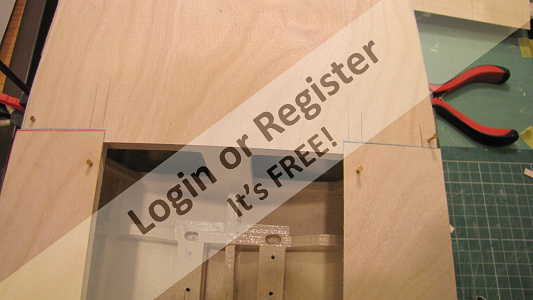
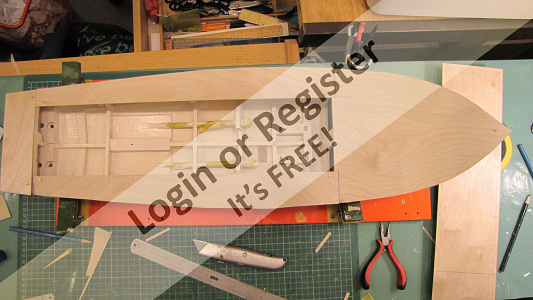
The plan shows a removable deck area so a frame was made within the area where the bulkheads had been removed. I made the frame allowing a card spacer between the frame and the aperture, then made the cross braces x 4 with the same curve as the main deck. These were glued in position and left to set.
The frame was then removed and the top made from 1/32 ply which was then glued to the frame using clamps to ensure the curvature was maintained.
The removable deck was then masked for the areas that needed to be a textured finish, this was done fairly early in the build process
The frame was then removed and the top made from 1/32 ply which was then glued to the frame using clamps to ensure the curvature was maintained.
The removable deck was then masked for the areas that needed to be a textured finish, this was done fairly early in the build process
▲
⟩⟩
hermank
jbkiwi
stevedownunder
Colin H
📝 Removable deck fittings
2 years ago by 🇬🇧 mturpin013 ( Admiral)
Admiral)✧ 150 Views · 6 Likes
Flag
💬 Add Comment
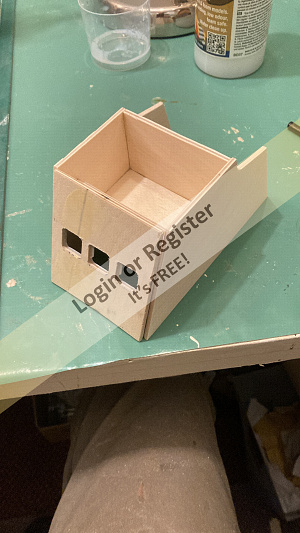
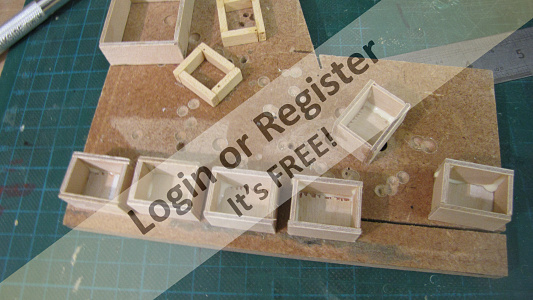
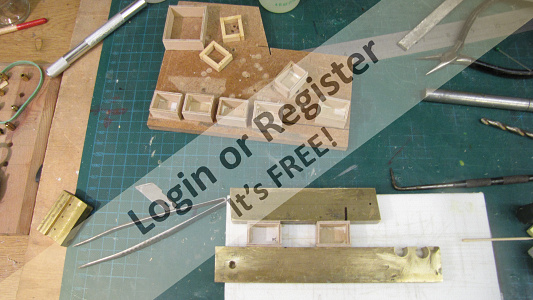
Cabin`
The first item to construct is the main cabin this is a simple construction consisting of 6 pieces. These were all cut out using the “copy onto sticky back paper and stick onto the ply” then cut out using the fret saw and finishing using the disc sander because the cabin has a floor and step in it the easiest way to construct it is to use 3mm x 3mm obeche and stick the profile onto each side panel this gives a solid frame to glue the floor and walls to . The whole assembly was glued all together using heavy pieces of brass bar to keep it square while it sets
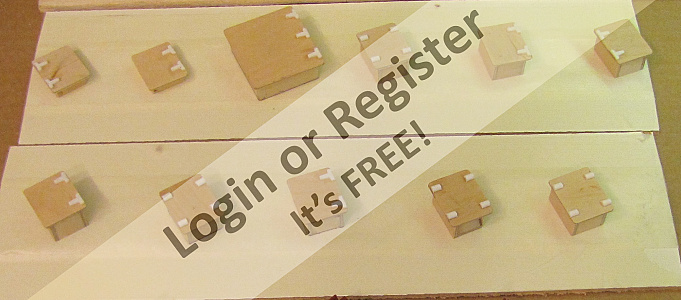
Ammunition boxes
In all there are 10 boxes to construct they are all the same foot print but with varying height. So I set the circular saw to cut the appropriate side panels and the top lids out of 1.5 mm ply.
I used a small jig made from scraps of wood to form a frame that would allow the side panels to be glued in fairly quick succession using the alephatic cement which dries very quickly. The next operation was to round the corners of the lids before they are stuck onto the boxes I then leave overnight to set completely. To make the boxes authentic they need some hinges these were made from a styrene “T” section so I set the circular saw to cut 1mm slices, cutting 20 plus pieces, these were deburred and then cemented using super glue to the lids.
The first item to construct is the main cabin this is a simple construction consisting of 6 pieces. These were all cut out using the “copy onto sticky back paper and stick onto the ply” then cut out using the fret saw and finishing using the disc sander because the cabin has a floor and step in it the easiest way to construct it is to use 3mm x 3mm obeche and stick the profile onto each side panel this gives a solid frame to glue the floor and walls to . The whole assembly was glued all together using heavy pieces of brass bar to keep it square while it sets
Ammunition boxes
In all there are 10 boxes to construct they are all the same foot print but with varying height. So I set the circular saw to cut the appropriate side panels and the top lids out of 1.5 mm ply.
I used a small jig made from scraps of wood to form a frame that would allow the side panels to be glued in fairly quick succession using the alephatic cement which dries very quickly. The next operation was to round the corners of the lids before they are stuck onto the boxes I then leave overnight to set completely. To make the boxes authentic they need some hinges these were made from a styrene “T” section so I set the circular saw to cut 1mm slices, cutting 20 plus pieces, these were deburred and then cemented using super glue to the lids.
▲
⟩⟩
hermank
Scratchbuilder
RedCatcher
stevedownunder
Graham93
Colin H


Login To
Remove Ads
Remove Ads