Join Us On Social Media!

|

|

|
Download The App!
Login To
Remove Ads
Remove Ads
Login To
Remove Ads
Remove Ads
Model Boats Website
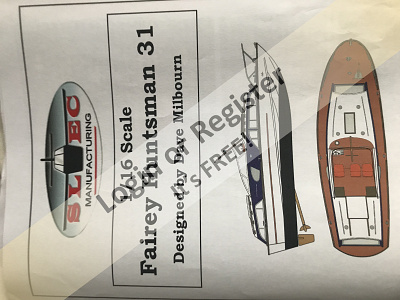
Fairey Huntsman 31
16 Posts · 16 Followers · 124 Photos · 139 Likes
Began 5 years ago by
 United Kingdom
Follow This Thread
Not currently following
> Click to follow
> Click to follow
Latest Post 5 years ago by
| Oldest posts shown first (Show Newest First) | (Print Booklet) |
📝 Fairey Huntsman 31
5 years ago by 🇬🇧 StuartE ( Chief Petty Officer 1st Class)
Chief Petty Officer 1st Class)✧ 34 Views · 3 Likes · 2 Comments
Flag
💬 Add Comment
Just purchased a new "Kit" from SLEC to build a Fairey Huntsman 31. This is only the second boat I'm building, the first being a Mowe 2 from an Aeronauts kit. 😆
▲
⟩⟩
sjacullen
BOATSHED
Martin555
|
💬 Re: Fairey Huntsman 31
4 years ago by 🇿🇦 redpmg (
 Commodore) Commodore)✧ 31 Views · 0 Likes
Flag
Try starting a new thread - get more attention than using this old one - you can also try the Model Boats Magazine site and ask Dave Milbourn for advice on the Huntsman as he is the Fairey expert as well as an electronics wizard. .
▲
⟩⟩
No likes yet
This member will receive 1 point for every like received |
|
💬 Re: Fairey Huntsman 31
4 years ago by 🇬🇧 Kennedy (
 Recruit) Recruit)✧ 31 Views · 0 Likes
Flag
Hi All.
As a newby to this site I hope you are able to help me. I am getting into building from scratch a 600mm Fairy Huntsman. Normally I am flying and building planes. Boats need something different ie reverse. I plan to use a brushless motor how do I reverse it at a sensible cost. Thanks Dave ▲
⟩⟩
No likes yet
This member will receive 1 point for every like received |
Login To
Remove Ads
Remove Ads
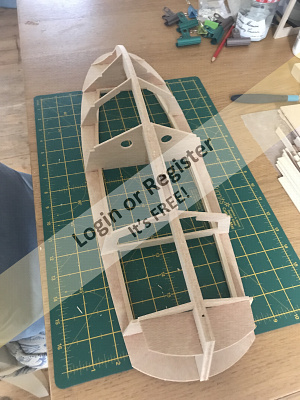
📝 Fist eager steps...easy!
5 years ago by 🇬🇧 StuartE ( Chief Petty Officer 1st Class)
Chief Petty Officer 1st Class)✧ 39 Views · 8 Likes · 1 Comment
Flag
💬 Add Comment
I opened the box, eager to start and quickly assembled the keel and base deck following the excellent and easy to read instructions and picture manuals....easy...I'll finish this in a week or two with a following wind and the wife and daughter being away on half term holidays!
▲
⟩⟩
sjacullen
Martin555
jacko
Colin H
BOATSHED
TOWN3810
marky
robbob
|
💬 Fist eager steps...easy!
5 years ago by 🇬🇧 robbob (
 Admiral) Admiral)✧ 32 Views · 1 Like
Flag
I do like the Huntsman, maybe I'll build one myself one day.
Following your blog with interest. Robbob. ▲
⟩⟩
BOATSHED
|
📝 First problem.......
5 years ago by 🇬🇧 StuartE ( Chief Petty Officer 1st Class)
Chief Petty Officer 1st Class)✧ 40 Views · 7 Likes · 3 Comments
Flag
💬 Add Comment
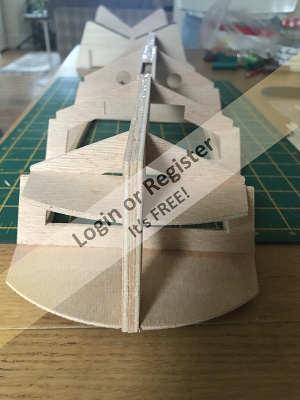
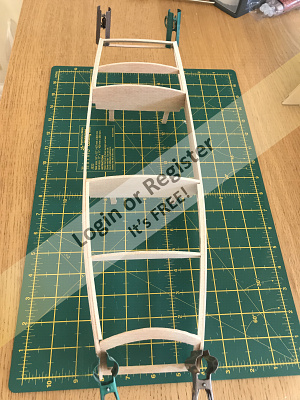
OK..... so after the first week and the excitement of getting the skeleton of the hull and keel in place I hit the first problem.....this is not a kit where everything is cut to the exact size, length, dimensions of the model. You have to do some cutting, sanding and getting out a modelling plane to get the parts supplied fitted.
This now requires some skill and careful fitting of the stringers. Basically they are 2 pieces of hardwood 1/8" x 1/4" cut to length and glued together and need to be shaped and held in place while the glue sets overnight...….not a simple task.
Next, to start fitting the hull skins, the stringers need to be shaped to 2 angles. One for the bottom skins and a different angle for the side skins.
Taking too much of the stringers off by using a plane will mean the skins don't lie at the correct angles for gluing….gently does it!!
I take my time and check angles after each pass of the plane over the stringers...WOW stressful, but all's well with the first 2 bottom skins!
In addition the Keel needs to be trimmed to the exact angles of the bottom skins so they overlap or butt up against each other.
My advice here is to follow the instructions to the letter or you'll probably be using far more P38 in the later stages filling holes and gaps!!
NOTE: The bottom and side skins are cut oversize, so they don't fit exactly to the stringers.
▲
⟩⟩
sjacullen
Martin555
jacko
Colin H
BOATSHED
TOWN3810
Donnieboy
|
💬 First problem.......
5 years ago by 🇬🇧 StuartE (
Chief Petty Officer 1st Class)✧ 39 Views · 2 Likes
Flag
Yes. The biggest enemy of making this model is patience! Thankyou for you responses...
▲
⟩⟩
BOATSHED
Donnieboy
|
|
Login To
Remove Ads 💬 First problem.......
5 years ago by 🇬🇧 Brianaro (
 Petty Officer 1st Class) Petty Officer 1st Class)✧ 33 Views · 2 Likes
Flag
Hello Stuart, all part of the challenge I’m afraid, but rewarding once you have used your skills and cracked it. I’ve yet to build a model of anything, especially with wood, where everything is cut to fit, ( I’m not sure if that is really possiible) Fairey Huntsman is a lovely craft to build and plenty of references if needed to the detail of the real boat from
▲
⟩⟩
BOATSHED
Donnieboy
|

|
💬 First problem.......
5 years ago by 🇬🇧 robbob (
Admiral)✧ 34 Views · 3 Likes
Flag
Hi Stuart.
Progressing well but don't rush it! Mistakes are easy to make and harder to fix so I spend more time planning to do something than doing it 😁. Robbob. ▲
⟩⟩
BOATSHED
RNinMunich
Donnieboy
|
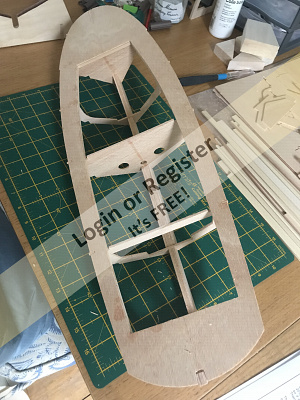
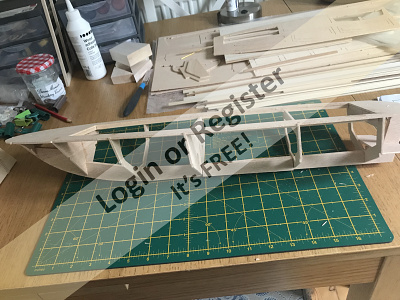
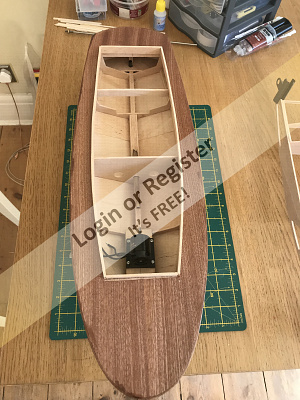
📝 Hull progressing nicely!
5 years ago by 🇬🇧 StuartE ( Chief Petty Officer 1st Class)
Chief Petty Officer 1st Class)✧ 42 Views · 9 Likes · 1 Comment
Flag
💬 Add Comment
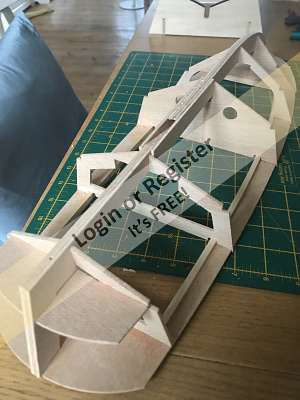
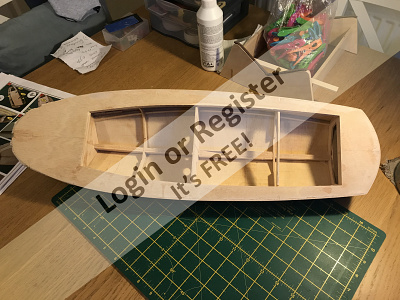
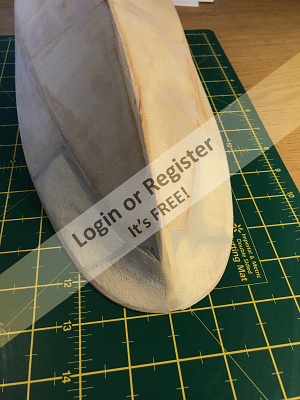
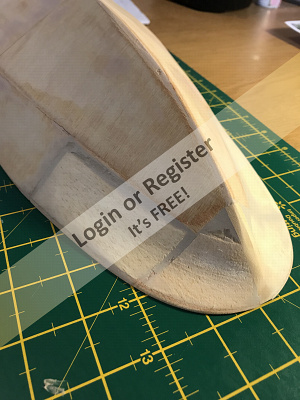
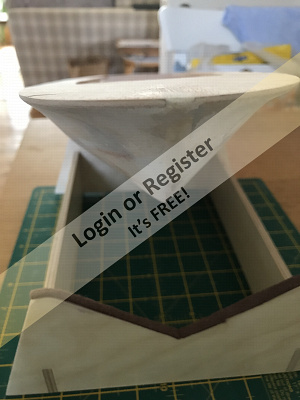
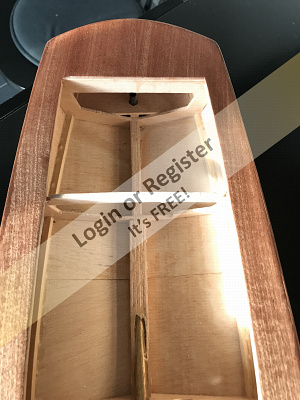
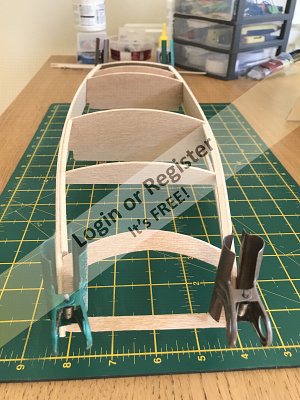
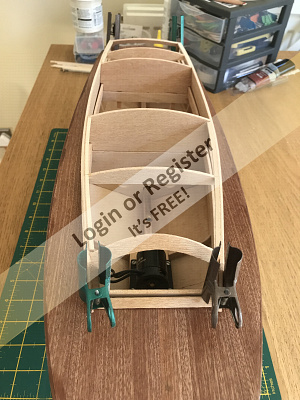
OK, so the last 2 posts on the blog were from work undertaken three weeks ago. I am now up to the present day and have spent the whole week and weekend in getting the bottom and side skins on the skeleton of the hull and putting on the transom. Because the curves of the hull are quite specific on the Huntsman, only one piece of skin can be fitted at a time, and then trimmed into place before the next piece of skin will fit.
In the previous post I mentioned all the laser cut pieces are cut oversize.....fitting the skins was a real challenge!
Following the instructions at this stage went out the window and I fitted the skins in the reverse order, but feel it was the best option. The instructions say built from the bow first and work back to the transom, but impossible to fit the pieces in this order, so I started with the aft and worked forwards.
It also mentions to overlap the side skins with the bottom skins, but all I could manage was to butt the pieces together with a tight fit and fill with P38 afterwards.
The pictures show the completed skins, trimmed, sanded and gaps filled with P38 and then sanded again.
It now takes on a good shape, however the difficult pieces on the bow are still to be completed. These are formed of 4 pieces of solid balsa wood that need to be cut and sanded to multiple curves...… next weeks job!
Once this is done then its on to filling again and re-sanding and finishing. Hopefully it would look more like a Huntsman Hull rather than a hammer head shark!
▲
⟩⟩
sjacullen
Martin555
jacko
Colin H
BOATSHED
Brianaro
TOWN3810
Donnieboy
mturpin013
|
💬 Hull progressing nicely!
5 years ago by 🇬🇧 BOATSHED (
 Lieutenant) Lieutenant)✧ 33 Views · 2 Likes
Flag
I hate the idea of having to shape the balsa front ends. I have in the past re cut the bottom skins on 1/16th marine ply and steamed and pinned with small brass nails. But if that model is all balsa you couldn't do that but if the bulkheads are ply and chine stringers then it is possible.
▲
⟩⟩
Martin555
Donnieboy
|
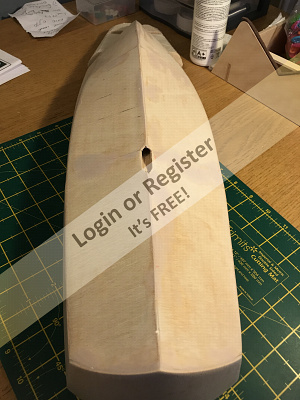
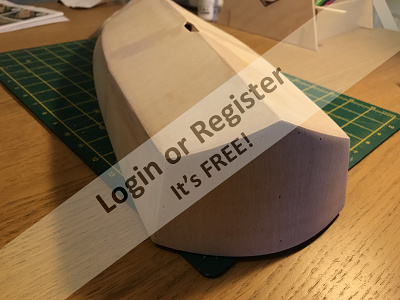
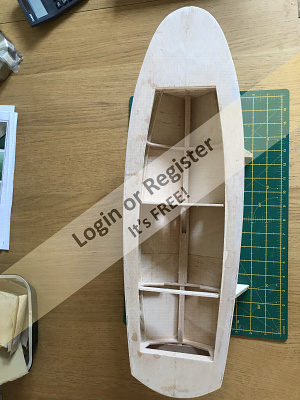
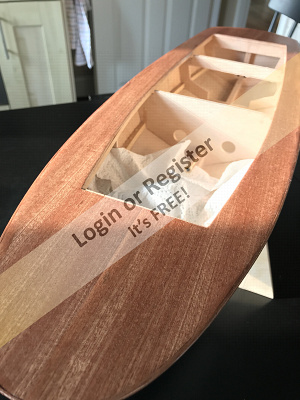
📝 Basic hull construction completed
5 years ago by 🇬🇧 StuartE ( Chief Petty Officer 1st Class)
Chief Petty Officer 1st Class)✧ 48 Views · 13 Likes · 8 Comments
Flag
💬 Add Comment
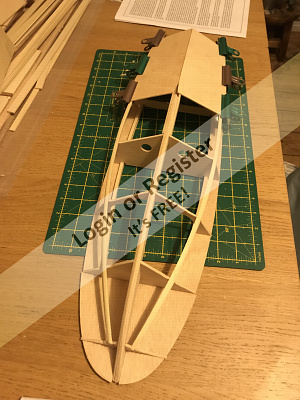
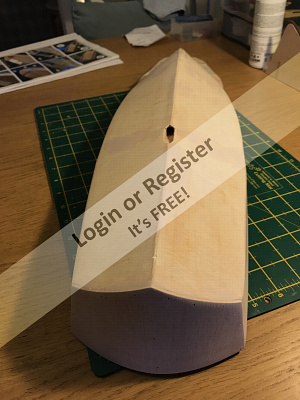
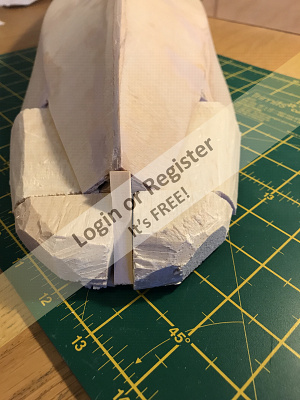
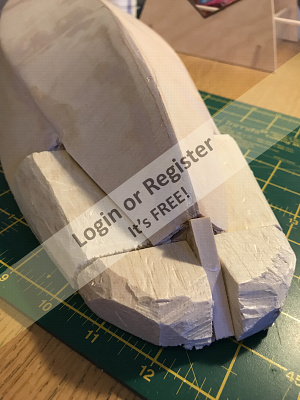
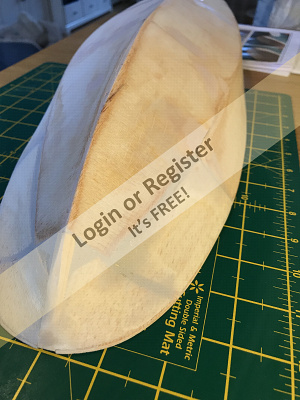
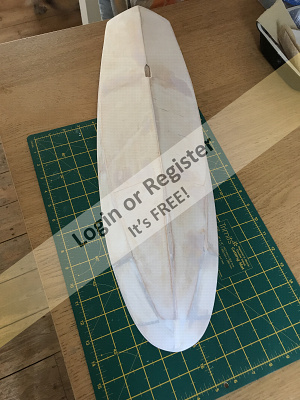
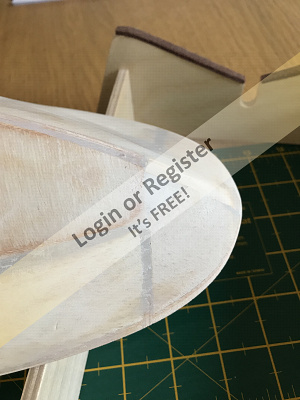
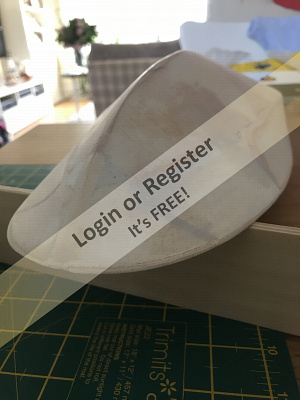
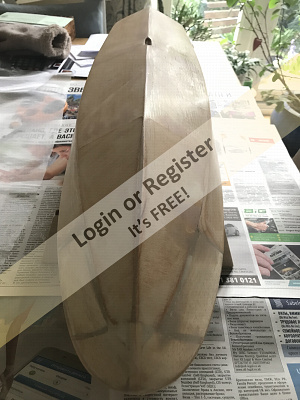
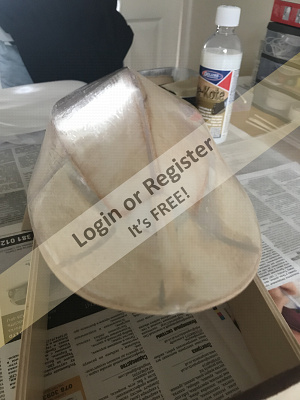
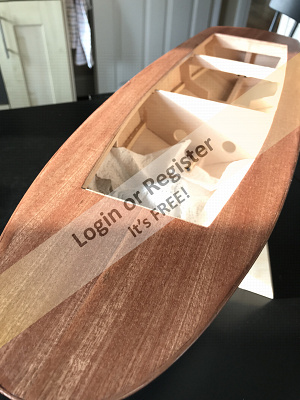
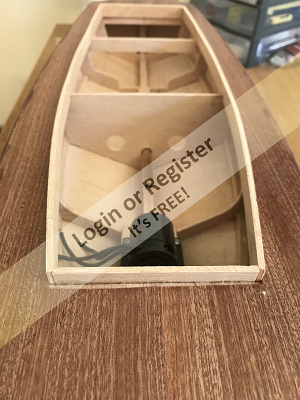
This week has been about getting the basic hull construction completed and especially the tricky bow. This was done in three stages; the first group of pictures shows the four balsa blocks being roughly sanded to shape. The instructions were good here as they recommended the required curves be shaped using sandpaper wrapped around an aerosol can....This being achieved, the next stage was to fill all the gaps around the balsa blocks with P38 and sand back to smooth out the curves. The 3rd stage was to fully coat the entire hull with Balsa Lite fine surface filler and sand back to wood so that all the fine grain imperfections are filled. I'm very happy with the results, but now concerned that too much has been sanded off the bow to get those curves...What do you think? 😉
Next stage is to apply a couple of thin coats of sanding sealer and then onto covering with 35gsm lightweight glassfibre fabric and Eze-Kote to give the hull more strength and durability.

Next stage is to apply a couple of thin coats of sanding sealer and then onto covering with 35gsm lightweight glassfibre fabric and Eze-Kote to give the hull more strength and durability.
▲
⟩⟩
sjacullen
Madwelshman
Martin555
Inkoust
jacko
Colin H
mturpin013
doghouse
Brianaro
TOWN3810
BOATSHED
Donnieboy
Rowen
|
💬 Basic hull construction completed
5 years ago by 🇦🇺 ChrisB (
Petty Officer 1st Class)✧ 33 Views · 2 Likes
Flag
Great work on the hull Stuart. I built the same kit last year and really enjoyed the project, the Huntsman is an awesome looking craft too and super light weight. in mine I’ve experimented with a few different brushed motors, trying to get scale speed versus “play time” balance. I landed on a 35 turn which at half speed is pretty good for scale speed and at full noise it really gets up and moves for a bit of fun. The last few runs I’ve seen up to 25-30 mins from a 7.2v Ni-Mh pack which has been great. Look forward to seeing your progress, all the best and enjoy the build.
▲
⟩⟩
StuartE
BOATSHED
|
|
Login To
Remove Ads 💬 Basic hull construction completed
5 years ago by 🇬🇧 vortex (
 Master Seaman) Master Seaman)✧ 36 Views · 2 Likes
Flag
Nice hard work, well done i now usually get a glass fibre hull if i can. Ive run mine with Irvine 40, and 2 different brushless, 2075 kva and 1150 motors and all performed well 3 or 4 cell lipos, go for the biggest capacity 5200`s as the weight is no problem and double your run time. Pic shows latest motor i think its 2900 kva ill try it out soon. I seem to use the Huntsman then take the motors out for other projects
▲
⟩⟩
BOATSHED
StuartE
|
|
💬 Basic hull construction completed
5 years ago by 🇬🇧 ChrisF (
 Lieutenant Commander) Lieutenant Commander)✧ 37 Views · 2 Likes
Flag
Hi Stuart - I have a Huntress which is the same length as your Huntsman which was built by Dave M. it will be a little lighter as it doesn't have an aft cabin. it is fitted with a Turnigy D2836/11 750kV so the one recommended to you is a good choice.
Chris ▲
⟩⟩
Kennedy
BOATSHED
|
|
💬 Basic hull construction completed
5 years ago by 🇬🇧 BOATSHED (
Lieutenant)✧ 32 Views · 1 Like
Flag
very nice bit of shaping on the balsa there and filling. I purchased a Perkasa MTB hull off of a boot fair and that part they have done is awful. I have got to sort that out. As far as the motor size goes, I put a 10 cc Irvine engine in a model boat that should only have had a 7.5cc in it. it went like stink. But even then it would all depend on how you use your throttle control. I would myself still go larger than instructions say but that's because I'm a speed freak. Flat out on the straight and test to the extreme on turn's. Turned a couple upside down as well and still was able to carry on running once recovered. I always take a telescopic fishing rod with me with a weight and floating line for recovery.
▲
⟩⟩
Martin555
|
|
💬 Basic hull construction completed
5 years ago by 🇬🇧 StuartE (
Chief Petty Officer 1st Class)✧ 38 Views · 2 Likes
Flag
No. The motor size is not in the instructions, but from a previous forum post I've been recommended a 28xx Brushless 1100Kv with a 11.1V 2200Mah LiPo battery.
Yes. I have that edition and following the editorial. it is a more detailed version of the instructions as both written by Dave Milbourne. 👍 ▲
⟩⟩
BOATSHED
mturpin013
|
|
💬 Basic hull construction completed
5 years ago by 🇬🇧 ChrisF (
Lieutenant Commander)✧ 36 Views · 1 Like
Flag
I guess you will only be able to tell properly is when it's primered. I suppose you could always fill it and resand - that will be my fallback position!
Is the motor size in the instructions? Had a look at a build article and it's not in there. if you haven't got it it's well worth getting because as well as the build of that very kit Dave Milbourn has written an article on finishing nd painting which I'm reffering to. it's the Model Boats Winter Special Edition 2018. Chris ▲
⟩⟩
BOATSHED
|
|
💬 Basic hull construction completed
5 years ago by 🇬🇧 StuartE (
Chief Petty Officer 1st Class)✧ 38 Views · 2 Likes
Flag
Hi Chris. Thanks for your feedback.....I thought so too, but I suppose its too late to change that now and we'll just have to see what it looks like after the glassfibre application. it probably won't affect performance, just the looks!😎
It's my first attempt at a hull like this, so can only learn from the experience. ▲
⟩⟩
BOATSHED
mturpin013
|
|
💬 Basic hull construction completed
5 years ago by 🇬🇧 ChrisF (
Lieutenant Commander)✧ 34 Views · 1 Like
Flag
Hi Stuart - I'm scratch building a Swordsman, albeit larger than your Huntsman as I'm building at 1:12, so 33" long. I haven't worked on it for a few weeks but am at a similar stage with the hull in that I'm just about to sand the concave into the bow to form the flare. This is a stressful part and I might delay it and start on the superstructure!
From the photos it's difficult to tell if you have overdone it or not due to the different materials breaking up the lines. it looks OK head on and from the side but when looking down towards the keel it does look a little excessve. I'm going to be building a Huntsman 31 as well soon but again at 1:12 so will be from plans, either existing or my own. I've got three Fairey builds on the go at the moment and another on the drawing board, well PC. Chris ▲
⟩⟩
BOATSHED
|
📝 Hull finishing touches
5 years ago by 🇬🇧 StuartE ( Chief Petty Officer 1st Class)
Chief Petty Officer 1st Class)✧ 48 Views · 10 Likes · 1 Comment
Flag
💬 Add Comment
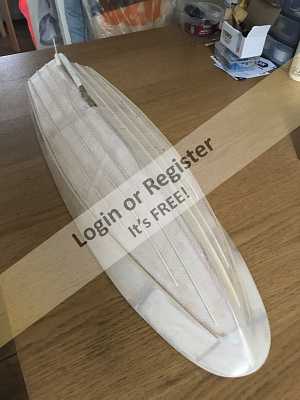
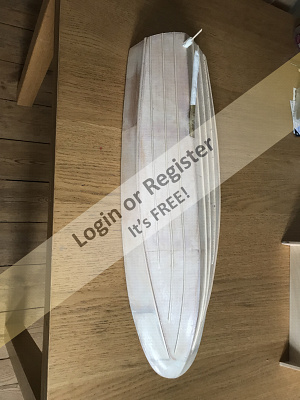
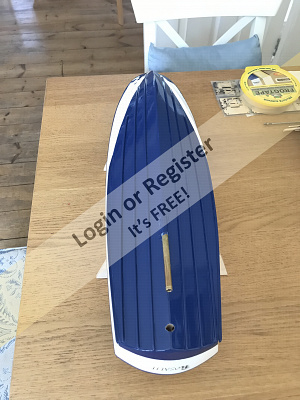
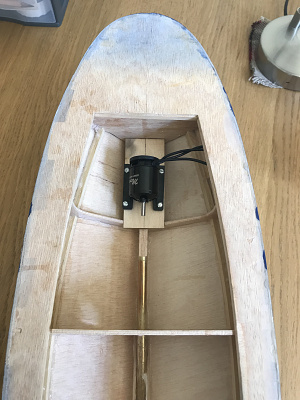
The Huntsman Hull has now had the finishing touches applied...Sanding Sealer, Eze-Kote, glassfibre sheet and hull chine bars added. The inside of the hull has been given a good dollop of Eze-Kote to seal it and waterproof it so next job is to fit the prop tube and motor before the whole hull gets a coat of primer...
I've only just realised, but the kit from SLEC does not contain any decking, so I need to sort out whether to just go for plain mahogany veneer or try to find teak decking which is laser cut to fit with plank marks....any help or advice here welcome for a novice! (I can't find anything suitable on the internet). 😡

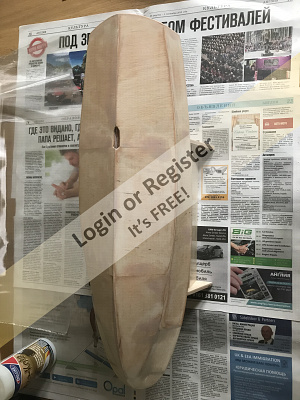


I've only just realised, but the kit from SLEC does not contain any decking, so I need to sort out whether to just go for plain mahogany veneer or try to find teak decking which is laser cut to fit with plank marks....any help or advice here welcome for a novice! (I can't find anything suitable on the internet). 😡
▲
⟩⟩
sjacullen
Madwelshman
Martin555
jacko
Colin H
mturpin013
BOATSHED
figtree7nts
Donnieboy
doghouse
|
💬 Hull finishing touches
5 years ago by 🇬🇧 ChrisF (
Lieutenant Commander)✧ 37 Views · 2 Likes
Flag
Stuart - as you can see from the article in Model Boats, Colin has fitted a contrasting timber to the perimeter of the hull and up the centre of the bow and then infilled with planking.
Another method is to veneer the deck and just varnish it or drawn lines on it with Biro or pencil before varnishing. SLEC do laser etched ply but the planks are straight. Really it depends on how accurate you want the result to be and how much time you want to spend on it. With my Huntsman 28 build I'm just using birch ply and varnishing it whilst with my larger Swordsman 33 (but same scale) I'm going the whole hog and planking it. Chris ▲
⟩⟩
BOATSHED
Colin H
|
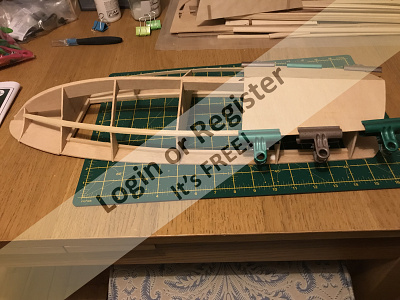
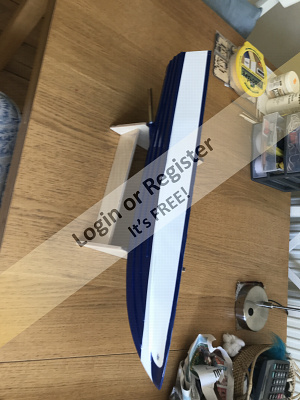
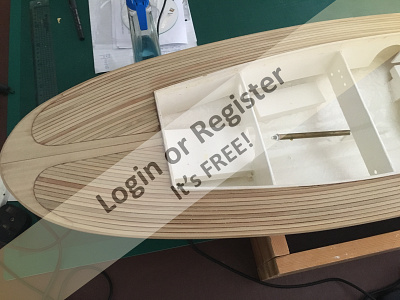
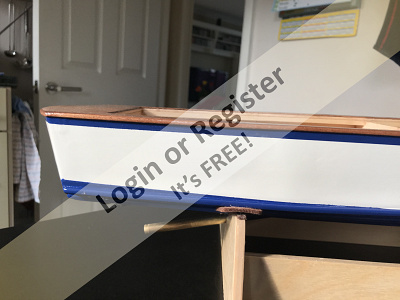
📝 Ready for the Paint job!
5 years ago by 🇬🇧 StuartE ( Chief Petty Officer 1st Class)
Chief Petty Officer 1st Class)✧ 70 Views · 10 Likes
Flag
💬 Add Comment
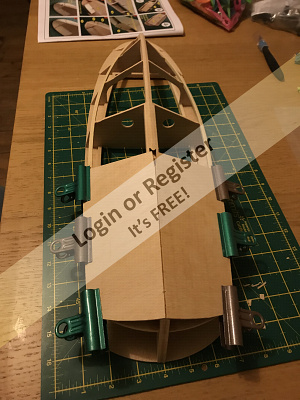
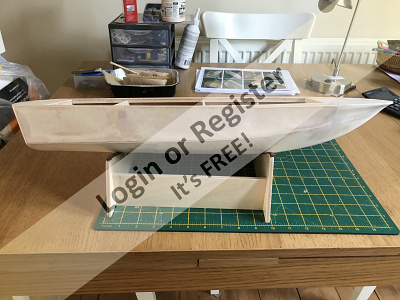
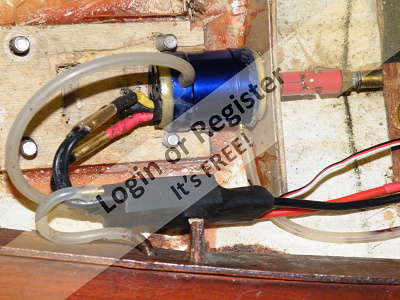
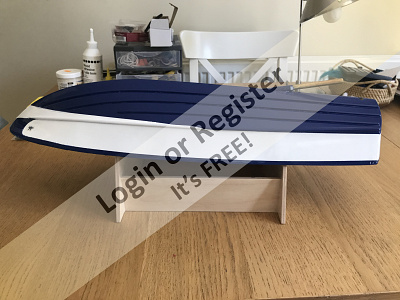
Following the completion of the basic hull build, I installed the prop shaft and motor ( Mtroniks Hydra 15A) and all lined up nicely. Next, drilled the hole ready for the rudder assembly to be inserted and it all fits perfectly vertical to my great delight. Its now masked up and ready for the hull paint job which will start with a primer filler layer followed by white primer, then brilliant white gloss with an Ink Blue design and black anti-foul keel.
I'm just waiting for the shed to warm up a bit and reduce the humidity as the wife wil definitely kick me out if I spray indoors. She just about allows me to do the build in the dining room, but only when she's out!

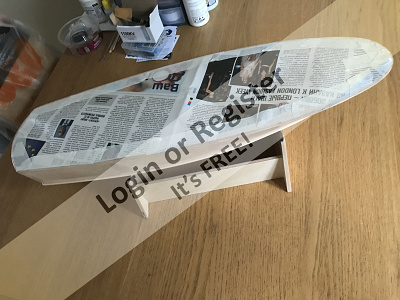
I'm just waiting for the shed to warm up a bit and reduce the humidity as the wife wil definitely kick me out if I spray indoors. She just about allows me to do the build in the dining room, but only when she's out!
▲
⟩⟩
sjacullen
BOATSHED
Madwelshman
Martin555
jacko
Colin H
mturpin013
marky
boatiebennett
robbob
📝 Hull Paint job complete
5 years ago by 🇬🇧 StuartE ( Chief Petty Officer 1st Class)
Chief Petty Officer 1st Class)✧ 71 Views · 10 Likes · 8 Comments
Flag
💬 Add Comment
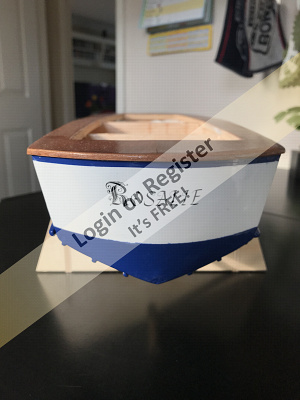
So.... Patience is not one of my strong points and paint spraying is definately not. I don't have the facilities or the right equipment to create a first class excellent paint job, so this part of the build was always going to be a challeng and it proved to be right.
the first primer layer went on great and it looked good, followed by a layer of brilliant appliance white from a large can from my local Halfords.....all looked perfect. Then came the masking and application of the Capri Blue hull and pinstriping at deck level. Well, this didn't go great as I couldn't get the hull line correct as it shows on real life Huntsmans or the instruction sheet. In addition, the Frog tape I used, lifted in places over the hull stringers and was a real mess......it had to come off!
A re-application of primer and white gloss coat followed, and with more patience than I thought I had, managed to mask up again for the Blue Hull. I learnt from the first mistake and made sure that the stirngers were masked on all sides first, then added a solid masking strip all the way down the hull.
Although not perfect the results can be see here in the pictures.
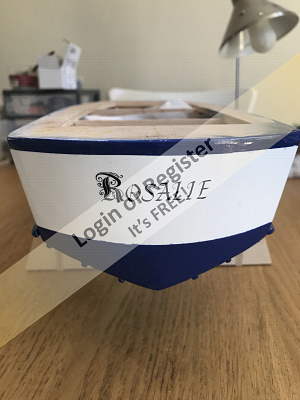
I decided that I'd add a couple of layers of Halfords clear laquer to finish of the paint job to create a tough, clear, glossy finish, but before this decided to name the boat by using lettraset. Here I learnt a second and third valuable lesson.....make sure the paint is completely dry first and also don't spray too much laquer in one place......it makes the paint run into the laquer!!! The results can be seen on the bow.
Oh well, I tried my best and not going to re-do it now.
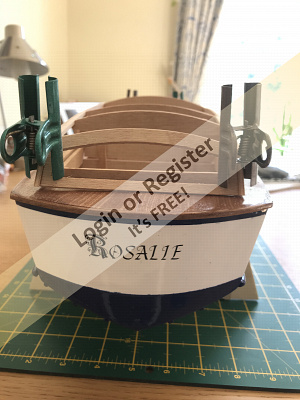
So, Rosalie hull is now painted and its time to do the decking.
For this I am going to use thin sheets of mahogany. They were not provided as part of the kit so had to appeal to SLEC who kindly sent me two sheets of mahogany for this purpose. Thank you SLEC for being understanding that a "Kit" should contain all that's necessary to build it and not have to go and find more pieces to buy.
Judge the paint job for yourself and don't be tooo critical as its only my second boat build.😋


the first primer layer went on great and it looked good, followed by a layer of brilliant appliance white from a large can from my local Halfords.....all looked perfect. Then came the masking and application of the Capri Blue hull and pinstriping at deck level. Well, this didn't go great as I couldn't get the hull line correct as it shows on real life Huntsmans or the instruction sheet. In addition, the Frog tape I used, lifted in places over the hull stringers and was a real mess......it had to come off!
A re-application of primer and white gloss coat followed, and with more patience than I thought I had, managed to mask up again for the Blue Hull. I learnt from the first mistake and made sure that the stirngers were masked on all sides first, then added a solid masking strip all the way down the hull.
Although not perfect the results can be see here in the pictures.
I decided that I'd add a couple of layers of Halfords clear laquer to finish of the paint job to create a tough, clear, glossy finish, but before this decided to name the boat by using lettraset. Here I learnt a second and third valuable lesson.....make sure the paint is completely dry first and also don't spray too much laquer in one place......it makes the paint run into the laquer!!! The results can be seen on the bow.
Oh well, I tried my best and not going to re-do it now.
So, Rosalie hull is now painted and its time to do the decking.
For this I am going to use thin sheets of mahogany. They were not provided as part of the kit so had to appeal to SLEC who kindly sent me two sheets of mahogany for this purpose. Thank you SLEC for being understanding that a "Kit" should contain all that's necessary to build it and not have to go and find more pieces to buy.
Judge the paint job for yourself and don't be tooo critical as its only my second boat build.😋
▲
⟩⟩
sjacullen
BOATSHED
Madwelshman
Martin555
Inkoust
robbob
jacko
Colin H
JOHN
figtree7nts
|
💬 Re: Hull Paint job complete
5 years ago by 🇬🇧 StuartE (
Chief Petty Officer 1st Class)✧ 64 Views · 1 Like
Flag
WoW. Fantastic planking!. How long did that take? I dont think I could attempt that so I'm just using Mahogany sheet for the decking like the instructions show. What wood have you used to get that effect?
▲
⟩⟩
BOATSHED
|
|
Login To
Remove Ads 💬 Re: Hull Paint job complete
5 years ago by 🇬🇧 StuartE (
Chief Petty Officer 1st Class)✧ 64 Views · 1 Like
Flag
Many thanks for the idea.
▲
⟩⟩
BOATSHED
|
|
💬 Re: Hull Paint job complete
5 years ago by 🇬🇧 StuartE (
Chief Petty Officer 1st Class)✧ 64 Views · 1 Like
Flag
Hi Colin, thanks. The Fairey decals came with the kit from SLEC.
▲
⟩⟩
BOATSHED
|
|
💬 Re: Hull Pint job complete
5 years ago by 🇬🇧 Brianaro (
Petty Officer 1st Class)✧ 57 Views · 7 Likes
Flag
The painting, lining and masking is never easy. I’m at a similar stage to you, I’ve just finished planking the deck, a lengthy task, now it needs sanding flat and varnishing
▲
⟩⟩
ChrisG
renew
sjacullen
BOATSHED
Madwelshman
MouldBuilder
RNinMunich
|
|
💬 Re: Hull Pint job complete
5 years ago by 🇬🇧 Rookysailor (
Commodore)✧ 54 Views · 1 Like
Flag
Nice paint job Stuart, particular the bow scoop and logo, a trim line to Finnish it, and you will have the envy at the pool side.👍
Peter ▲
⟩⟩
BOATSHED
|
|
💬 Re: Hull Pint job complete
5 years ago by 🇬🇧 mturpin013 (
Admiral)✧ 55 Views · 2 Likes
Flag
Each modeler has different abilities and you should be proud of your achievements the paint job looks OK but you could easily improve the joint lines with some pinstripe tape a nice 2mm yellow would look good.
▲
⟩⟩
BOATSHED
RNinMunich
|
|
💬 Re: Hull Pint job complete
5 years ago by 🇬🇧 Colin H (
 Fleet Admiral) Fleet Admiral)✧ 54 Views · 1 Like
Flag
Looks a lot better than mine, now you've had the practice can I send you a couple of huntsmen that need repainting.
Even the colour scheme is great. I like the Fairey decals, where did you locate them. Super job, keep up the good work matey, looking forward to seeing it on the water. Cheers Colin. ▲
⟩⟩
BOATSHED
|
|
💬 Re: Hull Pint job complete
5 years ago by 🇺🇸 figtree7nts (
Admiral)✧ 55 Views · 2 Likes
Flag
Hi Stuart,
That very good considering it's your second boat and all!👍 I like the way she's coming out. Job well done! Cheers, Ed ▲
⟩⟩
jacko
Colin H
|
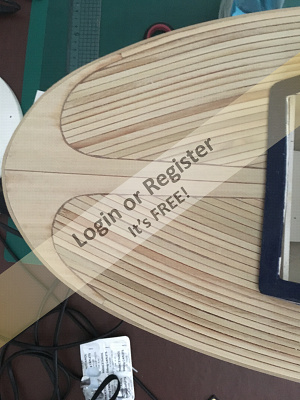
📝 Decking added
5 years ago by 🇬🇧 StuartE ( Chief Petty Officer 1st Class)
Chief Petty Officer 1st Class)✧ 70 Views · 10 Likes
Flag
💬 Add Comment
With the Hull paint job complete, the next stage of the build was to add the decking and rubbing strip. Being a novice at this I decided the best option was not to go for a complicated deck....KISS!!
So I opted for solid mahogany. Veneer was not included in the kit, but the nice people at SLEC sent me a 2mm solid sheet to make the decking out of. The instructions said to make the decking out of 6 pieces, 2 for the aft deck, 2 pieces port and starboard and 2 for the bow. I went for just the 2 pieces, one port side and one starboard as I didn't want to see too many joins. Cutting was a little tricky as I didnt want a large piece splitting, but a solid support for the cutting table and a sharp scalpel did the trick.
However, as throughout this build I learnt another valuable lesson, dont use a water based glue to attach bare wood to bare wood, especially one so thin....result are it bows and curls and distorts in all the wrong places. Use a two part contact adhesive! I weighed down the two pieces of decking for the entire deck and it eventually laid flat.
I finished it off with mahogany 1/8" x 1/4" strip all round the deck for the rubbing strip, sanded and then varnished with 3 coats of satin yatch varnish. I think the results are good, but judge for yourself....
Now its onto the superstructure....😎😜
▲
⟩⟩
ChrisG
renew
sjacullen
BOATSHED
Madwelshman
Martin555
Brianaro
Colin H
Donnieboy
robbob
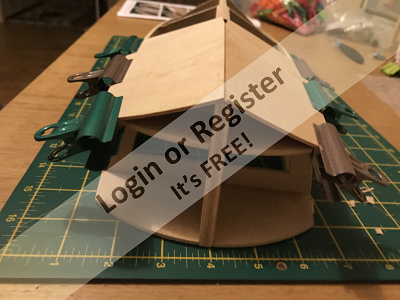
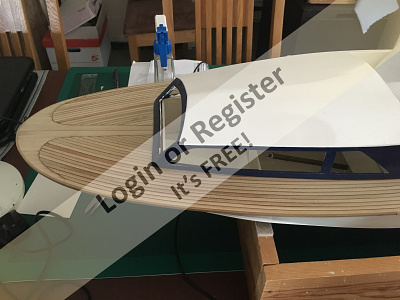
📝 Now onto the Superstructure
5 years ago by 🇬🇧 StuartE ( Chief Petty Officer 1st Class)
Chief Petty Officer 1st Class)✧ 74 Views · 10 Likes
Flag
💬 Add Comment
Now the hull is complete, instead of putting in all the electrics, I decided to start the superstructure build. As per the instructrions and to get a good snug fit on the hull, it has to be built on the hull. It's going well at present and no real worries yet!
Skeleton is complete, now onto the roofs and cockpit. I have decided to do roof in sheets of balsa 3mm thick rather than the 3/32" planks that the instructions suggest....that seems like a disaster waiting to happen for a novice! 😎

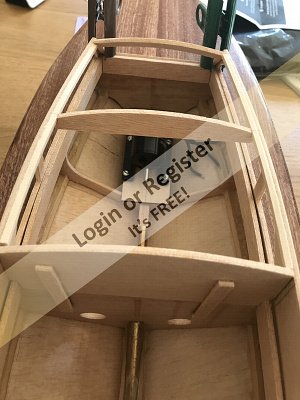
Skeleton is complete, now onto the roofs and cockpit. I have decided to do roof in sheets of balsa 3mm thick rather than the 3/32" planks that the instructions suggest....that seems like a disaster waiting to happen for a novice! 😎
▲
⟩⟩
renew
sjacullen
Kennedy
BOATSHED
Madwelshman
Martin555
Brianaro
Colin H
figtree7nts
JOHN


Login To
Remove Ads
Remove Ads