Join Us On Social Media!

|

|

|
Download The App!
Login To
Remove Ads
Remove Ads
Login To
Remove Ads
Remove Ads
Model Boats Website
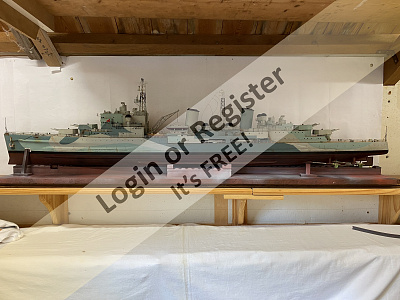
Graupner HMS Belfast 1:150.
16 Posts · 15 Followers · 272 Photos · 166 Likes
Began 1 year ago by
 United Kingdom
Follow This Thread
Not currently following
> Click to follow
> Click to follow
Latest Post 1 year ago by
| Most recent posts shown first (Show Oldest First) | (Print Booklet) |
📝 HMS Belfast Update No 15.Finally!!
1 year ago by 🇬🇧 Scratchbuilder ( Vice Admiral)
Vice Admiral)✧ 36 Views · 9 Likes · 2 Comments
Flag
💬 Add Comment
Evening Gents.
Well,quite a journey with HMS Belfast.
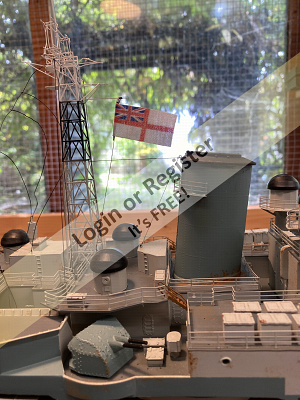
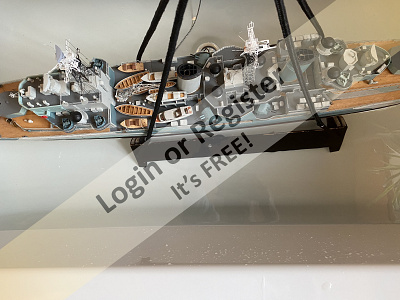
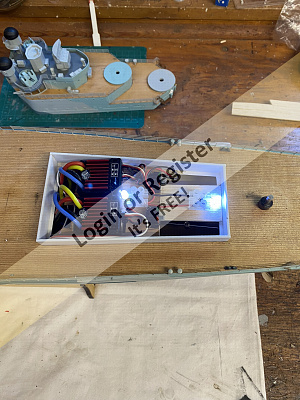
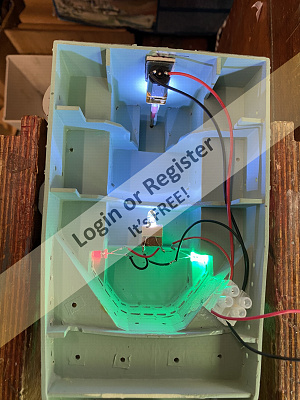
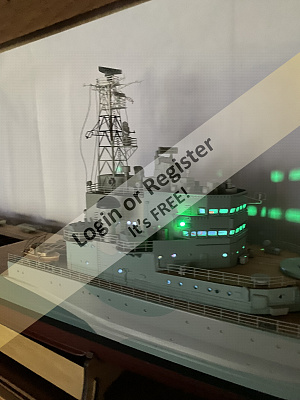
Yesterday I finally sorted the lighting and post one picture taken in the dark showing the internal lighting.
You will need to focus on the picture to see the outline of the ship.
I won’t be sailing in such darkness,but it’s good to see.
I then raised the White Ensign and Belfast is back in commission 😆.
I will post the video when I get her on the water,but I am not sure when that will be because of ongoing health issues that restrict what I can do.
I would struggle at the lakeside at this time ☹️.
I hope you have enjoyed this blog and thank you for reading.
SO!…what’s next?.
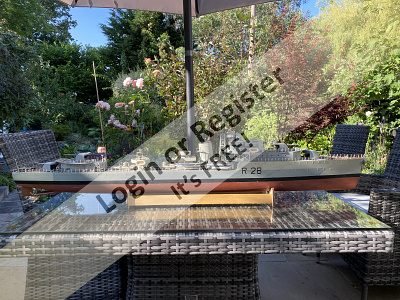
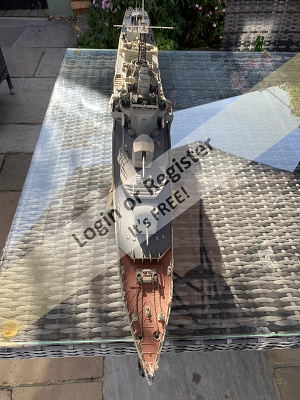
HMS Verulam R28… a WW2 V class destroyer.
Original model built by me in 1989 and in desperate need of a refit especially internally after nearly sinking two years ago.
Will start a blog soon.
Take care all.
Regards
Bill.


Well,quite a journey with HMS Belfast.
Yesterday I finally sorted the lighting and post one picture taken in the dark showing the internal lighting.
You will need to focus on the picture to see the outline of the ship.
I won’t be sailing in such darkness,but it’s good to see.
I then raised the White Ensign and Belfast is back in commission 😆.
I will post the video when I get her on the water,but I am not sure when that will be because of ongoing health issues that restrict what I can do.
I would struggle at the lakeside at this time ☹️.
I hope you have enjoyed this blog and thank you for reading.
SO!…what’s next?.
HMS Verulam R28… a WW2 V class destroyer.
Original model built by me in 1989 and in desperate need of a refit especially internally after nearly sinking two years ago.
Will start a blog soon.
Take care all.
Regards
Bill.
▲
⟩⟩
jbkiwi
AlessandroSPQR
MouldBuilder
dave976
RNinMunich
boatmam
AndyN
chugalone100
Doogle
|
💬 Re: HMS Belfast Update No 15.Finally!!
1 year ago by 🇺🇸 chugalone100 (
 Sub-Lieutenant) Sub-Lieutenant)✧ 37 Views · 4 Likes
Flag
Scratch builder
Congratulations again with all the work done in your Belfast. I really like your building attitude, you finish one and the other is already in the working table. It takes a lot to do that. 
▲
⟩⟩
AlessandroSPQR
MouldBuilder
RNinMunich
Scratchbuilder
|
|
💬 Re: HMS Belfast Update No 15.Finally!!
1 year ago by 🇬🇧 Doogle (
 Commodore) Commodore)✧ 35 Views · 3 Likes
Flag
Very nice Bill, congratulations on finishing such a superb model. Looking forward to seeing her sailing as and when you're up to it plus your new venture. 😀
▲
⟩⟩
AlessandroSPQR
Scratchbuilder
chugalone100
|
Login To
Remove Ads
Remove Ads
📝 HMS Belfast Update No 14.Trim tests.
1 year ago by 🇬🇧 Scratchbuilder ( Vice Admiral)
Vice Admiral)✧ 48 Views · 13 Likes · 1 Comment
Flag
💬 Add Comment
Morning Chaps.
Firstly please note that I have skipped Update No 13 as I am a tad superstitious with that date or number(long story won’t bore you)
Secondly, please be assured that where I live we are not restricted to water use or I wouldn’t have filled the bath.I did however recycle the water after so it wasn’t wasted.
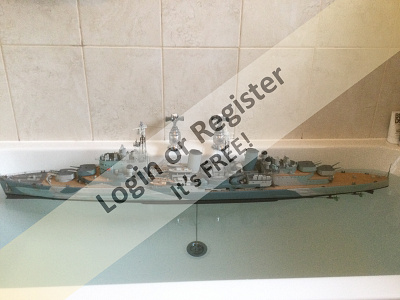
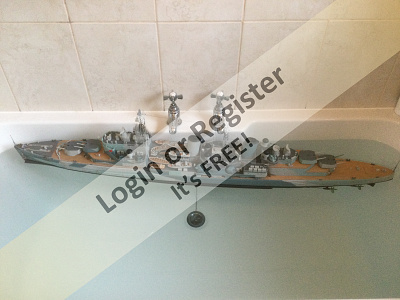
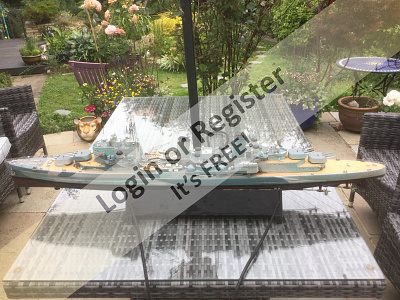
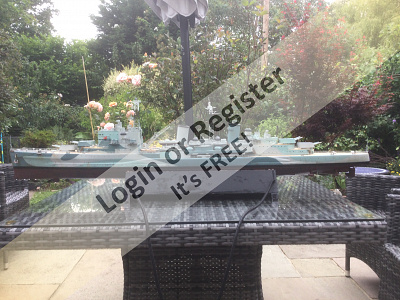
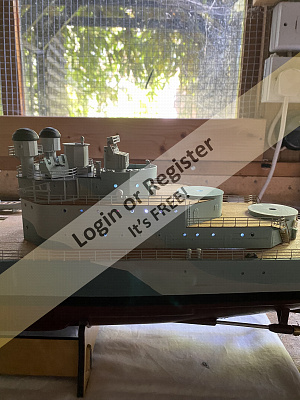
This morning I placed HMS Belfast into the bath and was very pleased indeed.
She floated exactly where I hoped she would on the black boot line.
The only slight issue was a slight list to Port which was easily remedied with 20grm of tyre balance weight (Courtesy of the local garage) placed at the stern close to the steering servo.
The picture with the spirit level shows the end result the bubble being centre.
So then there were some tests with a little rough weather and she seems quite stable.
It will be the real test when on the pond in due course in the real world.
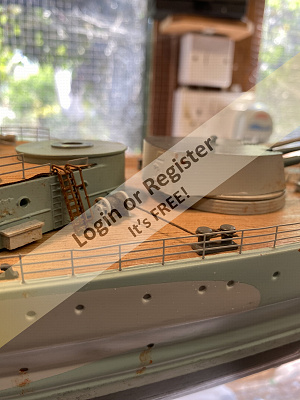
I also show the carrying cradle which I have weighted so that I can launch with ease.
So,I do have a couple of minor things to correct,ie the interior lighting of which I am still not happy and the boat crane which is not to my liking 100%.
Sadly it will be a while before I can test on the water because of an ongoing health issue which restricts things a little for me.
All up weight is….4.6 kg or 10.1 lbs in old money excluding the carry stand.
I hope the pictures once again explain my words.
Take care and stay safe.
Regards.
Bill 👍


Firstly please note that I have skipped Update No 13 as I am a tad superstitious with that date or number(long story won’t bore you)
Secondly, please be assured that where I live we are not restricted to water use or I wouldn’t have filled the bath.I did however recycle the water after so it wasn’t wasted.
This morning I placed HMS Belfast into the bath and was very pleased indeed.
She floated exactly where I hoped she would on the black boot line.
The only slight issue was a slight list to Port which was easily remedied with 20grm of tyre balance weight (Courtesy of the local garage) placed at the stern close to the steering servo.
The picture with the spirit level shows the end result the bubble being centre.
So then there were some tests with a little rough weather and she seems quite stable.
It will be the real test when on the pond in due course in the real world.
I also show the carrying cradle which I have weighted so that I can launch with ease.
So,I do have a couple of minor things to correct,ie the interior lighting of which I am still not happy and the boat crane which is not to my liking 100%.
Sadly it will be a while before I can test on the water because of an ongoing health issue which restricts things a little for me.
All up weight is….4.6 kg or 10.1 lbs in old money excluding the carry stand.
I hope the pictures once again explain my words.
Take care and stay safe.
Regards.
Bill 👍
▲
⟩⟩
AlessandroSPQR
MouldBuilder
chugalone100
GaryLC
stevedownunder
jbkiwi
boatmam
Ronald
Doogle
Colin H
RNinMunich
hermank
Graham93
|
💬 Re: HMS Belfast Update No 14.Trim tests.
1 year ago by 🇳🇿 jbkiwi (
 Fleet Admiral) Fleet Admiral)✧ 43 Views · 1 Like
Flag
Looks great Bill, successful builders trials done and passed by the looks of it.
JB ▲
⟩⟩
Scratchbuilder
|
📝 HMS Belfast Update No 12 Final touches.
1 year ago by 🇬🇧 Scratchbuilder ( Vice Admiral)
Vice Admiral)✧ 50 Views · 8 Likes · 1 Comment
Flag
💬 Add Comment
Evening Gents.
As I approach the end of the refit I am satisfied having touched up a few little bits that the weathering is about right so am going to leave it like it is for the time being at least.
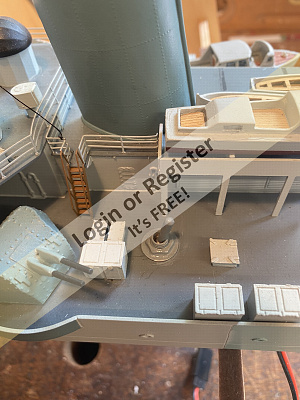
Today I did a few small touches that in my opinion just make the model a little more realistic.
Once again I hope the photographs show my efforts.
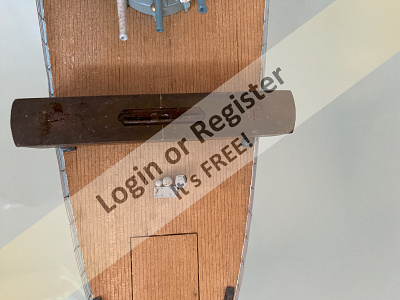
First job was to seal the wooden deck.
The previous owner had allowed it to get wet and the decking had started to lift a little in places.
This was remedied by cutting and gluing back the sections.Sorry I forgot to take pictures.
Once done I sealed the entire wooden deck with wax furniture polish,three coats in all.
The first picture shows the contrast with treated and untreated.
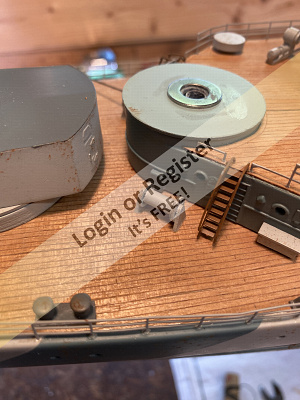
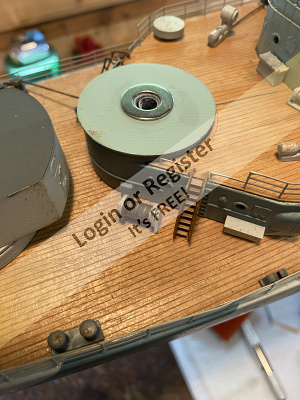
I then added a few ropes to some,but not to all of the bollards and rope drums.
It just makes it look a little more realistic.
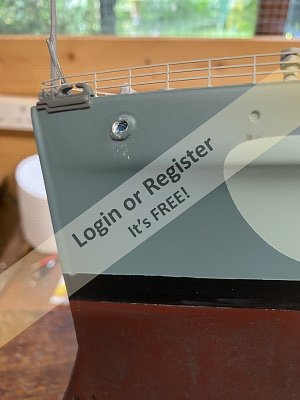
The finished anchor chain was cut to length and fixed in place so that it hangs nicely.
You will see I have added a length of rope swung over the side from bollard to anchor.
I have done this only,so that if the worst occurs and the anchor comes loose I won’t loose it 🤭
That was it for today and just about finishes what I wanted to achieve.
Tomorrow I intend to float her in the dry dock no 1(the bath) to get a true trim and balance.
Thanks for looking.
Regards Bill.


As I approach the end of the refit I am satisfied having touched up a few little bits that the weathering is about right so am going to leave it like it is for the time being at least.
Today I did a few small touches that in my opinion just make the model a little more realistic.
Once again I hope the photographs show my efforts.
First job was to seal the wooden deck.
The previous owner had allowed it to get wet and the decking had started to lift a little in places.
This was remedied by cutting and gluing back the sections.Sorry I forgot to take pictures.
Once done I sealed the entire wooden deck with wax furniture polish,three coats in all.
The first picture shows the contrast with treated and untreated.
I then added a few ropes to some,but not to all of the bollards and rope drums.
It just makes it look a little more realistic.
The finished anchor chain was cut to length and fixed in place so that it hangs nicely.
You will see I have added a length of rope swung over the side from bollard to anchor.
I have done this only,so that if the worst occurs and the anchor comes loose I won’t loose it 🤭
That was it for today and just about finishes what I wanted to achieve.
Tomorrow I intend to float her in the dry dock no 1(the bath) to get a true trim and balance.
Thanks for looking.
Regards Bill.
▲
⟩⟩
MouldBuilder
chugalone100
jbkiwi
RNinMunich
Rookysailor
Colin H
Doogle
hermank
|
💬 Re: HMS Belfast Update No 12 Final touches.
1 year ago by 🇬🇧 Doogle (
Commodore)✧ 49 Views · 1 Like
Flag
Looks superb 👌, a lovely piece of work. Happy sailing, looking forward to the next installment of seeing her afloat. Dream of having a bath to use for testing-we only have a wet room and tòo much gaffer tape needed to seal round the door 🤣. I have built a test tank behind the shed, works well until now, discovered that HMS NELSON is too long by about 3 inches. Guess I "need a bigger tank"
▲
⟩⟩
Scratchbuilder
|
📝 HMS Belfast Update No 11 Weathering.
1 year ago by 🇬🇧 Scratchbuilder ( Vice Admiral)
Vice Admiral)✧ 74 Views · 15 Likes · 9 Comments
Flag
💬 Add Comment
Good afternoon Gents.
Time for a little more weathering today.
Once again I reiterate that this is down to personal preferences and what I may like may not be another persons cup of tea.
The photographs again say it all,and I’m sorry the video was too large to load 😢.
In the first couple of pictures you see the items I use to weather…very simple and easy to use.Wash,cotton buds,brushes and toilet tissue
The little jam jar is my homemade rust consisting of nails and water,ie real rust.
I also add retail wash as shown.
The secret from my viewpoint is not to rush and to put small layers on,let it dry and touch it up.
I dab the wash on using a brush or cleaning scourer pad and when it’s tacky lightly rub with toilet tissue.
Once finished then I gently spray with MATT clear sealer so that none of the wash comes off because in my case I am using real homemade rust with a water base.
If NOT sealed it will come off the moment you put the boat in the water..
This is all about taking your time and not rushing.
To do both sides of the hull and the small areas on the superstructure (which I appreciate may not show up that well in the pictures) took me four hours.
I may well touch it up again,I will have to see.
Hoping you all enjoy this,and please remember it’s personal choice.I am NOT an expert on this.
Also remember that the close up pictures exaggerate the effect so they can look rougher than they are.
Regards
Bill.
▲
⟩⟩
hermank
Colin H
River Rat
RNinMunich
Double Rum
mturpin013
chugalone100
luckyduck
stevedownunder
Ronald
jbkiwi
Graham93
Doogle
MouldBuilder
boatmam
|
💬 Re: HMS Belfast Update No 11 Weathering.
1 year ago by 🇬🇧 Scratchbuilder (
Vice Admiral)✧ 55 Views · 5 Likes
Flag
Morning Doug.
Thanks for your reply. There are so many variables it’s a minefield. No gauntlet thrown down I assure you! re weathering . You’re right re HMS Victorious (carrier) and the guns motion. Yep problem was sorted and I will update soon. Alas she is still not finished, because of my ongoing health issues I can’t even lift her off the shelf so it’s sort of on hold for now. I’m concentrating on smaller vessels at moment while I can. Take care all. Further update soon. Regards Bill PS.1325 hrs found this video of my Victorious gun motion. Bill. 

▲
⟩⟩
chugalone100
RNinMunich
Graham93
Colin H
Doogle
|
|
Login To
Remove Ads 💬 Re: HMS Belfast Update No 11 Weathering.
1 year ago by 🇩🇪 RNinMunich (
Fleet Admiral)✧ 56 Views · 4 Likes
Flag
Hi Bill,
Then I bow to superior knowledge and authority and sit corrected.😔 I was not aware of that tradition, interesting. Ref Belfast chains: Shudda known, or suspected. Attached is a pic I found in my archive, clearly showing white chains. Date of photo unknown. Probably just dismissed it as 'tarting up' for the museum ship. I visited Belfast in the late seventies and took many photos, 35mm no digital cameras back then. Will have to dig around in the cellar to find them. I remember standing on the fo'c'sle but colour of the chains eludes my ancient memory, wudda sworn they were black🤔 Admittedly most RN ships I have been on were Ex RN 🙄 Last RN serving ships I was on were a Duke Class frigate in Valparaiso and an Assault Ship under refit at the BAE Surface Ships yard in Glasgow. I appreciate that you have thrown down the gauntlet by challenging me to post my weathering attempts. I freely admit that I have not yet attempted this awesome aspect of our hobby, as you presumably suspected😉 I have however done much research on the subject and watched several U-toob vids on the subject, especially those concerning WW2 naval subjects. My comment simply reflected a recurring comment in all these vids and the LifeColor 'How to' instructions. I have purchased their ship weathering sets of washes etc for hulls and decks. At the moment I am more concerned with getting the ships mobile. So they remain in 'Fleet Review' trim for now. Will watch your progress with great interest and admiration for your guts to take on this challenge. BTW: Did you ever finish your carrier? I recall a discussion on how to drive the aft gun turrets some time ago. Regards, Doug. 
▲
⟩⟩
chugalone100
hermank
Graham93
Colin H
|
|
💬 Re: HMS Belfast Update No 11 Weathering.
1 year ago by 🇬🇧 Scratchbuilder (
Vice Admiral)✧ 62 Views · 4 Likes
Flag
Hi Doug.
I hope I never do overdo it re weathering,just get the correct balance where appropriate.🤞 I have some slight adjustments to make to a couple of points to keep it as subtle as I can 👍 Perhaps you could post some pictures of your weathering on your models for us,it would be good to compare. There is a tradition in the Royal Navy that anchor chains were painted white. This certainly did not occur in reality. BTW,on each of the four ships I served on in the Royal Fleet Auxiliary and one attachment to the RN none of them had black anchor chain and I have never seen black chain on a RN vessel.(US Navy …yes!) That’s not to say they do not paint black,they may well do in some cases. Re Belfast… to my knowledge she never had black chain at any time in her service.An ex colleague of mine was the buffer on Belfast for two years and also is unaware of her carrying black chain. Again I am happy to stand corrected. Carrying on the good work over. Regards Bill ▲
⟩⟩
MouldBuilder
hermank
Graham93
Colin H
|
|
💬 Re: HMS Belfast Update No 11 Weathering.
1 year ago by 🇩🇪 RNinMunich (
Fleet Admiral)✧ 60 Views · 5 Likes
Flag
Don't overdo it Bill. Remember 'Less is more' when weathering, you don't want her to end up looking like Poseidon😮
However, you might consider the water run off from the breakwater in heavy seas. BTW anchor chain on every naval ship I've been on was painted black. Just a word to the wise😉 KUTGW 👍 Doug😎 ▲
⟩⟩
Scratchbuilder
Colin H
Doogle
dave976
chugalone100
|
|
💬 Re: HMS Belfast Update No 11 Weathering.
1 year ago by 🇬🇧 Scratchbuilder (
Vice Admiral)✧ 64 Views · 2 Likes
Flag
Thank you everyone for your comments.
Really appreciated. Still a bit more work to do to bring her to life. 👍👍 Regards Bill. ▲
⟩⟩
MouldBuilder
Doogle
|
|
💬 Re: HMS Belfast Update No 11 Weathering.
1 year ago by 🇨🇦 Double Rum (
 Chief Petty Officer 2nd Class) Chief Petty Officer 2nd Class)✧ 61 Views · 2 Likes
Flag
Nice weathering job, It really brings the ship to life. In my opinion weathering adds a lot to ship models. Makes them look as they should look.
▲
⟩⟩
dave976
Scratchbuilder
|
|
💬 Re: HMS Belfast Update No 11 Weathering.
1 year ago by 🇳🇿 jbkiwi (
Fleet Admiral)✧ 70 Views · 4 Likes
Flag
Quite realistic Bill👍 -need to get those ratings out with chipping hammer and paint brush😁
JB ▲
⟩⟩
RNinMunich
dave976
Double Rum
Scratchbuilder
|
|
💬 Re: HMS Belfast Update No 11 Weathering.
1 year ago by 🇬🇧 Doogle (
Commodore)✧ 69 Views · 3 Likes
Flag
Great photos and a very interesting tip. Thinking about giving this ago.😊👍
▲
⟩⟩
dave976
Double Rum
Scratchbuilder
|
|
💬 Re: HMS Belfast Update No 11 Weathering.
1 year ago by 🇭🇺 MouldBuilder (
Vice Admiral)✧ 69 Views · 3 Likes
Flag
I like it Bill. Super job. At leat I now know who to talk to when I want to weather my next project. Very soon I hope.😬😬
▲
⟩⟩
dave976
Double Rum
jbkiwi
|
📝 HMS Belfast Update Number 10.To Weather or not to Weather.
1 year ago by 🇬🇧 Scratchbuilder ( Vice Admiral)
Vice Admiral)✧ 76 Views · 7 Likes · 3 Comments
Flag
💬 Add Comment
Evening all.
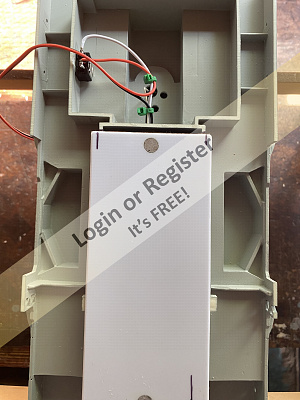
Although there are still various small jobs to do I am in my mind at the weathering stage.However before going on to that I just wished to do a small update on the internal lighting.
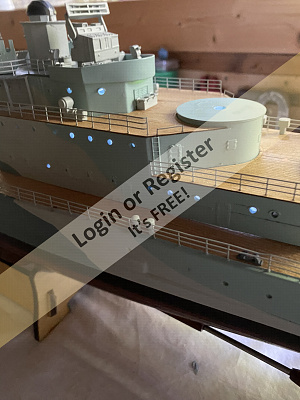
AndyN from our site kindly sent me some filtering material to tone down the rather bright lights.The first picture shows how I have added some of the filter to some of the interior and I agree that it is a more realistic duller effect
When I finish all the lighting I will update further.Thank you Andy 👍
I now move onto the weathering.
This is quite a personal thing in many ways,as to if you do it in the first place and to what degree you go.
I love to see the clean cut lines of a new and museum display model as admire those that do this.
I am a great believer that any working boat will by its very nature get dirty and weathered especially during wartime when they are worked hard with little time for refits and maintenance.
This HMS Belfast is not depicted in wartime mode but after any tour of operations will still show weathering.
I aim to be quite subtle if I can.
I am by no means an expert on this but will try to show a realistic effect.
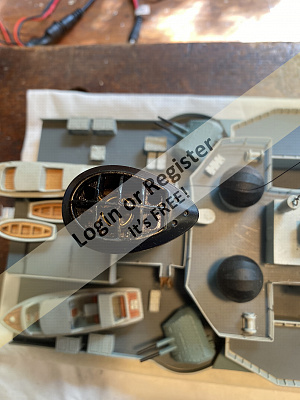
Today I tackled the Propellers and below the waterline.
PROPELLERS.
Nice bright shiny propellers look great but do not stay like it forever.
My weathering is aimed at dulling the shine and give the oxidation effect.
Paint used…..Humbrol 120 Matt.
I apply the paint using the foam side of a kitchen scouring pad and taking care not to soak it too much just gently dab the paint on little by little.
When nearly dry I turn the pad to the scour side and dab again.
Taking care not to apply too much you get the oxide effect with a little of the shiny prop underneath.
Let it dry and retouch if necessary.
BELOW THE WATERLINE.
Again using Humbrol paints ie the same 120 pot and Humbrol Black wash.(gently mixed in places and spread on the hull)
I use the same scour sponge as the paints mix in I gently use the same principle as the propellers but wash the black all over the red oxide,then when it is tacky gently rub with soft toilet tissue to achieve what ever effect YOU wish.Don’t overdose on the black as you still need to see the red underneath.
Cotten buds are great for the smaller areas.
As I said this is a personal thing and there are no hard and fast rules.
I give at least two coats allowing to dry between each one.
I hope one again the photographs show the difference especially the one showing the nice clean clinical red and then the weathered effect.
I am always happy to take advice on any aspect of modeling or weathering.
I hope this makes sense.
Take care all.
Regards
Bill.


Although there are still various small jobs to do I am in my mind at the weathering stage.However before going on to that I just wished to do a small update on the internal lighting.
AndyN from our site kindly sent me some filtering material to tone down the rather bright lights.The first picture shows how I have added some of the filter to some of the interior and I agree that it is a more realistic duller effect
When I finish all the lighting I will update further.Thank you Andy 👍
I now move onto the weathering.
This is quite a personal thing in many ways,as to if you do it in the first place and to what degree you go.
I love to see the clean cut lines of a new and museum display model as admire those that do this.
I am a great believer that any working boat will by its very nature get dirty and weathered especially during wartime when they are worked hard with little time for refits and maintenance.
This HMS Belfast is not depicted in wartime mode but after any tour of operations will still show weathering.
I aim to be quite subtle if I can.
I am by no means an expert on this but will try to show a realistic effect.
Today I tackled the Propellers and below the waterline.
PROPELLERS.
Nice bright shiny propellers look great but do not stay like it forever.
My weathering is aimed at dulling the shine and give the oxidation effect.
Paint used…..Humbrol 120 Matt.
I apply the paint using the foam side of a kitchen scouring pad and taking care not to soak it too much just gently dab the paint on little by little.
When nearly dry I turn the pad to the scour side and dab again.
Taking care not to apply too much you get the oxide effect with a little of the shiny prop underneath.
Let it dry and retouch if necessary.
BELOW THE WATERLINE.
Again using Humbrol paints ie the same 120 pot and Humbrol Black wash.(gently mixed in places and spread on the hull)
I use the same scour sponge as the paints mix in I gently use the same principle as the propellers but wash the black all over the red oxide,then when it is tacky gently rub with soft toilet tissue to achieve what ever effect YOU wish.Don’t overdose on the black as you still need to see the red underneath.
Cotten buds are great for the smaller areas.
As I said this is a personal thing and there are no hard and fast rules.
I give at least two coats allowing to dry between each one.
I hope one again the photographs show the difference especially the one showing the nice clean clinical red and then the weathered effect.
I am always happy to take advice on any aspect of modeling or weathering.
I hope this makes sense.
Take care all.
Regards
Bill.
▲
⟩⟩
dave976
chugalone100
hermank
RNinMunich
AndyN
Doogle
Colin H
|
💬 Re: HMS Belfast Update Number 10.To Weather or not to Weather.
1 year ago by 🇨🇦 Ronald (
 Admiral) Admiral)✧ 73 Views · 3 Likes
Flag
Here is a good example of a well used but cleaned up with powered wire brush on a propeller or Wheel.


▲
⟩⟩
chugalone100
dave976
Scratchbuilder
|
|
Login To
Remove Ads 💬 Re: HMS Belfast Update Number 10.To Weather or not to Weather.
1 year ago by 🇬🇧 AndyN (
 Warrant Officer) Warrant Officer)✧ 80 Views · 1 Like
Flag
That looks very promising Bill and i agree on the personal aspect of weathering. Since we don't have any colour pictures from that era we can only rely on common sense.
I think, regardless of how clean you want the model to be, some rust is a must. I might even tempt you to add some salt residues. Good luck ▲
⟩⟩
Scratchbuilder
|
|
💬 Re: HMS Belfast Update Number 10.To Weather or not to Weather.
1 year ago by 🇬🇧 Doogle (
Commodore)✧ 72 Views · 0 Likes
Flag
Great tips, photos and video. Thanks for sharing Bill 👍
▲
⟩⟩
No likes yet
This member will receive 1 point for every like received |
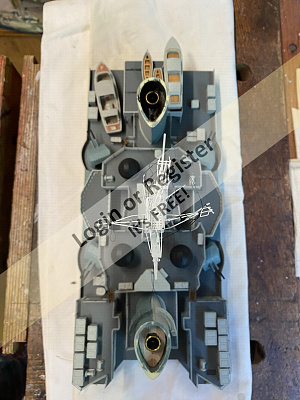
📝 HMS Belfast Update Number 9.Stand and Anchor.
1 year ago by 🇬🇧 Scratchbuilder ( Vice Admiral)
Vice Admiral)✧ 80 Views · 8 Likes · 1 Comment
Flag
💬 Add Comment
Evening All.
I thought I would go for a sail this morning with another model but that didn’t happen because of the dreaded weed(see posting on “Weed the dreaded Weed”)
So back to the boat shed to do a little more on HMS Belfast.
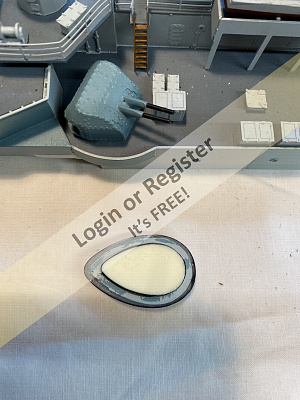
Having completed most of the internal workings apart from tidying up internally I thought I would take a break from that and do two other jobs externally.
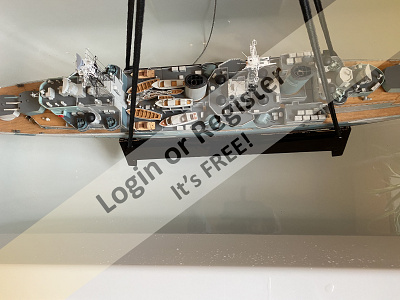
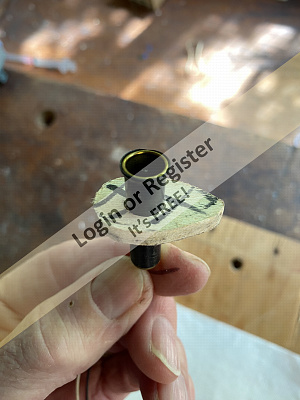
THE STAND.
The first thirteen pictures show the stand I have manufactured.
This stand was originally made for one of my submarines to give the impression of being on the stocks.
The submarine now hangs from the ceiling in the dining room as a talking point(with the wife’s consent😄).
I cut off some of the supports and repositioned others to make a base stand.
I had to cut two sections from the base keel blocks to allow for the rudder and asdic.
The new areas were then spray painted with red,grey and black just to give a little bit of “The bottom of the dry dock effect”
Not perfect I know but looks reasonably good and beats the ordinary basic stand.
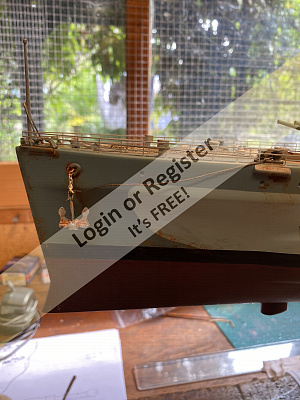
THE ANCHORS.
I scratched my head and thought that instead of just having the anchors in their stowed position I would have one in the semi dropped position as if it was being made ready to drop on the marker or in the weigh position…Just a bit of fun 😜.
Digging thru the dockyard stores spares box I found two white metal anchors of the same type/size along with a length of anchor chain 👍🤞.
I then removed the original anchor on the port side,and yep it broke which was expected.I then had to carefully drill out the housing.
I then made a very small O ring from a larger chain link and fixed the chain to the anchor.
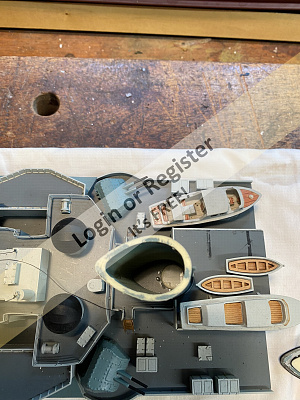
I placed the spare anchor on the deck as fitted to Belfast on decommissioning.
I will be explaining weathering the model in due course as I previously said but today
while in the mood I just weathered the anchor and chain.
The grey anchor was touched up with rust wash (homemade).
The chain was also rust washed and while still wet painted with Matt white paint so that it ran into the wash.
Left to dry for a while and then put in position I think it looks quite good,but then I am biased (please ignore the blue tack it is only temporary) I will fix the anchor in place when the boat is finished and also shorten the links so as the anchor isn’t dragging too close to the water.
I hope the pictures show the process.
I was very kindly sent some filter sheet by AndyN 👍which I will fix to the internal lighting to in effect dim the sharp lighting effect and make it more realistic.
Show that next time.
Enjoy everyone and take care.
Regards
Bill.


I thought I would go for a sail this morning with another model but that didn’t happen because of the dreaded weed(see posting on “Weed the dreaded Weed”)
So back to the boat shed to do a little more on HMS Belfast.
Having completed most of the internal workings apart from tidying up internally I thought I would take a break from that and do two other jobs externally.
THE STAND.
The first thirteen pictures show the stand I have manufactured.
This stand was originally made for one of my submarines to give the impression of being on the stocks.
The submarine now hangs from the ceiling in the dining room as a talking point(with the wife’s consent😄).
I cut off some of the supports and repositioned others to make a base stand.
I had to cut two sections from the base keel blocks to allow for the rudder and asdic.
The new areas were then spray painted with red,grey and black just to give a little bit of “The bottom of the dry dock effect”
Not perfect I know but looks reasonably good and beats the ordinary basic stand.
THE ANCHORS.
I scratched my head and thought that instead of just having the anchors in their stowed position I would have one in the semi dropped position as if it was being made ready to drop on the marker or in the weigh position…Just a bit of fun 😜.
Digging thru the dockyard stores spares box I found two white metal anchors of the same type/size along with a length of anchor chain 👍🤞.
I then removed the original anchor on the port side,and yep it broke which was expected.I then had to carefully drill out the housing.
I then made a very small O ring from a larger chain link and fixed the chain to the anchor.
I placed the spare anchor on the deck as fitted to Belfast on decommissioning.
I will be explaining weathering the model in due course as I previously said but today
while in the mood I just weathered the anchor and chain.
The grey anchor was touched up with rust wash (homemade).
The chain was also rust washed and while still wet painted with Matt white paint so that it ran into the wash.
Left to dry for a while and then put in position I think it looks quite good,but then I am biased (please ignore the blue tack it is only temporary) I will fix the anchor in place when the boat is finished and also shorten the links so as the anchor isn’t dragging too close to the water.
I hope the pictures show the process.
I was very kindly sent some filter sheet by AndyN 👍which I will fix to the internal lighting to in effect dim the sharp lighting effect and make it more realistic.
Show that next time.
Enjoy everyone and take care.
Regards
Bill.
▲
⟩⟩
RNinMunich
dave976
Colin H
luckyduck
River Rat
chugalone100
Doogle
Peejay
|
💬 Re: HMS Belfast Update Number 9.Stand and Anchor.
1 year ago by 🇬🇧 Doogle (
Commodore)✧ 78 Views · 1 Like
Flag
Great photos, thanks for sharing 👍
▲
⟩⟩
Scratchbuilder
|
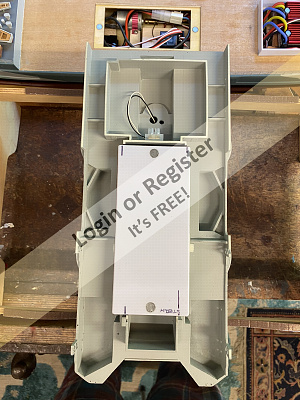
📝 HMS Belfast Update Number 8,more lighting.
1 year ago by 🇬🇧 Scratchbuilder ( Vice Admiral)
Vice Admiral)✧ 86 Views · 9 Likes · 4 Comments
Flag
💬 Add Comment
Evening Gents.
Thus far I have achieved most of what I set out in the first posting of this blog.
I wanted all four main turrets to rotate and have achieved three of the four.Lack of space excluded one.☹️
Both funnels have the desired smoke effect 👍
The crane rotates,but, I admit I am still not 100% happy with it so may redesign certain aspects.😠
The main radar is functioning well😄
The lighting forward is satisfactory,and today I spent a little time on the rear superstructure lighting.😁
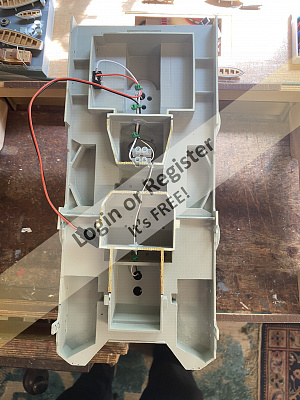
This was relatively easy and straight forward.
Once again my lack of space was the problem.
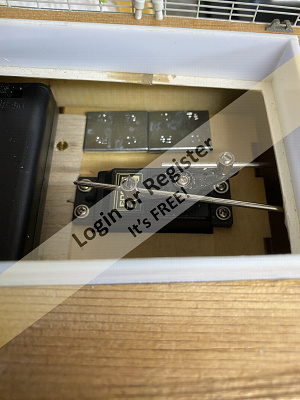
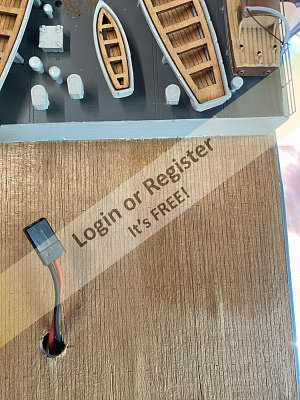
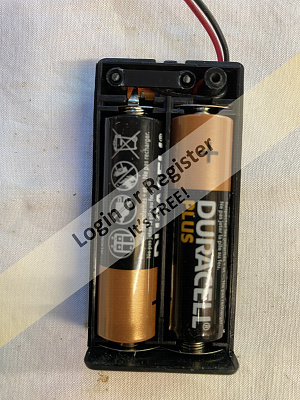
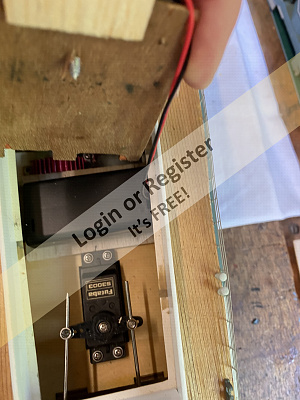
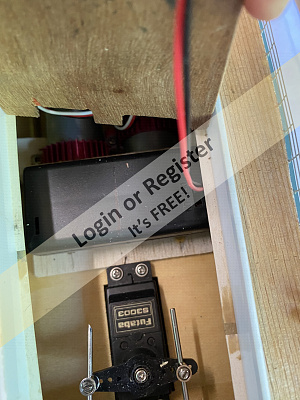
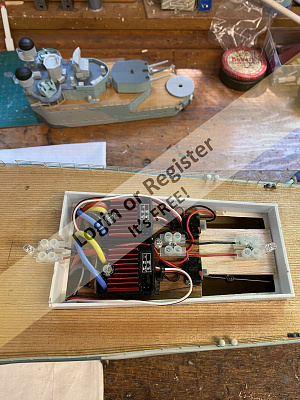
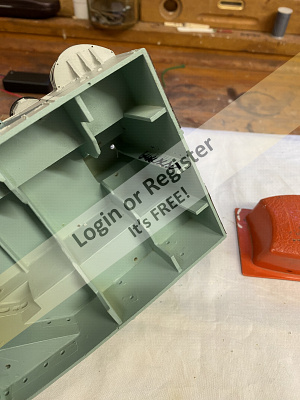
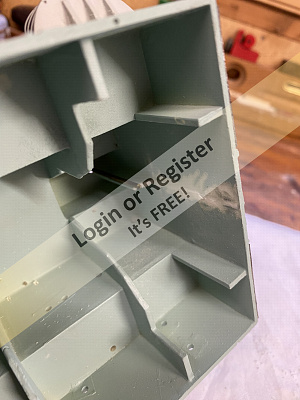
I didn’t want to run the lights (both forward and stern) thru a voltage reducer so I purchase a small switched encased AA battery box (£3.00 on EBay).
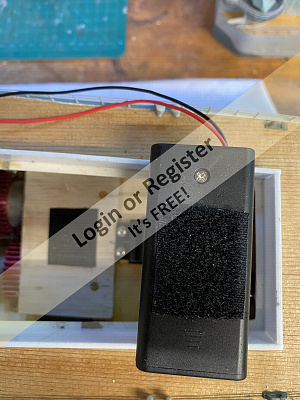
I managed to find enough space between the rear motors and rudder servo.
I made a small balsa false deck which rested between the servo and motors.
Fixed in place with two screws so that I can gain access to the motor couplings if needed.
The battery box sits nicely on the false deck and is as low as I can get it to avoid upper weight for stability.Held in place with double sided tape.
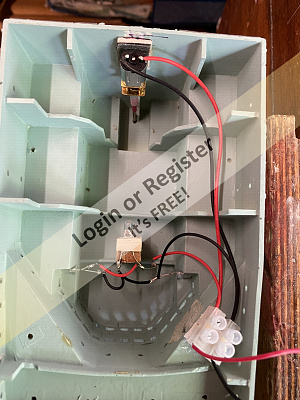
With just enough room,on the Speed controller deck and by extending it up to the bulkhead I fixed two electrical connectors along with two white 3volt LED wired them to the battery box and 👍 we had light.
A great use of minimal space.
Once again the photographs show the detail.
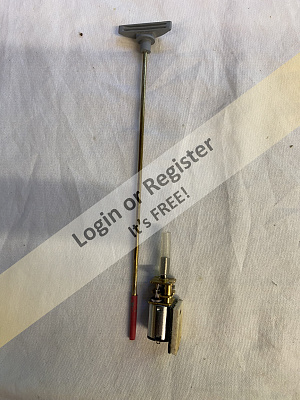
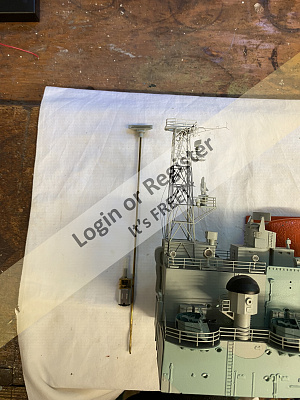
I am going to run a mast light at some point
There is still a lot to do do on this refit ie!
Replace the forward/stern flag poles.
The veneer deck was allowed to get wet by the previous owner and has started to lift in places.This needs to be remedied and the veneer treated.
Then there is the weathering and other odds and sods.
More on that in due course.
Hope your all ok everyone.
Thank you for following.
Catch you soon.
Regards
Bill.
PS.
Today 06/06/23 I added a third LED.
Why are we never happy with what we do?🤣


Thus far I have achieved most of what I set out in the first posting of this blog.
I wanted all four main turrets to rotate and have achieved three of the four.Lack of space excluded one.☹️
Both funnels have the desired smoke effect 👍
The crane rotates,but, I admit I am still not 100% happy with it so may redesign certain aspects.😠
The main radar is functioning well😄
The lighting forward is satisfactory,and today I spent a little time on the rear superstructure lighting.😁
This was relatively easy and straight forward.
Once again my lack of space was the problem.
I didn’t want to run the lights (both forward and stern) thru a voltage reducer so I purchase a small switched encased AA battery box (£3.00 on EBay).
I managed to find enough space between the rear motors and rudder servo.
I made a small balsa false deck which rested between the servo and motors.
Fixed in place with two screws so that I can gain access to the motor couplings if needed.
The battery box sits nicely on the false deck and is as low as I can get it to avoid upper weight for stability.Held in place with double sided tape.
With just enough room,on the Speed controller deck and by extending it up to the bulkhead I fixed two electrical connectors along with two white 3volt LED wired them to the battery box and 👍 we had light.
A great use of minimal space.
Once again the photographs show the detail.
I am going to run a mast light at some point
There is still a lot to do do on this refit ie!
Replace the forward/stern flag poles.
The veneer deck was allowed to get wet by the previous owner and has started to lift in places.This needs to be remedied and the veneer treated.
Then there is the weathering and other odds and sods.
More on that in due course.
Hope your all ok everyone.
Thank you for following.
Catch you soon.
Regards
Bill.
PS.
Today 06/06/23 I added a third LED.
Why are we never happy with what we do?🤣
▲
⟩⟩
Doogle
dave976
RNinMunich
luckyduck
MouldBuilder
chugalone100
Graham93
Colin H
AndyN
|
💬 Re: HMS Belfast Update Number 8,more lighting.
1 year ago by 🇬🇧 Scratchbuilder (
Vice Admiral)✧ 83 Views · 0 Likes
Flag
Morning Pete.
Thank you for the comments 👍👀. Using a six channel set. Motors,rudder,guns and crane from the channels. Lights,radar and smoke effects manually at this time. When I have the capacity I will combine smoke and throttle together. Hope all is well. Regards Bill. ▲
⟩⟩
No likes yet
This member will receive 1 point for every like received |
|
Login To
Remove Ads 💬 Re: HMS Belfast Update Number 8,more lighting.
1 year ago by 🇭🇺 MouldBuilder (
Vice Admiral)✧ 83 Views · 1 Like
Flag
Very nice Bill. You really are doing a good job.
How many channels will you need to operate all of the functions? Looking forward to the next episode. Pete.👍😀 ▲
⟩⟩
Scratchbuilder
|
|
💬 Re: HMS Belfast Update Number 8,more lighting.
1 year ago by 🇬🇧 Scratchbuilder (
Vice Admiral)✧ 85 Views · 0 Likes
Flag
Andy.
Thank you for your comments 👍. Always happy for suggestions to improve things. Warm Gel?. This is a new one on me!unless I’m missing the obvious. What is it please? Regards Bill ▲
⟩⟩
No likes yet
This member will receive 1 point for every like received |
|
💬 Re: HMS Belfast Update Number 8,more lighting.
1 year ago by 🇬🇧 AndyN (
Warrant Officer)✧ 94 Views · 2 Likes
Flag
This is becoming a great realistic model. I love the progress so far. Hope you will have enough juice to operate everything for more than 10min😂
As a scale modelmaker I can't wait for the weathering stage. One comment if you don't mind. I would put a warm gel around those leds to make it less starwars-like. ▲
⟩⟩
RNinMunich
Scratchbuilder
|
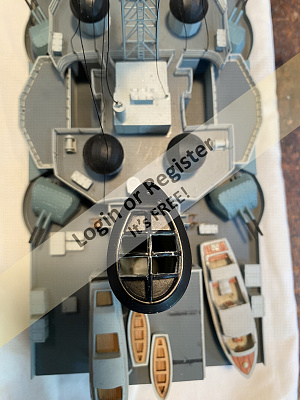
📝 HMS Belfast Update Number 7. Radar and Lighting.
1 year ago by 🇬🇧 Scratchbuilder ( Vice Admiral)
Vice Admiral)✧ 97 Views · 12 Likes · 5 Comments
Flag
💬 Add Comment
Evening Gents.
Trusting you are all well.
Today I managed to engineer the working radar, Port/Starboard lights and internal bridge lights.
Once again I hope the photographs are in the correct order as they explain so much.
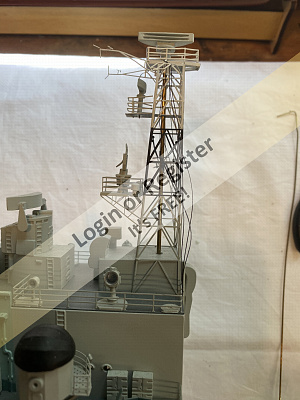
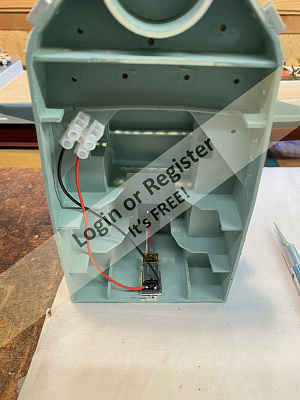
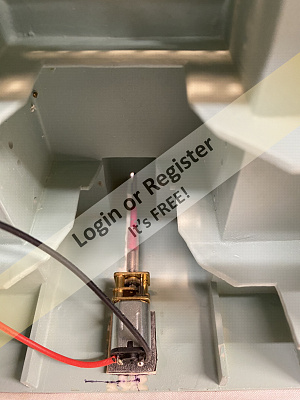
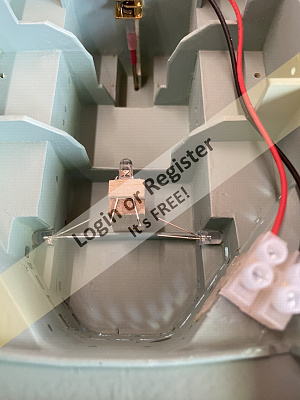
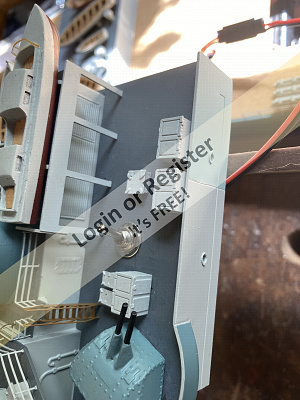
RADAR.
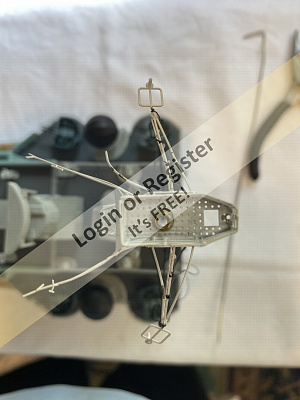
Without stating the obvious I removed the main radar scanner from the top of the lattice mast.
Luckily there is a good area inside the superstructure so I had plenty of room to work.
Taking care I drilled a 3mm hole down thru the lattice base that supports the radar and a secondary section below.
I then inserted a small brass bearing into the top hole leaving me a 2.5mm dia shaft size.
Taking some 2.5mm brass rod I heated the end and dropped it down thru the holes so that it melted a hole thru the bridge deck into the interior.
Then after drilling a hole in the scanner base I fitted it to the top of the rod.
For the motor I used a 3volt 36 rpm reduction motor from the ever faithful spares box and made a small fillet for the back of it.
Using some flexi pipe tubing I pushed it over the brass rod and glued the motor in place on the rear bulkhead.
This gave me a direct drive from motor to radar.
All tested and worked well 👍😇.
Lighting.
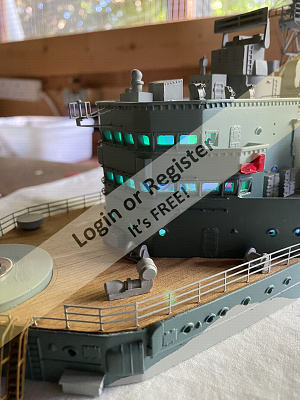
I wanted to have working Port/Starboard lights and at the least interior bridge lights so as I had time to spare off I went and did it.🤪
The P/S lights are so small that I simply did not have any bulbs small enough to fit externally.
Plan B…I drilled a 2mm hole thru the light and then glued the bulbs directly to the inside behind the hole.
I then made a small balsa stand and glued one white light grain of wheat bulb to it.
Having glued the balsa stand to the interior I wired all the bulbs up to the same 3volt power supply…..and hey presto we have light.
I hope the photographs do justice and all this makes sense.
I will be looking at some lighting for the mid and rear superstructure in due course.
Take care all till next time.
Regards
Bill👍


Trusting you are all well.
Today I managed to engineer the working radar, Port/Starboard lights and internal bridge lights.
Once again I hope the photographs are in the correct order as they explain so much.
RADAR.
Without stating the obvious I removed the main radar scanner from the top of the lattice mast.
Luckily there is a good area inside the superstructure so I had plenty of room to work.
Taking care I drilled a 3mm hole down thru the lattice base that supports the radar and a secondary section below.
I then inserted a small brass bearing into the top hole leaving me a 2.5mm dia shaft size.
Taking some 2.5mm brass rod I heated the end and dropped it down thru the holes so that it melted a hole thru the bridge deck into the interior.
Then after drilling a hole in the scanner base I fitted it to the top of the rod.
For the motor I used a 3volt 36 rpm reduction motor from the ever faithful spares box and made a small fillet for the back of it.
Using some flexi pipe tubing I pushed it over the brass rod and glued the motor in place on the rear bulkhead.
This gave me a direct drive from motor to radar.
All tested and worked well 👍😇.
Lighting.
I wanted to have working Port/Starboard lights and at the least interior bridge lights so as I had time to spare off I went and did it.🤪
The P/S lights are so small that I simply did not have any bulbs small enough to fit externally.
Plan B…I drilled a 2mm hole thru the light and then glued the bulbs directly to the inside behind the hole.
I then made a small balsa stand and glued one white light grain of wheat bulb to it.
Having glued the balsa stand to the interior I wired all the bulbs up to the same 3volt power supply…..and hey presto we have light.
I hope the photographs do justice and all this makes sense.
I will be looking at some lighting for the mid and rear superstructure in due course.
Take care all till next time.
Regards
Bill👍
▲
⟩⟩
Doogle
dave976
AndyN
Rookysailor
Julio
TerryH
luckyduck
JockScott
RNinMunich
hermank
chugalone100
Colin H
|
💬 Re: HMS Belfast Update Number 7. Radar and Lighting.
1 year ago by 🇬🇧 Scratchbuilder (
Vice Admiral)✧ 94 Views · 1 Like
Flag
Morning Pete.
Re the port light ! Good spot on your part 👍👀. For some reason the port light decided to play up just after fitting and went dim on me so it will be a case of replacing the offending item next week. Take care Bill ▲
⟩⟩
Rookysailor
|
|
Login To
Remove Ads 💬 Re: HMS Belfast Update Number 7. Radar and Lighting.
1 year ago by 🇬🇧 Rookysailor (
Commodore)✧ 109 Views · 1 Like
Flag
Nice job Bill, the port light in the photo does not look as bright as the starboard light, is it lit ? or is it the photo dulling it.
Cheers, Pete ▲
⟩⟩
Scratchbuilder
|
|
💬 Re: HMS Belfast Update Number 7. Radar and Lighting.
1 year ago by 🇬🇧 TerryH (
 Midshipman) Midshipman)✧ 95 Views · 1 Like
Flag
Lovely town class your building. My late father was on her in the early 50s I believe
▲
⟩⟩
Scratchbuilder
|
|
💬 Re: HMS Belfast Update Number 7. Radar and Lighting.
1 year ago by 🇬🇧 Scratchbuilder (
Vice Admiral)✧ 95 Views · 1 Like
Flag
“Those light bulbs look suspiciously like LED’s to me”
You’re right Doug,light bulbs….typo on my part. Put it down to my age! Bill. ▲
⟩⟩
RNinMunich
|
|
💬 Re: HMS Belfast Update Number 7. Radar and Lighting.
1 year ago by 🇩🇪 RNinMunich (
Fleet Admiral)✧ 98 Views · 0 Likes
Flag
Nice jobs Bill👍
Those light 'bulbs' look suspiciously like LEDs to me😉 When I eventually get around to it I'm proposing to use SMD LEDs, about 1mm square!🤓 Cheers, Doug😎 ▲
⟩⟩
No likes yet
This member will receive 1 point for every like received |
📝 HMS Belfast Follow up to Update No 6..Result!!
1 year ago by 🇬🇧 Scratchbuilder ( Vice Admiral)
Vice Admiral)✧ 113 Views · 14 Likes · 4 Comments
Flag
💬 Add Comment
Afternoon Chaps.
As I previously stated although I was on the whole quite happy with the smoke generators completed yesterday I was a little frustrated with the smoke flow.
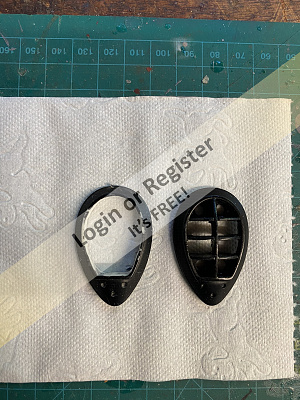
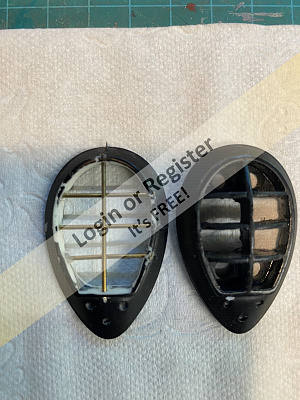
I had decided last evening to change the cage on the funnels,as I thought the large resin frame was restricting the flow and also looked out of proportion.
Quite correctly Doug pointed out re the lack of updraft despite my having drilled vent holes.Thank you also to others who gave suitable advice 👍.
Today I resolved the issue.
I drilled more vent holes in the smoker platforms and also in the deck under the funnels.(I learnt from my mistake on a previous boat re ventilation)
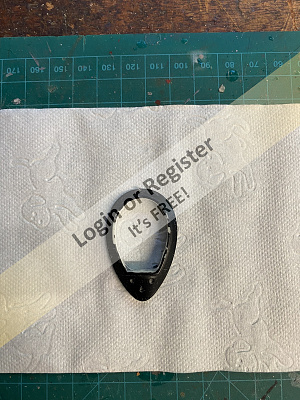
I then cut out the resin cage from both funnel caps and cleaned up the edges.
Careful drilling thru the funnel tops gave me 0.5 mm holes so that I could slide in and glue 0.5mm brass wire.
Phew! No breakages or disasters.
Once the glue was dry I repainted the tops Matt black,let the paint dry and placed in position.
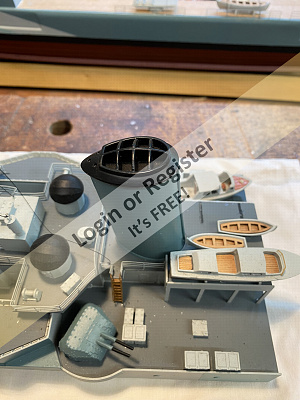
Come the moment of truth……….Tested,and I am sure the smoke flow is better and less restricted.
I also much prefer the thinner cage which looks much more realistic if you compare with the photograph of Belfast’s real funnel.(last picture before video)
Hopefully when on the water with wind flow all should be well🤞🤞
Next I will be taking on the lattice mast front Radar,but not for a couple of days.
Catch you soon and take care all.
Regards Bill.


As I previously stated although I was on the whole quite happy with the smoke generators completed yesterday I was a little frustrated with the smoke flow.
I had decided last evening to change the cage on the funnels,as I thought the large resin frame was restricting the flow and also looked out of proportion.
Quite correctly Doug pointed out re the lack of updraft despite my having drilled vent holes.Thank you also to others who gave suitable advice 👍.
Today I resolved the issue.
I drilled more vent holes in the smoker platforms and also in the deck under the funnels.(I learnt from my mistake on a previous boat re ventilation)
I then cut out the resin cage from both funnel caps and cleaned up the edges.
Careful drilling thru the funnel tops gave me 0.5 mm holes so that I could slide in and glue 0.5mm brass wire.
Phew! No breakages or disasters.
Once the glue was dry I repainted the tops Matt black,let the paint dry and placed in position.
Come the moment of truth……….Tested,and I am sure the smoke flow is better and less restricted.
I also much prefer the thinner cage which looks much more realistic if you compare with the photograph of Belfast’s real funnel.(last picture before video)
Hopefully when on the water with wind flow all should be well🤞🤞
Next I will be taking on the lattice mast front Radar,but not for a couple of days.
Catch you soon and take care all.
Regards Bill.
▲
⟩⟩
dave976
Colin H
RodC
River Rat
JockScott
TerryH
AndyN
pressonreguardless
hermank
jbkiwi
chugalone100
MouldBuilder
RNinMunich
ToraDog
|
💬 Re: HMS Belfast Follow up to Update No 6..Result!!
1 year ago by 🇬🇧 Scratchbuilder (
Vice Admiral)✧ 101 Views · 3 Likes
Flag
Afternoon Jockscott.
Thank you.Still a lot to do on this refit. All the railings are as fitted by Graupner from the factory. I will probably be replacing some stanchions with brass replacements and will be weathering the originals in due course. I think it is unlikely that you will be able to purchase the original railings as spares as Graupner spares are almost impossible to obtain. I did contact Graupner re spares and had a very negative unhelpful reply. Sorry I can’t be of more help. Regards Bill ▲
⟩⟩
Colin H
JockScott
RodC
|
|
Login To
Remove Ads 💬 Re: HMS Belfast Follow up to Update No 6..Result!!
1 year ago by 🇨🇦 JockScott (
 Chief Petty Officer 1st Class) Chief Petty Officer 1st Class)✧ 101 Views · 1 Like
Flag
Very impressive. May I ask you: did you do the railings from scratch? If not are they still available?
They don't look like photo etched. ▲
⟩⟩
AlessandroSPQR
|
|
💬 Re: HMS Belfast Follow up to Update No 6..Result!!
1 year ago by 🇭🇺 MouldBuilder (
Vice Admiral)✧ 112 Views · 1 Like
Flag
Great job Bill. This looks really good. Persistence has paid off. 😊😊
▲
⟩⟩
Scratchbuilder
|
|
💬 Re: HMS Belfast Follow up to Update No 6..Result!!
1 year ago by 🇩🇪 RNinMunich (
Fleet Admiral)✧ 112 Views · 1 Like
Flag
Much better Bill👍
😎 ▲
⟩⟩
Scratchbuilder
|
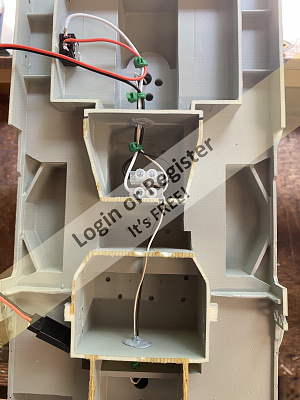
📝 HMS Belfast Update Number 6 Making Smoke
1 year ago by 🇬🇧 Scratchbuilder ( Vice Admiral)
Vice Admiral)✧ 115 Views · 11 Likes · 8 Comments
Flag
💬 Add Comment
Evening Gents.
Today I made smoke on both the funnel’s.
There is a mix and match of photographs but hopefully they are in the right order.
The same principles were used on both funnels during construction so I haven’t described both builds.
The plan was to operate the smoke with a servo and switch,but alas I have just run out of room and am up to maximum weight now.
I have simply used a mini switch placed on the deck and painted in grey so it blends as best as possible.
Smokers used are Seuthe No5 6volts,one in each funnel.
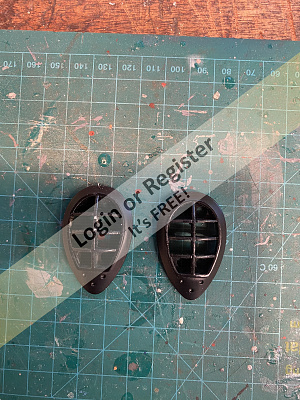
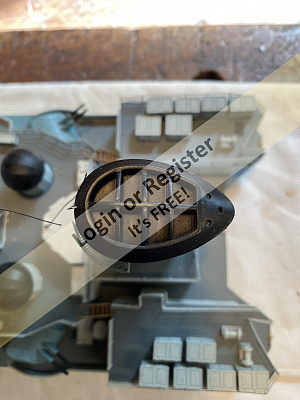
Firstly I carefully removed the funnel caps and drilled the sections out between the cross members of the lattice work.
Although difficult to see in the photographs I then drilled thru the deck base inside the funnel to allow the wiring to pass thru.
I then made two balsa supports to fit inside the funnels and drilled holes to place the smokers in.
Once happy that they fit and sit correctly then I glued the supports in and once dry push fitted the smokers in place.They can be removed in the event of failure.
A test run showed that both worked correctly 👍.
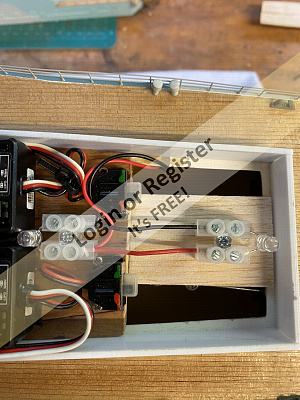
Next I had to turn the superstructure upside down to commence the wiring.
I had to remove the magnetic plastic deck section which gave me unlimited access to it together the simple wiring as shown in the photographs.
A hole was drilled for the switch which was fitted.
I am using a 6volt RX battery pack which sits nicely on top of the main engine battery pack.
The wiring was very simple and has no frills but serves the purpose.(See photographs)
With everything connected and tested for a circuit I put a little fluid in the smokers flipped the switch and all worked quite well.
I have found that the bulky false cage on the tops of the funnels restrict the smoke flow a little,so I will probably remove them completely and make two brass wire cages to fit the tops which will look better and allow more flow.
Probably do that tomorrow if time allows.
Hope you can make sense of this and enjoy the end product.
Take care all.
Regards Bill.


Today I made smoke on both the funnel’s.
There is a mix and match of photographs but hopefully they are in the right order.
The same principles were used on both funnels during construction so I haven’t described both builds.
The plan was to operate the smoke with a servo and switch,but alas I have just run out of room and am up to maximum weight now.
I have simply used a mini switch placed on the deck and painted in grey so it blends as best as possible.
Smokers used are Seuthe No5 6volts,one in each funnel.
Firstly I carefully removed the funnel caps and drilled the sections out between the cross members of the lattice work.
Although difficult to see in the photographs I then drilled thru the deck base inside the funnel to allow the wiring to pass thru.
I then made two balsa supports to fit inside the funnels and drilled holes to place the smokers in.
Once happy that they fit and sit correctly then I glued the supports in and once dry push fitted the smokers in place.They can be removed in the event of failure.
A test run showed that both worked correctly 👍.
Next I had to turn the superstructure upside down to commence the wiring.
I had to remove the magnetic plastic deck section which gave me unlimited access to it together the simple wiring as shown in the photographs.
A hole was drilled for the switch which was fitted.
I am using a 6volt RX battery pack which sits nicely on top of the main engine battery pack.
The wiring was very simple and has no frills but serves the purpose.(See photographs)
With everything connected and tested for a circuit I put a little fluid in the smokers flipped the switch and all worked quite well.
I have found that the bulky false cage on the tops of the funnels restrict the smoke flow a little,so I will probably remove them completely and make two brass wire cages to fit the tops which will look better and allow more flow.
Probably do that tomorrow if time allows.
Hope you can make sense of this and enjoy the end product.
Take care all.
Regards Bill.
▲
⟩⟩
dave976
RodC
ToraDog
chugalone100
Ronald
AndyN
MouldBuilder
hermank
RNinMunich
jbkiwi
Colin H
|
💬 Re: HMS Belfast Update Number 6 Making Smoke
1 year ago by 🇬🇧 Scratchbuilder (
Vice Admiral)✧ 113 Views · 2 Likes
Flag
Hi Andy.
Thank you for your comments. Good idea re moving the smokers further down which I may well do 👍. In the meantime I have revamped the existing ones and think they are working better. I am just about to post the addendum. Regards Bill. ▲
⟩⟩
RodC
hermank
|
|
Login To
Remove Ads 💬 Re: HMS Belfast Update Number 6 Making Smoke
1 year ago by 🇬🇧 AndyN (
Warrant Officer)✧ 122 Views · 3 Likes
Flag
That looks absolutely great, Bill. It will make the heads turn with that smoke.
I made me think however... What if you put those emitters a bit lower inside the chimneys? Would that make the smoke look less concentrated/accumulated in one spot? Excuse my english, I hope you know what I mean. Great job so far, can't wait to see her in action. ▲
⟩⟩
RodC
hermank
Scratchbuilder
|
|
💬 Re: HMS Belfast Update Number 6 Making Smoke
1 year ago by 🇧🇪 hermank (
 Captain) Captain)✧ 114 Views · 2 Likes
Flag
Mouldbuilder I like your funny comment😊😊😊
▲
⟩⟩
Scratchbuilder
MouldBuilder
|
|
💬 Re: HMS Belfast Update Number 6 Making Smoke
1 year ago by 🇭🇺 MouldBuilder (
Vice Admiral)✧ 113 Views · 4 Likes
Flag
Super job Bill. Just beware of those pesky Seagulls nesting on your new funnel cages.😃
▲
⟩⟩
RodC
Scratchbuilder
AndyN
Colin H
|
|
💬 Re: HMS Belfast Update Number 6 Making Smoke
1 year ago by 🇬🇧 Scratchbuilder (
Vice Admiral)✧ 114 Views · 3 Likes
Flag
Hi JB.
Thanks for following the refit. I am unsure at this time as I havn’t done a full test as yet,but on my Corvette the fluid lasted about 20 min. Have some modifications to do today on the funnels and will then test. Will update you then👍. Regards Bill. ▲
⟩⟩
RodC
hermank
MouldBuilder
|
|
💬 Re: HMS Belfast Update Number 6 Making Smoke
1 year ago by 🇬🇧 Scratchbuilder (
Vice Admiral)✧ 114 Views · 4 Likes
Flag
Morning all.
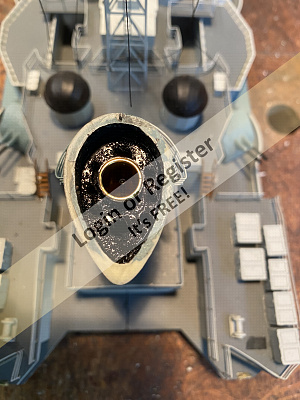
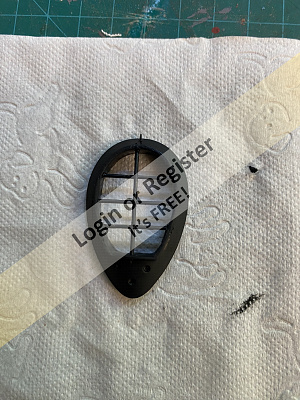
Doug. I don’t disagree with you on your thoughts,thank you! I had the same problem when I fitted an identical smoker to my Grandsons Corvette build just prior to being taken ill in November. To overcome it I did drill vent holes in the former inside the funnel.(see picture of Corvettes funnel). It did the trick! Having learnt from last time I also did the same on Belfasts funnels,BUT, because the space is smaller I don’t think they are as effective 😤.(Also see picture of vent holes in Belfast). I am going to enlarge the vent holes today and build a better brass cage as I thought yesterday.We can see if that makes a significant difference. I do like your suggestion of putting it all below decks,but sadly don’t have the room. Will update later chaps. Bill👍 
▲
⟩⟩
RNinMunich
RodC
AndyN
Colin H
|
|
💬 Re: HMS Belfast Update Number 6 Making Smoke
1 year ago by 🇩🇪 RNinMunich (
Fleet Admiral)✧ 114 Views · 5 Likes
Flag
Hi Bill,
So far so good👍 Re "I have found that the bulky false cage on the tops of the funnels restrict the smoke flow a little" I'm not convinced that the cage is really the problem. The real problem is most likely that your balsa former closes off the funnel and totally inhibits the 'Chimney effect', which is the whole point of having a funnel in the first place😉. Some 35 years ago I used the Graupner smokers, very similar in form and size but with a wick to 'slurp up' the smoke fluid whereas the Seuthe units (of which I also have some) are 'top fed' with ca 8ml per shot. I soon discovered that building into the funnel with a former such as yours was not terribly effective🤔 No updraught - no chimney effect! Sooo, I fitted a 10mm ally tube in the funnel and mounted the smoker underneath it so that the smoker gizmo did not close off the toob. The smoke fluid reservoir was the cap of a large paint spray can and the smoke unit was mounted on the rim by taking 1mm tinned copper wire from the smoker element through holes drilled in the cap rim, sealed with 2 part epoxy glue. Thus suspending the smoker above the fluid with only the wick immersed. Thus the whole smoke unit remained under deck and did not inhibit removal of deck and superstructure in any way. The 10mm tube provided the required updraught and greatly enhanced the 'Make smoke number one' effect when underway. I used the 'Gear' switch on my Sanwa TX to switch it on as required. Thanks to the large reservoir the unit would run all afternoon. Nor sure how long the 8ml in the Seuthe units will last but I guesstimate not more than ca 30 minutes if that. They were designed essentially for model railway locs. Sorry no pics or vids, did not possess a suitable camera back then🤔 Some years ago the ship (HMS Hotspur 1:72) was completely stripped out for a major refit, and I've been wondering for some time where the hell I put the smoker and reservoir unit🙄 Have moved house 3 times since then! Cheers, Doug 😎 ▲
⟩⟩
dave976
RodC
Scratchbuilder
Colin H
hermank
|
|
💬 Re: HMS Belfast Update Number 6 Making Smoke
1 year ago by 🇳🇿 jbkiwi (
Fleet Admiral)✧ 115 Views · 2 Likes
Flag
Just catching up Bill,- mods are looking great so far.👍 How long will the smoke run before it needs topping up?
JB ▲
⟩⟩
RodC
Scratchbuilder
|


Login To
Remove Ads
Remove Ads