Join Us On Social Media!

|

|

|
Download The App!
Login To
Remove Ads
Remove Ads
Login To
Remove Ads
Remove Ads
Model Boats Website
HMAFV SEAL
11 Posts · 7 Followers · 35 Photos · 82 Likes
Began 4 years ago by
 Canada
Follow This Thread
Not currently following
> Click to follow
> Click to follow
Latest Post 4 years ago by
| Oldest posts shown first (Show Newest First) | (Print Booklet) |
📝 HMAFV SEAL
4 years ago by 🇨🇦 Rowen ( Captain)
Captain)✧ 14 Views · 7 Likes · 6 Comments
Flag
💬 Add Comment
My last project, H.M.S. Brave Borderer, was an interesting and enjoyable build. It was based on a glass fibre (gf) hull from MTBHULLS. Have decided that purchasing a gf hull gives an excellent base for a scale, robust model. Have previously experienced minor issues of micro-cracking on wooden models, gf avoids that. From a cost perspective, the hulls are probably little more expensive than building from scratch.
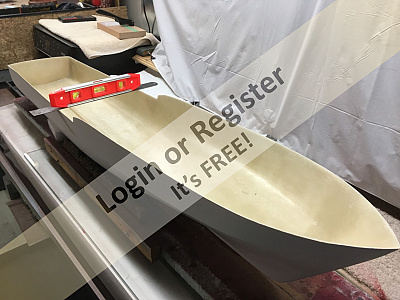
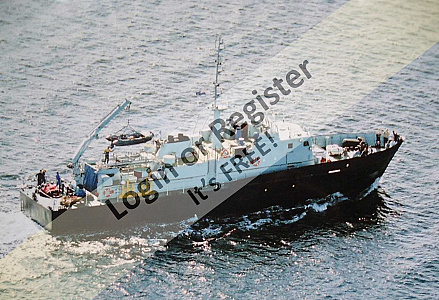
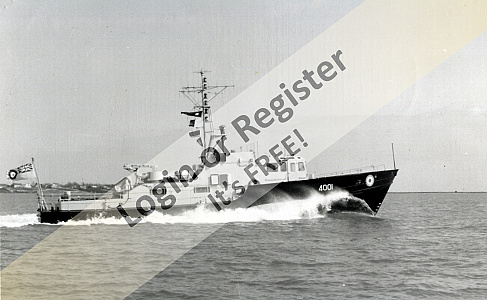
MTBHulls was planning to produce a hull for the R.A.F. Seal Class which would be available in time for my winter 2019 project. The Seal was the last class operated by the R.A.F. Marine Branch, but as a LRRS (Long Range Recovery & Support) launch. They were significantly larger than the traditional ASRL, offering much greater range and capability, albeit it at a lower speed.
At 1:35 scale the overall length would be 41.25”, just about my upper limit for transport.
Ordered the hull and it duly arrived well packaged and safely, rather earlier than expected! At least it gave the opportunity for installing and testing the running gear before winter.
▲
⟩⟩
Colin H
MouldBuilder
Joe727
jbkiwi
nasraf
Martin555
RNinMunich
|
💬 Re: HMAFV SEAL
4 years ago by 🇭🇺 MouldBuilder (
 Vice Admiral) Vice Admiral)✧ 9 Views · 2 Likes
Flag
I will be looking too.
▲
⟩⟩
Ianh
Martin555
|
|
Login To
Remove Ads 💬 Re: HMAFV SEAL
4 years ago by 🇬🇧 Scratchbuilder (
Vice Admiral)✧ 8 Views · 1 Like
Flag
I would like to follow this interesting build
Bill 👍 ▲
⟩⟩
Martin555
|
|
💬 Re: HMAFV SEAL
4 years ago by 🇬🇧 Martin555 (
 Fleet Admiral) Fleet Admiral)✧ 7 Views · 0 Likes
Flag
I too would like to see this build.
Martin555. ▲
⟩⟩
No likes yet
This member will receive 1 point for every like received |
|
💬 Re: HMAFV SEAL
4 years ago by 🇩🇪 RNinMunich (
Fleet Admiral)✧ 8 Views · 1 Like
Flag
"Patience is a virue!" ?
Virtue or virus Rowen?😮 😁 Whatever! Expecting good things from you, as ever👍 All the best, Doug 😎 PS: Croatia is open for visitors again!😉 ▲
⟩⟩
Martin555
|
|
💬 Re: HMAFV SEAL
4 years ago by 🇨🇦 Rowen (
Captain)✧ 9 Views · 2 Likes
Flag
Hi Doug,
Patience is a virue! All will be revealed in the fullness of time. Rowen ▲
⟩⟩
Martin555
RNinMunich
|
|
💬 Re: HMAFV SEAL
4 years ago by 🇩🇪 RNinMunich (
Fleet Admiral)✧ 9 Views · 2 Likes
Flag
Hurrah!
Dimly remember helping with research back then Rowen. Pleased to hear the project is underway at last. Looking forward to further instalments immensely. Pics of the hull? Cheers, Doug ▲
⟩⟩
alan50
Martin555
|
Login To
Remove Ads
Remove Ads
📝 HMAFV SEAL
4 years ago by 🇨🇦 Rowen ( Captain)
Captain)✧ 17 Views · 8 Likes · 3 Comments
Flag
💬 Add Comment
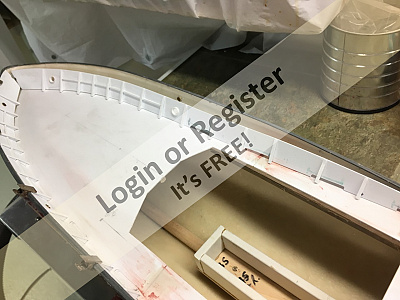
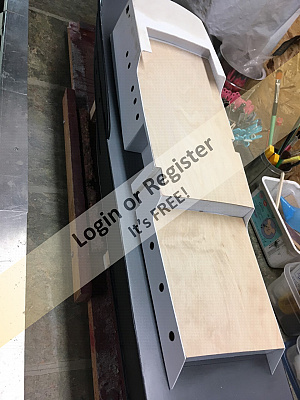
Checked the relevant dimensions. The drawings for this class are limited, but every measurement checked was correct. Fortunately there are a number of photographs on the net, so establishing details is possible.
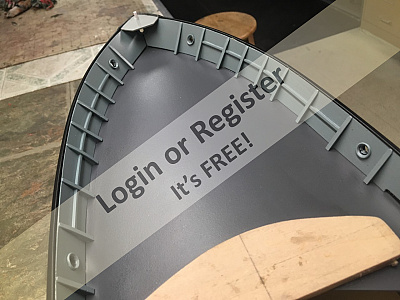
The hull upper edges followed the contour of the deck and bulwarks, with a trimming allowance of around 3mm. This must be removed to allow the hull height dimensions to be correctly reproduced on the model.
Using a combination of spirit level, steel rule and various other measuring tools marked the bulwark edge; then carefully removed the allowance by sanding and a Surform “scraper”.
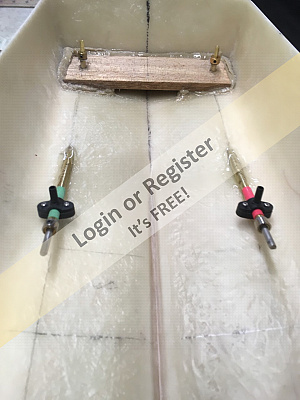
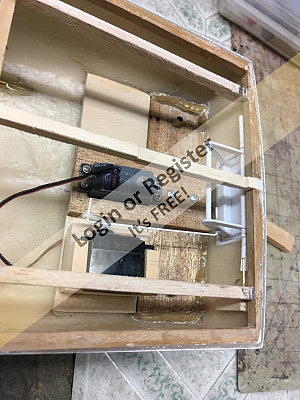
Once the deck & bulwark lines were dimensionally correct, turned to the propeller shafts and rudders. These are all straightforward and follow accepted practice. A wooden block was glued into place inside the lower rear portion of the hull to hold the rudder shafts and sleeves vertically. The cranks and servo will be installed above this block.
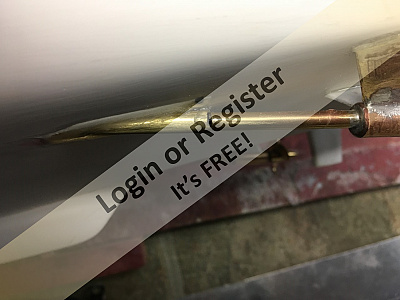
Fitting the twin propeller shafts accurately proved the usual challenge, but with care and patience it was completed. The only “trick” used to simplify this was to fit the shaft outer tubes into thin-wall brass sleeves where they go through the hull. This means that the three dimensional alignment needed to locate the propellers accurately can be simplified into two. The slope and parallelism of the shafts and then the horizontal protrusion.
Once the first is achieved and the shaft sleeves glued in place, the shaft can be slid in/out of the sleeve to the correct horizontal position. After that is established each shaft is glued into place in its respective sleeve.

The hull upper edges followed the contour of the deck and bulwarks, with a trimming allowance of around 3mm. This must be removed to allow the hull height dimensions to be correctly reproduced on the model.
Using a combination of spirit level, steel rule and various other measuring tools marked the bulwark edge; then carefully removed the allowance by sanding and a Surform “scraper”.
Once the deck & bulwark lines were dimensionally correct, turned to the propeller shafts and rudders. These are all straightforward and follow accepted practice. A wooden block was glued into place inside the lower rear portion of the hull to hold the rudder shafts and sleeves vertically. The cranks and servo will be installed above this block.
Fitting the twin propeller shafts accurately proved the usual challenge, but with care and patience it was completed. The only “trick” used to simplify this was to fit the shaft outer tubes into thin-wall brass sleeves where they go through the hull. This means that the three dimensional alignment needed to locate the propellers accurately can be simplified into two. The slope and parallelism of the shafts and then the horizontal protrusion.
Once the first is achieved and the shaft sleeves glued in place, the shaft can be slid in/out of the sleeve to the correct horizontal position. After that is established each shaft is glued into place in its respective sleeve.
▲
⟩⟩
Colin H
MouldBuilder
marky
jbkiwi
nasraf
Martin555
Joe727
RNinMunich
|
💬 Re: HMAFV SEAL
4 years ago by 🇨🇦 Rowen (
Captain)✧ 9 Views · 0 Likes
Flag
Thanks.
I find the more the number of shafts the better this idea works. It separates parallellism from protrusion, so each requirement can be adjusted independently. Used it on my 3 screw Brave Borderer (an earlier blog) and on my twin screw RAF RTTL (current build). Both were much easier then my earlier twin screw installations. ▲
⟩⟩
No likes yet
This member will receive 1 point for every like received |
|
Login To
Remove Ads 💬 Re: HMAFV SEAL
4 years ago by 🇬🇧 nasraf (
 Chief Petty Officer 1st Class) Chief Petty Officer 1st Class)✧ 27 Views · 0 Likes
Flag
I rather like your idea of fitting a positional mounting tube for the prop shaft assembly. I think I will do the same for my HSL but only with one shaft, bit too complicated with two and the real boat had three.
▲
⟩⟩
No likes yet
This member will receive 1 point for every like received |
|
💬 Re: HMAFV SEAL
4 years ago by 🇬🇧 Martin555 (
Fleet Admiral)✧ 9 Views · 0 Likes
Flag
You are off to a good start.
I am looking forward to your future updates. Martin555. ▲
⟩⟩
No likes yet
This member will receive 1 point for every like received |
📝 HMAFV SEAL
4 years ago by 🇨🇦 Rowen ( Captain)
Captain)✧ 17 Views · 8 Likes · 1 Comment
Flag
💬 Add Comment
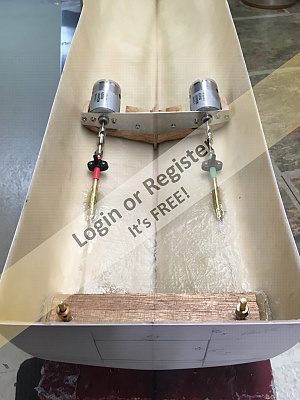
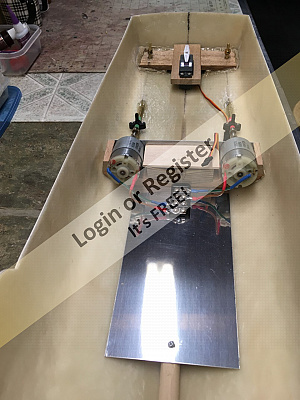
After the shafts were correctly located, the motor mount position was established. Made up a mount using wood and aluminium plate. The motor shaft spacing is determined using the shaft centre lines. The longitudinal location can be measured from the shaft slope and height.
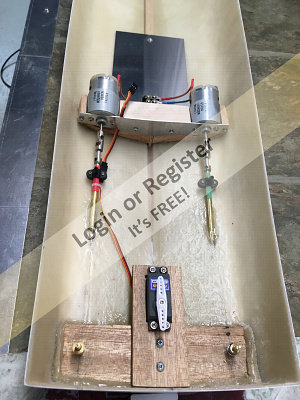
Two brushed, 550 type motors were then fitted to the mount, followed by the shaft couplings. The mount location can be fine tuned by slightly sliding the mount around until the motor and shafts could be rotated with the minimum force. The mount was then glued into place.
The shaft couplings used are steel, which tend to be noisy. Find that if a rubber or plastic sleeve is pushed over the coupling it quietens considerably. The inner coupling cavity/sleeve can also be filled with grease to ensure the joint is lubricated. Had earlier installed “oiler” fittings to the shafts for periodic lubrication.
Decided to try the Quicrun 1060 series ESC on this model, one per motor, to improve control. So far they work well, although the installation would be eased if the wires were longer.
Made up rudders by wrapping styrene sheet around a flattened brass rod and gluing together. The doubled over sheet is then be cut to the rudder side profile and the section sanded to shape. Once compete the shafts were lubricated and inserted into the tubes.
The rudder servo fitted with a control linkage made up using old bicycle spokes and tested.
Set the radio up to the “elevon” control sequence and tested the systems. Nice thing about brushed motors is everything usually works right the first time! No programming of ESCs etc needed either!
▲
⟩⟩
Colin H
Joe727
RNinMunich
MouldBuilder
Skydive130
ChrisB
nasraf
Martin555
|
💬 Re: HMAFV SEAL
4 years ago by 🇬🇧 Martin555 (
Fleet Admiral)✧ 9 Views · 0 Likes
Flag
You are to a great start.
Keep up the good work. Martin555. ▲
⟩⟩
No likes yet
This member will receive 1 point for every like received |
📝 HMAFV SEAL
4 years ago by 🇨🇦 Rowen ( Captain)
Captain)✧ 16 Views · 7 Likes
Flag
💬 Add Comment
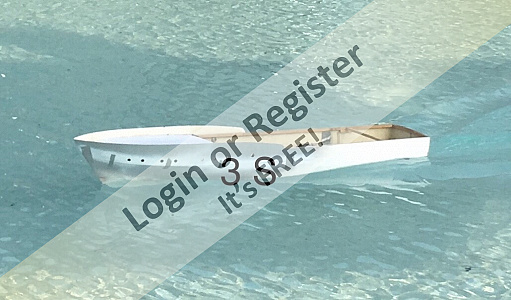
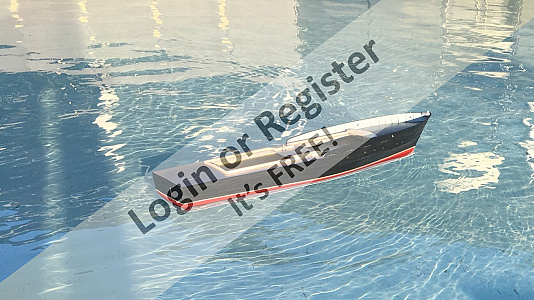
The hull was now watertight with the powertrain fitted; time for trail tests on the local pool. This blog tends to jump around chronologically as wanted to get the hull sailing properly before adding the superstructure etc as a winter project.
Using 3 S Li-Po batteries found the performance adequate. Nice bow and wave patterns, similar to the actual vessel photographs.
The forward / aft trim looks OK, although was surprised by the draft. The model weights about 6 lbs and is already close to the waterline. Added ballast weights to see what would be needed to bring the model down to waterline. This shows that rather less that 3 lbs is available for the deck, superstructure and detail. Going to have to watch my weight again!
Decided to increase the top speed by overpowering the ESCs using a 4S battery. The Quicrun ESCs must have a high voltage limiter as they cut out. From a box of bits found a voltage reducer and installed it. Providing the voltage is adjusted to below about 14 volts, the ESCs operate fine. Settled on using 13.25 v to give a slight margin.
The increase in voltage gives a marked increase in performance, decided to use this set-up permanently. Think the model is slightly overpowered, but at least it can be quickly moved out of conflict situations!
▲
⟩⟩
Colin H
Joe727
nasraf
Puddle-pirate
Martin555
RNinMunich
MouldBuilder
📝 HMAFV SEAL #5
4 years ago by 🇨🇦 Rowen ( Captain)
Captain)✧ 15 Views · 6 Likes · 4 Comments
Flag
💬 Add Comment
After several open water runs concluded the drivetrain and rudders work well. Parked the hull awaiting for winter, when could start work on fitting out the hull and adding the deck.
Most of this follows the processes used on my Brave Borderer on the Model Boats website. That blog should be consulted for details. Will only describe features here where the two hulls differ.
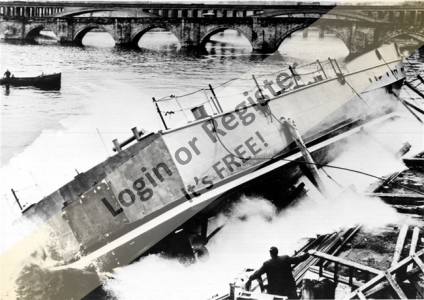
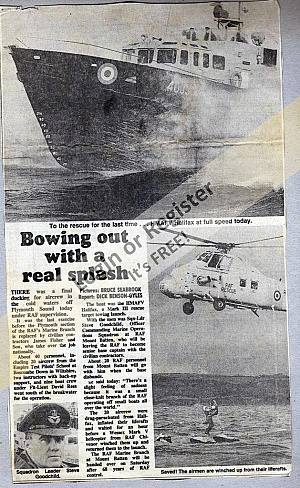
First step was to cut out the door in the transom. There are limited details of this on either the drawings or from on line. The best illustration is one taken at the launch of HMS Sea Otter, a sister ship. From these pictures the dimensions can be estimated and the hole cut to suite.
Proceed then to make up a opening door with the necessary operating linkage. This is controlled by a servo and uses a transmitter channel.
Readers might question the relevance of this door on a model. It was used to recover air-launched weapons or towed targets. These were then winched into the rear hull for storage and removed through the large upper access hatch.
Building a scale model Shackleton, Nimrod or Sea King to launch these weapons is beyond my skills, so cannot envisage ever using it. Just felt if it were needed would be much easier to add it now than once the decks were finished.
Most of this follows the processes used on my Brave Borderer on the Model Boats website. That blog should be consulted for details. Will only describe features here where the two hulls differ.
First step was to cut out the door in the transom. There are limited details of this on either the drawings or from on line. The best illustration is one taken at the launch of HMS Sea Otter, a sister ship. From these pictures the dimensions can be estimated and the hole cut to suite.
Proceed then to make up a opening door with the necessary operating linkage. This is controlled by a servo and uses a transmitter channel.
Readers might question the relevance of this door on a model. It was used to recover air-launched weapons or towed targets. These were then winched into the rear hull for storage and removed through the large upper access hatch.
Building a scale model Shackleton, Nimrod or Sea King to launch these weapons is beyond my skills, so cannot envisage ever using it. Just felt if it were needed would be much easier to add it now than once the decks were finished.
▲
⟩⟩
jbkiwi
mturpin013
Colin H
RNinMunich
Joe727
Martin555
|
💬 Re: HMAFV SEAL #5
4 years ago by 🇬🇧 mturpin013 (
 Admiral) Admiral)✧ 11 Views · 2 Likes
Flag
Nice detail well executed, most mechanisms on our models are never used but are really appreciated by everyone who sees them
▲
⟩⟩
RNinMunich
Martin555
|
|
Login To
Remove Ads 💬 Re: HMAFV SEAL #5
4 years ago by 🇩🇪 RNinMunich (
Fleet Admiral)✧ 10 Views · 1 Like
Flag
"Building a scale model Shackleton, Nimrod or Sea King to launch these weapons is beyond my skills, so cannot envisage ever using it"
I can lend you a 1.5m span Catalina if you like Rowen😉 You could always use the door for minelaying!!💥💥😮 Cheers, Doug 😎 PS Don't back up too fast with it open!😮😭 ▲
⟩⟩
Martin555
|
|
💬 Re: HMAFV SEAL #5
4 years ago by 🇺🇸 Joe727 (
 Commander) Commander)✧ 10 Views · 1 Like
Flag
Hello,
I really like your linkage and mechanism design. Nice photos as well. Joe ▲
⟩⟩
Martin555
|
|
💬 Re: HMAFV SEAL #5
4 years ago by 🇬🇧 Scratchbuilder (
Vice Admiral)✧ 10 Views · 1 Like
Flag
Hi.
This is excellent craftsmanship to a high standard. Regards Bill 👍 ▲
⟩⟩
Martin555
|
📝 HMAFV SEAL #6
4 years ago by 🇨🇦 Rowen ( Captain)
Captain)✧ 19 Views · 11 Likes · 5 Comments
Flag
💬 Add Comment
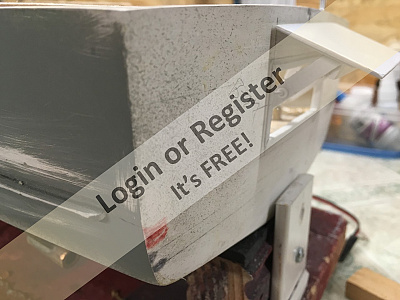
Have never been entirely satisfied with previous attempts to add support ribs / stanchions within the bulwarks. Often the bulwark is a contrasting colour to the deck and achieving a clean paint line is difficult.
A technique was described in a recent magazine where a modeller made an insert to fit inside the bulwark. The stanchions were fitted to the insert and then prepainted before fitting.
This approach is time consuming as all the stanchions and insert must fit neatly into the bulwark before painting and finally gluing in place. Think the end result justifies the effort though and will use this technique again.
▲
⟩⟩
Inkoust
Skydive130
SimpleSailor
nasraf
MouldBuilder
figtree7nts
Rookysailor
jbkiwi
peterd
Colin H
robbob
|
💬 Re: HMAFV SEAL #6
4 years ago by 🇺🇸 figtree7nts (
Admiral)✧ 10 Views · 1 Like
Flag
I really like the Idea!
On my Smit it took me forever. To paint around the Support Ribs! And try as I could, I couldn't paint a clean line! So, thanks for sharing the idea! Cheers, Ed ▲
⟩⟩
Martin555
|
|
Login To
Remove Ads 💬 Re: HMAFV SEAL #6
4 years ago by 🇨🇦 Rowen (
Captain)✧ 10 Views · 1 Like
Flag
Wish could take credit for the idea. Quite a lot of extra work but well worth it
▲
⟩⟩
Martin555
|
|
💬 Re: HMAFV SEAL #6
4 years ago by 🇳🇿 jbkiwi (
Fleet Admiral)✧ 10 Views · 1 Like
Flag
That's not a silly idea Rowan, worked out very nicely!👍👍
JB ▲
⟩⟩
Martin555
|
|
💬 Re: HMAFV SEAL #6
4 years ago by 🇬🇧 Colin H (
Fleet Admiral)✧ 10 Views · 1 Like
Flag
What a lovely finish, you have excelled.
Keep it up and happy modelling. Cheers Colin. ▲
⟩⟩
Martin555
|
|
💬 Re: HMAFV SEAL #6
4 years ago by 🇬🇧 Martin555 (
Fleet Admiral)✧ 9 Views · 0 Likes
Flag
Very neat and tidy, well worth it.
Martin555. ▲
⟩⟩
No likes yet
This member will receive 1 point for every like received |
📝 HMAFV SEAL #7
4 years ago by 🇨🇦 Rowen ( Captain)
Captain)✧ 17 Views · 9 Likes · 1 Comment
Flag
💬 Add Comment
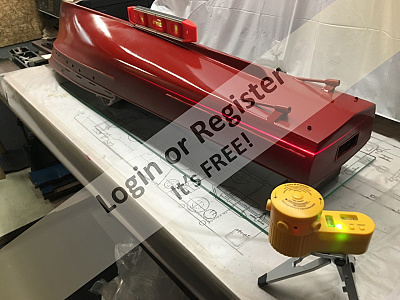
The several pictures of the Seal class show variously, a wide white waterline, a thin one or none at all. At the commissioning ceremony for Seal she had a thin white line and decided to replicate it.
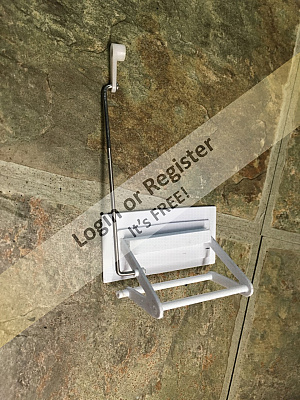
Over the years the question of accurately painting waterlines keeps coming up, I use a laser pointer.
Firstly, the hull must be supported upside down on a flat level surface. It must then be carefully leveled both fore and aft and transversely. Once correctly positioned it should be firmly supported to avoid upset.
The laser height can then be adjusted to the correct waterline. As can be seen from the picture, the red laser beam clearly defines the waterline. Using a pencil the waterline is then marked on the hull. The pencil marks are used to position masking tape and the contrasting colour added.
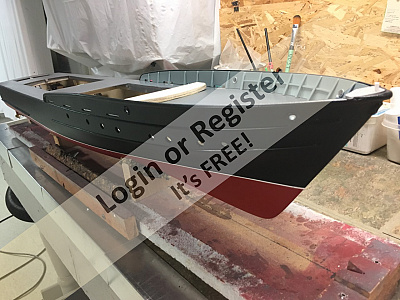
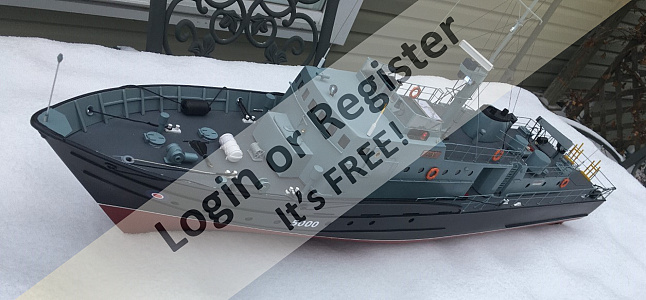
Finish painted the hull black with red underside and grey decks. The hull was also sprayed with a matt aerosol to deaden the paint gloss.
Could not resist a further water test as the weather is nice. The test shows the trim to be satisfactory until the superstructure is installed, when final trim ballast may be required.
Over the years the question of accurately painting waterlines keeps coming up, I use a laser pointer.
Firstly, the hull must be supported upside down on a flat level surface. It must then be carefully leveled both fore and aft and transversely. Once correctly positioned it should be firmly supported to avoid upset.
The laser height can then be adjusted to the correct waterline. As can be seen from the picture, the red laser beam clearly defines the waterline. Using a pencil the waterline is then marked on the hull. The pencil marks are used to position masking tape and the contrasting colour added.
Finish painted the hull black with red underside and grey decks. The hull was also sprayed with a matt aerosol to deaden the paint gloss.
Could not resist a further water test as the weather is nice. The test shows the trim to be satisfactory until the superstructure is installed, when final trim ballast may be required.
▲
⟩⟩
Inkoust
RNinMunich
Scratchbuilder
SimpleSailor
nasraf
Martin555
jbkiwi
Joe727
robbob
|
💬 Re: HMAFV SEAL #7
4 years ago by 🇺🇸 Joe727 (
Commander)✧ 10 Views · 1 Like
Flag
Very nice work, the thin white line separating the red and black is quite elegant!
Joe ▲
⟩⟩
Martin555
|
📝 HMAFV SEAL #8
4 years ago by 🇨🇦 Rowen ( Captain)
Captain)✧ 15 Views · 6 Likes
Flag
💬 Add Comment
As the hull is essentially complete, apart from adding deckdetail, moved to the superstructure.
Drawings for this vessel are very limited, fortunately there are several photographs on the Internet.
It seems the three vessels in this class all differed slightly, although those differences could have arisen in refits as the vessels aged. Decided to focus on Seal in her original build state as have the most information on this configuration.
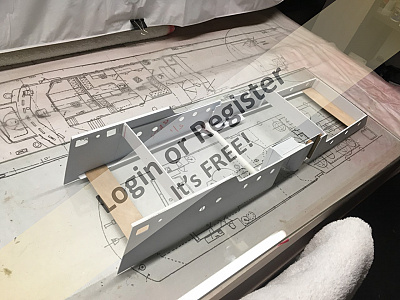
Defined the superstructure base outline using 1/4” square balsa strips glued to the deck. This locates the superstructure and provides a lip to prevent water ingress. The port and starboard sides differ as the port included a large doorway into the accommodation spaces.
Cut the port and starboard superstructure sides out of styrene sheet and clipped to the balsa strips. Was then able to make up the various bulkheads, also in styrene before glueing into place. Also added a round tube and various 1/16” sheet horizontal panels to add stiffness. These worked, leaving a self supporting and light structure.
The front panel was also made from styrene sheet, heat shaped and the windows cutout.
Continued to add detail, all made from the usual amalgam of wood and styrene sheet augmented with a few commercial items.
Drawings for this vessel are very limited, fortunately there are several photographs on the Internet.
It seems the three vessels in this class all differed slightly, although those differences could have arisen in refits as the vessels aged. Decided to focus on Seal in her original build state as have the most information on this configuration.
Defined the superstructure base outline using 1/4” square balsa strips glued to the deck. This locates the superstructure and provides a lip to prevent water ingress. The port and starboard sides differ as the port included a large doorway into the accommodation spaces.
Cut the port and starboard superstructure sides out of styrene sheet and clipped to the balsa strips. Was then able to make up the various bulkheads, also in styrene before glueing into place. Also added a round tube and various 1/16” sheet horizontal panels to add stiffness. These worked, leaving a self supporting and light structure.
The front panel was also made from styrene sheet, heat shaped and the windows cutout.
Continued to add detail, all made from the usual amalgam of wood and styrene sheet augmented with a few commercial items.
▲
⟩⟩
Joe727
jbkiwi
RNinMunich
nasraf
Martin555
figtree7nts
📝 HMAFV SEAL # 9
4 years ago by 🇨🇦 Rowen ( Captain)
Captain)✧ 16 Views · 7 Likes · 2 Comments
Flag
💬 Add Comment
The only deck feature that is unusual is the R.I.B. launch crane. Fortunately the earliest iteration of the Seal used a simple rigid jib crane with a winch to raise and lower and another one to swivel the jib from the vessel centreline to over the deck edge.
After much thought decided the hook raise/lower function could be achieved by using drum fastened to a 360 degree movement servo and the rotating function replicated using another servo that would rotate the crane jib. This was attached to a shaft that passed through the centre of the crane body and under the deck where it was moved by a pulley and belt drive to the servo.
Can now see why this arrangement was replaced with an articulated hydraulic crane in a refit! The RIB swings when lifted and has to be carefully guided past the engine room intakes. Probably not practicable in any kind of seaway.
Continued to add the usual selection of navigation and spot lights, also a radar scanner. The light installations were considerably eased by our local electronics shop now stocking a resistor that limits current in an LED circuit to 20 mA. This means any number of LEDs can be added into the circuit (up to the max. battery drop voltage) without corresponding resistors. The wiring is simplified enormously.
Finally had four circuits working, two lighting for the nav. and spotlights and one for the radar scanner motor and wheelhouse lighting. All controlled by an overall RC switch and individual circuit micro switches.
Used the idea previously tried on my Brave to have brushed connectors on the hull with corresponding copper pickups on the underside of the superstructure. These obviate the need for wires that link the superstructure and hull, making removal much easier.
▲
⟩⟩
Inkoust
Rogal118
nasraf
jbkiwi
Scratchbuilder
Martin555
RNinMunich
|
💬 Re: HMAFV SEAL # 9
4 years ago by 🇬🇧 Martin555 (
Fleet Admiral)✧ 9 Views · 0 Likes
Flag
Great work.
Well done. Martin555. ▲
⟩⟩
No likes yet
This member will receive 1 point for every like received |
|
💬 Re: HMAFV SEAL # 9
4 years ago by 🇳🇿 jbkiwi (
Fleet Admiral)✧ 10 Views · 1 Like
Flag
Looking very nice as usual Rowan, looking forward to a video.
JB ▲
⟩⟩
Martin555
|
📝 HMAFV SEAL #10
4 years ago by 🇨🇦 Rowen ( Captain)
Captain)✧ 20 Views · 10 Likes · 7 Comments
Flag
💬 Add Comment
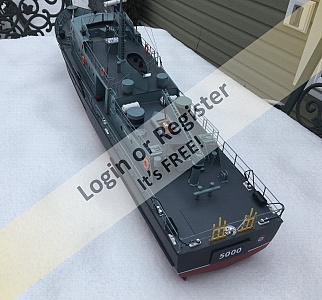
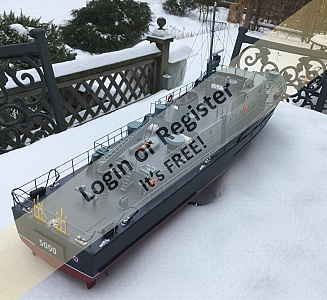
Miscellaneous detail added to complete the model. Had to deviate from my usual focus on building accurately to scale as some detail is not shown on either the plans or photographs. Fortunately “Modelers License” helped.
The model is essentially complete, just some minor bridge detail and flags needed. Then, once the ice goes, back to the pond for a final trim ballast and finish.
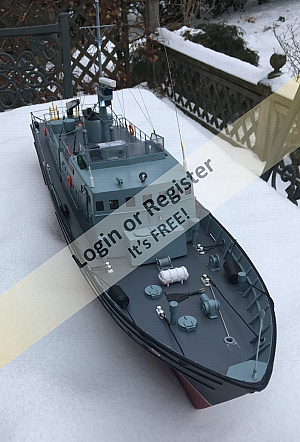
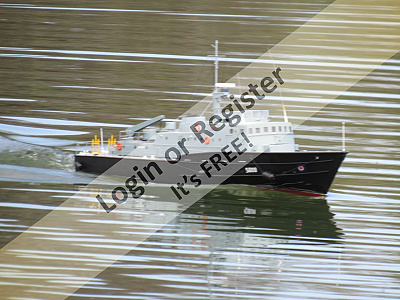
In summary, an interesting build of a little known vessel, a build that makes an attractive model and one that sails well with a straight forward, brushed motor powertrain.
The ice has gone and the model has now been sailed extensively, as the 3 wet pictures show. The extra experience has confirmed my earlier remarks on just how good a model this vessel makes
t


The model is essentially complete, just some minor bridge detail and flags needed. Then, once the ice goes, back to the pond for a final trim ballast and finish.
In summary, an interesting build of a little known vessel, a build that makes an attractive model and one that sails well with a straight forward, brushed motor powertrain.
The ice has gone and the model has now been sailed extensively, as the 3 wet pictures show. The extra experience has confirmed my earlier remarks on just how good a model this vessel makes
t
▲
⟩⟩
Inkoust
Ianh
jbkiwi
Graham93
Martin555
RNinMunich
marky
Rogal118
Skydive130
figtree7nts
|
💬 Re: HMAFV SEAL #10
4 years ago by 🇨🇦 Newby7 (
Fleet Admiral)✧ 10 Views · 1 Like
Flag
Nice job as usual Rowan looks good on the water.
Rick ▲
⟩⟩
Martin555
|
|
Login To
Remove Ads 💬 Re: HMAFV SEAL #10
4 years ago by 🇬🇧 mturpin013 (
Admiral)✧ 10 Views · 1 Like
Flag
I'm all for “Modellers License” its a lovely model, well done
▲
⟩⟩
Martin555
|
|
💬 Re: HMAFV SEAL #10
4 years ago by 🇳🇿 jbkiwi (
Fleet Admiral)✧ 10 Views · 2 Likes
Flag
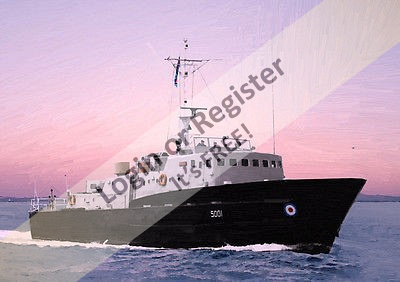
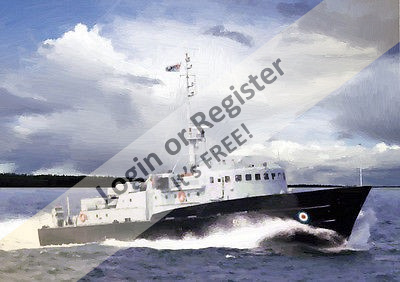
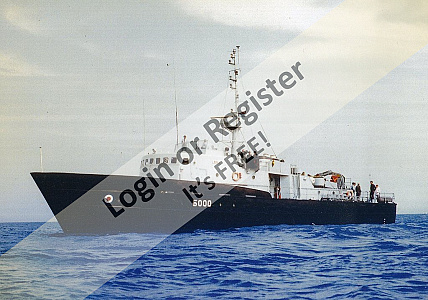
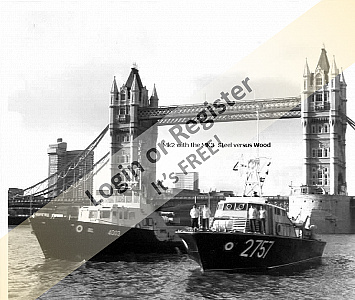
Here are a few pics I found in my collection Rowen, not sure if you have any of these?
JB 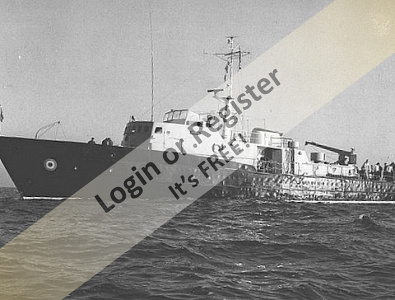

▲
⟩⟩
Inkoust
Martin555
|
|
💬 Re: HMAFV SEAL #10
4 years ago by 🇳🇿 jbkiwi (
Fleet Admiral)✧ 10 Views · 1 Like
Flag
Another great model Rowen and an interesting subject as well. Don't think I've ever seen another model of this ship. Actually found three of them (briefly) in a you tube vid the other day moored one behind the other (don't know where it was)
JB ▲
⟩⟩
Martin555
|
|
💬 Re: HMAFV SEAL #10
4 years ago by 🇬🇧 Martin555 (
Fleet Admiral)✧ 9 Views · 0 Likes
Flag
Very nice indeed.
You have a great model there and should be very proud of what you have made. Well done. Martin555. ▲
⟩⟩
No likes yet
This member will receive 1 point for every like received |
|
💬 Re: HMAFV SEAL #10
4 years ago by 🇬🇧 marky (
 Commodore) Commodore)✧ 10 Views · 1 Like
Flag
Looking very nice, Great job
Cheers Marky👍 ▲
⟩⟩
Martin555
|
|
💬 Re: HMAFV SEAL #10
4 years ago by 🇬🇧 Rogal118 (
 Lieutenant Commander) Lieutenant Commander)✧ 28 Views · 1 Like
Flag
Very nice Rowen, you have been busy, what a super model, I bet your so proud. I hope my borderer looks half as good
▲
⟩⟩
Martin555
|


Login To
Remove Ads
Remove Ads