Join Us On Social Media!

|

|

|
Download The App!
Login To
Remove Ads
Remove Ads
Login To
Remove Ads
Remove Ads
Model Boats Website
Yet to be named launch
8 Posts · 14 Followers · 52 Photos · 105 Likes
Began 1 year ago by
 United States
Follow This Thread
Not currently following
> Click to follow
> Click to follow
Latest Post 4 months ago by
| Most recent posts shown first (Show Oldest First) | (Print Booklet) |
📝 Encore
4 months ago by 🇺🇸 Black Shoe ( Sub-Lieutenant)
Sub-Lieutenant)✧ 35 Views · 15 Likes · 4 Comments
Flag
💬 Add Comment
I thought the last entry was the last entry. 😊
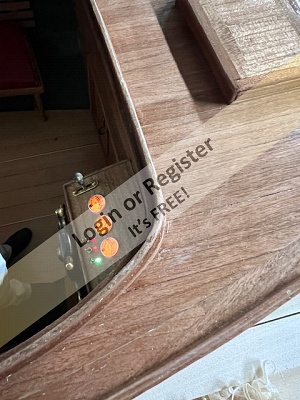
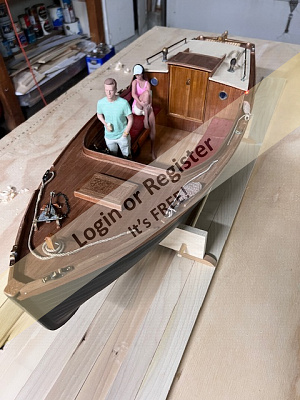
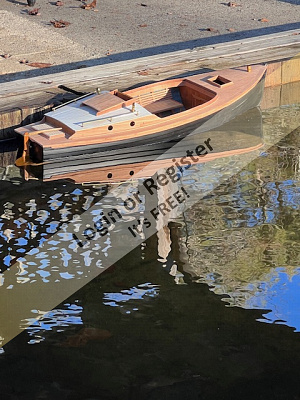
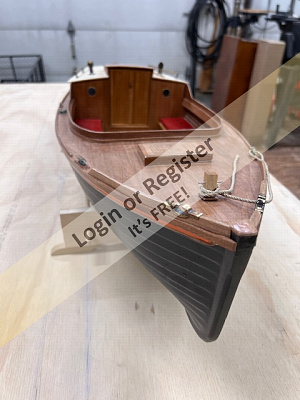
After shelving the launch to wait for the ice to go out and thinking about it a little, it seemed like a good time to add a few lights and a couple more details. I also didn't like having to remove the cabin roof to turn on and off the power. It seemed like an opportunity to break something particularly at pond-side, so moving the power switch was added to the list.
Interior, running, cockpit, and instrument lights were added. The main power switch was moved to a mount under the small hatch forward.
The anchor and boathook was also added.
The boat has been launched and run albeit in a very small area of a very small pond, but I suspect even with a six volt system it'll still operate at speeds somewhat above scale.
▲
⟩⟩
Commodore-H
AlessandroSPQR
Rookysailor
roycv
stevedownunder
Graham93
Doogle
Wolle
Len1
peterd
Ronald
EdW
Mike Stoney
Colin H
Chum444
|
💬 Re: Encore
4 months ago by 🇺🇸 Black Shoe (
Sub-Lieutenant)✧ 23 Views · 1 Like
Flag
Thank you all!
Chum, it'll be there! Already looking forward to the combined float. Ron, we'll pin down the day as we get closer! 👍 Hermank, the figures came from a printer on Etsy. ▲
⟩⟩
Len1
|
|
Login To
Remove Ads 💬 Re: Encore
4 months ago by 🇨🇦 Ronald (
 Admiral) Admiral)✧ 46 Views · 4 Likes
Flag
Looking forward to the day of seeing it on the water...in person!
▲
⟩⟩
AlessandroSPQR
Len1
Black Shoe
peterd
|
|
💬 Re: Encore
4 months ago by 🇧🇪 hermank (
 Captain) Captain)✧ 42 Views · 4 Likes
Flag
BLACK SHOE
very nice model, and i must say l like the models on the boat! well done👎👍👍 ▲
⟩⟩
AlessandroSPQR
Len1
Black Shoe
Mike Stoney
|
|
💬 Re: Encore
4 months ago by 🇺🇸 Chum444 (
Sub-Lieutenant)✧ 38 Views · 2 Likes
Flag
Some fine T!👍👍 Will we see it in Scarborough next June?🤞
▲
⟩⟩
Len1
Black Shoe
|
Login To
Remove Ads
Remove Ads
📝 Launch cushions
5 months ago by 🇺🇸 Black Shoe ( Sub-Lieutenant)
Sub-Lieutenant)✧ 50 Views · 9 Likes · 3 Comments
Flag
💬 Add Comment
Hi Steve,
Glad you found the (probably) last installment of this build. I inadvertently posted it as a comment to a previous installment instead of a new "chapter" of the build log.
The cushions:
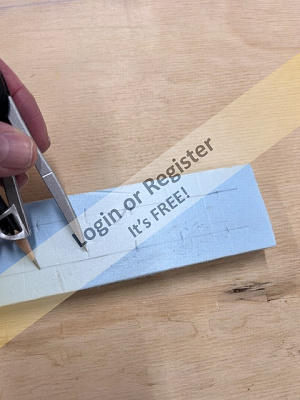
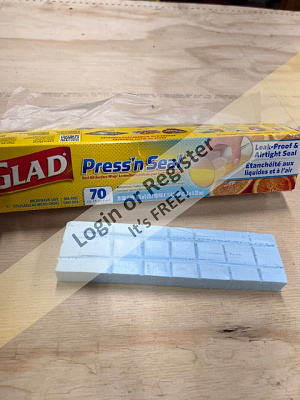
All they are is a piece of rigid closed cell foam used for insulation from a big box store or lumber yard. (I use it cut up and installed in voids for floatation as well.) It can also be found on construction sites as cut-offs in sizes good for our hobby.
The photos:
After a bit of experimenting, here's a quick summary of how these cushions came to be.
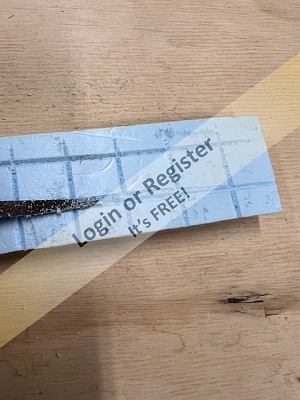
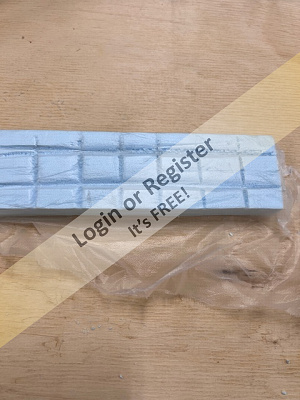
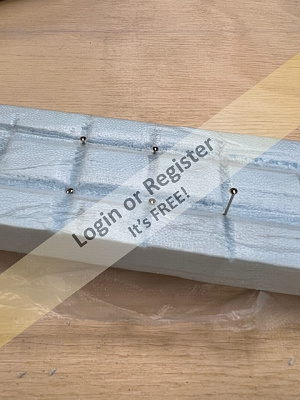
Cutting the cushions to size and shape, marking off, filing and sanding the grooves to create the pattern of the sections, rounding off the rough edges, wrapping the part with a kitchen wrapping product. (I have no stake in this company, it just happens to have a little texture to it, sticks well during this process, takes rattle-can paint well, and above all was available in the kitchen cabinet.👍 Some of the spray paints are too "hot" for the foam, but this wrap provides a barrier so the foam isn't effected. I recommend experimenting with the materials at hand to be sure they're compatible. )
Once the wrap is applied the pins were installed to simulate the buttons, CA glued on the backside and cut off if too long. A piece of cord is glued to the outside edge of the cushions to simulate the piping.
A couple light coats of primer, then a color coat.


Glad you found the (probably) last installment of this build. I inadvertently posted it as a comment to a previous installment instead of a new "chapter" of the build log.
The cushions:
All they are is a piece of rigid closed cell foam used for insulation from a big box store or lumber yard. (I use it cut up and installed in voids for floatation as well.) It can also be found on construction sites as cut-offs in sizes good for our hobby.
The photos:
After a bit of experimenting, here's a quick summary of how these cushions came to be.
Cutting the cushions to size and shape, marking off, filing and sanding the grooves to create the pattern of the sections, rounding off the rough edges, wrapping the part with a kitchen wrapping product. (I have no stake in this company, it just happens to have a little texture to it, sticks well during this process, takes rattle-can paint well, and above all was available in the kitchen cabinet.👍 Some of the spray paints are too "hot" for the foam, but this wrap provides a barrier so the foam isn't effected. I recommend experimenting with the materials at hand to be sure they're compatible. )
Once the wrap is applied the pins were installed to simulate the buttons, CA glued on the backside and cut off if too long. A piece of cord is glued to the outside edge of the cushions to simulate the piping.
A couple light coats of primer, then a color coat.
▲
⟩⟩
Mike Stoney
pressonreguardless
Len1
EdW
stevedownunder
River Rat
GaryLC
Colin H
RNinMunich
|
💬 Re: Launch cushions
5 months ago by 🇦🇺 stevedownunder (
Captain)✧ 47 Views · 2 Likes
Flag
Hi Black Shoe,
Fantastic idea, thanks for sharing your method and as Doug says this process could be used for other applications. 👍 Cheers, Stephen. ▲
⟩⟩
Black Shoe
AlessandroSPQR
|
|
Login To
Remove Ads 💬 Re: Launch cushions
5 months ago by 🇺🇸 Chum444 (
Sub-Lieutenant)✧ 49 Views · 2 Likes
Flag
I have a name suggestion. How about SOME FINE! Another example of your skills that result in truly excellent models. Well on you BS.👍👍👍👍👍
▲
⟩⟩
Black Shoe
stevedownunder
|
|
💬 Re: Launch cushions
5 months ago by 🇩🇪 RNinMunich (
 Fleet Admiral) Fleet Admiral)✧ 51 Views · 2 Likes
Flag
What a cushy job😁
Bet you were glad to have that one wrapped up though! Nice one BS👍One for the 'Tips n Tricks' box. Cheers, Doug😎 Thinks🤕 Process could also be used for the splinter protection bags on older naval ships. ▲
⟩⟩
stevedownunder
Black Shoe
|
📝 Harbor Launch
7 months ago by 🇺🇸 Black Shoe ( Sub-Lieutenant)
Sub-Lieutenant)✧ 83 Views · 20 Likes · 8 Comments
Flag
💬 Add Comment
Back to The bench.
A summer of projects around the house, gardens, an old van, and the holidays used a lot of 2023. There were occasional evenings on the bench, but the weather has turned with the calendar and it's time to dust off the launch.
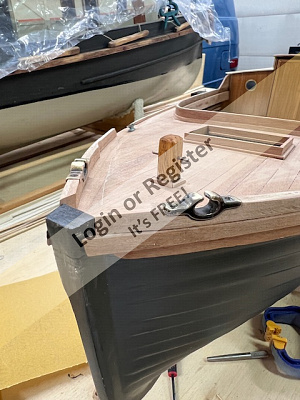
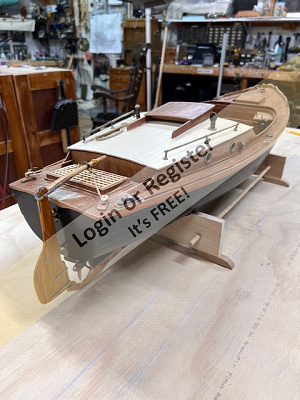
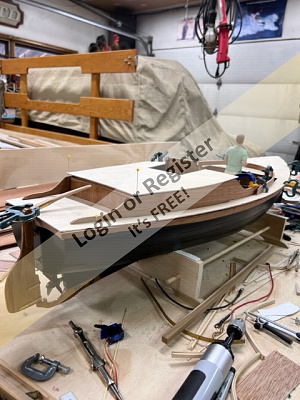
The original design had a sweeping arc as a coaming around the cockpit (shown in an earlier photo) and the foredeck continued under this and terminated in a straight horizontal line. To me it made the coaming look like an after-thought. I used a wall paper steamer and built a steam box to try some pretty severe curves in the cherry wood at the forward corners of the cockpit. There were a couple of pieces that split, but paying close attention to the grain of the wood enhanced the success of the bending. I built a buck just slightly smaller than the contour I needed and clamped the steamed strakes to it allowing them to cool and take a set for a day.
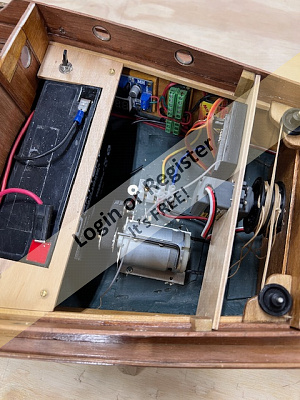
Most of the electronics and electrical components have been temporarily installed in order to prove their effectiveness and determine the trim/ballast requirements.
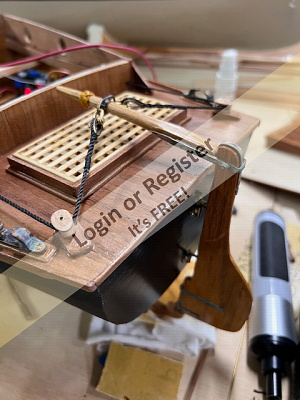
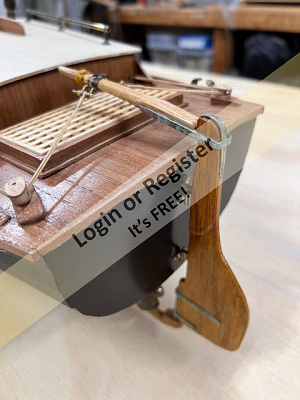
The steering apparatus is a little unusual, in that with an outboard rudder and tiller a conventional rudder post and quadrant inboard forward of the transom wasn't possible. A system of turning blocks and a vertically mounted servo answers to operate the tiller. I used the stock servo arm and although it's relatively short still provides close to the 35 degree rudder port and starboard which is considered maximum effectiveness. (The image below shows the winch pulleys which proved unnecessary. The original thought was a two part purchase that would have needed more line, but the rudder action and size has proved the single line to be sufficient.)
A float test has proven successful in the trim department although a full test under power couldn't be done as at that time the rudder rig wasn't sorted out yet.
Several coats of satin finish have been applied and weathering and fitting the hardware is in the process now. After this is completed it'll be disassembled, sanded, and final finish applied.
The detailing will follow with lines, "stuff", and perhaps running lights.
A summer of projects around the house, gardens, an old van, and the holidays used a lot of 2023. There were occasional evenings on the bench, but the weather has turned with the calendar and it's time to dust off the launch.
The original design had a sweeping arc as a coaming around the cockpit (shown in an earlier photo) and the foredeck continued under this and terminated in a straight horizontal line. To me it made the coaming look like an after-thought. I used a wall paper steamer and built a steam box to try some pretty severe curves in the cherry wood at the forward corners of the cockpit. There were a couple of pieces that split, but paying close attention to the grain of the wood enhanced the success of the bending. I built a buck just slightly smaller than the contour I needed and clamped the steamed strakes to it allowing them to cool and take a set for a day.
Most of the electronics and electrical components have been temporarily installed in order to prove their effectiveness and determine the trim/ballast requirements.
The steering apparatus is a little unusual, in that with an outboard rudder and tiller a conventional rudder post and quadrant inboard forward of the transom wasn't possible. A system of turning blocks and a vertically mounted servo answers to operate the tiller. I used the stock servo arm and although it's relatively short still provides close to the 35 degree rudder port and starboard which is considered maximum effectiveness. (The image below shows the winch pulleys which proved unnecessary. The original thought was a two part purchase that would have needed more line, but the rudder action and size has proved the single line to be sufficient.)
A float test has proven successful in the trim department although a full test under power couldn't be done as at that time the rudder rig wasn't sorted out yet.
Several coats of satin finish have been applied and weathering and fitting the hardware is in the process now. After this is completed it'll be disassembled, sanded, and final finish applied.
The detailing will follow with lines, "stuff", and perhaps running lights.
▲
⟩⟩
MartinH2
Mike Stoney
jbkiwi
Commodore-H
luckyduck
DuncanP
Wolle
mturpin013
EdW
Len1
River Rat
boatmam
Colin H
stevedownunder
hermank
Peejay
RNinMunich
Doogle
Ronald
AlessandroSPQR
|
💬 Re: Harbor Launch
5 months ago by 🇦🇺 stevedownunder (
Captain)✧ 56 Views · 2 Likes
Flag
Hi Black Shoe,
Beautiful work. 👍 What material did you use for the cushions? Cheers, Stephen. ▲
⟩⟩
AlessandroSPQR
Peejay
|
|
Login To
Remove Ads 💬 Re: Harbor Launch
5 months ago by 🇺🇸 Black Shoe (
Sub-Lieutenant)✧ 54 Views · 6 Likes
Flag
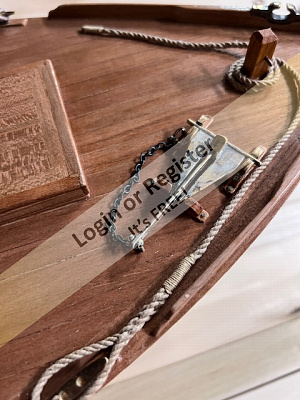
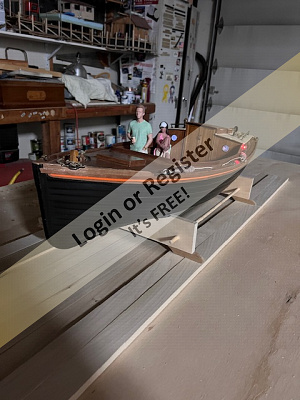
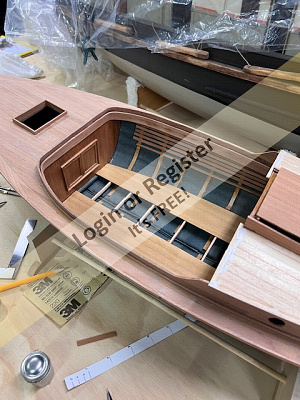
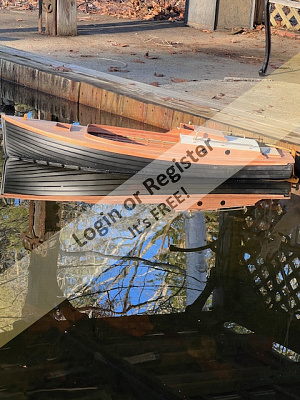
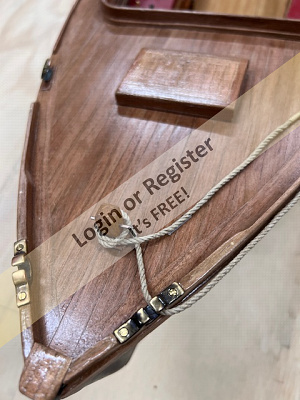
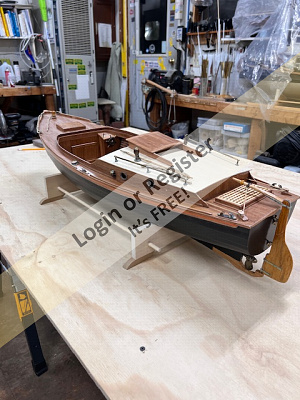
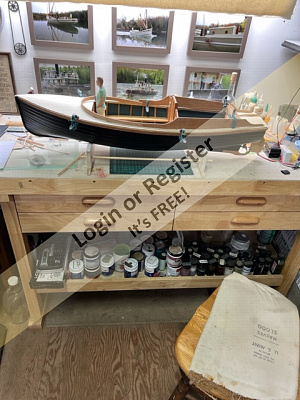
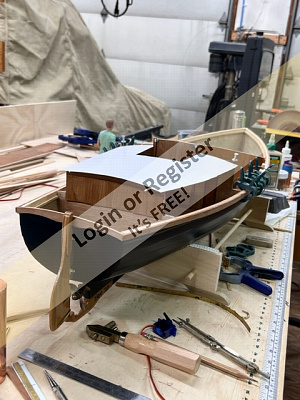
Things are wrapping up on the launch. Other than a "shake-down cruise" (delayed because of ice in the thoroughfare,) and a few added details this project is about as ready as it will be for a spring float.
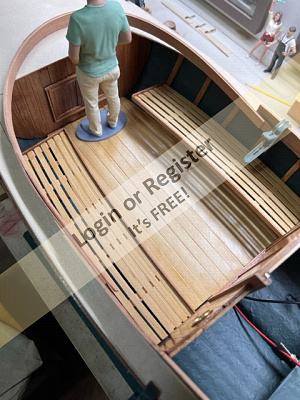
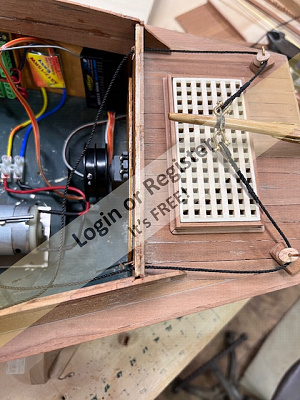
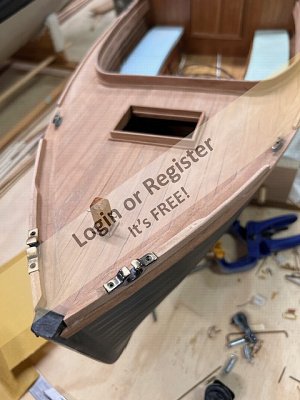
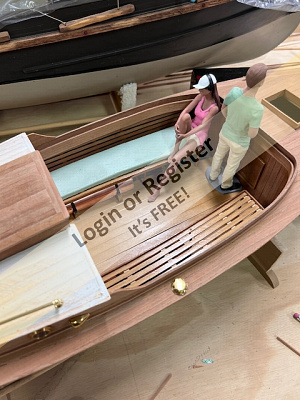
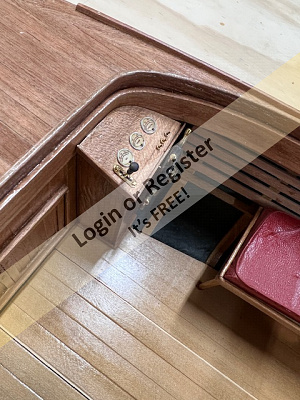
There were a couple of experiments trying to get the cushions looking like I thought they should. A little more finessing and they should be OK. The photos: 1. Overall shot of the cockpit. 2. The engine room roof. 3. Cushions 4. Cocks combing on the boat hook, and spliced stern mooring line. 5. Forward deck and mooring line. 6. Control console. (The toggle switches are actually very small scale belaying pins mounted through an #090 nut and a .025" hole drilled through the console panel.) 7. Rudder, gudgeons, pintles, and tiller mount. It's difficult to pick out, but there had to be a lock fabricated to keep the rudder from floating up under wheel pressure and disengaging from the gudgeons. 8. The "engine room" which is still being sorted out. It's functional, but there's a couple more electrical circuits that need to be added. 9., 10., & 11. Overall shots of the launch. 
▲
⟩⟩
Mike Stoney
MartinH2
Peejay
jbkiwi
stevedownunder
RNinMunich
|
|
💬 Re: Harbor Launch
7 months ago by 🇺🇸 Black Shoe (
Sub-Lieutenant)✧ 76 Views · 4 Likes
Flag
Thank you all for the comments!
I spoke with the guy in the photos and shared the concerns posted by Doug. He responded; "Please relay to Mr. Doug that even though my posture suggests otherwise, I am not enjoying the relief he suggests ~ although two more of these cans and I WILL be ready to pump bilges! Carry on.....👍" 😊 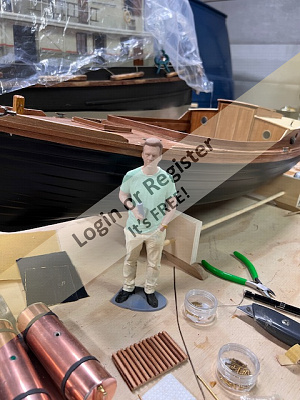
▲
⟩⟩
Peejay
stevedownunder
Ronald
RNinMunich
|
|
💬 Re: Harbor Launch
7 months ago by 🇺🇸 LewZ (
 Commodore) Commodore)✧ 80 Views · 2 Likes
Flag
Wood, wood, and more wood! Great job👍. As I sad before, I like to zoom in on the photos and checkout the details.
Lew Florida ⛵, USA ▲
⟩⟩
Peejay
Black Shoe
|
|
💬 Re: Harbor Launch
7 months ago by 🇩🇪 RNinMunich (
Fleet Admiral)✧ 81 Views · 6 Likes
Flag
Wonderful "stuff" Blackshoe👍
To go back to one of your earlier posts if I may. You wrote then- "I'm reluctant to hazard what the fellow in the third image is thinking. Most likely not appropriate for a family site such as this." This is the same fellow as in the first and last photos you just posted. Looks like he's taking a leak and he's just thinking "Aaaah. That's better😊". Dunno what his girlfriend was thinking😮 😁😂😎 ▲
⟩⟩
Peejay
stevedownunder
Ronald
Black Shoe
River Rat
Colin H
|
|
💬 Re: Harbor Launch
7 months ago by 🇺🇸 Commodore-H (
 Lieutenant) Lieutenant)✧ 81 Views · 1 Like
Flag
Absolutely first class!👍👍👍👍👍
▲
⟩⟩
Black Shoe
|
|
💬 Re: Harbor Launch
7 months ago by 🇬🇧 Doogle (
Commodore)✧ 81 Views · 2 Likes
Flag
Very nice blackshoe, looking forward to seeing more pics 👍
▲
⟩⟩
Black Shoe
AlessandroSPQR
|
|
💬 Re: Harbor Launch
7 months ago by 🇧🇪 hermank (
Captain)✧ 86 Views · 2 Likes
Flag
BLACK SHOE
a very nice and well built model. Hopefully we will see moooooooooore pictures as you continue the built ▲
⟩⟩
Black Shoe
AlessandroSPQR
|
📝 Launch
1 year ago by 🇺🇸 Black Shoe ( Sub-Lieutenant)
Sub-Lieutenant)✧ 98 Views · 13 Likes · 4 Comments
Flag
💬 Add Comment
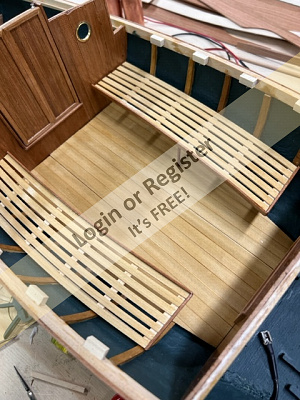
Managed to get the cockpit decking completed as well as the benches on either side. The benches will have a couple of turned spindles each to support them on the inboard side. I'll make a couple of cushions for the benches a little later.
I need to turn to the mechanical side before much more topside work, but I have to shelve the project for a week or better and get some yard work done since the majority of the snow is gone.

I need to turn to the mechanical side before much more topside work, but I have to shelve the project for a week or better and get some yard work done since the majority of the snow is gone.
▲
⟩⟩
MartinH2
Peejay
Doogle
pressonreguardless
MotoPilot
stevedownunder
RNinMunich
mturpin013
Colin H
flaxbybuck
MouldBuilder
hermank
jbkiwi
|
💬 Re: Launch
1 year ago by 🇦🇺 stevedownunder (
Captain)✧ 104 Views · 3 Likes
Flag
Beautiful work Black Shoe,
Cheers, Stephen. ▲
⟩⟩
AlessandroSPQR
pressonreguardless
Black Shoe
|
|
Login To
Remove Ads 💬 Re: Launch
1 year ago by 🇬🇧 mturpin013 (
Admiral)✧ 102 Views · 3 Likes
Flag
That's some really nice bench work
▲
⟩⟩
pressonreguardless
stevedownunder
Black Shoe
|
|
💬 Re: Launch
1 year ago by 🇧🇪 hermank (
Captain)✧ 95 Views · 3 Likes
Flag
Vert Nice built model with an eye for details 👍👍
▲
⟩⟩
pressonreguardless
stevedownunder
Black Shoe
|
|
💬 Re: Launch
1 year ago by 🇺🇸 Chum444 (
Sub-Lieutenant)✧ 94 Views · 3 Likes
Flag
Snow gone? Who hoo! torra dog said water was getting soft in the shallows. Well on Maine.
Such an interesting & different model you are bringing to life with your exceptional skills. ▲
⟩⟩
pressonreguardless
stevedownunder
Black Shoe
|
📝 Launch update part II
1 year ago by 🇺🇸 Black Shoe ( Sub-Lieutenant)
Sub-Lieutenant)✧ 110 Views · 11 Likes · 2 Comments
Flag
💬 Add Comment
Thank you for the comments!
Just a very quick update before I begin the trying and fitting, trying and fitting, repeat, repeat, repeat.
These are the things that take such a long time and very little progress shows.
The first two photos show the general arrangement of the deck and coaming that will take some time to finesse.
I'm reluctant to hazard what the fellow in the third image is thinking. Most likely not appropriate for a family site such as this.
▲
⟩⟩
MartinH2
pressonreguardless
GaryLC
stevedownunder
RNinMunich
MouldBuilder
jbkiwi
flaxbybuck
Peejay
Colin H
hermank
|
💬 Re: Launch update part II
1 year ago by 🇬🇧 flaxbybuck (
Captain)✧ 99 Views · 6 Likes
Flag
You are absolutely right about 'try and fit - repeat - repeat' But, whether it takes time or not, many of us can really appreciate what has gone into making a splendid model. Those who have not experienced the highs and lows of model making have little idea of the time and effort that goes into making our models. This is why many of us on this forum can properly appreciate someone else's work.
I love the lines and the look of this launch, and you appear to be making a really good job of it. At this stage one is encouraged by the apparent nearness to completion ?? Keep us updated on progress. We're loving it !😉 ▲
⟩⟩
Peejay
pressonreguardless
stevedownunder
RNinMunich
hermank
Black Shoe
|
|
💬 Re: Launch update part II
1 year ago by 🇬🇧 MotoPilot (
 Chief Petty Officer 2nd Class) Chief Petty Officer 2nd Class)✧ 101 Views · 4 Likes
Flag
That’s a really lovely looking launch. Obviously some good skills going into its build. 👍
▲
⟩⟩
Peejay
pressonreguardless
stevedownunder
Black Shoe
|
📝 Launch update
1 year ago by 🇺🇸 Black Shoe ( Sub-Lieutenant)
Sub-Lieutenant)✧ 110 Views · 10 Likes · 3 Comments
Flag
💬 Add Comment
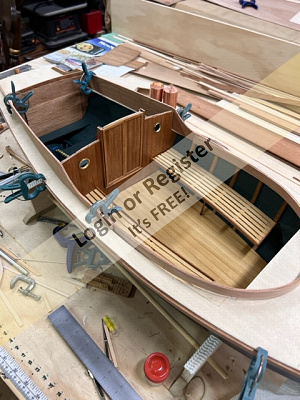
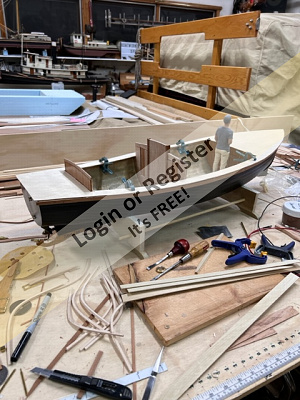
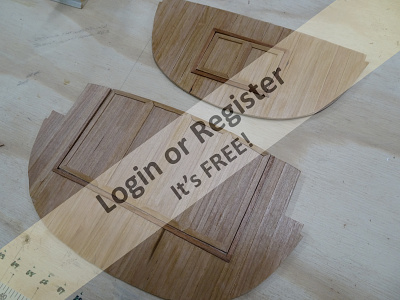
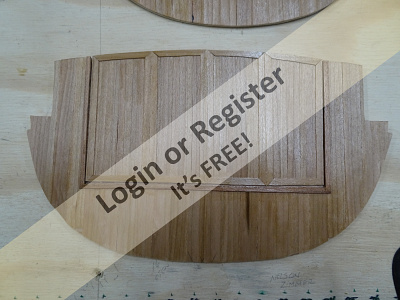
There hasn't been a lot of progress that shows, but some of the mundane items have been tended to. The forward and main bulkheads are epoxied in permanently after attaching the hatches closer hardware.
Patterns for the deck and cabin roof have been made and the false deck/roof laid out and roughed to shape. Still a lot of finesse is needed for a good fit.
I've also made up five sets of frames and marked the hull where they're to be installed. These frames are not required for this hull, but will be installed to facilitate attaching the floor stringers, fuel tank brackets, and seat stringer.
Photos:
1.thru 4. making up patterns and fitting the false deck and cabin roof, plus the rudder and wheel arrangement.
5. & 6. Laying out and marking the frame stations.
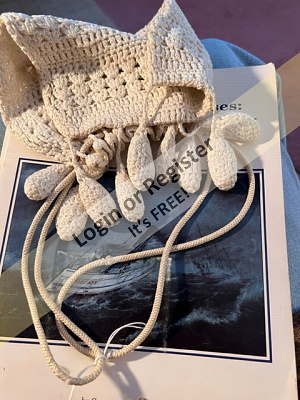
7. thru 9. The forward bulkhead and cabin hatches fastening method. these are just a small hook at the bottom of the hatch to retain the bottoms in place and a small magnet glued to the top corners which engage tin flashing shaped around and glued to the strip jams.
10. As with other builds I have found "fenders" in some most unlikely places. I have also "trained" my adult daughter (who frequents antique stores and flea markets ,) to keep an eye out for crochet tassels as found on some home made ladies purses and hand bags. She sent me this find recently which will produce nine excellent fenders for this build. With what she paid for the purse, the fenders come out to less than a dollar (US) a piece. I couldn't make them for that.
Patterns for the deck and cabin roof have been made and the false deck/roof laid out and roughed to shape. Still a lot of finesse is needed for a good fit.
I've also made up five sets of frames and marked the hull where they're to be installed. These frames are not required for this hull, but will be installed to facilitate attaching the floor stringers, fuel tank brackets, and seat stringer.
Photos:
1.thru 4. making up patterns and fitting the false deck and cabin roof, plus the rudder and wheel arrangement.
5. & 6. Laying out and marking the frame stations.
7. thru 9. The forward bulkhead and cabin hatches fastening method. these are just a small hook at the bottom of the hatch to retain the bottoms in place and a small magnet glued to the top corners which engage tin flashing shaped around and glued to the strip jams.
10. As with other builds I have found "fenders" in some most unlikely places. I have also "trained" my adult daughter (who frequents antique stores and flea markets ,) to keep an eye out for crochet tassels as found on some home made ladies purses and hand bags. She sent me this find recently which will produce nine excellent fenders for this build. With what she paid for the purse, the fenders come out to less than a dollar (US) a piece. I couldn't make them for that.
▲
⟩⟩
MartinH2
jbkiwi
Peejay
pressonreguardless
stevedownunder
RNinMunich
MouldBuilder
Colin H
hermank
Ronald
|
💬 Re: Launch update
1 year ago by 🇺🇸 Chum444 (
Sub-Lieutenant)✧ 106 Views · 4 Likes
Flag
Quite an interesting build. Your skills are admirable. Thanks for the tip about fenders; it’s a really good one.
▲
⟩⟩
stevedownunder
PeterJ
Colin H
Black Shoe
|
|
Login To
Remove Ads 💬 Re: Launch update
1 year ago by 🇧🇪 hermank (
Captain)✧ 109 Views · 3 Likes
Flag
This is real craftsmanship. Very nice model
▲
⟩⟩
stevedownunder
Colin H
Black Shoe
|
|
💬 Re: Launch update
1 year ago by 🇨🇦 Ronald (
Admiral)✧ 113 Views · 2 Likes
Flag
Super Fenders!
Love to spend a day with you in your workshop! It would be fun. Ron ▲
⟩⟩
Colin H
Black Shoe
|
📝 A side trip...
1 year ago by 🇺🇸 Black Shoe ( Sub-Lieutenant)
Sub-Lieutenant)✧ 119 Views · 12 Likes · 3 Comments
Flag
💬 Add Comment
Here's one of those side trips that I alluded to in an earlier post.
In the drawings there were two 10"X36" fuel tanks one each port and starboard under the benches. No particular fittings were called out, so I suppose it was "builder's discretion" as to how they were plumbed. If my calcs are remotely in the ball park, a 10"X36" tank doesn't hold very much fuel. (Surely you didn't think I was going to hazard my volume guess amongst you wizards?) however, I can with some authority proclaim that two of these tanks will double the volume of just one!😊
Short of a sounding stick, I don't know how one would determine the remaining fuel in either tank unless they were fitted with electric gauges. Running a wire from a sealed and painted closet dowel to simulate an electric gauge would be the sensible thing to do.
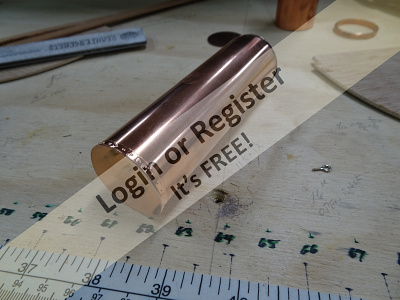
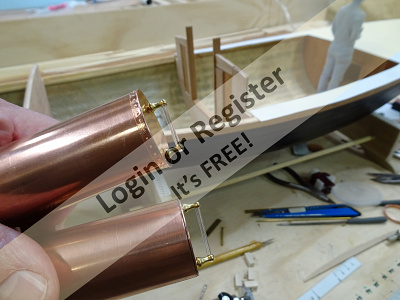
OR, find a short length of 1 1/4" copper pipe, cut it to represent 36" in scale (4 1/2") cut some discs of copper flashing, solder these to the pipe, and polish the whole thing. Now, to determine the fuel level...sight glasses. In 1:1 context the sight glasses probably wouldn't satisfy the authorities, but I'm reasonably certain in 1:8 scale no one is going to inadvertently kick out the glass.
Although these are not complete, here's where we are. I think they'll work.
The photo's:
1. using a 1/16" acrylic rod for the "glass", and drilling out a cabin-top grab rail stanchion to 1/16" provided the upper and lower valves. (The valve wheels are yet to be installed.)
2. Work in progress.
3. If the authorities find out we're using off-road fuel they may take a dim view of the operation.
4. I contemplated installing a couple of safety rods down both sides of the glass as would be done in the full sized installation to protect the glass, (and may still,) but here's where this little excursion is as of this update.


In the drawings there were two 10"X36" fuel tanks one each port and starboard under the benches. No particular fittings were called out, so I suppose it was "builder's discretion" as to how they were plumbed. If my calcs are remotely in the ball park, a 10"X36" tank doesn't hold very much fuel. (Surely you didn't think I was going to hazard my volume guess amongst you wizards?) however, I can with some authority proclaim that two of these tanks will double the volume of just one!😊
Short of a sounding stick, I don't know how one would determine the remaining fuel in either tank unless they were fitted with electric gauges. Running a wire from a sealed and painted closet dowel to simulate an electric gauge would be the sensible thing to do.
OR, find a short length of 1 1/4" copper pipe, cut it to represent 36" in scale (4 1/2") cut some discs of copper flashing, solder these to the pipe, and polish the whole thing. Now, to determine the fuel level...sight glasses. In 1:1 context the sight glasses probably wouldn't satisfy the authorities, but I'm reasonably certain in 1:8 scale no one is going to inadvertently kick out the glass.
Although these are not complete, here's where we are. I think they'll work.
The photo's:
1. using a 1/16" acrylic rod for the "glass", and drilling out a cabin-top grab rail stanchion to 1/16" provided the upper and lower valves. (The valve wheels are yet to be installed.)
2. Work in progress.
3. If the authorities find out we're using off-road fuel they may take a dim view of the operation.
4. I contemplated installing a couple of safety rods down both sides of the glass as would be done in the full sized installation to protect the glass, (and may still,) but here's where this little excursion is as of this update.
▲
⟩⟩
MartinH2
jbkiwi
RNinMunich
MouldBuilder
stevedownunder
Colin H
Graham93
hermank
Rookysailor
peterd
RodC
Ronald
|
💬 Re: A side trip...
1 year ago by 🇨🇦 RodC (
Lieutenant)✧ 109 Views · 2 Likes
Flag
When i was a kid in Southern Ontario in the 1950s we used untaxed farm fuel in Grandpa's 5-1/2 h.p. Johnson outboard. Why would one voluntarily pay road tax on fuel for marine use?
▲
⟩⟩
Black Shoe
Colin H
|
|
Login To
Remove Ads 💬 Re: A side trip...
1 year ago by 🇺🇸 Chum444 (
Sub-Lieutenant)✧ 114 Views · 4 Likes
Flag
I recall boats of this era using sounding sticks to determine fuel levels. However your approach is MUCH more interesting. Excellent craftsmanship.
▲
⟩⟩
stevedownunder
Colin H
hermank
Black Shoe
|
|
💬 Re: A side trip...
1 year ago by 🇨🇦 Ronald (
Admiral)✧ 120 Views · 1 Like
Flag
Cool 😎!!!
▲
⟩⟩
Black Shoe
|
📝 Yet to be named launch
1 year ago by 🇺🇸 Black Shoe ( Sub-Lieutenant)
Sub-Lieutenant)✧ 150 Views · 15 Likes · 6 Comments
Flag
💬 Add Comment
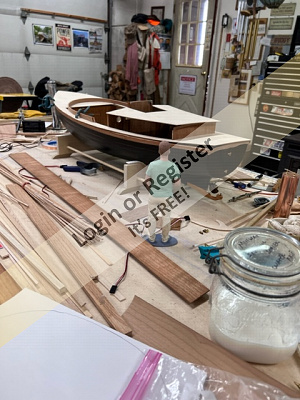
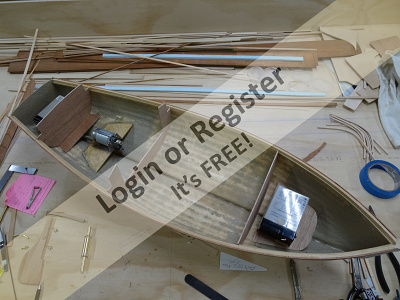
Two or three years ago an older modeler passed on and left his tools, parts and pieces behind. As is often the case, the son had little interest in the hobby so advertised the items for sale. I don't remember where I even saw the ad, but responded more out of curiosity than anything else. The son and I corresponded via email a few times with him sending images of box-lots of what was available, Towards the end of our correspondence he mentioned there was a boat hull that he knew nothing about, but apparently had not generated any interest and I could have it for a few dollars and shipping. I didn't need another hull and particularly didn't need a 'glass lapstrake boat, but thought it might be worth something down-stream as trading material, or someone may want it. The alternative was it would end up in a New Jersey landfill. ☹️
I received it about a week later, checked it out, and shelved it in the "stash" group.
A while ago I was idly thumbing through a book with page after page of study plans and blew by a launch-type hull that was carvel planked. A couple of days later the plan resurfaced in my mind's eye and I looked it up again and thought the 'glass hull in a 1:8 scale would be close enough to loosely emulate these lines. The inspiration drawings were drawn by a fellow named Nelson Zimmer out of the greater Detroit MI area. My apologies to Mr. Zimmer as I've taken some subtle liberties with his drawing, all the while keeping the basic profile of his design. His title for the boat was "Utility Launch" at 23'3" and the hull I have is 35". Close enough for my purposes.
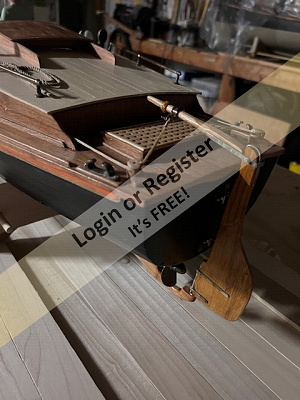
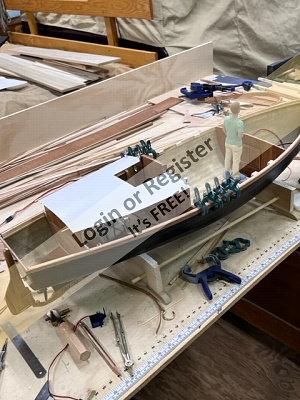
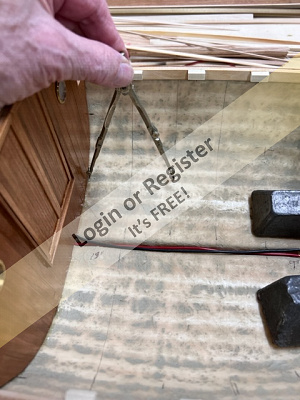
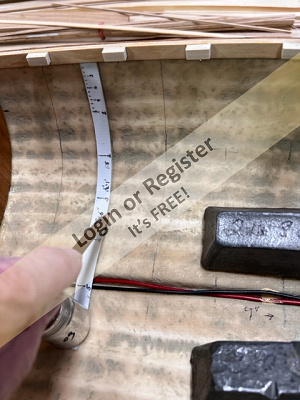
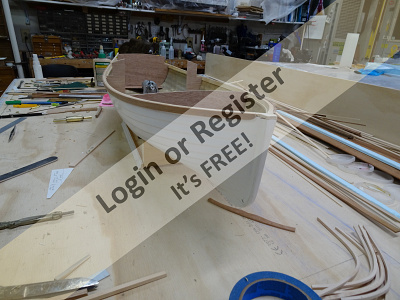
In this opening "chapter' I have drilled the shaft log hole, determined the log angle, and built a platform for the motor and drive pulley. Given enough room I like the timing belt method of propulsion as they're not real particular about alignment, (that's not to say some care isn't necessary to set up the drive,) they just seem to be quieter, plus one can experiment with different pulleys to come to a good efficient RPM for the propeller.
Photos:
1. A cursory general beginning.
2. determining that everything is "on the level." (This of course starts with the bench the build is on)
3. The propulsion will be a six volt system. One larger battery didn't fit well anywhere in the hull given the open midships area, so I tried two smaller batts in the ends which will be hooked up in parallel. There was some ballast required anyway, so doing a tub test proved this a viable solution.
4, 5, & 6. The forward and main bulkheads. After the time invested in these, I decided both need some modifications. Once the forward deck is in place retrieving the forward battery can be done through the hatch, but it would have been tight with the middle open cockpit benches, flooring, and "stuff". Keeping in mind this was only a 23' launch the 1:1 main bulkhead was originally designed with the bi-fold doors as shown which was a help to access the engine. I'm thinking of reconfiguring this arrangement as well.
I'd name this "Knot Likely", but it's knot a speed likely boat... 😊

I received it about a week later, checked it out, and shelved it in the "stash" group.
A while ago I was idly thumbing through a book with page after page of study plans and blew by a launch-type hull that was carvel planked. A couple of days later the plan resurfaced in my mind's eye and I looked it up again and thought the 'glass hull in a 1:8 scale would be close enough to loosely emulate these lines. The inspiration drawings were drawn by a fellow named Nelson Zimmer out of the greater Detroit MI area. My apologies to Mr. Zimmer as I've taken some subtle liberties with his drawing, all the while keeping the basic profile of his design. His title for the boat was "Utility Launch" at 23'3" and the hull I have is 35". Close enough for my purposes.
In this opening "chapter' I have drilled the shaft log hole, determined the log angle, and built a platform for the motor and drive pulley. Given enough room I like the timing belt method of propulsion as they're not real particular about alignment, (that's not to say some care isn't necessary to set up the drive,) they just seem to be quieter, plus one can experiment with different pulleys to come to a good efficient RPM for the propeller.
Photos:
1. A cursory general beginning.
2. determining that everything is "on the level." (This of course starts with the bench the build is on)
3. The propulsion will be a six volt system. One larger battery didn't fit well anywhere in the hull given the open midships area, so I tried two smaller batts in the ends which will be hooked up in parallel. There was some ballast required anyway, so doing a tub test proved this a viable solution.
4, 5, & 6. The forward and main bulkheads. After the time invested in these, I decided both need some modifications. Once the forward deck is in place retrieving the forward battery can be done through the hatch, but it would have been tight with the middle open cockpit benches, flooring, and "stuff". Keeping in mind this was only a 23' launch the 1:1 main bulkhead was originally designed with the bi-fold doors as shown which was a help to access the engine. I'm thinking of reconfiguring this arrangement as well.
I'd name this "Knot Likely", but it's knot a speed likely boat... 😊
▲
⟩⟩
stevedownunder
peterd
MotoPilot
jbkiwi
MartinW
MouldBuilder
AndyN
Ronald
pressonreguardless
Colin H
TonyAsh
hermank
Peejay
GaryLC
RNinMunich
|
💬 Re: Yet to be named launch
1 year ago by 🇺🇸 Chum444 (
Sub-Lieutenant)✧ 123 Views · 3 Likes
Flag
This will be yet another of your masterful builds. Looking forward to progress & perhaps seeing it in Scarborough.👍
▲
⟩⟩
stevedownunder
Black Shoe
hermank
|
|
Login To
Remove Ads 💬 Re: Yet to be named launch
1 year ago by 🇦🇺 peterd (
 Midshipman) Midshipman)✧ 134 Views · 2 Likes
Flag
Looks like she has really nice lines. Looking forward to seeing your progress.
▲
⟩⟩
stevedownunder
Black Shoe
|
|
💬 Re: Yet to be named launch
1 year ago by 🇬🇧 MotoPilot (
Chief Petty Officer 2nd Class)✧ 126 Views · 2 Likes
Flag
What a lovely looking traditional launch 👍
▲
⟩⟩
stevedownunder
Black Shoe
|
|
💬 Re: Yet to be named launch
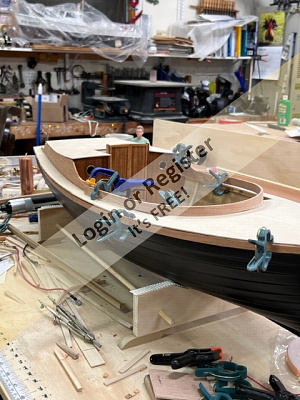
1 year ago by 🇺🇸 Black Shoe (
Sub-Lieutenant)✧ 135 Views · 8 Likes
Flag
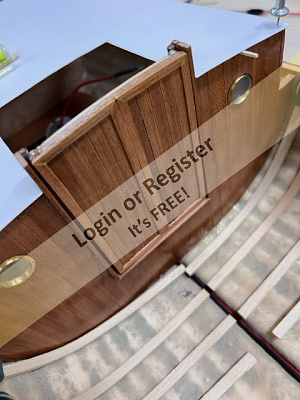
Chapter II
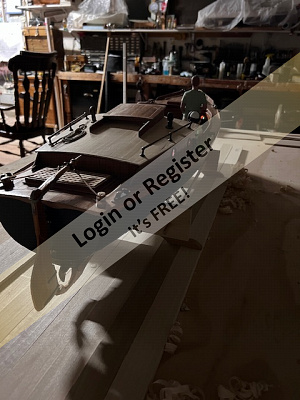
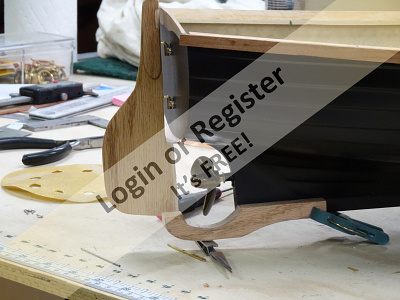
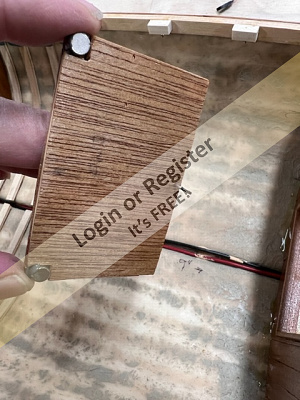
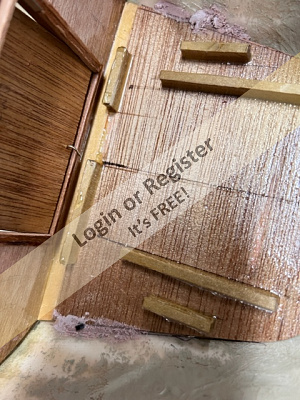
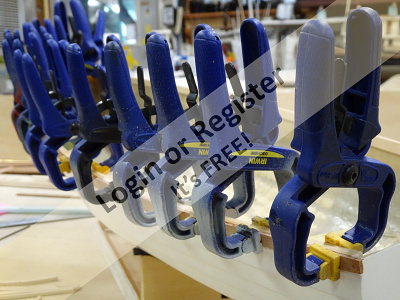
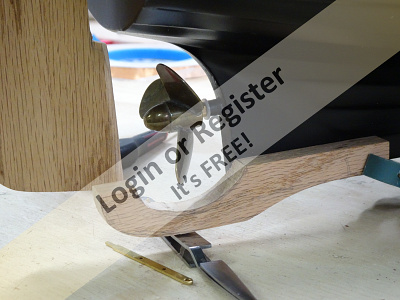
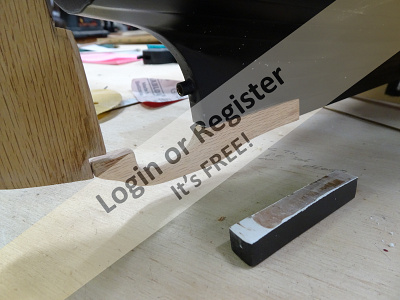
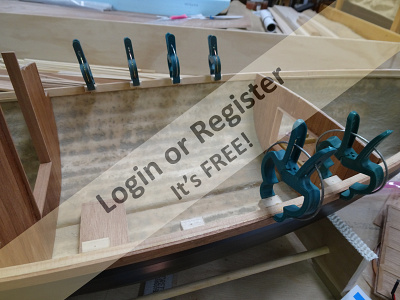
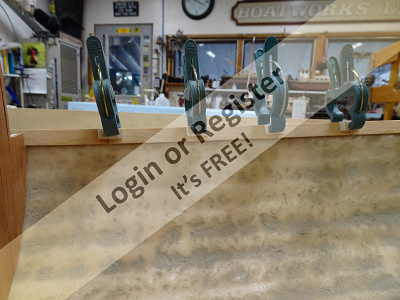
I am not a very fast builder, and as a result tend to have a build well along before I post anything so I don't give the impression that a project has been abandoned The launch is farther along than it appears, so I'll bring it up to speed quickly with just a couple of entry's then if you'll bear with me I'll keep the progress current with subsequent posts although they may be a few days apart. Several months ago a neighbor brought over some cherry cut-offs that he came across asking could I use any of it. Like this launch hull I had put it in the "stash" to be used at a later date. It would seem with this hull, the cherry, and some other bits and pieces the later date has arrived.😊 The images below are pretty much self explanatory with just a few exceptions. Photo 1 I like the black hull's contrast with the cherry better than the white. 2. If you don't use all your clamps you didn't use enough...if you did use them all you don't have enough. 3, 4, & 5. It would have been easier to fabricate a brass support for the bottom of the rudder so the gudgeons and pintles didn't take all the strain, but my masochistic nature decided an oak skeg extension would be much more trouble. Cutting the required amount out of the molded skeg and fitting the oak while allowing the wheel radius was an exercise. Filling the inside area with epoxy then drilling and tapping the filler allowed two flathead machine screws to hold the skeg in place without any potential for water seeping into the hull. 6 &7. There will be a narrow side deck running along the open cockpit so some small screw eyes were threaded into blocks which were glued to the clamp strake. These eyelets will carry the wires from the forward battery back to the "engine room". 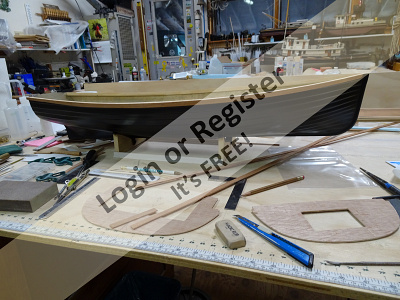

▲
⟩⟩
RNinMunich
stevedownunder
jbkiwi
MouldBuilder
RodC
AndyN
Ronald
hermank
|
|
💬 Re: Yet to be named launch
1 year ago by 🇧🇪 hermank (
Captain)✧ 140 Views · 1 Like
Flag
Well known writer !!! This i phone drives me crazy all thé Time suggesting similar Words 😩😩😩😩
▲
⟩⟩
Black Shoe
|
|
💬 Re: Yet to be named launch
1 year ago by 🇧🇪 hermank (
Captain)✧ 147 Views · 2 Likes
Flag
I like your story and how you got it. It read like à book of Agatha Christie the famous well j OWN weiger 👍👍👍👍
▲
⟩⟩
pressonreguardless
Peejay
|


Login To
Remove Ads
Remove Ads