Join Us On Social Media!

|

|

|
Download The App!
Login To
Remove Ads
Remove Ads
Login To
Remove Ads
Remove Ads
Model Boats Website
Vintage Model Works 46" RAF Crash Tender
105 Posts · 42 Followers · 659 Photos · 1218 Likes
Began 10 years ago by
 United Kingdom
Follow This Thread
Not currently following
> Click to follow
> Click to follow
Latest Post 1 year ago by
| Most recent posts shown first (Show Oldest First) | (Print Booklet) |
📝 New fire monitors.
1 year ago by 🇬🇧 robbob ( Fleet Admiral)
Fleet Admiral)✧ 99 Views · 14 Likes · 5 Comments
Flag
💬 Add Comment
It’s been a while since I posted my last update of the new fire monitors but for those of you that are interested Vintage Model Works have introduced an extended range of fittings for their 46” Crash Tender including the new monitors that I modelled for them.
The new fire monitors that they asked me to provide patterns for are now available for just £14 plus P+P for the pair.
There’s also a very comprehensive set of parts for the salvage hoses for £23.50 plus P+P and also a completely new tow bar kit that that has been accurately modelled at a cost of just £15.50 plus P+P
Sadly, I can’t claim to have produced the patterns for the hoses or the tow bar, they are the work of a professional model maker and far better that anything I could make!
I might add that I don’t have any commercial connection to VWM and I produced the new fire monitor patterns purely for the prestige of making a better job than those that were made so many years ago.
All of these items can be seen on the VMW website on the accessories page:

▲
⟩⟩
Missouri
tonyb2
Colin H
DaveWhittaker
RNinMunich
Len1
chugalone100
PeteJev
GaryLC
Mike Stoney
stevedownunder
Rookysailor
DuncanP
hermank
|
💬 Re: New fire monitors.
1 year ago by 🇺🇸 chugalone100 (
 Commodore) Commodore)✧ 82 Views · 3 Likes
Flag
WOW
Very realistic feature that will enhance the looks of your model. 😎 ▲
⟩⟩
AlessandroSPQR
stevedownunder
Len1
|
|
Login To
Remove Ads 💬 Re: New fire monitors.
1 year ago by 🇬🇧 PeteJev (
 Petty Officer 2nd Class) Petty Officer 2nd Class)✧ 75 Views · 2 Likes
Flag
They certainly look the part, shame they would be too big for my smaller Aerokits model👍
▲
⟩⟩
stevedownunder
Len1
|
|
💬 Re: New fire monitors.
1 year ago by 🇦🇺 stevedownunder (
Commodore)✧ 90 Views · 6 Likes
Flag
Hi Robbob,
Very nice looking fittings and clean castings. Cheers, Stephen. ▲
⟩⟩
Len1
DuncanP
hermank
AlessandroSPQR
GaryLC
robbob
|
|
💬 Re: New fire monitors.
1 year ago by 🇬🇧 robbob (
Fleet Admiral)✧ 100 Views · 7 Likes
Flag
Hi Duncan.
"Pity they are not for the 36 inch model which I have!" There are some plastic/styrene fittings for the 34" model, SLEC make some, but it's not a very comprehensive set. I've seen the same in white metal elsewhere, but again very poor ☹️. At the smaller scale the detail is very difficult to achieve. Robbob. ▲
⟩⟩
Missouri
tonyb2
Len1
DuncanP
hermank
Mike Stoney
stevedownunder
|
|
💬 Re: New fire monitors.
1 year ago by 🇬🇧 DuncanP (
 Commander) Commander)✧ 98 Views · 5 Likes
Flag
Fabulous and at a reasonable price as well! Pity they are not for the 36 inch model which I have! 😊
▲
⟩⟩
Len1
hermank
stevedownunder
robbob
AlessandroSPQR
|
Login To
Remove Ads
Remove Ads
📝 Assembling and finishing the new monitors.
2 years ago by 🇬🇧 robbob ( Fleet Admiral)
Fleet Admiral)✧ 141 Views · 13 Likes · 3 Comments
Flag
💬 Add Comment
My first task is to clean up the white metal castings to remove any casting marks and blemishes and to key the surface for a good paint finish.
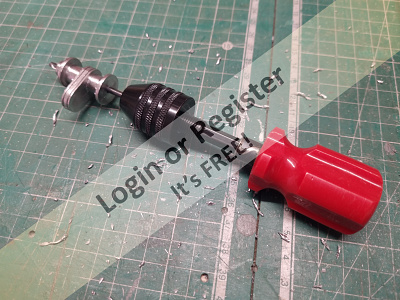
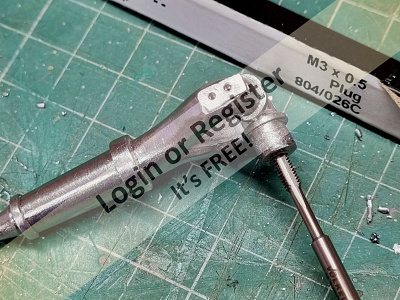
I have decided that the best way to assemble the monitors is to drill a 3.2mm central hole through the base part to accept a threaded rod which will then hold the top piece firmly.
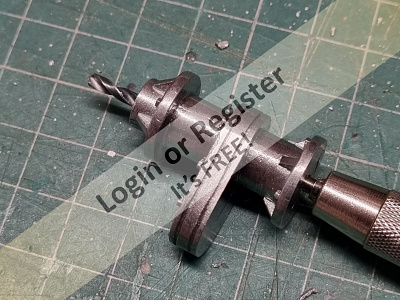
It is not possible to drill white metal as a drill bit in an electric or hand drill will very soon seize and snap, but the trick is to put a drill bit in a hand chuck and bore the hole a few turns at a time, withdrawing the bit to clear the swarf produced and then continuing.
This is quite laborious work but it is the only way to bore a hole through white metal to any depth.
I did fully drill through the base and to my relief the exit hole was pretty much centre of the casting and I was then able to put the upper casting in place and drill a shallow hole in the top part which was then tapped with a 3mm thread, again this tap had to be done a few turns at a time withdrawing the tap frequently to remove the swarf.
I could then insert a 3mm threaded rod through the castings to pull the two parts together, with a nut on the bottom of the base, in a recessed hole, both with some Loctite threadlock to keep them tight.
To add some extra detail to the monitors I used a couple of steel washers and a plastic spacer between the top and bottom parts to simulate some flanges that are on the real thing.
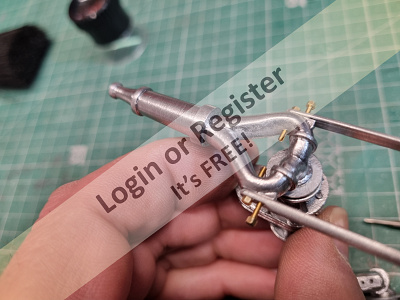
The white metal casting of the operating handles is a little bit fragile but they will withstand a single bending to introduce the crank that raises the height of the handles for the operator.
I had made the handles for the pattern in brass for strength so I’ll have to see how they fair in the much softer white metal.
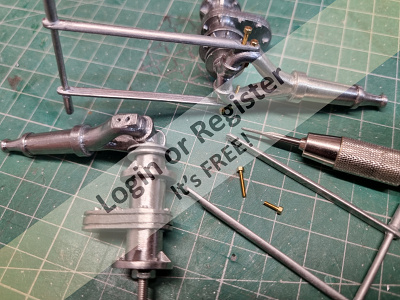
The handles are attached to the side bosses of the top hose part using some 1.2mm brass screws, again I very carefully tapped the holes that I made through the casting to get a secure fixing for the handles. The excess brass screw was cut back and the screws re-fixed with a dab of Loctite to ensure they stayed tight.
The new fire monitor kit is actually supplied with four tiny white metal screws for attaching the handles but in my view they are unsuitable to provide any kind of firm fixing and hence my use of proper brass screws as used in my original pattern.
Another small detail on the monitor base is an operating lever that presumably is foot operated to allow the monitor to be unlocked from a centred position and allow the monitor to be rotated to the desired direction, that’s just a guess as I really don’t know the true purpose of that lever!
I made this lever from a short length of brass rod and finished with a small round brass bead on the end. This piece was bent to the correct shape and then epoxied into a hole drilled into the underside if the base.
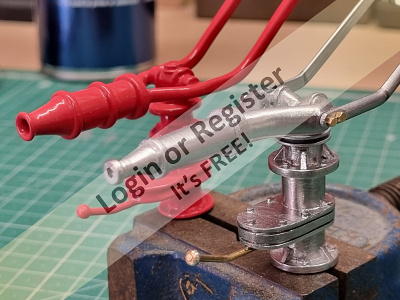
A side-by-side comparison of the old and new monitors was satisfying to see as the new pattern looks so much more true to the real ones.
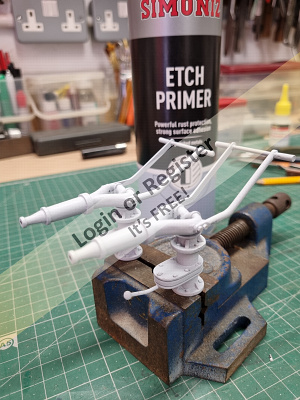
With the monitors fully assembled I cleaned them thoroughly with some panel wipe to remove any grease or contaminants and then gave them a light coat of primer.
I had some etch primer to hand so I used that although I don’t think it’s particularly effective on white metal.
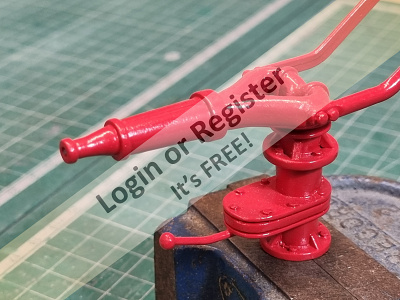
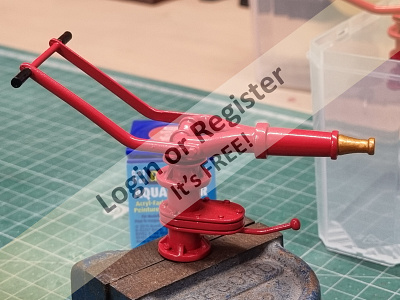
The final coats of red acrylic were applied and then some black to simulate the hand grips and finally some ‘bronze’ acrylic for the nozzle at the end of the hose.
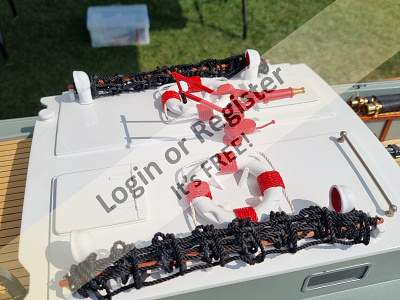
When fitted to the boat the monitors look so much more realistic, I hope you would agree?
Vintage Model Works are also introducing some other new fitting for their 46” RAF Crash Rescue Tender to replace older designs and I’ll post some pictures of them in another update.


I have decided that the best way to assemble the monitors is to drill a 3.2mm central hole through the base part to accept a threaded rod which will then hold the top piece firmly.
It is not possible to drill white metal as a drill bit in an electric or hand drill will very soon seize and snap, but the trick is to put a drill bit in a hand chuck and bore the hole a few turns at a time, withdrawing the bit to clear the swarf produced and then continuing.
This is quite laborious work but it is the only way to bore a hole through white metal to any depth.
I did fully drill through the base and to my relief the exit hole was pretty much centre of the casting and I was then able to put the upper casting in place and drill a shallow hole in the top part which was then tapped with a 3mm thread, again this tap had to be done a few turns at a time withdrawing the tap frequently to remove the swarf.
I could then insert a 3mm threaded rod through the castings to pull the two parts together, with a nut on the bottom of the base, in a recessed hole, both with some Loctite threadlock to keep them tight.
To add some extra detail to the monitors I used a couple of steel washers and a plastic spacer between the top and bottom parts to simulate some flanges that are on the real thing.
The white metal casting of the operating handles is a little bit fragile but they will withstand a single bending to introduce the crank that raises the height of the handles for the operator.
I had made the handles for the pattern in brass for strength so I’ll have to see how they fair in the much softer white metal.
The handles are attached to the side bosses of the top hose part using some 1.2mm brass screws, again I very carefully tapped the holes that I made through the casting to get a secure fixing for the handles. The excess brass screw was cut back and the screws re-fixed with a dab of Loctite to ensure they stayed tight.
The new fire monitor kit is actually supplied with four tiny white metal screws for attaching the handles but in my view they are unsuitable to provide any kind of firm fixing and hence my use of proper brass screws as used in my original pattern.
Another small detail on the monitor base is an operating lever that presumably is foot operated to allow the monitor to be unlocked from a centred position and allow the monitor to be rotated to the desired direction, that’s just a guess as I really don’t know the true purpose of that lever!
I made this lever from a short length of brass rod and finished with a small round brass bead on the end. This piece was bent to the correct shape and then epoxied into a hole drilled into the underside if the base.
A side-by-side comparison of the old and new monitors was satisfying to see as the new pattern looks so much more true to the real ones.
With the monitors fully assembled I cleaned them thoroughly with some panel wipe to remove any grease or contaminants and then gave them a light coat of primer.
I had some etch primer to hand so I used that although I don’t think it’s particularly effective on white metal.
The final coats of red acrylic were applied and then some black to simulate the hand grips and finally some ‘bronze’ acrylic for the nozzle at the end of the hose.
When fitted to the boat the monitors look so much more realistic, I hope you would agree?
Vintage Model Works are also introducing some other new fitting for their 46” RAF Crash Rescue Tender to replace older designs and I’ll post some pictures of them in another update.
▲
⟩⟩
tonyb2
GaryLC
Mike Stoney
hermank
DaveWhittaker
Missouri
stevedownunder
Jay
Rogal118
Len1
RNinMunich
Peejay
Fred
|
💬 Re: Assembling and finishing the new monitors.
2 years ago by 🇬🇧 robbob (
Fleet Admiral)✧ 141 Views · 5 Likes
Flag
Hi Doug.
They are indeed non-functional and are intended to be a very realistic representation of the real monitors. Adding practical features with the level of detail I have used would be difficult (for me) but not impossible for others. Mike Turpin (mturpin013) has produced some monitors that are operational and also have a good level of detail. Robbob. ▲
⟩⟩
hermank
tonyb2
Missouri
Jay
Len1
|
|
Login To
Remove Ads 💬 Re: Assembling and finishing the new monitors.
2 years ago by 🇩🇪 RNinMunich (
Fleet Admiral)✧ 140 Views · 4 Likes
Flag
Hi Rob,
They look really great😀 But I guess they are non functional☹️ cos I see no provision for water supply, rotation or raising / lowering? Cheers, Doug😎 ▲
⟩⟩
hermank
Jay
Len1
robbob
|
|
💬 Re: Assembling and finishing the new monitors.
2 years ago by 🇬🇧 luckyduck (
 Lieutenant) Lieutenant)✧ 132 Views · 4 Likes
Flag
Looks good, hope they shoot the water well.
▲
⟩⟩
hermank
Jay
Len1
robbob
|
📝 New Fire Monitors, making the pattern.
2 years ago by 🇬🇧 robbob ( Fleet Admiral)
Fleet Admiral)✧ 155 Views · 14 Likes · 6 Comments
Flag
💬 Add Comment
Some while ago I was asked by Vintage Model Works to make new patterns for the fire monitors which are quite characteristic to the RAF Crash Rescue Tender. The current type supplied with the VMW kits are based on a very old pattern from the early days of the model when it was produced by AeroKits many years ago.
I took this as a great honour to be asked and I set about finding as many photographic references, original drawing and early film of the boats in action.
Of particular use was a video from film taken by Pathé, a newsreel company, when the boats were demonstrated to the public, and one sequence showed the fire monitors in action and some very usable detail of the construction and scale.
Having gathered as much detail as I could find I made some scale drawings of the monitors as I perceived them and worked out, as best as possible, the correct scale for the 46” model.
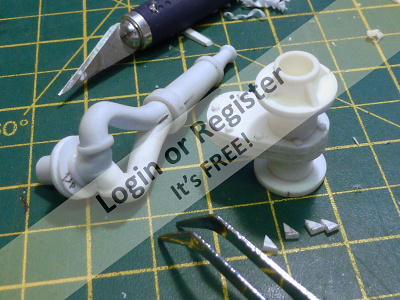
As I don’t have any metal turning experience or equipment I decided that the best material to use for the new patterns was plastic, particularly as some of the parts would need to be heat formed.
I made up a small wood former around which I could bend heated Plasticard rod around to form the distinctive curved shape of the top of the monitor.
This took multiple attempts until I made a satisfactory shape which will still need some filing and shaping to refine it.
With the hardest part out of the way the remainder of the pattern was relatively easy to make by ‘turning’ the rest of the parts for the body and the base in an electric drill chuck against some files and abrasives.
Small details were easy to add such as the reinforcing fillets between the circular flanges and the main pillar and also bolt heads which were made from short sections of hexagonal plastic rod. I added some blocks to the curved part to form the mounting base of the operating handles.
The operating handles themselves were made from some 'D' profile brass rod and they attach to the body of the fire monitor with very fine brass 1.5mm screws.
Once I was happy with the final result I supplied the pattern to VMW for approval.
Sometime later I was sent some samples of the white metal castings to evaluate and to my delight they had turned out quite well with a minimal amount of flashing to file away.
Remarkably they had even made white metal casting of the screws however I don't think they will be strong enough to be used to fix the handles to the monitors.
Next part….assembling and finishing the new monitors.


I took this as a great honour to be asked and I set about finding as many photographic references, original drawing and early film of the boats in action.
Of particular use was a video from film taken by Pathé, a newsreel company, when the boats were demonstrated to the public, and one sequence showed the fire monitors in action and some very usable detail of the construction and scale.
Having gathered as much detail as I could find I made some scale drawings of the monitors as I perceived them and worked out, as best as possible, the correct scale for the 46” model.
As I don’t have any metal turning experience or equipment I decided that the best material to use for the new patterns was plastic, particularly as some of the parts would need to be heat formed.
I made up a small wood former around which I could bend heated Plasticard rod around to form the distinctive curved shape of the top of the monitor.
This took multiple attempts until I made a satisfactory shape which will still need some filing and shaping to refine it.
With the hardest part out of the way the remainder of the pattern was relatively easy to make by ‘turning’ the rest of the parts for the body and the base in an electric drill chuck against some files and abrasives.
Small details were easy to add such as the reinforcing fillets between the circular flanges and the main pillar and also bolt heads which were made from short sections of hexagonal plastic rod. I added some blocks to the curved part to form the mounting base of the operating handles.
The operating handles themselves were made from some 'D' profile brass rod and they attach to the body of the fire monitor with very fine brass 1.5mm screws.
Once I was happy with the final result I supplied the pattern to VMW for approval.
Sometime later I was sent some samples of the white metal castings to evaluate and to my delight they had turned out quite well with a minimal amount of flashing to file away.
Remarkably they had even made white metal casting of the screws however I don't think they will be strong enough to be used to fix the handles to the monitors.
Next part….assembling and finishing the new monitors.
▲
⟩⟩
DaveWhittaker
tonyb2
Missouri
Jay
EdW
MartinW
Fred
Commodore-H
Peejay
Len1
stevedownunder
Rookysailor
hermank
luckyduck
|
💬 Re: New Fire Monitors, making the pattern.
2 years ago by 🇬🇧 robbob (
Fleet Admiral)✧ 149 Views · 6 Likes
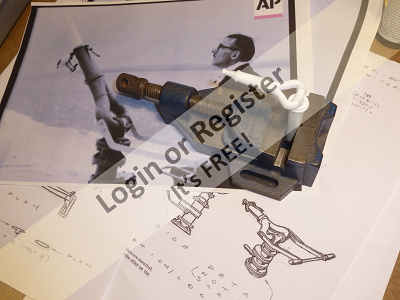
Flag
Hi Stephen.
The original fire monitors in pics 4 & 5 are more like representations of the real thing with more regard to sturdiness and practical construction and less regard to accuracy. My new pattern is more realistic and true to scale but possibly not as robust the old 'clumsy' design. White metal castings are very heavy and the alloy is rather weak so ideally they should be cast in something stronger like bronze or perhaps even 3D metal printed but then the cost of production may make them too expensive. Rob. ▲
⟩⟩
hermank
tonyb2
Missouri
Jay
Len1
stevedownunder
|
|
Login To
Remove Ads 💬 Re: New Fire Monitors, making the pattern.
2 years ago by 🇦🇺 stevedownunder (
Commodore)✧ 152 Views · 6 Likes
Flag
Hi Rob,
I am assuming that the original kit part is the red fire monitor in photos 4 & 5, in which case your interpretation is something I can work out how it worked the original kit part I cannot work out how it might have got water to the nozzle. I hope you were reimbursed for your time and effort. Cheers, Stephen. ▲
⟩⟩
hermank
AlessandroSPQR
Jay
Len1
robbob
Peejay
|
|
💬 Re: New Fire Monitors, making the pattern.
2 years ago by 🇬🇧 robbob (
Fleet Admiral)✧ 153 Views · 6 Likes
Flag
Thanks for your kind words Stephen.
I think the finished pattern looks so much more authentic than the old one which was quite crude by comparison. Rob. ▲
⟩⟩
tonyb2
Missouri
Jay
stevedownunder
Len1
hermank
|
|
💬 Re: New Fire Monitors, making the pattern.
2 years ago by 🇦🇺 stevedownunder (
Commodore)✧ 157 Views · 6 Likes
Flag
Hi Rob,
Beautiful work. Cheers, Stephen. ▲
⟩⟩
Jay
Peejay
Len1
hermank
robbob
AlessandroSPQR
|
|
💬 Re: New Fire Monitors, making the pattern.
2 years ago by 🇬🇧 robbob (
Fleet Admiral)✧ 152 Views · 7 Likes
Flag
Hi Pete.
I can usually get by with my 'drill chuck' lathe, but for anything requiring precision I get my brother to turn it on his lathe. I did contemplate getting a small Warco lathe when one came up for sale in my model club but I really don't have room for one in my small workshop. Rob. ▲
⟩⟩
tonyb2
Missouri
Jay
Peejay
stevedownunder
Len1
Rookysailor
|
|
💬 Re: New Fire Monitors, making the pattern.
2 years ago by 🇬🇧 Rookysailor (
 Rear Admiral) Rear Admiral)✧ 163 Views · 5 Likes
Flag
Wow Rob, what an excellent job you have made considering you are only using plastic rod, still remember you telling me how you turned brass on your drill connected to the frame, I then also got my self said frame and tried to do what you did, didn't work for me, so I ended up buy a lathe from a friend.
Cheers, Pete😊 ▲
⟩⟩
Jay
Peejay
Len1
stevedownunder
robbob
|
📝 A Fan for the Motor
2 years ago by 🇬🇧 robbob ( Fleet Admiral)
Fleet Admiral)✧ 172 Views · 16 Likes · 12 Comments
Flag
💬 Add Comment
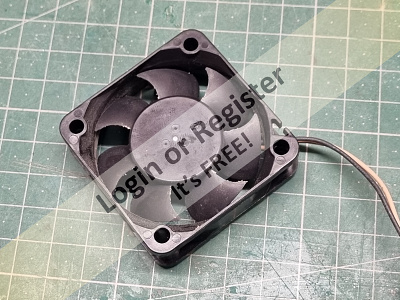
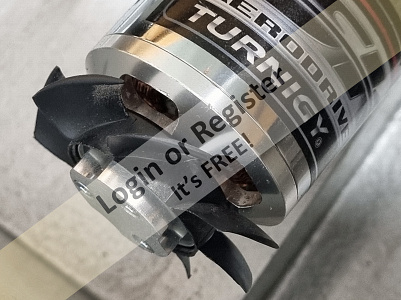
The motor compartment in the boat is quite large and thus a reasonable volume of air surrounds the motor and despite never having any motor overheating issues previously I did decide to add a fan onto the end of the motor shaft to introduce a bit of air circulation.
This is something that I did on my VMW Thames River Police Launch where the motor is enclosed in quite a small box and benefited from the forced ventilation. It’s not that the Crash Tender really needs it, but more that I have another small computer fan of the right size and that it is so easy to do!
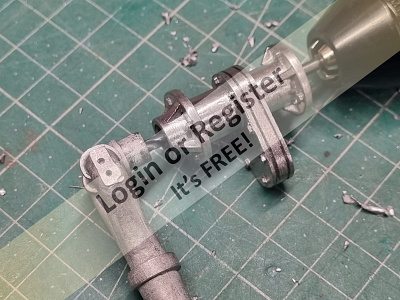
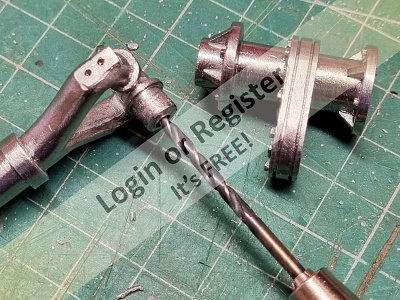
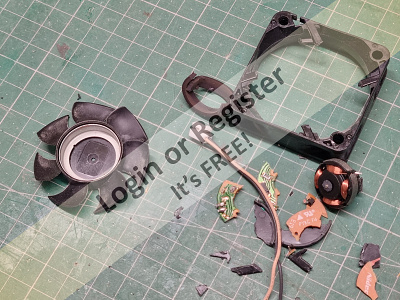
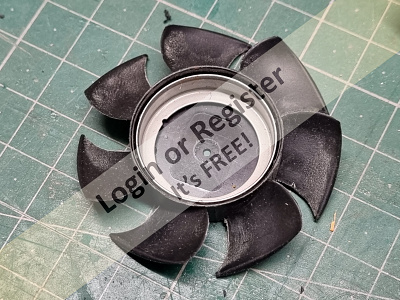
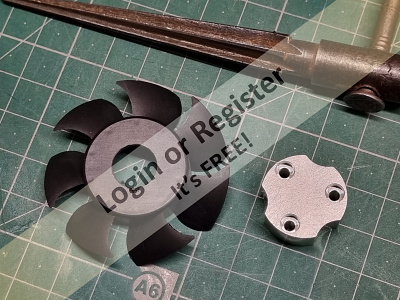
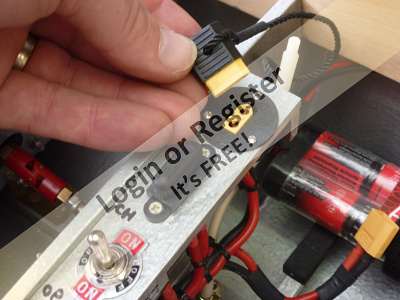
Disassembling the fan is quite brutal but necessary to extract the fan blade in one piece. A hole was then made through the fan at dead centre to the exact diameter of the spigot at the end of the motor using a reamer. The Turnigy Aerodrive motor comes supplied with some extra metal parts for attaching an aero propeller when the motor is used in an aircraft.
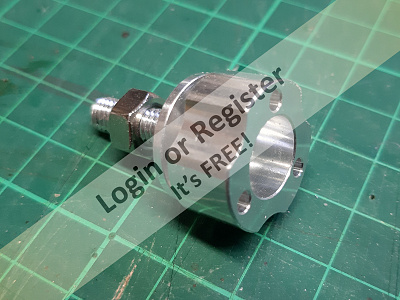
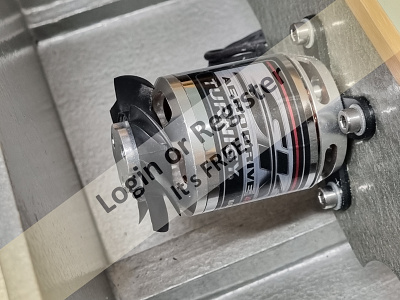
The piece is easily re-purposed by cutting off the threaded stud and grinding/sanding the face to a flat and smooth finish, and then it's fitted over the spigot on the end of the motor and secured with the three cap screws which are also supplied with the motor.
I operation the fan is either pushing or pulling air through the motor and stator depending on the direction of rotation, and in either event it is stirring the air in the motor compartment.
This mod seems to add no extra load on the motor, no additional bearing strain, no extra noise and if you’ve got the bits, no cost!
This is something that I did on my VMW Thames River Police Launch where the motor is enclosed in quite a small box and benefited from the forced ventilation. It’s not that the Crash Tender really needs it, but more that I have another small computer fan of the right size and that it is so easy to do!
Disassembling the fan is quite brutal but necessary to extract the fan blade in one piece. A hole was then made through the fan at dead centre to the exact diameter of the spigot at the end of the motor using a reamer. The Turnigy Aerodrive motor comes supplied with some extra metal parts for attaching an aero propeller when the motor is used in an aircraft.
The piece is easily re-purposed by cutting off the threaded stud and grinding/sanding the face to a flat and smooth finish, and then it's fitted over the spigot on the end of the motor and secured with the three cap screws which are also supplied with the motor.
I operation the fan is either pushing or pulling air through the motor and stator depending on the direction of rotation, and in either event it is stirring the air in the motor compartment.
This mod seems to add no extra load on the motor, no additional bearing strain, no extra noise and if you’ve got the bits, no cost!
▲
⟩⟩
DaveWhittaker
tonyb2
Missouri
Jay
xtramaths
Len1
Mike Stoney
EdW
SimpleSailor
stevedownunder
Rookysailor
RNinMunich
Peejay
DuncanP
Isaac
hermank
|
💬 Re: A Fan for the Motor
2 years ago by 🇨🇭 Mike Stoney (
Rear Admiral)✧ 160 Views · 4 Likes
Flag
Man oh man! oh Rob!
All the ideas that are put forward here! Awesome! Thank you! See you soon, Michel-C. ▲
⟩⟩
Jay
robbob
Len1
stevedownunder
|
|
Login To
Remove Ads 💬 Re: A Fan for the Motor
2 years ago by 🇳🇿 jbkiwi (
Fleet Admiral)✧ 162 Views · 5 Likes
Flag
Not a bad idea, as it will move the air around, but as Isaac mentioned, you need to get rid of any heat somehow (maybe a small hidden venting fan).
Outrunner motors are generally used for planes and rely on a good supply of air going through the motor to cool the stator, (hence the large holes front and back) which in an outrunner is in the center of the motor. By blowing air mostly over the outside of the can, you are really only cooling the can and magnets. The important part is the stator. You can demonstrate this by running an outrunner hard for about 30 seconds, then check the can temp,- it will usually be warm. Wait a minute or two and check it again, and you will usually find it is hotter, as the heat is transferring from the copper windings on the stator through the bearings to the can. That's a reason why the water cooled mounts bolt to the stator. With an inrunner, the stator is on the outside against the can, so air or water cooling work best. A lot of outrunners will be ok in a boat if not loaded too much, but some (depending on the build/KV) will get very hot without air flowing through them (as in a plane), the same goes for inrunners without cooling. 40-60 deg C is probably as hot as you would want to run either type, but if it's too hot to touch after a run, that's probably too much. The cooler they run the more efficient they are in most cases. Outrunners are more efficient running faster, as running them slowly creates more heat. I have used thermostatically controlled fans on some of my models, which come on at 30deg C and go off at 28degC. Very easy and cheap to do, just requires a cheap in line thermo switch and voltage regulator, which can be powered from your main battery, or made independent. The fan setup in my amphibious truck for eg, which uses a geared 550 brushed motor, will come on at 30c and keep running after the model stops until it's cooled down, then switch off. I also use this setup as a safety feature for the Lipo in one of my boats. You can even add a buzzer as a warning, to let you know if something is overheating. Hopefully this blurb might be of interest. JB ▲
⟩⟩
Jay
Mike Stoney
RNinMunich
Len1
stevedownunder
|
|
💬 Re: A Fan for the Motor
2 years ago by 🇩🇪 RNinMunich (
Fleet Admiral)✧ 166 Views · 5 Likes
Flag
I think photo #2 explains that quite graphically Ross 😮🤕
😎 ▲
⟩⟩
Mike Stoney
stevedownunder
Len1
robbob
RossM
|
|
💬 Re: A Fan for the Motor
2 years ago by 🇨🇦 RossM (
 Captain) Captain)✧ 170 Views · 6 Likes
Flag
wow!
Tell us again why you gave up your career as a brain surgeon . . . ▲
⟩⟩
Jay
Mike Stoney
stevedownunder
Len1
robbob
RNinMunich
|
|
💬 Re: A Fan for the Motor
2 years ago by 🇺🇸 LewZ (
 Admiral) Admiral)✧ 168 Views · 4 Likes
Flag
Just a few thoughts on motor cooling... rather than a fan blowing air over a smooth motor housing, was any consideration given to cooling fins (heat sinks) on the motor?
Also, does a shaft mounted fan account for situations where the motor is under a heavy load yet not turning fast enough to cool properly? Example: some growth tangled about the prop but not enough to stop the motor or have the ESC power off. Think about automobiles, old design was a motor driven fan and new designs are electrically driven fans. Lew Florida ⛱️, USA 🇺🇸 ▲
⟩⟩
Jay
Len1
robbob
hermank
|
|
💬 Re: A Fan for the Motor
2 years ago by 🇩🇪 RNinMunich (
Fleet Admiral)✧ 166 Views · 3 Likes
Flag
Neither have I Rob.
I suspect they have more resonance with the fly boys. I just thought I'd mention it. Em passant so to speak😉 Watching with interest👍 Cheers, Doug😎 ▲
⟩⟩
Jay
robbob
Len1
|
|
💬 Re: A Fan for the Motor
2 years ago by 🇬🇧 robbob (
Fleet Admiral)✧ 170 Views · 5 Likes
Flag
Hi Doug.
"BTW: I guess you can wrap a coil round an Inrunner brushless." You know what, 🤔 I'd forgotten all about the In-Runner variety of brushless motor. They often have a water cooling jacket built in but I've seldom seen them used. Rob. ▲
⟩⟩
tonyb2
Missouri
Jay
Len1
RNinMunich
|
|
💬 Re: A Fan for the Motor
2 years ago by 🇦🇺 stevedownunder (
Commodore)✧ 174 Views · 4 Likes
Flag
Hi Rob,
Great idea and execution. Cheers, Stephen. ▲
⟩⟩
AlessandroSPQR
Jay
Len1
robbob
|
|
💬 Re: A Fan for the Motor
2 years ago by 🇩🇪 RNinMunich (
Fleet Admiral)✧ 165 Views · 4 Likes
Flag
I'm a fan Rob👍😉
BTW: I guess you can wrap a coil round an Inrunner brushless. If you tried it with an Outrunner life would get kinda interesting for a few seconds😮😭🤕 😎 ▲
⟩⟩
Jay
Len1
robbob
stevedownunder
|
|
💬 Re: A Fan for the Motor
2 years ago by 🇬🇧 mturpin013 (
Admiral)✧ 169 Views · 11 Likes
Flag
Hi Rob good to see you back, if you remember I did that mod on my Crash tender when I built mine (3 years ago now, doesn't time fly) mine was slightly different in that I used the prop adaptor but mounted the fan as a prop so a greater distance from the motor.
As for efficiency/power loss, when your powering from a 5s as I am as well it doesn't really matter as there's an abundance of power to spare Those fire monitors look familiar too, I guess Stephen took the tip do his pump water? 


▲
⟩⟩
Mike Stoney
DaveWhittaker
Jay
Len1
EdW
RNinMunich
Peejay
PemyslJ
hermank
robbob
DuncanP
|
|
💬 Re: A Fan for the Motor
2 years ago by 🇬🇧 robbob (
Fleet Admiral)✧ 171 Views · 6 Likes
Flag
Hi Isaac.
Thanks for your comments, you make some interesting suggestions but in my view none are really practical in this particular situation. The point of mounting the fan blade directly on the motor is that involved nothing more than fitting it to the end of the motor and while the motor is running, in either direction it is creating airflow around and more importantly, through the motor. Thus the motor is self cooling. I'm not sure how it could generate more heat than it removes 🤔 The motor compartment is very capacious and also vents to adjoining compartments. You can't water cool a brushless motor, but you can use a water cooled mounting but that's even more weight, plumbing pipes etc. The speed controller is already water cooled anyway so nothing more can be improve that. Consider the positives, no fan mounting structure is needed, no wiring is required, no battery or power supply is needed, all of which involve a cost and more complexity than is really warranted. The fan was ex-computer power supply, it was not working and had a noisy bearing when it was, so no cost implications at all. I can't think of any valid negatives. The KISS principle is well applied in what I have done here. As I said in the blog, it cost me nothing to do, it adds nothing to the weight of the boat or affects it's trim requiring corrective ballast etc. but it certainly seems to stir up a lot of hot air! 😉 For your boat with three large brushed motors and no space for motor cooling coils I would agree that motorised fan cooling may well be your best option 👍. Kind Regards. Rob. ▲
⟩⟩
tonyb2
Missouri
Jay
Len1
Peejay
hermank
|
|
💬 Re: A Fan for the Motor
2 years ago by 🇺🇸 Isaac (
Lieutenant)✧ 168 Views · 4 Likes
Flag
Rob
Why take the electronic fan apart? Why not use it as is and run it off a 2S battery to cool the entire compartment ( motors and ESCs ). Or a separate more powerful motor with a fan ( you also need to vent the compartment to expel the heat overboard ). Also, you may want to see if that fan mounted on the motor that close is really cooling the motors ( you need a surface thermometer ). It may generate more heat than it cools ( there is no such thing as free energy ). Small air 👍cooling fans are used on closely coweled aircraft engines ( like the Focke Wulf 190 ), but fans are more effective against a radiator cooler. I really don't know where things are better, but I agree that cooling motors is important. Water cooling is best if you can do it. My big 3 brushed motors has no room to coil water lines around them. But I really want to cool them, thus I am interested in what you find. Isaac ▲
⟩⟩
Jay
Len1
Peejay
hermank
|
📝 New Electrics
2 years ago by 🇬🇧 robbob ( Fleet Admiral)
Fleet Admiral)✧ 180 Views · 18 Likes · 2 Comments
Flag
💬 Add Comment
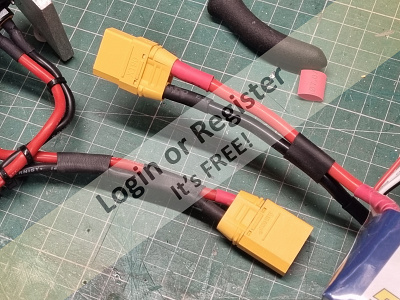
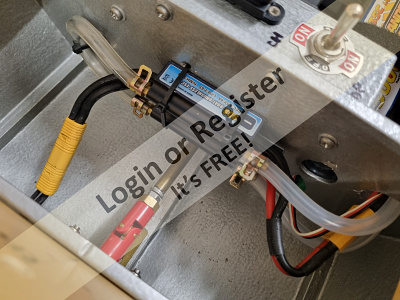
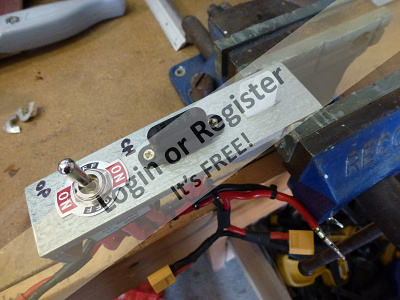
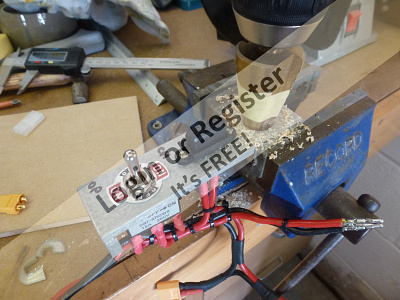
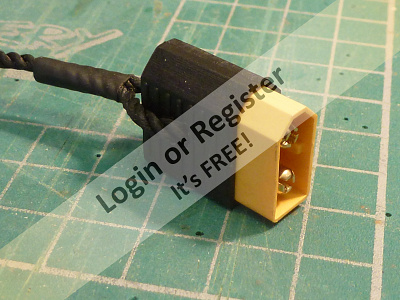
The new LiPo batteries are not supplied with any type of connector, so that the user can supply and fit whatever they prefer to use. In my case it was XT60 for all the battery connections but for this refurb I chose to upgrade them all to XT90 to allow for higher discharge rates.
Fortunately I already had sufficient XT90 connector sets in my ‘electrical bits box’ and I soldered these onto the new LiPo batteries, using extreme care to avoid shorts and heat shrink sleeve to insulate the connections.
As the old NiMh batteries were arranged in a series connection I had to modify the cable loom for the single battery connection and re-terminate the fly lead to the battery with an XT90 connector.
I have left the in-board charging facility unchanged as that would require a quite unnecessary change to the entire wiring loom and switch panel. I will be charging the new LiPo batteries, in a fireproof charging 'pouch', on the workbench for safety.
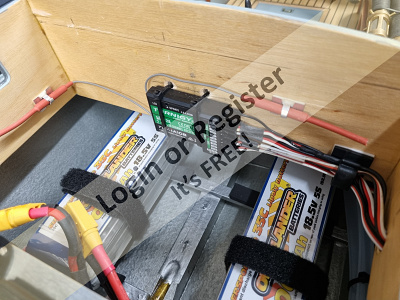
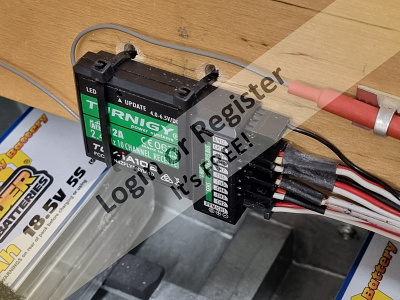
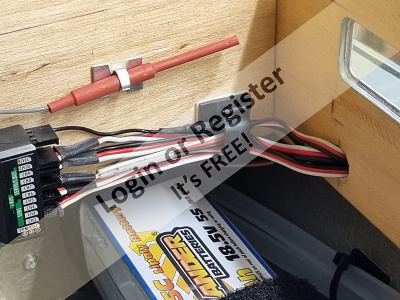
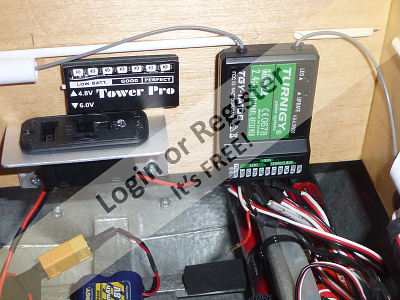
Because the receiver will now be powered from the BEC in the speed controller I have put the (red) 5v supply line of the speed controller back into its 3 pin connector so that the receiver is powered from the speed controller. Whilst I remembered, I dug out the programming card for the controller to set the speed controller for LiPo operation and also set the battery cut-off voltage accordingly.
The receiver was then fixed to the side of the compartment with some cable ties and all of the servo wires tidied up with cable clips, the two receiver aerials were also re-fixed in the recommended 90 degree polarisation and also secured with some clips.
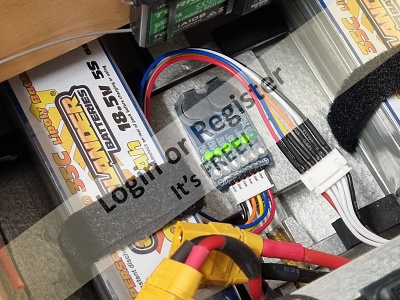
The small ‘platform’ that I had the old receiver battery mounted on is an ideal place for a battery voltage alarm which is a very useful thing to have with a LiPo battery system, the audible warning is very loud and can be heard quite well even when the boat is running at speed and a vital prompt to bring the boat in for a battery swap.
With all of the wiring in place I was able to test the system for full operation and it all worked perfectly. Previously I had to remember to switch on the receiver battery supply before turning on the main power switch, now it is all powered up by the main switch alone.

Fortunately I already had sufficient XT90 connector sets in my ‘electrical bits box’ and I soldered these onto the new LiPo batteries, using extreme care to avoid shorts and heat shrink sleeve to insulate the connections.
As the old NiMh batteries were arranged in a series connection I had to modify the cable loom for the single battery connection and re-terminate the fly lead to the battery with an XT90 connector.
I have left the in-board charging facility unchanged as that would require a quite unnecessary change to the entire wiring loom and switch panel. I will be charging the new LiPo batteries, in a fireproof charging 'pouch', on the workbench for safety.
Because the receiver will now be powered from the BEC in the speed controller I have put the (red) 5v supply line of the speed controller back into its 3 pin connector so that the receiver is powered from the speed controller. Whilst I remembered, I dug out the programming card for the controller to set the speed controller for LiPo operation and also set the battery cut-off voltage accordingly.
The receiver was then fixed to the side of the compartment with some cable ties and all of the servo wires tidied up with cable clips, the two receiver aerials were also re-fixed in the recommended 90 degree polarisation and also secured with some clips.
The small ‘platform’ that I had the old receiver battery mounted on is an ideal place for a battery voltage alarm which is a very useful thing to have with a LiPo battery system, the audible warning is very loud and can be heard quite well even when the boat is running at speed and a vital prompt to bring the boat in for a battery swap.
With all of the wiring in place I was able to test the system for full operation and it all worked perfectly. Previously I had to remember to switch on the receiver battery supply before turning on the main power switch, now it is all powered up by the main switch alone.
▲
⟩⟩
Mike Stoney
DaveWhittaker
tonyb2
Missouri
PemyslJ
Jay
cenbeth
MartinW
EdW
SimpleSailor
Rookysailor
luckyduck
RNinMunich
Trident73
hermank
Peejay
Len1
Fred
|
💬 Re: New Electrics
2 years ago by 🇬🇧 robbob (
Fleet Admiral)✧ 179 Views · 5 Likes
Flag
Hi luckyduck.
Thanks for your compliment on my wiring 😊, professional pride would have me do nothing less than that. Rob. ▲
⟩⟩
tonyb2
Missouri
hermank
Jay
Len1
|
|
💬 Re: New Electrics
2 years ago by 🇬🇧 luckyduck (
Lieutenant)✧ 175 Views · 4 Likes
Flag
Fabulously neat wiring
▲
⟩⟩
Jay
Len1
robbob
Peejay
|
📝 Making room
2 years ago by 🇬🇧 robbob ( Fleet Admiral)
Fleet Admiral)✧ 190 Views · 16 Likes · 4 Comments
Flag
💬 Add Comment
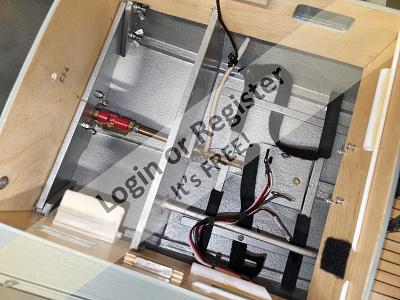
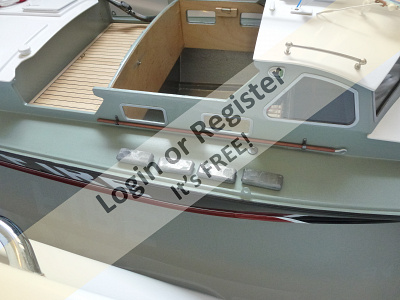
As the battery/receiver compartment was already quite crowded I decided to do away with the separate receiver battery, switch and voltage meter. The receiver would now be powered by the BEC in the speed controller. The power meter was also removed as it was seldom used to log any power parameters and it just overcomplicated the wiring loom.
The first job was to modify the battery cradles and Velcro securing straps and to remove the receiver and its associated power switch and battery voltage indicator, and also the cable loom and cooling pipe support bar that would make it difficult to put the new batteries in the hull.
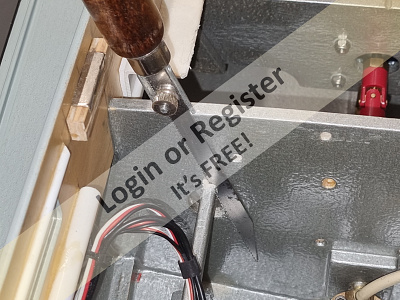
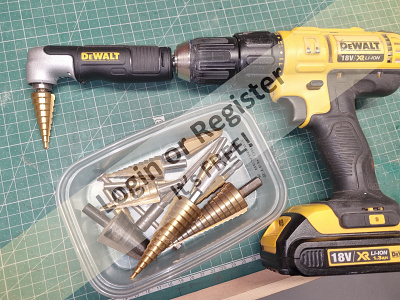
After removing all of the plumbing and wiring the support bar was cut away from the bulkhead with a fine tooth saw and the other end removed from the rudder servo compartment too. Both holes were cleaned up and painted with silver Hammerite to seal the plywood and then a 20mm rubber grommet fitted into each of the old holes hole to seal the compartments. I then had to use my right-angle drill attachment to get a step drill into the hull to make new holes for the wiring and plumbing. These were also painted to seal the ply.
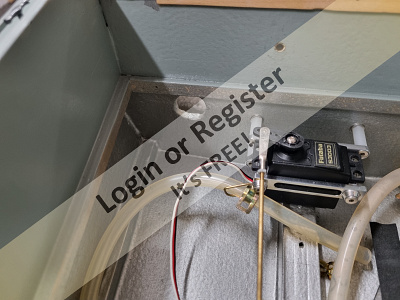
With the support bar out of the way I could then put back all of the servo wiring to the receiver. As I had drilled the new holes through the bulkheads quite high up I was able to tuck the servo wiring up and out of the way of the new batteries, some needed extending as I had to reposition the receiver, and I also used some new silicone tubing for the cooling pipes as they were both slightly too short after re-routing them.
After some other mods to the battery support bars and some new Velcro retaining straps both of the batteries fitted nicely into the compartment with relative ease.
Easy removal of the batteries is important as I will not be charging these new packs in-situ, although I have retained the in-board charging facility.
Next up…a bit of re-wiring and motor cooling.


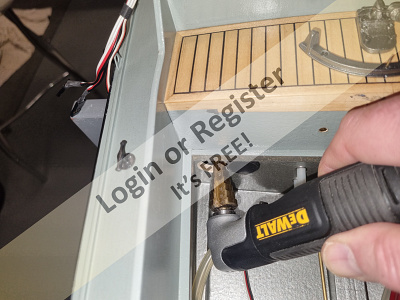
The first job was to modify the battery cradles and Velcro securing straps and to remove the receiver and its associated power switch and battery voltage indicator, and also the cable loom and cooling pipe support bar that would make it difficult to put the new batteries in the hull.
After removing all of the plumbing and wiring the support bar was cut away from the bulkhead with a fine tooth saw and the other end removed from the rudder servo compartment too. Both holes were cleaned up and painted with silver Hammerite to seal the plywood and then a 20mm rubber grommet fitted into each of the old holes hole to seal the compartments. I then had to use my right-angle drill attachment to get a step drill into the hull to make new holes for the wiring and plumbing. These were also painted to seal the ply.
With the support bar out of the way I could then put back all of the servo wiring to the receiver. As I had drilled the new holes through the bulkheads quite high up I was able to tuck the servo wiring up and out of the way of the new batteries, some needed extending as I had to reposition the receiver, and I also used some new silicone tubing for the cooling pipes as they were both slightly too short after re-routing them.
After some other mods to the battery support bars and some new Velcro retaining straps both of the batteries fitted nicely into the compartment with relative ease.
Easy removal of the batteries is important as I will not be charging these new packs in-situ, although I have retained the in-board charging facility.
Next up…a bit of re-wiring and motor cooling.
▲
⟩⟩
DaveWhittaker
tonyb2
Missouri
Mike Stoney
PemyslJ
Jay
jbkiwi
EdW
Peejay
Fred
MartinW
Rookysailor
Isaac
Len1
RNinMunich
hermank
|
💬 Re: Making room
2 years ago by 🇬🇧 robbob (
Fleet Admiral)✧ 187 Views · 6 Likes
Flag
Hi Isaac.
Oooops...sorry...my bad! Your'e quite correct. Yes, I meant a 5S pack. In this case it's a 35C/65C burst rated pack and under full throttle it does run frighteningly fast but is still remarkably stable even when turning at high speed. Rob. ▲
⟩⟩
tonyb2
Missouri
Jay
Peejay
Len1
hermank
|
|
Login To
Remove Ads 💬 Re: Making room
2 years ago by 🇺🇸 Isaac (
Lieutenant)✧ 186 Views · 4 Likes
Flag
Rob
The 5C rating is for the battery ability to provide a surge of power. Normally LiPo batteries are in the 10C,20C, 30C and up. But for a large boat a small number is best. but, my question is about the voltage. Do you mean 5S instead? that is more in line with the 19 volts you are replacing. And regarding the voltage, my 3 motor torpedo boat at 6 ft 5 inches long weighing close to 25 lbs, I run it on a 2S or 3S LiPo battery ( that is 7 or 11 volts ). At 11 volts, it feels like it is running way too fast for me. Isaac ▲
⟩⟩
Jay
Len1
Peejay
hermank
|
|
💬 Re: Making room
2 years ago by 🇬🇧 robbob (
Fleet Admiral)✧ 188 Views · 7 Likes
Flag
Hello Isaac.
At 47" length and 13" beam it is a big and heavy boat! The 5C LiPo is not uncommon and the chosen battery is ideally suited and in this instance a single LiPo can easily do the same job as two of the old NiMh batteries. The first sailing with the new batteries was very impressive !! Kind Regards. Rob. ▲
⟩⟩
tonyb2
Missouri
Jay
Len1
Peejay
hermank
Isaac
|
|
💬 Re: Making room
2 years ago by 🇺🇸 Isaac (
Lieutenant)✧ 186 Views · 5 Likes
Flag
19 volts for the motor? Wow. That’s a ton of volts. How big and how heavy is your boat.
Normally LiPo batteries are approx 7, 11 or 14 volts and that is a 2S, 3S or 4S size. At 19 volts, the boat will be flying. Isaac ▲
⟩⟩
Jay
Len1
Peejay
hermank
robbob
|
📝 Batteries, old & new.
2 years ago by 🇬🇧 robbob ( Fleet Admiral)
Fleet Admiral)✧ 197 Views · 16 Likes · 2 Comments
Flag
💬 Add Comment
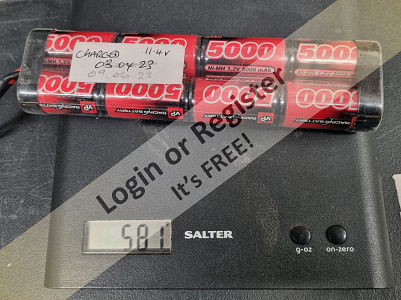
On the last outing of my crash tender the run time from a fully charged set of NiMh batteries was very short and I had to bring the boat in after only a few laps of the lake. I changed the batteries over to my second pair and tried for another run but the performance of the boat was similarly disappointing.
Those NiMh batteries are now about 8 years old and despite regular maintenance charges are clearly not capable of delivering the power required for the boat to perform as it has previously.
It’s clear that the batteries are in need of replacement and it is also a good opportunity to move to a better battery chemistry. The obvious choice is LiPo and so I began by finding a battery of the right voltage, capacity and most importantly, size.
The old NiMh batteries were 9.6 volts each and wired in series to give a 19.2 v supply and they were placed either side of the prop shaft to give the correct balance, however I was confident that a single LiPo would easily do the job of the two old batteries but to maintain the balance of the boat I would either need to make up a dummy battery of equivalent size and weight to maintain the equilibrium or put in two new batteries.
I decided that the simplest, although more costly, way to proceed was to have a second battery in the hull that I could change over to when required.
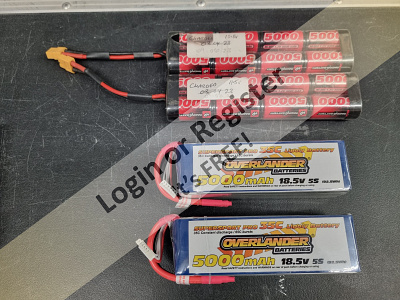
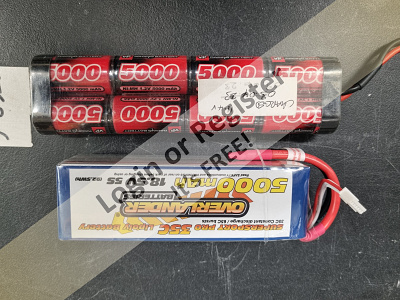
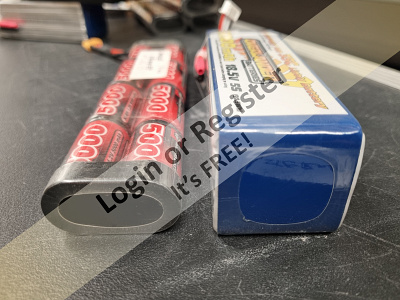
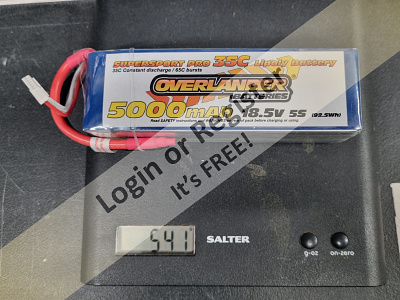
My research turned up a suitable battery pack made by Overlander, a 5C LiPo at 18.5 V and 5000mAh capacity, and not only was it almost a similar size it was also a very close equivalent weight to the old NiMh pack. However I would need to make some alterations to the battery compartment to accommodate the difference in height of the LiPo packs.
As one single new battery was more than adequate to run the boat it meant that I could retain the existing wiring harness without modification as I did not want to have to incorporate any kind of changeover switch to facilitate a battery change, I would simply do it as a plug swap.
I purchased the new batteries from my local model shop. Yes, I do have one nearby I’m pleased to say!
Al’s Hobbies in Volverton, Milton Keynes is quite close to my new home and it’s a delight to go there to feast on the aroma of a traditional model shop.
Older readers will know to what I am referring to!
With the batteries back in the workshop I was able to make some true comparisons between the old and the new packs to confirm their suitability.
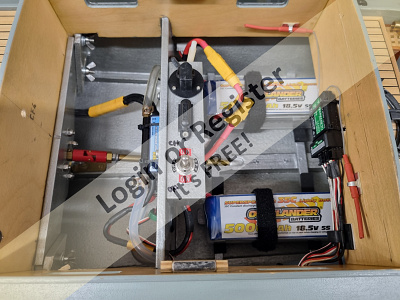
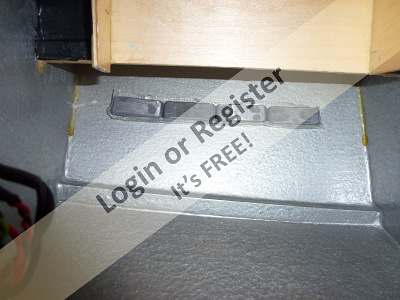
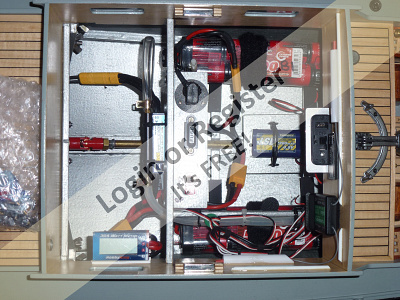
In the pictures you can see the battery compartment with the NiMh battery supports and Velcro retaining straps that will need modification.
Also the comparative size and weight of the old and new batteries and some wiring and cooling ‘plumbing’ that will have to be removed to make way for the new battery set.
OK...time to get some tools out 😁

Those NiMh batteries are now about 8 years old and despite regular maintenance charges are clearly not capable of delivering the power required for the boat to perform as it has previously.
It’s clear that the batteries are in need of replacement and it is also a good opportunity to move to a better battery chemistry. The obvious choice is LiPo and so I began by finding a battery of the right voltage, capacity and most importantly, size.
The old NiMh batteries were 9.6 volts each and wired in series to give a 19.2 v supply and they were placed either side of the prop shaft to give the correct balance, however I was confident that a single LiPo would easily do the job of the two old batteries but to maintain the balance of the boat I would either need to make up a dummy battery of equivalent size and weight to maintain the equilibrium or put in two new batteries.
I decided that the simplest, although more costly, way to proceed was to have a second battery in the hull that I could change over to when required.
My research turned up a suitable battery pack made by Overlander, a 5C LiPo at 18.5 V and 5000mAh capacity, and not only was it almost a similar size it was also a very close equivalent weight to the old NiMh pack. However I would need to make some alterations to the battery compartment to accommodate the difference in height of the LiPo packs.
As one single new battery was more than adequate to run the boat it meant that I could retain the existing wiring harness without modification as I did not want to have to incorporate any kind of changeover switch to facilitate a battery change, I would simply do it as a plug swap.
I purchased the new batteries from my local model shop. Yes, I do have one nearby I’m pleased to say!
Al’s Hobbies in Volverton, Milton Keynes is quite close to my new home and it’s a delight to go there to feast on the aroma of a traditional model shop.
Older readers will know to what I am referring to!
With the batteries back in the workshop I was able to make some true comparisons between the old and the new packs to confirm their suitability.
In the pictures you can see the battery compartment with the NiMh battery supports and Velcro retaining straps that will need modification.
Also the comparative size and weight of the old and new batteries and some wiring and cooling ‘plumbing’ that will have to be removed to make way for the new battery set.
OK...time to get some tools out 😁
▲
⟩⟩
Mike Stoney
DaveWhittaker
tonyb2
PemyslJ
Jay
jbkiwi
EdW
Peejay
Missouri
Fred
Len1
SimpleSailor
Rookysailor
Doogle
RNinMunich
hermank
|
💬 Re: Batteries, old & new.
2 years ago by 🇬🇧 robbob (
Fleet Admiral)✧ 195 Views · 11 Likes
Flag
Hi Alan.
Good to hear from you. I hope you and Mike C are keeping well. I have indeed reprogrammed the ESC for LiPo operation and I ran the boat for it's maiden voyage on the new batteries at the Model Boat Mayhem event at Wicksteed Park in May this year. The difference in performance is amazing. I have also added a fan on the motor shaft for forced cooling, which may not really be necessary but it was so easy to do whilst the boat was on the bench. I'll also be covering the new fire monitors in the refurb too which look excellent and so much more true to life! And making mention of the new hoses and fittings that are available from VMW. See the pic for a preview of the new monitors, old style alongside the new version!! 😁 Rob. 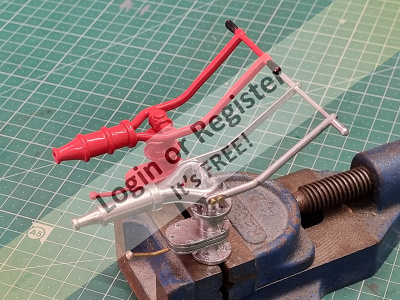
▲
⟩⟩
DaveWhittaker
tonyb2
Jay
jbkiwi
EdW
Peejay
Len1
ukengineman
Missouri
Fred
hermank
|
|
💬 Re: Batteries, old & new.
2 years ago by 🇬🇧 ukengineman (
 Leading Seaman) Leading Seaman)✧ 190 Views · 5 Likes
Flag
Hi Rob, good to see you back, don't forget to reprogram the ESC for LiPo operation.
Alan ▲
⟩⟩
Jay
Peejay
Len1
hermank
robbob
|
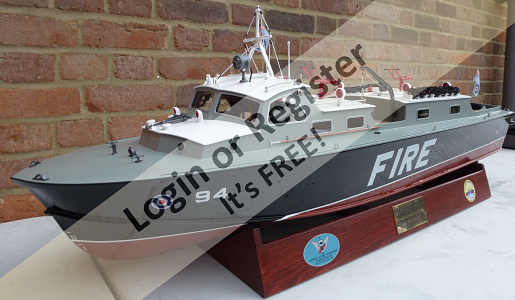
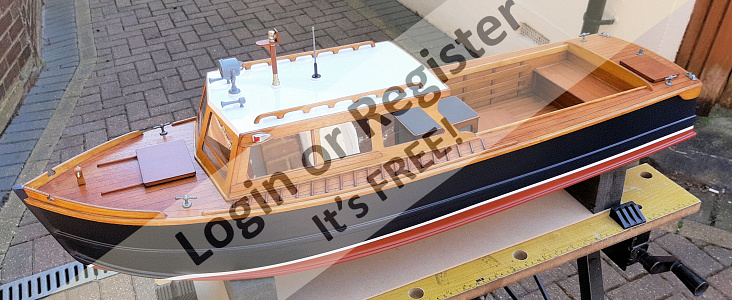
📝 My 46" RAF Crash Tender, Some much needed refurbishment!
2 years ago by 🇬🇧 robbob ( Fleet Admiral)
Fleet Admiral)✧ 203 Views · 19 Likes · 8 Comments
Flag
💬 Add Comment
I’ve not posted anything on this blog for quite a while as I have since moved house from London to Buckinghamshire into a ‘new build’ house with an internal garage which I have finished converting into my new workshop. With all of the business of settling into a new house out of the way I decided that it was about time to get back to some model engineering.
First job, some much needed refurbishment of my Vintage Model Works 46” RAF Crash Rescue Tender.
I’ll be posting updates on that in a short series and I hope you will be interested in how it went……

First job, some much needed refurbishment of my Vintage Model Works 46” RAF Crash Rescue Tender.
I’ll be posting updates on that in a short series and I hope you will be interested in how it went……
▲
⟩⟩
PeteJev
PemyslJ
Jay
jbkiwi
Peejay
Missouri
DuncanP
hermank
Rookysailor
AustinG
Doogle
RNinMunich
AlessandroSPQR
Len1
DaveWhittaker
EdW
stevedownunder
Trident73
cenbeth
|
💬 Re: My 46" RAF Crash Tender, Some much needed refurbishment!
2 years ago by 🇬🇧 robbob (
Fleet Admiral)✧ 195 Views · 3 Likes
Flag
Hello Duncan.
Yes, I do try to keep clean and tidy workshop, my wife says that I should be just as fastidious in the house too! 🤣😂 ▲
⟩⟩
tonyb2
Jay
Missouri
|
|
Login To
Remove Ads 💬 Re: My 46" RAF Crash Tender, Some much needed refurbishment!
2 years ago by 🇬🇧 DuncanP (
Commander)✧ 204 Views · 2 Likes
Flag
Love your workshop - it looks fantastic. Just remember to keep it this tidy!!🤣🤣
▲
⟩⟩
Jay
Len1
|
|
💬 Re: My 46" RAF Crash Tender, Some much needed refurbishment!
2 years ago by 🇬🇧 robbob (
Fleet Admiral)✧ 196 Views · 6 Likes
Flag
Hi Pete.
Thanks. I'ts laid out very much like my old workshop so it feels very familiar. Sadly no room for the spray booth that I had in the old one though☹️ but that took up a lot of space. Rob. ▲
⟩⟩
tonyb2
Jay
Missouri
Len1
hermank
Rookysailor
|
|
💬 Re: My 46" RAF Crash Tender, Some much needed refurbishment!
2 years ago by 🇬🇧 Rookysailor (
Rear Admiral)✧ 206 Views · 4 Likes
Flag
Wow Rob, what a beautiful new workshop you have made, feeling very jealous of you now.
Cheers, Pete😊 ▲
⟩⟩
Jay
Len1
hermank
robbob
|
|
💬 Re: My 46" RAF Crash Tender, Some much needed refurbishment!
2 years ago by 🇬🇧 robbob (
Fleet Admiral)✧ 197 Views · 4 Likes
Flag
Hi Doug.
Kind words. Thanks.😊👍 ▲
⟩⟩
tonyb2
Jay
Missouri
Len1
|
|
💬 Re: My 46" RAF Crash Tender, Some much needed refurbishment!
2 years ago by 🇩🇪 RNinMunich (
Fleet Admiral)✧ 194 Views · 4 Likes
Flag
ALWAYS interested in your superb Blogs and exceptional skills Rob👍
😎 ▲
⟩⟩
Jay
Len1
hermank
robbob
|
|
💬 Re: My 46" RAF Crash Tender, Some much needed refurbishment!
2 years ago by 🇬🇧 robbob (
Fleet Admiral)✧ 197 Views · 5 Likes
Flag
Thank you Herman.
I promised myself that I would build a better workshop than my old one...and I think it has worked out quite well 😁 Rob. ▲
⟩⟩
tonyb2
Jay
Missouri
Len1
hermank
|
|
💬 Re: My 46" RAF Crash Tender, Some much needed refurbishment!
2 years ago by 🇧🇪 hermank (
Rear Admiral)✧ 199 Views · 5 Likes
Flag
Robbob
What a CLEAN, well SORTED space you got there. It happens not very often but i take my hat off!!!! Well done ▲
⟩⟩
Jay
Len1
AustinG
robbob
AlessandroSPQR
|
📝 The next project...........
8 years ago by 🇬🇧 robbob ( Fleet Admiral)
Fleet Admiral)✧ 341 Views · 16 Likes · 2 Comments
Flag
💬 Add Comment
Since completing this model have started work on a new boat and I promised those following my Crash Tender build blog that I would post an update here.
The new model is a ‘Thames River Police Launch’ constructed from a kit by Vintage Model Works.
The new blog is here:
The new model is a ‘Thames River Police Launch’ constructed from a kit by Vintage Model Works.
The new blog is here:
▲
⟩⟩
Jay
PeteJev
Mike Stoney
Missouri
hermank
Yngvegr
EdW
Jase
ScottS
ireneM
Colin H
Scamp
doghouse
DaveWhittaker
BOATSHED
Rookysailor
|
💬 Re: The next project...........
5 years ago by 🇬🇧 robbob (
Fleet Admiral)✧ 312 Views · 4 Likes
Flag
Hi Martin.
It's good to have you back....and catching up with things too. I'm very pleased that you appreciate the amount effort I put into writing my blogs and posting good photos too 😊👍 Rob. ▲
⟩⟩
Jay
Missouri
hermank
Martin555
|
|
💬 Re: The next project...........
5 years ago by 🇬🇧 Martin555 (
Fleet Admiral)✧ 310 Views · 4 Likes
Flag
Hi Rob,
As you know i had been missing for a while so as i have been trying to catch up i accidentally came across this build log. I know it is a few years old but i started reading a few posts and thought i must start this from the beginning. So i scrolled right back to the start. It has taking quite a few hours but i really must say it is well written and i enjoyed it tremendously. And as for the Crash Rescue tender It is truly a master piece. The amount of work you put in to is amazing and the detail is stunning. Extremely well done. Martin555. ▲
⟩⟩
Jay
hermank
jbkiwi
robbob
|
📝 Seat Trials and mods.
8 years ago by 🇬🇧 robbob ( Fleet Admiral)
Fleet Admiral)✧ 343 Views · 13 Likes · 5 Comments
Flag
💬 Add Comment
It’s been a while since the boat had it’s maiden voyage on the lake at St. Albans and I’m pleased to report that it looks really good in the water and goes like stink if you open up the throttle.
Sadly I still don’t have any decent video of the boat yet as I can’t film and drive the thing at the same time, but I do have some static wide shots from my GoPro.
When I do the video I’ll ask a cameraman mate to do the honours, maybe I’ll put the GoPro on the bow and then the stern to get some low action shots…the storyboard is already building in my head!!
These early runs were great as they showed up some minor problems that needed attending to.
I found that it needed ballasting slightly as it was not sitting on the waterline evenly from side to side so I flattened out some old lead water pipe and cut it into small sections so that I could add ballast incrementally.
I did this in the ‘domestic test tank’ and once I was happy the lead pieces were fixed in place inside the hull with some super strong double sided tape.
The ESC needed a little programming adjustment because I had forgotten to set the low battery level point to ‘off’ as I am using NiMh batteries and not LiPo’s , that was the cause of the short initial run time on the first outing…..DOH !!
The batteries are now held in place by Velcro straps on some bearers that I added, otherwise a battery change involved cutting cable ties and replacing them at the lakeside…not very practical.
The volt/amp/watt meter is also now on a proper bracket so that the display is more readable.
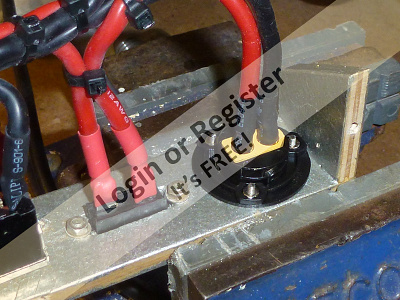
I have also changed the charging connection from the nasty Tamiya connector to a nice little panel mount XT 60 connector that HobbyKing sell, it comes with a handy blanking plug that I have drilled for a retaining cord.
I have also finally got around to upgrading the firmware on my Turnigy i6 radio to the 10 channel version so that I can assign the lighting to the switches properly and have the rotation of the searchlight on one of the two rotary knobs.
I can use the old 6 channel RX in the new boat….blog coming soon.

Sadly I still don’t have any decent video of the boat yet as I can’t film and drive the thing at the same time, but I do have some static wide shots from my GoPro.
When I do the video I’ll ask a cameraman mate to do the honours, maybe I’ll put the GoPro on the bow and then the stern to get some low action shots…the storyboard is already building in my head!!
These early runs were great as they showed up some minor problems that needed attending to.
I found that it needed ballasting slightly as it was not sitting on the waterline evenly from side to side so I flattened out some old lead water pipe and cut it into small sections so that I could add ballast incrementally.
I did this in the ‘domestic test tank’ and once I was happy the lead pieces were fixed in place inside the hull with some super strong double sided tape.
The ESC needed a little programming adjustment because I had forgotten to set the low battery level point to ‘off’ as I am using NiMh batteries and not LiPo’s , that was the cause of the short initial run time on the first outing…..DOH !!
The batteries are now held in place by Velcro straps on some bearers that I added, otherwise a battery change involved cutting cable ties and replacing them at the lakeside…not very practical.
The volt/amp/watt meter is also now on a proper bracket so that the display is more readable.
I have also changed the charging connection from the nasty Tamiya connector to a nice little panel mount XT 60 connector that HobbyKing sell, it comes with a handy blanking plug that I have drilled for a retaining cord.
I have also finally got around to upgrading the firmware on my Turnigy i6 radio to the 10 channel version so that I can assign the lighting to the switches properly and have the rotation of the searchlight on one of the two rotary knobs.
I can use the old 6 channel RX in the new boat….blog coming soon.
▲
⟩⟩
Jay
Missouri
EdW
Scratchbuilder
Waverider
Martin555
Colin H
doghouse
DaveWhittaker
RNinMunich
MouldBuilder
Northumbrian
NPJ
|
💬 Re: Seat Trials and mods.
6 years ago by 🇬🇧 drspock (
 Petty Officer 1st Class) Petty Officer 1st Class)✧ 339 Views · 3 Likes
Flag
Hi Robbob, Thank goodness for tour blog!
i felt many parts of the instructions were vague,so with your blog with photos have made this build feasible for me! One question niggling at the moment is what size fuse did you use? I note that your main switch is 25A.As you have trialled the boat I imagine it is adequate. drspock ▲
⟩⟩
Jay
Martin555
robbob
|
|
Login To
Remove Ads 💬 Sea Trials and mods.
7 years ago by 🇬🇧 BOATSHED (
Captain)✧ 340 Views · 3 Likes
Flag
I have just been watching your video again of your Crash Tender on the water. I do have a couple more questions, first is what motor is in her and second is she going full throttle on the water or not. Sorry to be nosey.
▲
⟩⟩
Jay
Martin555
doghouse
|
|
💬 Sea Trials and mods.
7 years ago by 🇬🇧 BOATSHED (
Captain)✧ 341 Views · 5 Likes
Flag
Wow Robbob, I have just seen the video of your Crash Tender. She is amazing. Looks great on the water. I just love the way these hulls sit on the water. Virtually no roll at all, it's as if they are glued to the waters surface. The Aerokits Crash Tender was my very first boat back int 1959, it was my 9th birthday present and my father and I started to a build. But he wasn't happy about building the original kit straight outright. As our first ever build, he brought home broken down tea chests and orange boxes and he got me to draw round all the parts and he went on to cut each piece out with a nice new fretsaw. So as the first one went together and it seemed to go well then the Aerokits one followed on. He then bought me a ED Hunter 3.46cc Diesel engine for my Christmas present that year. I say he I should say my parents both bought them for me. Sadly I never got to have radio control in it. I was weird as we went on to build another five in all. One was given to my younger brother, his had a Taycol Standard in it, and I had the job of taking the accumulator to the local model shop to have it charged up as we never had a charger for it. I think they used to charge something like a shilling each time it was done. The other five that we built he actually gave away to friends and one even went to the milkman. I still have a 34 and a 46 inch still new in boxes. The 34" is an original that Was Released in 1994 by Aerokits on the 50th Anniversary and the 46" is a VMW kit. I have a 46" to refurbish and have scaled one down and built a 28" in Balsa wood. As well as a 46" PT 109 with a 26cc in her that also sits on the water the same way. Sorry to waffle on it just brings back old memories. I'll leave it there. I just love your Build such detail.
▲
⟩⟩
Jay
Martin555
doghouse
Donnieboy
robbob
|
|
💬 Seat Trials and mods.
8 years ago by 🇬🇧 robbob (
Fleet Admiral)✧ 340 Views · 5 Likes
Flag
Hi Michael.
I know what you mean about distractions, I'm building an Amati 'ship in a bottle' model of the American warship 'Hannah' for my 5 year old granddaughter, also called Hannah. It's a real challenge on the eyes and fingers...seemed like a good idea at the time...🤓 If you want to see the Crash Tender close-up and have a chat I'll be showing it at the St. Albans model club exhibition in September, details are on the 'events' page. Rob. 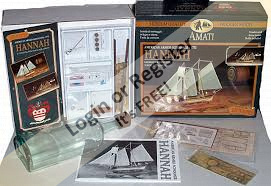

▲
⟩⟩
Jay
Missouri
Martin555
doghouse
RNinMunich
|
|
💬 Seat Trials and mods.
8 years ago by 🇬🇧 mturpin013 (
Admiral)✧ 341 Views · 5 Likes
Flag
Hi Rob, thank goodness these changes/modifications have come before I get to that stage so I can incorporate them in mine. The boat looks really good on the water, and if ever I get to your neck of the woods I'd really like to see it close up as it's certainly an inspiring build. My build is coming on OK but the detailing takes such a long time to get it to the right standard, but this is the enjoyable part of modelling for me. The other thing that's slowing things down is my 5 year old grandson who wants a boat as well so I'm building a Freeman 22 alongside my crash tender.
PS keep us informed of any other updates Michael ▲
⟩⟩
Jay
Martin555
drspock
doghouse
RNinMunich
|


Login To
Remove Ads
Remove Ads