Join Us On Social Media!

|

|

|
Download The App!
Login To
Remove Ads
Remove Ads
Login To
Remove Ads
Remove Ads
Model Boats Website
Fairey Huntsman 31 (47” SLEC kit) build blog
11 Posts · 17 Followers · 82 Photos · 83 Likes
Began 3 years ago by
 United Kingdom
Follow This Thread
Not currently following
> Click to follow
> Click to follow
Latest Post 3 years ago by
| Oldest posts shown first (Show Newest First) | (Print Booklet) |
📝 Fairey Huntsman 31 (47” SLEC kit) build blog
3 years ago by 🇬🇧 Skydive130 ( Rear Admiral)
Rear Admiral)✧ 134 Views · 8 Likes · 10 Comments
Flag
💬 Add Comment
I decided I needed a challenge and a quote from a certain film springs to mind “your gonna need a bigger boat!” Well, I think I’m gonna need a bigger workbench!
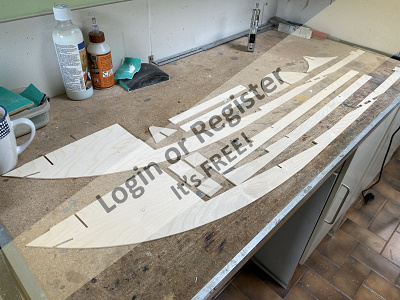
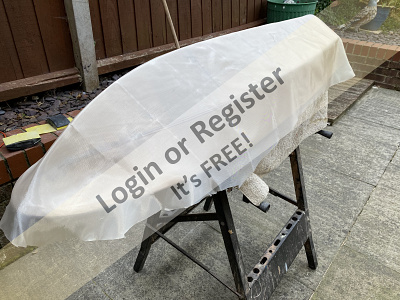
I’ve been thinking about doing a big Huntsman for a while and as the Springer tug wasn’t doing it for me I decided to rest the tug for another day and pull the trigger on the large 47” length Huntsman kit from SLEC. 2 days after ordering the huge box arrived and upon opening I was greeted with that smell of new wood and Slecs’s usually quality mix of laser cut ply, liteply, balsa, hardwood and other types of strip wood. Also included was a sheet of vacform parts, clear acetate for the windows, scaled down simple plan, pictorial instructions, build manual and as an extra, I bought the accessories pack separately.
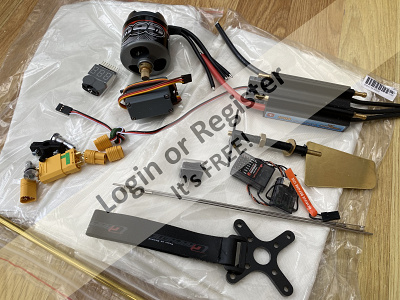
At the same time I ordered the kit, I ordered some stuff from Hobbyking which I picked up today which including a huge chunk of a motor Turnigy G60 500kv (equivalent to a 61 glow!), 120amp brushless esc, propeller coupling, 18” propshaft, heavy duty metal gear servo and a few bits from my spares box. I will need other items like a 6S lipo and other bits, but I’ll order those as needed.
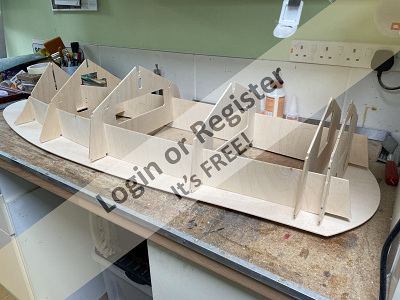
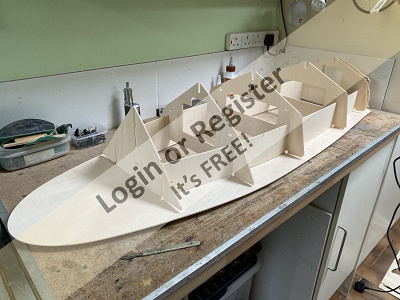
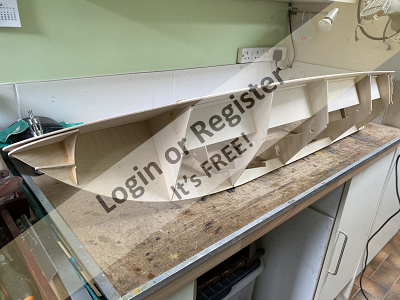
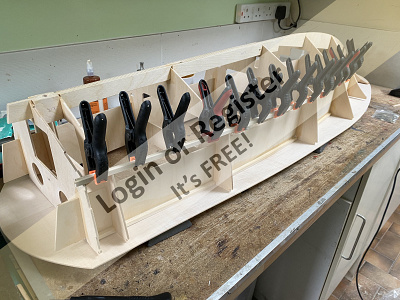
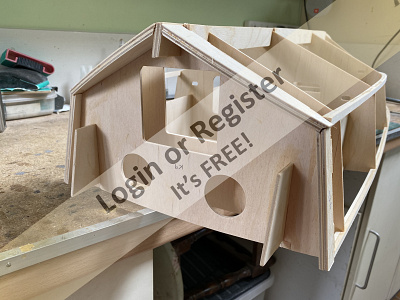
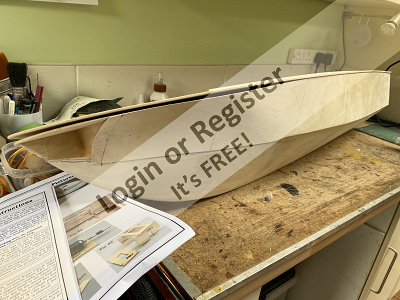
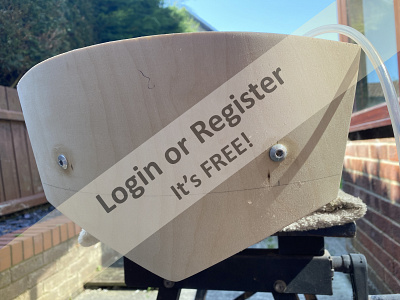
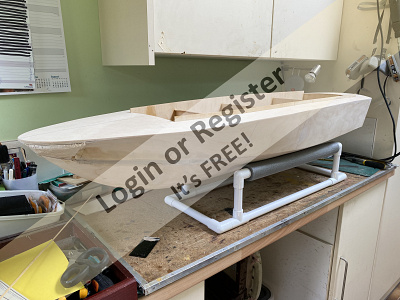
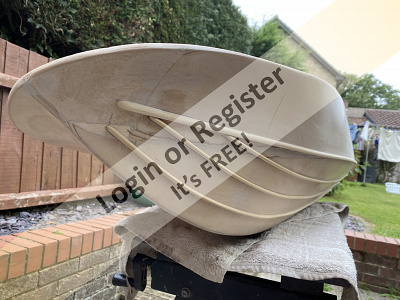
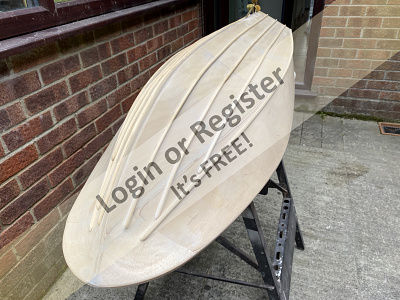
Construction wise all I’ve done is dry assembled the bulkheads and side formers and slotted them onto the false deck just for impression, and as you can see, she’s gonna be huge! Everything is a really nice snug fit and almost self jigging, which is great as it will be vital to build this model square and true, any twists will show up big style!
I shall sand everything properly at the weekend and start gluing……


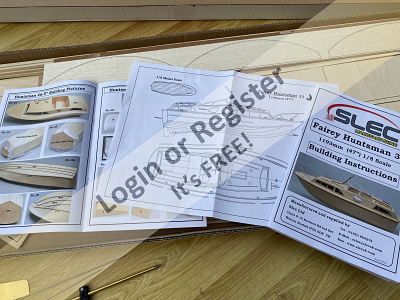
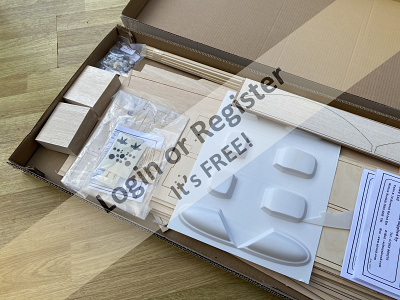


I’ve been thinking about doing a big Huntsman for a while and as the Springer tug wasn’t doing it for me I decided to rest the tug for another day and pull the trigger on the large 47” length Huntsman kit from SLEC. 2 days after ordering the huge box arrived and upon opening I was greeted with that smell of new wood and Slecs’s usually quality mix of laser cut ply, liteply, balsa, hardwood and other types of strip wood. Also included was a sheet of vacform parts, clear acetate for the windows, scaled down simple plan, pictorial instructions, build manual and as an extra, I bought the accessories pack separately.
At the same time I ordered the kit, I ordered some stuff from Hobbyking which I picked up today which including a huge chunk of a motor Turnigy G60 500kv (equivalent to a 61 glow!), 120amp brushless esc, propeller coupling, 18” propshaft, heavy duty metal gear servo and a few bits from my spares box. I will need other items like a 6S lipo and other bits, but I’ll order those as needed.
Construction wise all I’ve done is dry assembled the bulkheads and side formers and slotted them onto the false deck just for impression, and as you can see, she’s gonna be huge! Everything is a really nice snug fit and almost self jigging, which is great as it will be vital to build this model square and true, any twists will show up big style!
I shall sand everything properly at the weekend and start gluing……
▲
⟩⟩
Mike Stoney
robbob
Seanympth
Rookysailor
mistyoptic
Newby7
Colin H
Martin555
|
💬 Re: Fairey Huntsman 31 (47” SLEC kit) build blog
3 years ago by 🇬🇧 Skydive130 (
Rear Admiral)✧ 131 Views · 3 Likes
Flag
I hear you Pete, I was desperate for a “new in box” MS kit and on impulse I paid the price although it does come with the motor and hopefully it’s the right one recommended. Still awaiting the postie to deliver!
I’m really desperate for a MS Tamar unbuilt kit, sadly they seem to go for over £500 on the odd occasion they turn up on ebay and I’ve no interest in some of the built ones that turn up again commanding extortionate prices. As you say, it would be nice if someone could take on the MS range again. Kind regards sy ▲
⟩⟩
Scratchbuilder
Rookysailor
Martin555
|
|
Login To
Remove Ads 💬 Re: Fairey Huntsman 31 (47” SLEC kit) build blog
3 years ago by 🇬🇧 Rookysailor (
 Commodore) Commodore)✧ 144 Views · 3 Likes
Flag
I saw the kit of 'Maggie M ' on Ebay, I thought he was asking a little bit to much for it, it appears that since Model slipway ceased trading, their kits are bringing silly high prices, just wish that somebody would get the range and start producing the kits again.😐
Cheers, Pete ▲
⟩⟩
Skydive130
Martin555
Robertcooper
|
|
💬 Re: Fairey Huntsman 31 (47” SLEC kit) build blog
3 years ago by 🇬🇧 Skydive130 (
Rear Admiral)✧ 133 Views · 3 Likes
Flag
Hi Pete,
My “Loyal” was almost next! I’ve still got a brand new Loyal kit sat in France awaiting its travels across the channel, goodness only knows when that will arrive? However, I managed to secure an impulse eBay buy of a very old and dusty part started Loyal which I picked up last week from Devon. It’s going to take quite a bit of work to get it cleaned and stripped back to a starting point and I just feel that if I spend hours doing that then all of a sudden the new kit comes over the channel! It’s always posssible that the kit in France may not arrive for various reasons and that will leave me no choice but to build the other, whatever happens, it will be next. Kind regards Sy Ps, I managed to get a brand new Maggie M slipway kit last week off that dreaded auction site! 🤬🤬🤬 ▲
⟩⟩
Scratchbuilder
Rookysailor
Martin555
|
|
💬 Re: Fairey Huntsman 31 (47” SLEC kit) build blog
3 years ago by 🇬🇧 Rookysailor (
Commodore)✧ 146 Views · 3 Likes
Flag
Wot's happened to the 'Loyal Moderator' Sy? I thought that was going to be your next build.😊
Cheers, Pete btw, Only arskin! cause I've got one to build and I wanted to follow yours.... ▲
⟩⟩
Martin555
Skydive130
Robertcooper
|
|
💬 Re: Fairey Huntsman 31 (47” SLEC kit) build blog
3 years ago by 🇬🇧 Skydive130 (
Rear Admiral)✧ 134 Views · 1 Like
Flag
Thanks Rick, hope you enjoy the build, but please note I don’t always finish ha ha, I’ve many a started project that I promise to go back to and never do! This one will be finished 😂
Kind regards Sy ▲
⟩⟩
Martin555
|
|
💬 Re: Fairey Huntsman 31 (47” SLEC kit) build blog
3 years ago by 🇨🇦 Newby7 (
 Fleet Admiral) Fleet Admiral)✧ 135 Views · 2 Likes
Flag
Sy You excel at choosing a boat. Will watch with envy as you build her.Hats off to your skills in building and finishing your boats.
Rick ▲
⟩⟩
Skydive130
Martin555
|
|
💬 Re: Fairey Huntsman 31 (47” SLEC kit) build blog
3 years ago by 🇬🇧 Skydive130 (
Rear Admiral)✧ 134 Views · 2 Likes
Flag
Hi Jacko and welcome aboard. Yes is the answer, this is the start of a start to finish blog, so subscribe for regular updates.
Kind regards Sy ▲
⟩⟩
Scratchbuilder
Martin555
|
|
💬 Re: Fairey Huntsman 31 (47” SLEC kit)
3 years ago by 🇬🇧 Skydive130 (
Rear Admiral)✧ 134 Views · 2 Likes
Flag
Hi Martin and welcome aboard once again! I shall do my best to produce a stunner, at this scale (1:8 scale) it needs to be right as mistakes will show.
Great idea on pre-drilling cable holes! There are already some in the bulk heads, but will look to see if I’m going to need more before committing to glue. Kind regards Sy ▲
⟩⟩
Scratchbuilder
Martin555
|
|
💬 Re: Fairey Huntsman 31 (47” SLEC kit)
3 years ago by 🇬🇧 Martin555 (
Fleet Admiral)✧ 134 Views · 3 Likes
Flag
Hi Sy,
I can only dream of making something like this. I think you will make an amazing model. You certainly have the skill to make a real masterpiece. May i make a suggestion that you drill a few holes in the frames so that you can neatly run cables, tube's and so on. Looking forward to this. Martin555. ▲
⟩⟩
Scratchbuilder
Skydive130
Robertcooper
|
|
💬 Re: Fairey Huntsman 31 (47” SLEC kit)
3 years ago by 🇬🇧 jacko (
 Lieutenant Commander) Lieutenant Commander)✧ 136 Views · 3 Likes
Flag
looks like a nice kit will there be a build blog ??
▲
⟩⟩
Scratchbuilder
Skydive130
Martin555
|
Login To
Remove Ads
Remove Ads
📝 Let building commence….
3 years ago by 🇬🇧 Skydive130 ( Rear Admiral)
Rear Admiral)✧ 183 Views · 8 Likes · 12 Comments
Flag
💬 Add Comment
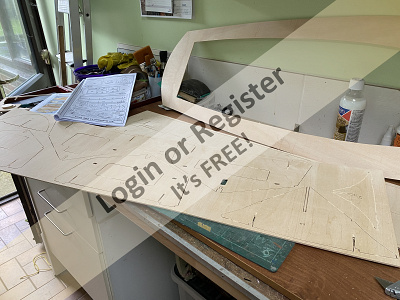
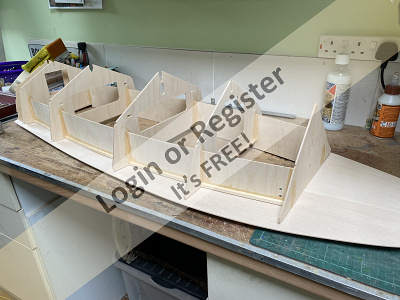
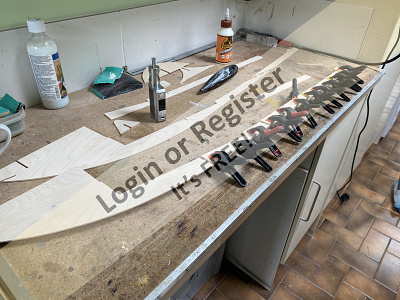
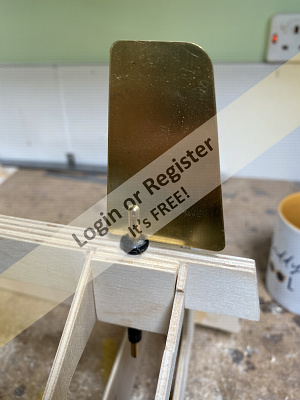
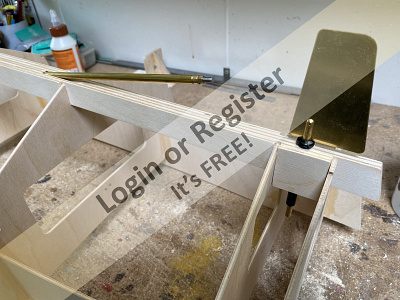
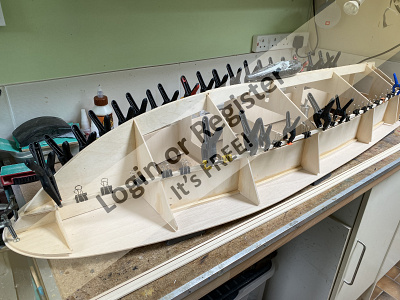
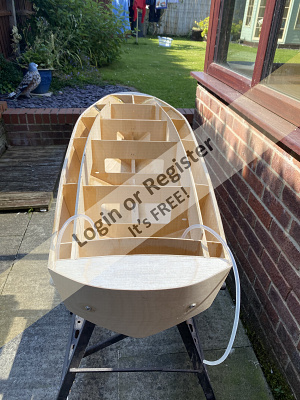
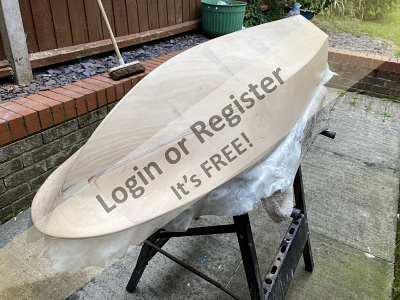
So, starting on the huge Huntsman initially starting with preparing all the laser cut parts that make up the keel and bulkheads. All parts required were cut from the sheets and marked up to avoid mistakes later. Due to the quality of the SLEC laser cutting, the parts required minimal preparation, with a gentle sand both sides of each part and ensuring the cut lugs were sanded flush. One other thing I did which I feel is important for a good fit was to square file the round slots so that when the bulkheads were pushed onto their side former sheets they sat true. Once happy all parts were prepared properly and after a “Dry no glue fit” to make sure everything was right I started gluing the bulkheads onto the side sheets and also bonded the 6.5mm square hardwood rails to formers and side sheets. Everything was initially tacked with cyano then with the false deck fitted (not glued at this stage, that comes much later) I then went round each joint with slightly thinned waterproof PVA with a brush giving it’s first coat of glue. I will give all joints a second coat tomorrow.
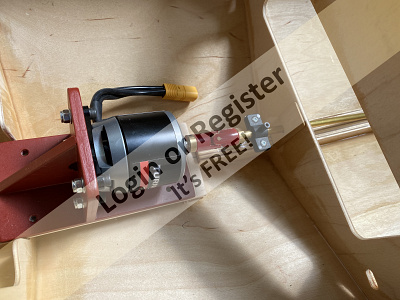
At this point, I decided to make up the motor mount as I intend to fit the propshaft earlier in the build than described in the destructions. The motor mount is again a laser cut affair and will be the perfect fit for my motor as the already drilled holes for the mount mount plate are perfectly aligned.
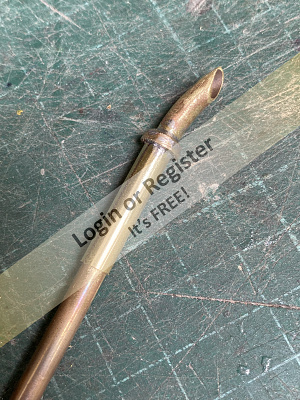
Last job was to prepare all the parts for the keel which includes several doublers for the rudder post and propshaft guide slot. The instructions stated that the propshaft slot is drilled once all the doublers are fitted, however I decided for ease and accuracy that I would fit the 2 doublers on one side of the main keel, add the second keel layer than cut out with the dremel 2x pieces inside the propshaft channel that are there to make sure that the keel stays inline when fitting the doublers. Once I did that, I checked the propshaft fitted ok and then added the remaining doublers, clamped it and that’s to be left overnight for a solid bond.
More tomorrow…..


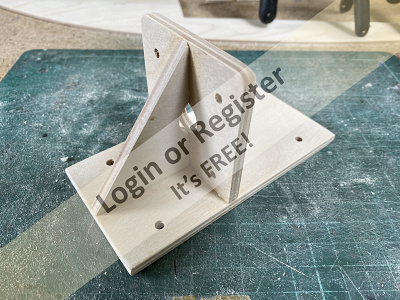
At this point, I decided to make up the motor mount as I intend to fit the propshaft earlier in the build than described in the destructions. The motor mount is again a laser cut affair and will be the perfect fit for my motor as the already drilled holes for the mount mount plate are perfectly aligned.
Last job was to prepare all the parts for the keel which includes several doublers for the rudder post and propshaft guide slot. The instructions stated that the propshaft slot is drilled once all the doublers are fitted, however I decided for ease and accuracy that I would fit the 2 doublers on one side of the main keel, add the second keel layer than cut out with the dremel 2x pieces inside the propshaft channel that are there to make sure that the keel stays inline when fitting the doublers. Once I did that, I checked the propshaft fitted ok and then added the remaining doublers, clamped it and that’s to be left overnight for a solid bond.
More tomorrow…..
▲
⟩⟩
robbob
Newby7
Scratchbuilder
RNinMunich
Rookysailor
Colin H
T33CNO
Martin555
|
💬 Re: Let building commence….
3 years ago by 🇬🇧 Skydive130 (
Rear Admiral)✧ 179 Views · 2 Likes
Flag
Colin, thank you so much for those pictures and link, there is some superb reference pics there that will come in very useful.
Curious to see the price she sold for, not a lot in my eyes although it would neeed money thrown at it to bring her back to standards and then the running and mooring costs after! I’d love a boat like that, but fear it would be a money pit, maybe I’ll rent one for a holiday in the next couple of years 👍 Kind regards Sy ▲
⟩⟩
Martin555
Colin H
|
|
Login To
Remove Ads 💬 Re: Let building commence….
3 years ago by 🇬🇧 Colin H (
Fleet Admiral)✧ 182 Views · 3 Likes
Flag
Good afternoon Sy, I thought these pics mihgt give you some ideas.
I wish I was a boy again, my dad rented us a Swordsman for the 1969 boatshow lived aboard for 10 Days, and cruised the south coast and round the Isle of White. VERY HAPPY DAYS!!!!! Cheers Colin. 
▲
⟩⟩
Rookysailor
Skydive130
Martin555
|

|
💬 Re: Let building commence….
3 years ago by 🇬🇧 Skydive130 (
Rear Admiral)✧ 179 Views · 1 Like
Flag
Cheers Rick, I am to please 😂
▲
⟩⟩
Martin555
|
|
💬 Re: Let building commence….
3 years ago by 🇨🇦 Newby7 (
Fleet Admiral)✧ 181 Views · 2 Likes
Flag
Hi Sy Off to a good start.
Rick ▲
⟩⟩
Martin555
Skydive130
|
|
💬 Re: Let building commence….
3 years ago by 🇬🇧 Skydive130 (
Rear Admiral)✧ 180 Views · 1 Like
Flag
Hi Bill and welcome aboard again, hopefully I’ll do my best to keep you entertained!
Kind regards Sy ▲
⟩⟩
Martin555
|
|
💬 Re: Let building commence….
3 years ago by 🇬🇧 Scratchbuilder (
 Vice Admiral) Vice Admiral)✧ 186 Views · 2 Likes
Flag
Morning Sy.
Looking good and another worthwhile project that will keep us all enthralled. Keep it up. Regards Bill. ▲
⟩⟩
Martin555
Skydive130
|
|
💬 Re: Let building commence….
3 years ago by 🇬🇧 Skydive130 (
Rear Admiral)✧ 181 Views · 1 Like
Flag
Hi Doug and welcome aboard. I was looking at different Fairey logos ect last night and your right at some point I will need them. Due to the big scale of this model though and I will probably go with a standard blue and white scheme, I’m hoping I can find someone who makes decals in vinyl. Thankfully the Huntsman 31 doesn’t often appear with lots of logos and decals ect, unlike the smaller 28 which often does.
I’ll worry about that down the line, but another issue I have is what to do about the deck planking? The kit comes with a pre-printed deck representing the curved planks of the real thing. I want to lay down planking strips with white plastic of lime caulking but have no idea how to do the curved planks, straight ones would be a doddle! Again I’ll put that thought out there in a week or 2 when I’m closer to deck planking. Kind regards Sy ▲
⟩⟩
Martin555
|
|
💬 Re: Let building commence….
3 years ago by 🇩🇪 RNinMunich (
Fleet Admiral)✧ 191 Views · 2 Likes
Flag
So far so very good Sy 👍
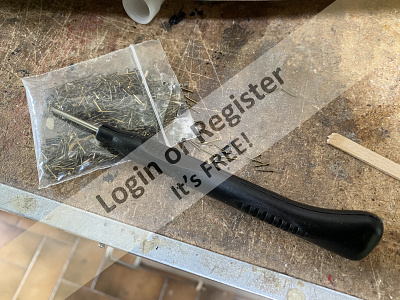
Figure you might need some of these at some stage - see pics. Cheers, Doug 😎 


▲
⟩⟩
robbob
Skydive130
|
|
💬 Re: Let building commence….
3 years ago by 🇬🇧 Skydive130 (
Rear Admiral)✧ 183 Views · 1 Like
Flag
Indeed Colin, there is something about the classic lines of Fairey boats that’s just so pleasing on the eye
Kind regards Sy ▲
⟩⟩
Martin555
|
|
💬 Re: Let building commence….
3 years ago by 🇬🇧 Colin H (
Fleet Admiral)✧ 186 Views · 2 Likes
Flag
Sy, that's a good start to your new boat,a big beast but a beautiful shape.
Cheers Colin. ▲
⟩⟩
Skydive130
Martin555
|
|
💬 Re: Let building commence….
3 years ago by 🇬🇧 Skydive130 (
Rear Admiral)✧ 183 Views · 1 Like
Flag
Hi Martin, yes, all is aligned nicely, the keel will go in tomorrow along with the chine rails prior to sheeting, that much loved job 😂
As for the smoker unti, that has kept me off the fags for 7 years lol, Kind regards Sy ▲
⟩⟩
Martin555
|
|
💬 Re: Let building commence….
3 years ago by 🇬🇧 Martin555 (
Fleet Admiral)✧ 185 Views · 1 Like
Flag
Off to a great start Sy,
Did you use the keel to double check alignment ? I see you have a smoker unit already assembled on the bench. LOL!!! Martin555. ▲
⟩⟩
Skydive130
|
📝 Fitting the keel and chine rails …
3 years ago by 🇬🇧 Skydive130 ( Rear Admiral)
Rear Admiral)✧ 179 Views · 6 Likes · 5 Comments
Flag
💬 Add Comment
I have managed to achieve what I set out to do today before the start of a certain footie match this evening!
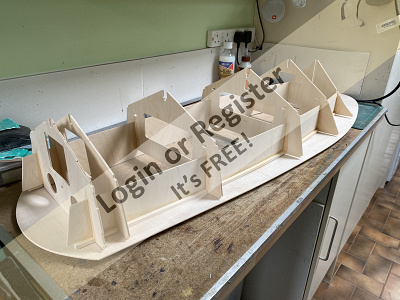
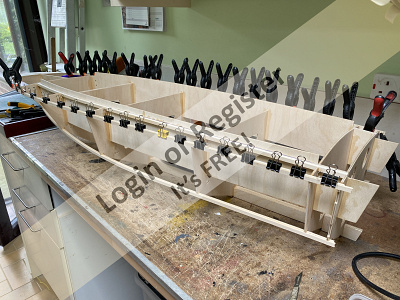
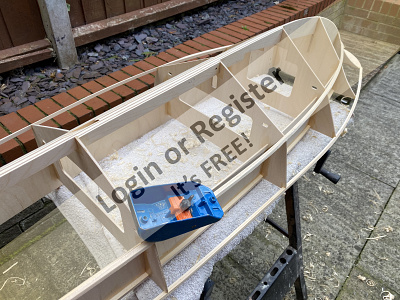
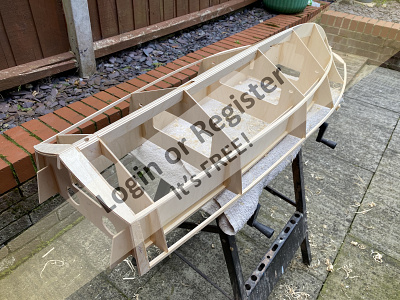
First job having glued up all the keel parts yesterday was to check the prop shaft passed through its slot ok and to to drill out the hole for the rudder post, easy enough. Once done, I cleaned out with the files, the slots on the keel and the bulk heads before fitting the keel to the models frames, checking for true on every angle possible before again painting in part diluted gorilla PVA glue into all the joints and giving a second coat to other joints already glued.
After lunch I was in the position to start fitting the chine rails. There are 2 obechi rails each side of the hull and each chine is made of 2 strips to aid bending. Clamps are good for a lot of things, but I’ve always struggled in the past to get clamps on to chines without them pinging off at the wrong moment! What I do now is to use thick cyano for the first run and then using a pin pusher and 12mm brass nails left over from model display ships, pin the chine at each point it touches a bulkhead. Works every time!
I gave that an hour to really set (distracted my impatience by cutting the grass!)before adding the second runs with PVA and every clamp I have (must get more, you can never have enough!). Then finally, again made sure everything was square and true before leaving to set. At this point, if we are out of square, it will be a lot harder to straighten although it can be done when we sheet the hull, although I’d rather avoid it!
That’s it until Tuesday when I will fit the transom supports and start sheeting….
▲
⟩⟩
robbob
Martin555
Rookysailor
jbkiwi
Newby7
Colin H
|
💬 Re: Fitting the keel and chine rails …
3 years ago by 🇬🇧 Colin H (
Fleet Admiral)✧ 180 Views · 2 Likes
Flag
Sy, look for reusable ties they are great and no waste.
Cheers Colin. ▲
⟩⟩
Martin555
Skydive130
|
|
Login To
Remove Ads 💬 Re: Fitting the keel and chine rails …
3 years ago by 🇬🇧 Skydive130 (
Rear Admiral)✧ 179 Views · 2 Likes
Flag
Good tip with the cable ties nerys, I’ll keep that one in the mental bank for the future, I’ve hundreds of the little plastic blighters lol.
Kind regards Sy ▲
⟩⟩
Martin555
Colin H
|
|
💬 Re: Fitting the keel and chine rails …
3 years ago by 🇬🇧 Nerys (
Fleet Admiral)✧ 178 Views · 3 Likes
Flag
She's a big old boat, Sy, but you seem to be getting on well with her. As you say, one can never have enough cramps but they don't work when fitting chines, I find that cable ties can be quite helpful.
Cheers, Nerys ▲
⟩⟩
Martin555
Colin H
Skydive130
|
|
💬 Re: Fitting the keel and chine rails …
3 years ago by 🇬🇧 Skydive130 (
Rear Admiral)✧ 180 Views · 1 Like
Flag
I’m switching the iPad off Rick, I need no distractions, the chines are ok,a I just checked 😂😂😂
▲
⟩⟩
Martin555
|
|
💬 Re: Fitting the keel and chine rails …
3 years ago by 🇨🇦 Newby7 (
Fleet Admiral)✧ 181 Views · 2 Likes
Flag
Hi Sy The chine will look after its self. The game whistle is more important.
Rick ▲
⟩⟩
Martin555
Skydive130
|
📝 The battle of the skins!……
3 years ago by 🇬🇧 Skydive130 ( Rear Admiral)
Rear Admiral)✧ 173 Views · 8 Likes · 35 Comments
Flag
💬 Add Comment
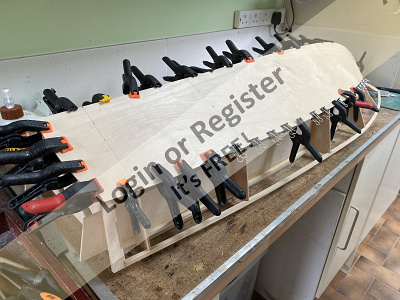
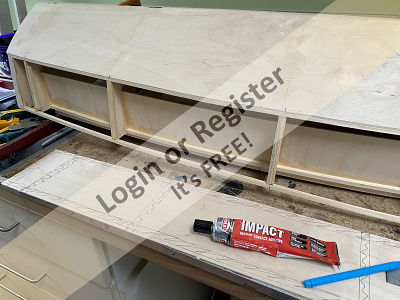
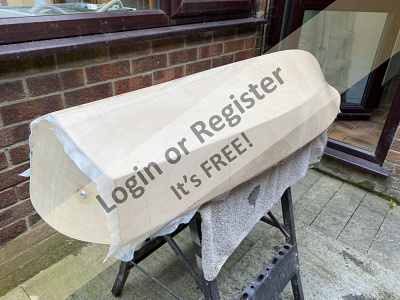
Last night after work, I set about shaping and glueing the transom supports which consisted of 8 pieces. All that was required was a bevel sanded where the pieces met the keel, then glued and clamped and let to set overnight.
Today’s task was the prepare the bulkheads and keel ect in readiness for the hull sheeting. Shaping the chines and keel was easy enough to achieve with the razor plane, dremel sanding drum and finally the sanding block although quite time consuming but reasonably pleasant in the sunshine!
Then it was onto the first of the sheets which is a job that fills me with utter hatred! I don’t know why, but it’s always a battle to get them fitted well to all the bulkheads ect. According to the instructions, the sheets are fitted bottom of hull. First and then the side pieces. Also according to the instructions it states that the side sheets are harder to fit, great, the bottom ones are hard enough!
I test fitted the first sheet to make sure it was touching all the right parts and then did a practice run with the clamps, all seemed reasonably good. I then followed up with PVA to all the contact parts on the keel and put on the first sheet quickly clamping with as many clamps as possible to keep it in position and also checking to make sure the hull is still squared. I drew lines on the sheet where the bulkheads are running underneath and with my trusty pin pusher and 12mm brass nails, pushed them into the sheet and into the bulkheads to make sure they were contacting the curved bulkheads towards the bow. It’s a bit trial and error with the pin pusher, some hit, some don’t but once you’ve got enough into the sheet over the bulkheads, they ,work. Once happy that all the wood was contacting we’re needed, I ran a bead of PVA into all the joints with a mark 1 finger and will now leave this to set over night before sheet 2 tomorrow….
▲
⟩⟩
jbkiwi
Rookysailor
Scratchbuilder
Robertcooper
Martin555
robbob
Colin H
Nerys
|
💬 Re: The battle of the skins!……
3 years ago by 🇬🇧 Geoffrhoose (
 Recruit) Recruit)✧ 116 Views · 0 Likes
Flag
I agree excellent products.
▲
⟩⟩
No likes yet
This member will receive 1 point for every like received |
|
Login To
Remove Ads 💬 Re: The battle of the skins!……
3 years ago by 🇬🇧 Colin H (
Fleet Admiral)✧ 173 Views · 1 Like
Flag
I thought that would have been the case, (or are you building a full size version. On the qt.)
Cheers Colin. ▲
⟩⟩
Martin555
|
|
💬 Re: The battle of the skins!……
3 years ago by 🇬🇧 Skydive130 (
Rear Admiral)✧ 172 Views · 2 Likes
Flag
Colin, when I said I was using 48oz cloth, what I meant was 48gsm cloth, so no, I’m not using ultra heavyweight canvas ro cover the hull 😂😂😂
Kind regards. Sy ▲
⟩⟩
Martin555
Colin H
|
|
💬 Re: The battle of the skins!……
3 years ago by 🇬🇧 Skydive130 (
Rear Admiral)✧ 170 Views · 1 Like
Flag
Hi Bill, work gets in the way of modelling if I’m honest, thankfully I only work 3-4 days a week now so get plenty of time off. But yes, going to work does give me a break then I can come back at the modelling reinvigorated ha ha!
Kind regards Sy ▲
⟩⟩
Martin555
|
|
💬 Re: The battle of the skins!……
3 years ago by 🇬🇧 Scratchbuilder (
Vice Admiral)✧ 174 Views · 2 Likes
Flag
Amazing Sy.
I think I’ve said it before but with the amount of time you dedicate to your masterpieces do you go to work for a rest? Regards Bill. ▲
⟩⟩
Martin555
Skydive130
|
|
💬 Re: The battle of the skins!……
3 years ago by 🇬🇧 Skydive130 (
Rear Admiral)✧ 170 Views · 1 Like
Flag
Cheers Martin, a good idea indeed but Colin suggested doublers which will mean less drilling and filling later. But thank you one and all for your input, every little helps. 👍
▲
⟩⟩
Martin555
|
|
💬 Re: The battle of the skins!……
3 years ago by 🇬🇧 Skydive130 (
Rear Admiral)✧ 170 Views · 1 Like
Flag
Great idea Colin, I shall add some doublers 👍
▲
⟩⟩
Martin555
|
|
💬 Re: The battle of the skins!……
3 years ago by 🇬🇧 Martin555 (
Fleet Admiral)✧ 169 Views · 2 Likes
Flag
Sy,
Maybe you could drill a hole through the form and a couple of holes through the skin then with some cable ties or strong string you could pull the skins in hard to the form until the glue dries. I know you will have to fill the hols later. Martin555. ▲
⟩⟩
Skydive130
Colin H
|
|
💬 Re: The battle of the skins!……
3 years ago by 🇬🇧 Colin H (
Fleet Admiral)✧ 172 Views · 3 Likes
Flag
Sy, in places where you have compound curves such as your Fairey, I add doublers to the edge of the bulkheads. 1/4inch Square. Glued and pinned, this gives a good solid area to put screws or pins.
Cheers Colin. ▲
⟩⟩
jbkiwi
Skydive130
Martin555
|
|
💬 Re: The battle of the skins!……
3 years ago by 🇬🇧 Skydive130 (
Rear Admiral)✧ 170 Views · 2 Likes
Flag
Hi Martin,
The issue I have is the thickness of the bulkhead formers, they aren’t thick enough to take a screw. ▲
⟩⟩
Martin555
Colin H
|
|
💬 Re: The battle of the skins!……
3 years ago by 🇬🇧 Martin555 (
Fleet Admiral)✧ 169 Views · 2 Likes
Flag
Hi Sy,
I have recently done a bit of skinning up and i found i had to use some small wood screws to hold the skin in place around the bow. When the glue had dried i removed the screws then glued cocktail sticks in to fill the holes. the sticks were then cut flush ready for sanding. Martin555. ▲
⟩⟩
Skydive130
Colin H
|
|
Login To
Remove Ads 💬 Re: The battle of the skins!……
3 years ago by 🇬🇧 Skydive130 (
Rear Admiral)✧ 170 Views · 2 Likes
Flag
Hi JB, that sounds like a great idea.
My next issue is when fitting the side ply sheets there is quite an inward curve on the bow bulkheads that the ply has to bend too. I think I need to try and pre-curve the ply with hot water and the heat gun otherwise I will rage trying to get the ply sheet in position! Let the fun begin! ▲
⟩⟩
Colin H
Martin555
|
|
💬 Re: The battle of the skins!……
3 years ago by 🇳🇿 jbkiwi (
Fleet Admiral)✧ 170 Views · 3 Likes
Flag
Sy, just a suggestion,- what I do, is once everything is lined up and sized, I drill 2 (firm fitting) locating dowel holes (say- transom and mid keel) with the planks clamped in the correct position (small pointed bamboo skewers are good). Make a couple of small dowels (10mm) with a point on both ends and push them into the holes (leaving 5mm protruding). Remove the sheet and re apply to check. This will make locating and clamping the sheets spot on first time, with no worries about them moving (works for decks as well)
Alternatively, you can drill the holes, apply the glue, then push pointed dowels in to locate, but I've found fixing the dowels first is easier. I apply the PVA or balsa glue as usual, and leave say 5mm gaps every so often for a blob of thick Cyano. This will grab quickly when the plank is clamped and hold things in case the clamps move. The dowels can be sanded off later. When you run the resin round the inside, it will fill up any gaps and glue everything solidly, (also seals and waterproofs PVA,)- I've found that even a good coating of dope, -then painted,- will do that as well. JB ▲
⟩⟩
Colin H
Skydive130
Martin555
|
|
💬 Re: The battle of the skins!……
3 years ago by 🇬🇧 Colin H (
Fleet Admiral)✧ 172 Views · 2 Likes
Flag
Sy, 48oz? Very heavy duty, the heaviest I ever used was 24oz to build myself a fishing Kayak.
So I don't think you will ever break this one. Cheers Colin. ▲
⟩⟩
Skydive130
Martin555
|
|
💬 Re: The battle of the skins!……
3 years ago by 🇬🇧 Skydive130 (
Rear Admiral)✧ 170 Views · 2 Likes
Flag
Many thanks for the tips Colin. I shall give the bare wood a coat of thinned resin in the first instance then a couple of coats neat as suggested. I’m using a slightly heavier 48oz cloth as it’s a large model, so may need more to fill the weave.
Kind regards Sy ▲
⟩⟩
Martin555
Colin H
|
|
💬 Re: The battle of the skins!……
3 years ago by 🇬🇧 Colin H (
Fleet Admiral)✧ 173 Views · 4 Likes
Flag
Sy, I usually thin my first coat 1 part water 2 parts Ezekote, then any further coats neat. I use 25gsm glass cloth and I have also used a pair of ladies tights(with permission)
Which follows the Hull shape really well without having any overlaps or joints. Also ezekote mixed with some fine sanding dust makes a great filler paste that sets hard and bonds well without shrinkage. Hope this helps Colin. ▲
⟩⟩
jbkiwi
Martin555
Skydive130
Rookysailor
|
|
💬 Re: The battle of the skins!……
3 years ago by 🇬🇧 Skydive130 (
Rear Admiral)✧ 171 Views · 2 Likes
Flag
I dare say Doug will pop in and advise when he sees the post Pete 👌
▲
⟩⟩
Martin555
Rookysailor
|
|
💬 Re: The battle of the skins!……
3 years ago by 🇬🇧 Rookysailor (
Commodore)✧ 184 Views · 2 Likes
Flag
Hi Sy, I believe that Doug mentioned something about thinning it down for the first coat to let it sink in, just wish I could find the post that it relates to.
Cheers, Pete😐 ▲
⟩⟩
Martin555
Skydive130
|
|
💬 Re: The battle of the skins!……
3 years ago by 🇬🇧 Skydive130 (
Rear Admiral)✧ 171 Views · 2 Likes
Flag
Hi Mike and welcome aboard! Many thanks for your input, hopefully things will stay stuck with waterproof pva and all the other layers of cloth, resin paint ect.
I’ve got a bottle of that eze cote resin which I am going to use for the first time on this model. I’ve always used 2 part finishing resin but that stuff is expensive and doesn’t go far, especially on a model this size. I did a little experiment with the eze cote the other day on a piece of ply and a scrap piece of glass cloth. I gave the wood a cote of resin, sanded it smooth when dry then added the cloth and another coat of resin. Once dried, sanded that smooth and gave the cloth a further 2 coats with sanding between followed by a coat of red oxide primer, I was quite pleased with the finish. I used the resin neat, do I need to thin it? What I do like is the quick drying time and lack of smell, oh and the brush washes out in water, win win I say! Any tips gratefully received before I get to the clothing stage. Kind regards Sy ▲
⟩⟩
Martin555
Colin H
|
|
💬 Re: The battle of the skins!……
3 years ago by 🇬🇧 mturpin013 (
 Admiral) Admiral)✧ 172 Views · 3 Likes
Flag
Hi Sy I'm sure with the addition of glass in the overall process it will stay glued together.
However for future reference I would use epoxy 30 minute set for all the construction of the main frame and skins and as Rob says Hammarite for the internal wood after a coat of Deluxe Materials Eze Kote Finishing Resin (diluted) PS I use smooth hammarite in cream as it lightens up the internals, I know Rob uses silver in a hammered finish. All in all its looking good ▲
⟩⟩
Martin555
Scratchbuilder
Skydive130
|
|
💬 Re: The battle of the skins!……
3 years ago by 🇬🇧 Skydive130 (
Rear Admiral)✧ 171 Views · 2 Likes
Flag
In fact Rob, I’ve gotta pass B&Q on way home Thursday, so I’ll take the smooth back and get the hammered 👍
▲
⟩⟩
Martin555
robbob
|
|
Login To
Remove Ads 💬 Re: The battle of the skins!……
3 years ago by 🇬🇧 Skydive130 (
Rear Admiral)✧ 171 Views · 2 Likes
Flag
I saw the hammered effect stuff on the shelf, I’ll get some next time I’m in B&Q Rob 👍
▲
⟩⟩
Martin555
robbob
|
|
💬 Re: The battle of the skins!……
3 years ago by 🇬🇧 robbob (
Admiral)✧ 198 Views · 3 Likes
Flag
Hi Sy.
I have used the expanding type Gorilla Glue for joinery work and that's very good as it expands into the grain and fills any gaps in yer mortice and tenon joints, (yes..... I can still make all the joints I was taught in woodwork class 😊) but I've not used their PVA though. Hammerite...that is indeed the stuff I used inside my Crash Tender, but I used the 'hammered effect' finish as it's more tolerant of brush marks. Once it has dried and 'cured' it's makes for a very hard, durable and waterproof finish. Rob. ▲
⟩⟩
Skydive130
Scratchbuilder
Martin555
|
|
💬 Re: The battle of the skins!……
3 years ago by 🇬🇧 Martin555 (
Fleet Admiral)✧ 170 Views · 1 Like
Flag
SY,
I have been saying for a long time now that i am not right LOL!! Martin555. ▲
⟩⟩
Skydive130
|
|
💬 Re: The battle of the skins!……
3 years ago by 🇬🇧 Colin H (
Fleet Admiral)✧ 173 Views · 2 Likes
Flag
That's the same paint I use Sy,
Cheers Colin. ▲
⟩⟩
Skydive130
Martin555
|
|
💬 Re: The battle of the skins!……
3 years ago by 🇬🇧 Skydive130 (
Rear Admiral)✧ 171 Views · 1 Like
Flag
Hi Colin, always happy for people’s input and comments, it’s what the hobby is all about, learning and sharing the knowledge.
▲
⟩⟩
Martin555
|
|
💬 Re: The battle of the skins!……
3 years ago by 🇬🇧 Skydive130 (
Rear Admiral)✧ 171 Views · 1 Like
Flag
Martin, you must surly be tapped in the head if you think sheeting is fun, I hate it with a passion !😂😂😂. I’ll be glad when it’s done, sanded, filled and glassed, never to be seen again lol
Kind regards Sy ▲
⟩⟩
Martin555
|
|
💬 Re: The battle of the skins!……
3 years ago by 🇬🇧 Skydive130 (
Rear Admiral)✧ 171 Views · 3 Likes
Flag
Hi Rob,
I’ve been using Gorilla PVA recently as it’s waterproof, sands like aliphatic and sets hard fast, really like it. Can I confirm the Hammerite paint I bought today pictured is the same stuff you use to great effect? Kind regards Sy 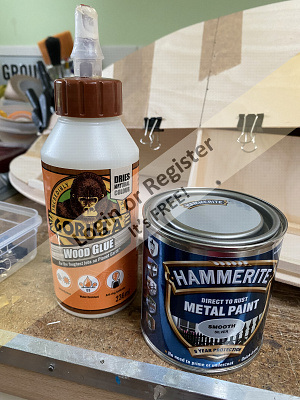
▲
⟩⟩
robbob
Martin555
Colin H
|
|
💬 Re: The battle of the skins!……
3 years ago by 🇬🇧 Martin555 (
Fleet Admiral)✧ 170 Views · 1 Like
Flag
I will admit Sy this is a fun bit LOL!
I am sure you will conquer it. Martin555. ▲
⟩⟩
Skydive130
|
|
💬 Re: The battle of the skins!……
3 years ago by 🇬🇧 robbob (
Admiral)✧ 198 Views · 4 Likes
Flag
Very rapid progress as we've all come to expect from you Sy 👍😀.
I'm following your build with great interest as I very nearly bought the same kit. I have always used Titebond II PVA glue which is 'water resistant' and far better that ordinary white PVA which is definitely not! There is also Titebond III which is apparently a 'waterproof' PVA if you really want 'belt 'n braces'. With the hull properly sealed with fibreglass and resin externally and a thorough paint finish internally I don't think you will have much to worry about. KUTGW 👍👍. Rob. 
▲
⟩⟩
Geoffrhoose
Skydive130
Martin555
Colin H
|
|
💬 Re: The battle of the skins!……
3 years ago by 🇬🇧 Colin H (
Fleet Admiral)✧ 173 Views · 2 Likes
Flag
Sy, it sounds like you've got it fully figured out, so I'll stop putting doubts in your head.
Great job so far and I'm sure it'll be a very special model when finished. Cheers Colin. ▲
⟩⟩
Skydive130
Martin555
|
|
Login To
Remove Ads 💬 Re: The battle of the skins!……
3 years ago by 🇬🇧 Skydive130 (
Rear Admiral)✧ 171 Views · 2 Likes
Flag
Hi Colin, fingers crossed my use of PVA should be fine. The hull will be glass clothed and resin and painted on the outside and the inside will get a coat of resin followed by a coat of Hammerite paint which hopefully will mean the PVA will never come into contact with water. Of course I hope never to capsize the model either but you never know!
Kind regards Sy ▲
⟩⟩
Martin555
Colin H
|
|
💬 Re: The battle of the skins!……
3 years ago by 🇬🇧 Colin H (
Fleet Admiral)✧ 173 Views · 2 Likes
Flag
Sy it's getting this part right that helps give the model its strength, looks like you are coping well so far.
My only concern is your use of pva adhesive. I was given a model to repair that was built a couple of years ago using industrial waterproof pva, but after it capsized almost every joint opened up within half an hour. I had one hell of a job rebuilding it. Cheers Colin. ▲
⟩⟩
Martin555
Skydive130
|
|
💬 Re: The battle of the skins!……
3 years ago by 🇬🇧 Skydive130 (
Rear Admiral)✧ 172 Views · 2 Likes
Flag
I see what you mean Nerys, could be a bird house ha ha 😂👍
▲
⟩⟩
Nerys
Martin555
|
|
💬 Re: The battle of the skins!……
3 years ago by 🇬🇧 Nerys (
Fleet Admiral)✧ 172 Views · 2 Likes
Flag
Please forgive me for saying this, but from the first photo I thought you were building an elaborate two room bird house.
Nerys ▲
⟩⟩
Martin555
Skydive130
|
📝 Sheeting continues….
3 years ago by 🇬🇧 Skydive130 ( Rear Admiral)
Rear Admiral)✧ 178 Views · 5 Likes · 2 Comments
Flag
💬 Add Comment
So, I managed to sneak the second bottom sheet on last night before bed giving that overnight to set.
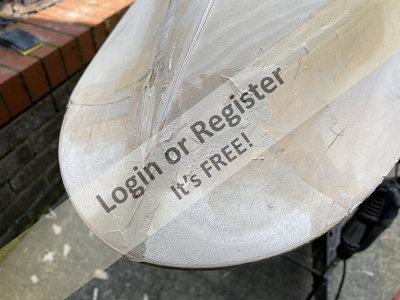
This morning I trimmed, shaped and sanded the bottom sheets ready to receive the dreaded side sheets. Before anything else, I filed out the prop shaft exit and the hole leading to the rudder tube and check them in place for a good fit. One thing I have ordered today is a brass p-frame bracket as the prop shaft is only 6.30mm dia and would be very vulnerable to damage or bending if left hanging out in the breeze as you can see in the picture!
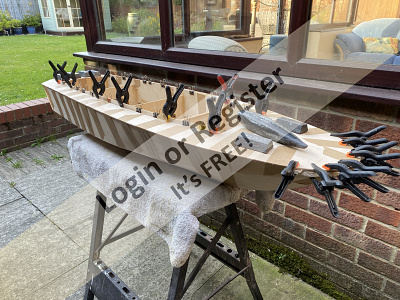
Having re-read the instructions, it recommended using contact adhesive to bond the sheets to the frames, ok, I’ll give that a go! First of all though, as recommended I added some doublers to the frames to give the sheeting more to grab onto and then set about marking the sheet we’re it was to make contact with the frames. I then put a coat of contact adhesive on all the frames except the curved front 2 and the chines and the marked side sheet. Leaving this for 10 minutes gave me a chance to grab the clamp box ready to bond the sheet on. And bond it did! You only get one shot, so with a couple of alignment marks I’d made, I offered up the sheet to the frames and started to bond and clamp it.
The instructions recommended using cyano and kicker for the curved formers and front chines and with a bit of brute force and muscle power, managed to get the curved parts bonded. I left the whole lot a couple of hours to set and then smeared Gorilla PVA into all the joints for added strength.
I’m now at a point we’re I need a break, so as I’m back at work tomorrow and Friday, I shall leave the final sheet and transom sheet until the weekend. Once they are on, it’s a case of adding the front balsa blocks followed by sanding, filler, more sanding before adding the false deck and getting ready to glass cloth.
See you at the weekend……..


This morning I trimmed, shaped and sanded the bottom sheets ready to receive the dreaded side sheets. Before anything else, I filed out the prop shaft exit and the hole leading to the rudder tube and check them in place for a good fit. One thing I have ordered today is a brass p-frame bracket as the prop shaft is only 6.30mm dia and would be very vulnerable to damage or bending if left hanging out in the breeze as you can see in the picture!
Having re-read the instructions, it recommended using contact adhesive to bond the sheets to the frames, ok, I’ll give that a go! First of all though, as recommended I added some doublers to the frames to give the sheeting more to grab onto and then set about marking the sheet we’re it was to make contact with the frames. I then put a coat of contact adhesive on all the frames except the curved front 2 and the chines and the marked side sheet. Leaving this for 10 minutes gave me a chance to grab the clamp box ready to bond the sheet on. And bond it did! You only get one shot, so with a couple of alignment marks I’d made, I offered up the sheet to the frames and started to bond and clamp it.
The instructions recommended using cyano and kicker for the curved formers and front chines and with a bit of brute force and muscle power, managed to get the curved parts bonded. I left the whole lot a couple of hours to set and then smeared Gorilla PVA into all the joints for added strength.
I’m now at a point we’re I need a break, so as I’m back at work tomorrow and Friday, I shall leave the final sheet and transom sheet until the weekend. Once they are on, it’s a case of adding the front balsa blocks followed by sanding, filler, more sanding before adding the false deck and getting ready to glass cloth.
See you at the weekend……..
▲
⟩⟩
Scratchbuilder
Rookysailor
robbob
Martin555
Colin H
|
💬 Re: Sheeting continues….
3 years ago by 🇬🇧 Skydive130 (
Rear Admiral)✧ 178 Views · 2 Likes
Flag
You do see the doublers Colin, great tip, helped a lot, thank you very much 👍
▲
⟩⟩
Scratchbuilder
Martin555
|
|
💬 Re: Sheeting continues….
3 years ago by 🇬🇧 Colin H (
Fleet Admiral)✧ 174 Views · 3 Likes
Flag
Sy, Looks like you are getting the shape really well, do I see the doublers on the bulkhead edges.
Going really well sir. Cheers Colin. ▲
⟩⟩
Scratchbuilder
Skydive130
Martin555
|
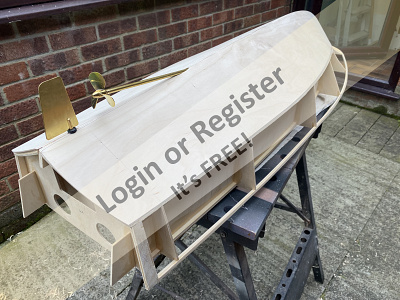
📝 Sheeting completed, onwards and upwards!
3 years ago by 🇬🇧 Skydive130 ( Rear Admiral)
Rear Admiral)✧ 176 Views · 7 Likes · 2 Comments
Flag
💬 Add Comment
Good day in the sunshine! First job this morning was to make sure that all the previous sheeting and chine rails were shaped and sanded ready to receive the last side sheet. Last night I prepared the last side sheet by soaking the curved bow end in boiling hot water in a baking tray on the cooker and then when pliable, curved it round a Halfords spray can and taped overnight to dry the curve in.
Once happy that everything was ready to receive the sheet, I again marked the areas which would be glued on the sheet, chines and any other glue points. Again the sheet was fitted using contact adhesive less the curved bow section which was glued with medium and thick cyano and kicker. Within a few minutes, the sheet was in position hopefully never to part company and all glue joints were reinforced with PVA and in some areas epoxy for belt and braces. This will all be left overnight before shaping and sanding.
Other jobs was to fit the 3 laminations of balsa sheet which form a curved base (when shaped) for the false deck at the transom and also increase the glue area for the transom sheet which hopefully will be fitted tomorrow after the rear end of the boat has been shaped ready to receive it.
I also fitted the 2 rough shaped balsa blocks at the bow which when shaped, sanded and filled will form that nice curved bow the Huntsman is famous for. That area will need quite a bit of work to get it ready for the cloth to be applied to the hull, but will be worth the graft.
Before I fit the transom sheet I plan on marking tHe water line on it so that I can gauge where I am going to have the twin water cooling outlets which I need to fit prior to fitting the sheet. If I don’t, it will be nigh on impossible to fit the tubing later as that area is just about impossible to reach from inside the hull once the transom is fitted.
See you tomorrow…..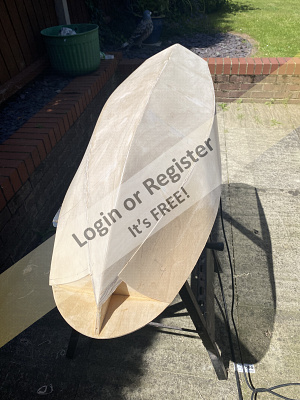
▲
⟩⟩
Mike Stoney
jacko
robbob
Scratchbuilder
Rookysailor
Aerostar55
Colin H
|
💬 Re: Sheeting completed, onwards and upwards!
3 years ago by 🇬🇧 Skydive130 (
Rear Admiral)✧ 175 Views · 2 Likes
Flag
Your not wrong Martin, sunshine, sawdust and a cup of tea outside, winner! It also helps being outside as the boat is as long as my workbench!
▲
⟩⟩
Martin555
Colin H
|
|
💬 Re: Sheeting completed, onwards and upwards!
3 years ago by 🇬🇧 Martin555 (
Fleet Admiral)✧ 167 Views · 1 Like
Flag
Coming along nicely Sy,
It is nice to have a bit of good weather to be able to work outside. Martin555. ▲
⟩⟩
Skydive130
|
📝 Transom and false deck…,
3 years ago by 🇬🇧 Skydive130 ( Rear Admiral)
Rear Admiral)✧ 175 Views · 9 Likes · 5 Comments
Flag
💬 Add Comment
The last of days excellent weather has given me plenty of time to get outside and press on….
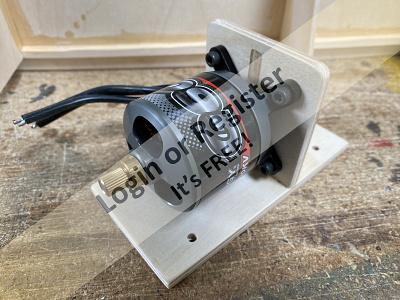
The first job was to sand, seal, spray paint and lacquer the motor mount, which now has the motor fitted and I consider finished and ready to install.
After that I prepared and shaped the stern of th3 boat to receive the transom ply sheet. Prior to fitting that sheet, I fitted 2 water cooling outlets above the guestimated waterline which were sealed with epoxy and had the tubing fitted as it will be nigh on impossible to fit after. The transom sheet was then glued on and taped into position to be left overnight to set.
Whist waiting for the transom to set, I painted in some finishing resin inside the hull into the parts that will be impossible to reach once the deck is on. I will give the internals another full coat of resin followed by a coat of Hammerite silver paint in due course.
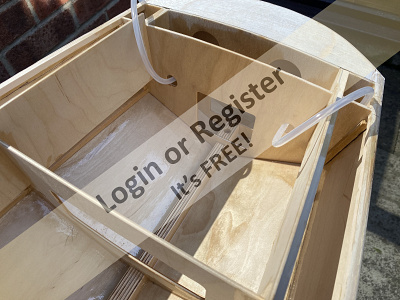
The only job today after work was to glue and fit the false deck and tape, clamp and weight it into position making sure that contact points were glued.
That will be it until Wednesday when I will start sanding and filling the the hull ready to cloth along with making the motor mount plate, esc, Rx and servo mount……


The first job was to sand, seal, spray paint and lacquer the motor mount, which now has the motor fitted and I consider finished and ready to install.
After that I prepared and shaped the stern of th3 boat to receive the transom ply sheet. Prior to fitting that sheet, I fitted 2 water cooling outlets above the guestimated waterline which were sealed with epoxy and had the tubing fitted as it will be nigh on impossible to fit after. The transom sheet was then glued on and taped into position to be left overnight to set.
Whist waiting for the transom to set, I painted in some finishing resin inside the hull into the parts that will be impossible to reach once the deck is on. I will give the internals another full coat of resin followed by a coat of Hammerite silver paint in due course.
The only job today after work was to glue and fit the false deck and tape, clamp and weight it into position making sure that contact points were glued.
That will be it until Wednesday when I will start sanding and filling the the hull ready to cloth along with making the motor mount plate, esc, Rx and servo mount……
▲
⟩⟩
Mike Stoney
mturpin013
Martin555
Rookysailor
jacko
mistyoptic
Newby7
robbob
Colin H
|
💬 Re: Transom and false deck…,
3 years ago by 🇬🇧 Martin555 (
Fleet Admiral)✧ 167 Views · 1 Like
Flag
Hi SY,
She is really taking shape now. Martin555. ▲
⟩⟩
Skydive130
|
|
Login To
Remove Ads 💬 Re: Transom and false deck…,
3 years ago by 🇬🇧 Skydive130 (
Rear Admiral)✧ 175 Views · 1 Like
Flag
Cheers Rick, that hardness part is done, almost onto the fun stuff!
Kind regards Sy ▲
⟩⟩
Martin555
|
|
💬 Re: Transom and false deck…,
3 years ago by 🇨🇦 Newby7 (
Fleet Admiral)✧ 169 Views · 2 Likes
Flag
Nicely done SY.
Rick ▲
⟩⟩
Martin555
Skydive130
|
|
💬 Re: Transom and false deck…,
3 years ago by 🇬🇧 Skydive130 (
Rear Admiral)✧ 175 Views · 2 Likes
Flag
Cheers Colin, everything about the kit is nice, from the quality of the wood to the fit, hats off to SLEC!
Kind regards Sy ▲
⟩⟩
Martin555
Colin H
|
|
💬 Re: Transom and false deck…,
3 years ago by 🇬🇧 Colin H (
Fleet Admiral)✧ 172 Views · 3 Likes
Flag
Nicely done Sy, that transom is a good fit sir, keep it going.
Cheers Colin. ▲
⟩⟩
Martin555
Skydive130
jacko
|
📝 Hull shaping, cloth and resin, oh and a stand….
3 years ago by 🇬🇧 Skydive130 ( Rear Admiral)
Rear Admiral)✧ 173 Views · 9 Likes · 14 Comments
Flag
💬 Add Comment
Taking advantage of the weather, managed to get out into the sunshine and push forward.
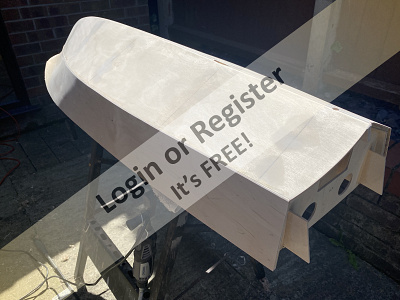
First job was to shape and sand the balsa nose blocks previously fitted and this was followed with P38 filler in any areas that need it. Once set the whole hull was sanded with various grades of sandpaper until all was perfectly smooth. Prior to fitting the cloth, I gave the hull a wipe with Panel Prep spray and a lint free cloth to ensure it was ready.
Prior to laying the first sheet of 48gram cloth, I gave the hull a thinned coat of eze-kote and once dry a light sand and another spray of panel prep. I then cut the cloth oversized before laying on a layer of straight eze-kote with a soft 3” brush. This is my first time using eze-kote and as much as it’s easy to use, it sets fast, so on a large model like this you have to work fast! Once satisfied that the cloth was glued on in all areas, this was left to set for an hour before a light sand and a second coat.
I shall leave the hull overnight before putting on the transom cloth tomorrow or friday.
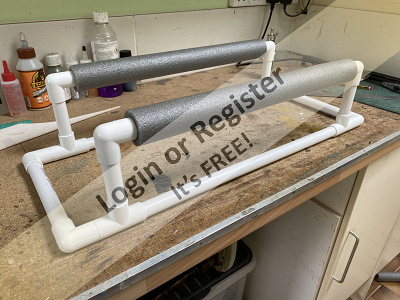
Other jobs done today have included cutting the slot for the P-frame propshaft support and making the stand from good old B&Q pvc pipe.
The kit comes with a pre-printed deck of ply which I will not be using. Whilst it shows the distinct curved planking as fitted to the full size, I feel that at this scale I have no option but to plank the hull.
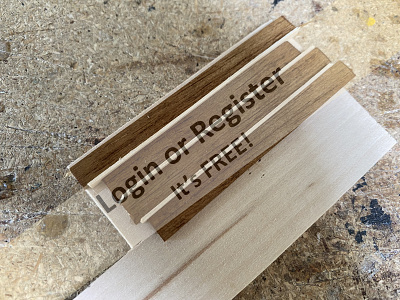
I had some off cuts of 1.5mx8mm strip wood which when stained and with 1mm lime in between will look much better than the pre-printed affair. I’ve made up a test piece to see what it turned out like and gave it a coat of satin yacht varnish. I doubt I will use yacht varnish on this model as to be honest I hate the stuff! It takes days to dry properly at tracking dust and yellows with age. I will probably give the deck coats of Ronseal exterior varnish which drys in hours unless of course you guys have any better ideas?
More friday……


First job was to shape and sand the balsa nose blocks previously fitted and this was followed with P38 filler in any areas that need it. Once set the whole hull was sanded with various grades of sandpaper until all was perfectly smooth. Prior to fitting the cloth, I gave the hull a wipe with Panel Prep spray and a lint free cloth to ensure it was ready.
Prior to laying the first sheet of 48gram cloth, I gave the hull a thinned coat of eze-kote and once dry a light sand and another spray of panel prep. I then cut the cloth oversized before laying on a layer of straight eze-kote with a soft 3” brush. This is my first time using eze-kote and as much as it’s easy to use, it sets fast, so on a large model like this you have to work fast! Once satisfied that the cloth was glued on in all areas, this was left to set for an hour before a light sand and a second coat.
I shall leave the hull overnight before putting on the transom cloth tomorrow or friday.
Other jobs done today have included cutting the slot for the P-frame propshaft support and making the stand from good old B&Q pvc pipe.
The kit comes with a pre-printed deck of ply which I will not be using. Whilst it shows the distinct curved planking as fitted to the full size, I feel that at this scale I have no option but to plank the hull.
I had some off cuts of 1.5mx8mm strip wood which when stained and with 1mm lime in between will look much better than the pre-printed affair. I’ve made up a test piece to see what it turned out like and gave it a coat of satin yacht varnish. I doubt I will use yacht varnish on this model as to be honest I hate the stuff! It takes days to dry properly at tracking dust and yellows with age. I will probably give the deck coats of Ronseal exterior varnish which drys in hours unless of course you guys have any better ideas?
More friday……
▲
⟩⟩
Mike Stoney
stevedownunder
Madwelshman
Newby7
Rookysailor
robbob
mistyoptic
Colin H
Martin555
|
💬 Re: Hull shaping, cloth and resin, oh and a stand….
3 years ago by 🇬🇧 Skydive130 (
Rear Admiral)✧ 168 Views · 2 Likes
Flag
Hi Rob, the cloth was fairly easy to get down, but the eze-Kote doesn’t allow much time for fiddling! I had a couple of creases up at the bow but got then out in time! Job done, on with all the hull chine and spray rails tomorrow, a very distinct part of the Huntsman family!
Kind regards Sy ▲
⟩⟩
Colin H
Martin555
|
|
Login To
Remove Ads 💬 Re: Hull shaping, cloth and resin, oh and a stand….
3 years ago by 🇬🇧 Skydive130 (
Rear Admiral)✧ 168 Views · 2 Likes
Flag
Nice one will, watch my planking to see how I get on. I’m going to use the printed deck for various templates and have bought plenty of basswood 1.5mmx8mm strip along with some 1.5mmx1.5mm mahogany for the caulking although I bought all the stock my local shop had and will need Another 20x strips! He’s panic ordered some more!
Looking at various pictures of real Huntsman, a lot seem to have light coloured sun bleached planking, so might just varnish the deck with no stain? Kind regards Sy ▲
⟩⟩
Madwelshman
Martin555
|
|
💬 Re: Hull shaping, cloth and resin, oh and a stand….
3 years ago by 🇬🇧 robbob (
Admiral)✧ 188 Views · 3 Likes
Flag
Hi Sy.
As always I'm amazed at your rate of progress 😮😀 You did well to get the glass cloth on the hull all in one piece without any serious wrinkles 😀 Real planking is sooooo much nicer than laser etched and adds a real touch of class to any model. I found that once you got into the rhythm of layng the planks and caulking strips the process was relatively quick but always rewarding. ▲
⟩⟩
Skydive130
Madwelshman
Martin555
|
|
💬 Re: Hull shaping, cloth and resin, oh and a stand….
3 years ago by 🇬🇧 Madwelshman (
 Midshipman) Midshipman)✧ 169 Views · 2 Likes
Flag
You're making good headway and in my opinion, it's great to see another Fairey being built.
A Huntsman, or any Fairey motor cruiser model with a planked deck just looks right. The laser etching does a job and for someone inexperienced like myself, is welcomed. I will be having a 1st attempt at planking the deck of one of my Faireys at some point. Will ▲
⟩⟩
Skydive130
Martin555
|
|
💬 Re: Hull shaping, cloth and resin, oh and a stand….
3 years ago by 🇬🇧 Skydive130 (
Rear Admiral)✧ 171 Views · 1 Like
Flag
Cheers Rick 👍
▲
⟩⟩
Martin555
|
|
💬 Re: Hull shaping, cloth and resin, oh and a stand….
3 years ago by 🇨🇦 Newby7 (
Fleet Admiral)✧ 168 Views · 2 Likes
Flag
Looking good Sy moving along nicely.
Rick ▲
⟩⟩
Martin555
Skydive130
|
|
💬 Re: Hull shaping, cloth and resin, oh and a stand….
3 years ago by 🇬🇧 Skydive130 (
Rear Admiral)✧ 172 Views · 1 Like
Flag
Hi Geoff, another idea to think about, thank you
Sy ▲
⟩⟩
Martin555
|
|
💬 Re: Hull shaping, cloth and resin, oh and a stand….
3 years ago by 🇬🇧 Skydive130 (
Rear Admiral)✧ 172 Views · 1 Like
Flag
Cheers Colin, will google that stuff, kind regards Sy
▲
⟩⟩
Martin555
|
|
💬 Re: Hull shaping, cloth and resin, oh and a stand….
3 years ago by 🇬🇧 mistyoptic (
Midshipman)✧ 172 Views · 2 Likes
Flag
I find Rustins Outdoor Clear Varnish very good, dries in 30 minutes, can be thinned with water if required and brush wash up with water.
Geoff ▲
⟩⟩
Martin555
Skydive130
|
|
💬 Re: Hull shaping, cloth and resin, oh and a stand….
3 years ago by 🇬🇧 Colin H (
Fleet Admiral)✧ 170 Views · 2 Likes
Flag
Sy, Le Tonkinois Marine No 1 Varnish.
Gives that glass coated look and it goes on well, but you need to do 1 coat a day with rubbing down between coats, I usually give 6 coats and a final polish with Farecla finishishing compound available at most Good auto paint suppliers. I know it's a slow process but it's worthwhile and lasts for years. Cheers Colin. ▲
⟩⟩
Martin555
Skydive130
|
|
💬 Re: Hull shaping, cloth and resin, oh and a stand….
3 years ago by 🇬🇧 Skydive130 (
Rear Admiral)✧ 173 Views · 2 Likes
Flag
Hi Martin, I was thinking about using resin, the z poxy stuff I’ve got. I need to research it to see if it’s an option unless none has tried it before? What I would like to achieve is that glass like finish you see on post yachts !
Kind regards Sy ▲
⟩⟩
Colin H
Martin555
|
|
Login To
Remove Ads 💬 Re: Hull shaping, cloth and resin, oh and a stand….
3 years ago by 🇬🇧 Colin H (
Fleet Admiral)✧ 170 Views · 3 Likes
Flag
That's handy to know Nerys, I've used it for furniture repairs and Caroline's dolls houses but never thought about the model boats.
Cheers Colin. ▲
⟩⟩
Martin555
Skydive130
Nerys
|
|
💬 Re: Hull shaping, cloth and resin, oh and a stand….
3 years ago by 🇬🇧 Nerys (
Fleet Admiral)✧ 167 Views · 3 Likes
Flag
In the days when ply was the normal product to build dinghies, it was quite common to paint the whole of the interior with an adhesive called Cascamite. This was a powder that was mixed with water to become a waterproof adhesive. Like resin, it dried clear. I built several small boats with it even using it in the main construction. I see no reason why it should not be used to coat the interior of a model boat in fact it could be easier than resin as it does not go off quickly. I've seen it on sale in Axminster Tools, so I'm sure it is still readily available.
Cheers, Nerys ▲
⟩⟩
Martin555
Skydive130
Colin H
|
|
💬 Re: Hull shaping, cloth and resin, oh and a stand….
3 years ago by 🇬🇧 Martin555 (
Fleet Admiral)✧ 165 Views · 2 Likes
Flag
Hi Sy,
Instead of using varnish for the wood could you use resin ? Looking forward to the next update. Martin555. ▲
⟩⟩
Skydive130
Nerys
|
📝 Chine and spray rails…
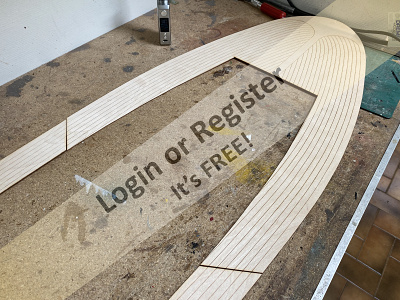
3 years ago by 🇬🇧 Skydive130 ( Rear Admiral)
Rear Admiral)✧ 168 Views · 5 Likes · 5 Comments
Flag
💬 Add Comment
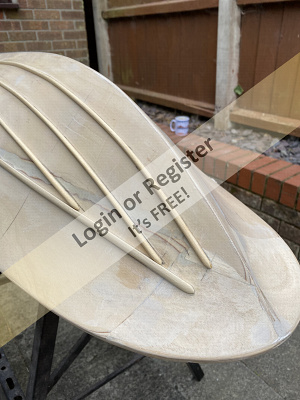
Next job was to start preparing and installing the important chine and spray rails which are vital to the boats performance. They also add some character and look pretty cool too!
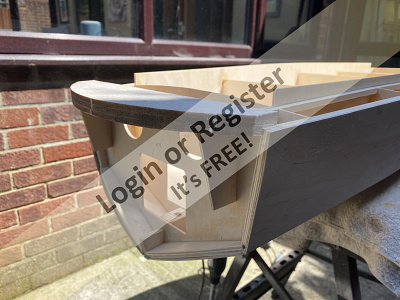
The chine rails are a piece of 1100mm 6.5mmx5mm bass word with one edge planned and sanded to a curve and run down the side of the hull from stern to bow. Once prepared, I marked the position on the hull with pencil using the measurements given in the instructions then with thick cyano and kicker glued it to the hull starting at the stern. This was a nice tight fit and only required a smidge of filler in a couple of spots to blend in.
The spray rails of which there will be 6 in total, 3 either side of the keel are 5mm square bass wood curved on 2 edges to form a half circle. Simple job with careful use of the razor plane to take the corners off then sand paper to finish. Again the position was marked on the bottom of the hull for the first piece 35mm down from the keel and glued in the same fashion as the chine. The next 2 rails were fitted exactly the same way with 35mm separation and finished at the bow with that characteristic curve previously marked to avoid errors.
Fitting those rails to one side has taken most of the day, I shall finish the other side tomorrow. The last job of the day and this is my impatience showing, I thought I’d stick a couple of pieces of deck wood planking and caulking towards the stern to see if I liked the result. Happy to say I do, but will not do anymore until the hull is complete and any further resin sealing is done to prevent errant splashes running the deck planks!
▲
⟩⟩
Colin H
Rookysailor
stevedownunder
Martin555
Newby7
|
💬 Re: Chine and spray rails…
3 years ago by 🇬🇧 Skydive130 (
Rear Admiral)✧ 166 Views · 1 Like
Flag
Hi Mike, I must admit, working with wood on the most part is a joy (apart from sheeting hulls around complex curves!), smells so much nicer than plastic, fibre glass ect.
Kind regards Sy ▲
⟩⟩
Martin555
|
|
Login To
Remove Ads 💬 Re: Chine and spray rails…
3 years ago by 🇬🇧 Skydive130 (
Rear Admiral)✧ 166 Views · 1 Like
Flag
Your not Wrong Martin, wanting to get outside and finish the rails off today, but the weather forecast is looking “iffy” with storms possible!
Kind regards Sy ▲
⟩⟩
Martin555
|
|
💬 Re: Chine and spray rails…
3 years ago by 🇬🇧 mturpin013 (
Admiral)✧ 163 Views · 3 Likes
Flag
Hi Sy I hope this construction in wood has got rid of those feelings that hulls are made of plastic, they are not, wood is for the soul, plus it brings out all the best skills in you. - great job
▲
⟩⟩
Skydive130
Martin555
stevedownunder
|
|
💬 Re: Chine and spray rails…
3 years ago by 🇬🇧 Martin555 (
Fleet Admiral)✧ 161 Views · 1 Like
Flag
Nice smooth lines Sy.
It is surprising how long this sort of job takes to do. Martin555. ▲
⟩⟩
Skydive130
|
|
💬 Re: Chine and spray rails…
3 years ago by 🇨🇦 Newby7 (
Fleet Admiral)✧ 164 Views · 2 Likes
Flag
Right Sy they do look cool.
Rick ▲
⟩⟩
Martin555
Skydive130
|
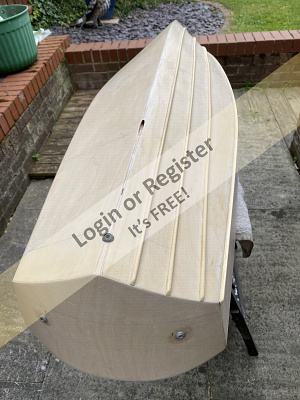
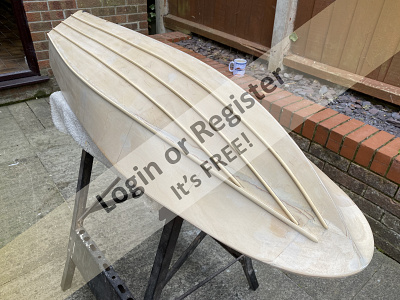
📝 Spray rails finished and other small tasks….
3 years ago by 🇬🇧 Skydive130 ( Rear Admiral)
Rear Admiral)✧ 157 Views · 9 Likes · 13 Comments
Flag
💬 Add Comment
This weekend has seen good progress, but that’s enough now as I have to fulfill husband duties….
I have finished the chine and spray rails following the same method as before, but found the second half a little quicker as I’d found a process that worked. Once all the rails were fitted, they were given a final sand to ensure that all curves were even and some very tiny amounts of filler where needed. Once all was good, any bare wood was given a further coat of Eze-Kote to seal them in.
Question if I may? Will I be able to put a coat of finishing resin over the top of the Eze-Kote for a hard outer coat and possibly after wet n dry sanding, a better coat for painting without any undue reaction? Answers on a postcard too…..
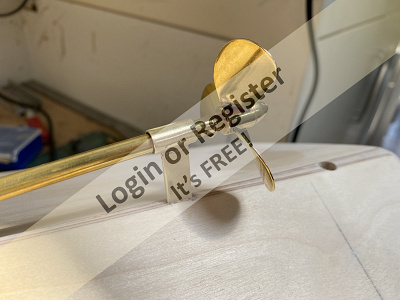
I have made a brass water inlet pick up in a similar fashion to how Rob made his for his pilot boat. Not having a lathe I placed a brass nut on a screw into my drill bit, spun it up and filed it round and soldered it to the brass tube. I heated the brass tube prior to bending, cut it then soldered the brass nut on and epoxied the piece into the hull. Once set I soldered on a brass nut on the inside and a further coat of epoxy to confirm seal. The whole hull is due a coat of resin inside followed by silver paint, so all should be waterproof in the end.
Last job was to confirm the propshaft was exactly inline with the motor coupling using my trusty solid coupling adaptor and also drilled a hole for the oiler.
That will be it until Thursday when I shall getting all the sealing coats inside and out done, servo mount, rx mount, esc mount and other internal jobs…..


I have finished the chine and spray rails following the same method as before, but found the second half a little quicker as I’d found a process that worked. Once all the rails were fitted, they were given a final sand to ensure that all curves were even and some very tiny amounts of filler where needed. Once all was good, any bare wood was given a further coat of Eze-Kote to seal them in.
Question if I may? Will I be able to put a coat of finishing resin over the top of the Eze-Kote for a hard outer coat and possibly after wet n dry sanding, a better coat for painting without any undue reaction? Answers on a postcard too…..
I have made a brass water inlet pick up in a similar fashion to how Rob made his for his pilot boat. Not having a lathe I placed a brass nut on a screw into my drill bit, spun it up and filed it round and soldered it to the brass tube. I heated the brass tube prior to bending, cut it then soldered the brass nut on and epoxied the piece into the hull. Once set I soldered on a brass nut on the inside and a further coat of epoxy to confirm seal. The whole hull is due a coat of resin inside followed by silver paint, so all should be waterproof in the end.
Last job was to confirm the propshaft was exactly inline with the motor coupling using my trusty solid coupling adaptor and also drilled a hole for the oiler.
That will be it until Thursday when I shall getting all the sealing coats inside and out done, servo mount, rx mount, esc mount and other internal jobs…..
▲
⟩⟩
Martin555
Mike Stoney
mturpin013
Rookysailor
Madwelshman
Colin H
robbob
mistyoptic
Newby7
|
💬 Re: Spray rails finished and other small tasks….
3 years ago by 🇬🇧 ChrisF (
Lieutenant Commander)✧ 144 Views · 3 Likes
Flag
Thanks Sy. I'd like to see at least one finished and on the water pretty soon out of the five builds I've got on the go!
Chris ▲
⟩⟩
Martin555
Madwelshman
Skydive130
|
|
Login To
Remove Ads 💬 Re: Spray rails finished and other small tasks….
3 years ago by 🇬🇧 Skydive130 (
Rear Admiral)✧ 150 Views · 2 Likes
Flag
Hi Chris,
Such lovely boats, Fairey certainly built some classic lines! Yours look terrific, look forward to seeing them finished, Kind regards sy ▲
⟩⟩
Martin555
Madwelshman
|
|
💬 Re: Spray rails finished and other small tasks….
3 years ago by 🇬🇧 ChrisF (
Lieutenant Commander)✧ 144 Views · 5 Likes
Flag
Hi Sy
I'd rather have the laser etched planking than nothing but agree that if one can do it planking gives the best effect. I've done it on three of my Fairey builds so far, photo shows my Huntsman 31 in the foreground and Swordsman behind. Unfortunately I haven't done any building for quite a few weeks now due to commitments and it being summer! Chris 
▲
⟩⟩
Martin555
Madwelshman
Rookysailor
Colin H
Skydive130
|
|
💬 Re: Spray rails finished and other small tasks….
3 years ago by 🇬🇧 Skydive130 (
Rear Admiral)✧ 155 Views · 2 Likes
Flag
Hi Chris, the bow wasn’t a pleasant task, but the result was pleasing so well worth the effort. As for size, I hear you, I think mine works out at 1:8 scale so almost action man scale and almost too big for my bench, never again ha ha!
Kind regards Sy ▲
⟩⟩
Martin555
Colin H
|
|
💬 Re: Spray rails finished and other small tasks….
3 years ago by 🇬🇧 Skydive130 (
Rear Admiral)✧ 155 Views · 4 Likes
Flag
I hear your sentiments JB, the hobby is struggling to attract new builders, unfortunately today’s younger generation are probably more interested in playstations, fashion and many other things good and bad. We are sadly a dying breed 😢
Kind regards Sy ▲
⟩⟩
Martin555
Madwelshman
jbkiwi
Colin H
|
|
💬 Re: Spray rails finished and other small tasks….
3 years ago by 🇬🇧 ChrisF (
Lieutenant Commander)✧ 150 Views · 3 Likes
Flag
Nice to see another Huntsman 31 being built. You've made a very nice job of the flared bow, not easy.
I did have a big Precedent version, bought already built, but found it too big for me and sold it on. Now scratch building one at 1:12 which matches my other Fairey builds. Chris ▲
⟩⟩
Martin555
Madwelshman
Skydive130
|
|
💬 Re: Spray rails finished and other small tasks….
3 years ago by 🇳🇿 jbkiwi (
Fleet Admiral)✧ 150 Views · 4 Likes
Flag
It would be a shame to lose you as well Colin, as there is a distinct lack of regular contributors at the moment, and that seems to be getting worse every month, to the detriment of the site. I hope things will come right soon before it goes too far, as we need experienced modellers to help the newcomers, or perhaps the hobby will die out completely.
JB ▲
⟩⟩
Martin555
Madwelshman
Skydive130
Colin H
|
|
💬 Re: Spray rails finished and other small tasks….
3 years ago by 🇬🇧 Skydive130 (
Rear Admiral)✧ 157 Views · 3 Likes
Flag
Cheers Colin, will be sorry to see you go if you leave, Martin sent me a private message yesterday saying he’d left the site for the same reasons, all very sad 😢
Kind regards Sy ▲
⟩⟩
Martin555
Madwelshman
jbkiwi
|
|
💬 Re: Spray rails finished and other small tasks….
3 years ago by 🇬🇧 Colin H (
Fleet Admiral)✧ 155 Views · 6 Likes
Flag
Sy, you are welcome, chuck out any comments I make that don't fit in with your build. I try my best to be as helpful as I can, but even I make mistakes.
When I was an apprentice I was told that anyone who doesn't make mistakes doesn't make anything. So over my 60+ years of modelling I've made a few mistakes but hopefully I've learnt something from them. I may be leaving the site soon because of the way the moderators were treated. Keep modelling, your an inspiration to many. Cheers Colin. ▲
⟩⟩
Martin555
MouldBuilder
jbkiwi
Skydive130
Madwelshman
Nerys
|
|
💬 Re: Spray rails finished and other small tasks….
3 years ago by 🇬🇧 Skydive130 (
Rear Admiral)✧ 157 Views · 2 Likes
Flag
Hi Colin, many thanks for that info, on the note I shall resin inside and give the outside another coat of Eze-Kote followed by filler primer. Maybe you’ve saved me a disaster!
Kind regards Sy ▲
⟩⟩
Martin555
Colin H
|
|
💬 Re: Spray rails finished and other small tasks….
3 years ago by 🇬🇧 Colin H (
Fleet Admiral)✧ 155 Views · 4 Likes
Flag
Sy, what great progress you have made.
To answer your question about resin over Ezekote. I tried polyester resin and it peeled in hot weather. I contacted Ezekote website and asked about my problem, they told me that any resin that wasn't water based would peel either from vibration or climate variables. So I always paint directly over the Ezekote with two coats of filler primer before starting on the final coats. Hope this helps, cheers Colin. ▲
⟩⟩
Martin555
StuartE
Rookysailor
Skydive130
|
|
Login To
Remove Ads 💬 Re: Spray rails finished and other small tasks….
3 years ago by 🇬🇧 Skydive130 (
Rear Admiral)✧ 157 Views · 1 Like
Flag
Cheers Rick, I try my best ha ha, kind regards. Sy
▲
⟩⟩
Martin555
|
|
💬 Re: Spray rails finished and other small tasks….
3 years ago by 🇨🇦 Newby7 (
Fleet Admiral)✧ 152 Views · 2 Likes
Flag
You do nice clean work Sy
Rick ▲
⟩⟩
Martin555
Skydive130
|


Login To
Remove Ads
Remove Ads