
Occre Ulises

Started by Trident73

22 updates 251 likes 88 comments

Deck

The hull is planked and rubbed down awaiting some decent warm weather so i can give it a coat of glass and resin. I have now moved on to decking - more planking 🙄. I’m edging the planks with a black sharpie before I glue them in place to represent caulking. I am using a medium viscosity cyano to stick them down.
Liked by Peejay and Fred and
8 comments
  1. RNinMunichBronze
    Fleet Admiral
    Trident,
    You have been added to the list of nominees for 'Planker of the Month'👍
    😎
    PS: Don't know what a 'sharpie' is, but if it's a permanent marker it should not react with your varnish. UNLESS! They use the same solvent.
    To be absolutely sure you could seal the deck with a resin, e.g. Deluxe Materials Ezekote.
    A water based one part resin, NO hardener needed.😀 I use it diluted with 10 to 20% water as a sealant. Let dry overnight and you'll have no problems with your varnish, whatever it's basis / solvent is.👍
    Cheers, Doug😎
    Liked by Peejay and Len1 and
  2. LewZ
    Admiral
    Just be careful with the "black" Sharpies. I've seen them fade to a purple.

    Lew
    Liked by Peejay and Len1 and

Sign in to comment on this update.

Progressing slowly

Fitted the gunwales this weekend and also the keel strip. Need to give the varnish on the deck another coat as it got a bit of glue on it that had to be sanded back off. Also need to give the gunwales a few coats of satin white inside still.
Liked by StuartE and hermank and
3 comments

Sign in to comment on this update.

About to start the glass fibre

This is probably the reason that it takes me so long to make models..😁 I have spent an hour or so putting off doing the glass fibre covering whilst I made this jig to hold the hull steady when inverted.

I have started with the tricky stern and covered this in one piece. This will mean that i can get two long runs in down each side tomorrow when this is dry. Not the most exciting picture, but if you zoom in you can see the fine weave of the 0.6oz glass cloth. This will ultimately be filled with the second coat of resin. I have included a shot of the resin that I use. I like this stuff and have used it on my planes for a few years now. I always dab it on through the cloth with a torn bit of dish sponge. I have found that this does not pull the cloth around causing snags etc.

Added a few more pics as I have done the port side this morning and slightly overlapped what I did at the stern yesterday. It took about 20mins to do. The excess epoxy was dabbed off with toilet tissue as this is obviously absorbent, and for some reason does not stick to the resin.
Liked by EdW and Rogal118 and
4 comments
  1. AlessandroSPQR
    Fleet Admiral
    Hi Trident73, I had some questions for you about the exterior resin method.
    But then I saw the pictures and there was no longer any need.
    I have to say you did very well.
    I'm afraid to use resin on the outside of the hull.
    I prefer to reinforce only the inside with resin and leave the wood exposed on the outside (but this is not your case), using paints for waterproofing.
    If I decided to put the resin on the outside too, I wouldn't use a special fabric but I would impregnate the wood directly. This is because I don't have enough experience and I'm afraid that the fabric won't adhere perfectly to all the sinuosities of the hull.
    But as I said, you have mastered this operation very well.
    I see that you didn't consider it necessary to pass the resin inside too or am I wrong?
    Did you consider the hull already robust and resistant enough as it is now?
    I am interested in any reasons you have for your choices and would like to know them.

    As for your last problem, I would wait to sand the deck.
    I would first try to remove the adhesive residue with progressively more aggressive products. First the alcohol, then acetone, then white spirit and only lastly thinner for nitro paints.
    I would try it on a small portion first.
    If instead it is a reaction of the cyanoacrylate then all these products are useless.
    It has often happened to me that cyanoacrylate reacts with whitish manifestations (this characteristic is used to detect fingerprints in the field of judicial police instead of powders).
    In this case, very cautious mechanical removal (fine sanding) and subsequent repainting is perhaps the only solution.
    I'm curious to see how you manage to solve it because this negative experience of yours will also be useful to me and other modelers.
    Liked by Trident73
  2. Trident73
    Sub-Lieutenant
    Hi Alessandro.Thanks for your compliment on the fibreglassing. I did a couple of coats of resin on the inside of the hull as well. On the inside there is no cloth however. Basically the hull is fully watertight inside and out.

    Watch this space for updates on the deck 😁 the reaction has spread across the whole deck where I masked the deck off. I am going to sand it back and start over.
    Liked by AlessandroSPQR

Sign in to comment on this update.

What do you reckon for this next step?

Hi folks. So I have primed and rubbed back and re-primed the hull now thanks to a weekend of decent UK weather.
This week I now need to bend these. 2mm x 5mm walnut strips into rubbing strips. Do you think crimping them would work best, or steaming them… or a combo of both? It is only the stern I am really worried about as it is a tight-ish radius. I am going to sand a small (5mm) flat around the stern for them to sit on as the area is too sharp at the moment. Thanks in advance for any thoughts.
Liked by EdW and AlessandroSPQR and
1 comment
  1. Trident73
    Sub-Lieutenant
    Actually, I have answered my own question- a bit of experimentation showed that crimping worked quite satisfactorily …
    Liked by EdW and StuartE and

Sign in to comment on this update.

£&@@£#!!

Been having a few nightmares with the deck. For some reason when I masked and sprayed the bulwarks (with rattle can car acrylic) yesterday, the lower edges of them reacted and blistered. Don’t know why. The oly thing they could have reacted with is the cyano I used to glue the bulwarks on. Anyway, I tidied that up and decided to give the deck a thin coat of satin acrylic clearcoat. Bad idea. Now the edges of the deck itself have reacted to where I had masking tape yesterday when doing the bulwarks 🙄. Any ideas? Should I try and rub the deck edges down and start again?
Liked by Peejay and hermank and
3 comments
  1. Trident73
    Sub-Lieutenant
    Hi Wolle, no just at the edges where a particular brand of masking tape was used. I guess some of the adhesive residue must have been left behind. Am considering flat-scraping the edges with a razor blade edge when it has fully cured and then satin coating the edges again. It happened in places on the port side and all the way down the stbd side.
    Liked by Peejay and hermank and
  2. WolleSilver
    Rear Admiral
    That's probably the better solution. I was thinking of sanding the deck again with very fine sandpaper, but I think you're better off not doing that because it will damage the structure of the deck.
    Liked by Peejay and hermank and

Sign in to comment on this update.

It got worse 😁

The longer I left it to cure the more the deck reacted. I think a full sanding and varnishing with something neutral/waterbased like the eze kote iswhat I am going to have to do now. Oh well, i guess modelling is 90% about solving challenges.

Update 24.05: the deck scraping seems to have worked thankfully. I have applied a couple of coats of really thinned down yacht varnish and all seems to be well so far. I think this coming weekend I will begin to make a start on the superstructure and possibly start the colour on the hull. I don’t know why but I don’t really want to paint it the box art colours so I am going to go with dark green and white above the waterline instead of the black that the box shows.
Liked by Peejay and Len1 and
5 comments
  1. StuartE
    Chief Petty Officer 1st Class
    Hi Trident... I bought this kit 3 years ago and had a build blog.....but never kept it up. I have now finished and will add some pictures and video to the blog i was running.... It was the first model I have done with planking and it was very challenging as you've found.
    Liked by GaryLC and EdW and

Sign in to comment on this update.

Started on the superstructure

Now that the deck woes are finished (scraping down and revarnishing worked), I have made a start on the superstructure. I have to line the wheelhouse inside and out with strips of walnut. Should hopefully look nice when it is finished. I was pondering whether I could make the door functional - in real life would it swing inwards towards the cabin interior?
Liked by Mike Stoney and Peejay and
10 comments
  1. Trident73
    Sub-Lieutenant
    Thanks for the info Doug and Len. It all makes sense. I will have a think about whether I could replicate a sliding door perhaps 🤔
    Regards, Chris.
    Liked by Peejay and hermank and
  2. AlessandroSPQR
    Fleet Admiral
    I'm glad you eliminated the problem on the bridge, you are now progressing very quickly after that annoying obstacle.
    Liked by Peejay and hermank and

Sign in to comment on this update.

Maiden voyage

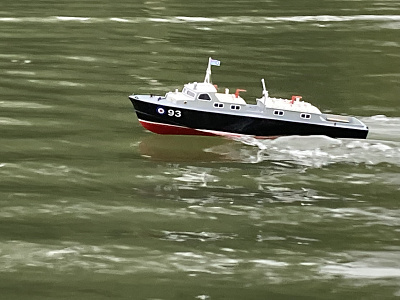
Despite being a long way from finished everything so far is resin coated or primed and therefore waterproof so I decided to give her a test outing. Ballast was courtesy of three 6v 4Ah batteries and a small amount of lead and it still needs some “finessing”. I sailed her for about 45 minutes and am pleased with her so far.
Liked by jbkiwi and Mike Stoney and
9 comments
  1. AlessandroSPQR
    Fleet Admiral
    Great intermediate test, Trident73.
    It sails very well.
    Three lead-acid batteries! Great, you'll have a lot of autonomy I imagine.
    Did you connect all three in parallel, or is one dedicated to the receiver and servos and the other two in parallel to the motor (my favorite solution)? Or other?

    But am I wrong or could it do much more than 45 minutes?
    Liked by hermank and Mike Stoney and
  2. Trident73
    Sub-Lieutenant
    Hiya Alessandro, thanks for the comments. On the day I only hooked up one battery to the motor, but the plan would be to use a parallel connection to the others next time. I am sure it could sail for longer than 45mins. By the time the rest of the build is done I guess I will probably be down to two batteries and some lead for ballast as the fittings will all add up in weight terms.
    Liked by hermank and Mike Stoney and

Sign in to comment on this update.

It has been a while

I have had limited time to build recently, but in the recent run of good weather I have made a start to the painting of the hull and superstructure on the Occre Ulises. All the paints are either Humbrol or Revell enamels and have been thinned about 40-50% for airbrushing. I still have to do another coat of the antifouling red and then I am going for a dark green upper hull to leave a thin white waterline between the two.
Liked by jbkiwi and MartyV and

Sign in to comment on this update.

Hull painted

Well that is the hull done now I think. The green took several coats to get right. I decided Humbrol gloss #3 was a bit too bright for my liking so I mixed in some gloss black before I sprayed it until it looked about right to my tastes and I am quite happy with the result.
Liked by Chuck and hermank and
5 comments

Sign in to comment on this update.

Delete this post?

It will be removed from the site.

Discard this draft?

Your draft will be deleted and cannot be recovered.

You have an unfinished draft

What would you like to do with it?