Join Us On Social Media!

|

|

|
Download The App!
Login To
Remove Ads
Remove Ads
Login To
Remove Ads
Remove Ads
Model Boats Website
'MOJO'
27 Posts · 21 Followers · 141 Photos · 315 Likes
Began 3 years ago by
 United Kingdom
Follow This Thread
Not currently following
> Click to follow
> Click to follow
Latest Post 3 years ago by
| Oldest posts shown first (Show Newest First) | (Print Booklet) |
📝 'MOJO'
3 years ago by 🇬🇧 Martin555 ( Fleet Admiral)
Fleet Admiral)✧ 147 Views · 13 Likes · 19 Comments
Flag
💬 Add Comment
Hi Guys,
This may come as a bit of a shock to you but i am going to do another build log.
It may also be a DOUBLE SHOCK as this boat will be made from WOOD. yes you did read this right WOOD,!! and not my usual Ice cream tubs,Yogurt pots and Margarine tubs.
The last wooden boat i made must of been about 35 to 40 years ago
So this will be fun.
I would imagine there will be a few words spoken that will not be printable LOL!!
As you know i have had big trouble getting motivated with my model making for some time now and that coupled with a few medical and other problems has seen very little modelling activity from me.
I have been approached by a friend to make this model for him.
I know i still have to complete HMS Cottesmore and the Submarine U552 but somehow i just can’t get in to the small detail work at the moment.
So i hope by making something that will not be complicated and not have lots of bits that could brake off will motivate me and take my mined off of all the other things that are happening at the moment.
I am using the ‘Flying Christina II’ kit from HAKits as a base.
The plan is just to make something that is functional and pleasing to the eye.
She will not be modelled on any particular boat so some modifications will be done.
I would like to get a few bits and bobs working but without getting overly complicated.
Hopefully this will also help me to get my MOJO back.
Martin555.
▲
⟩⟩
Madwelshman
stevedownunder
Rookysailor
RNinMunich
alan44
Scratchbuilder
mistyoptic
MouldBuilder
redpmg
Graham93
T33CNO
jbkiwi
Colin H
|
💬 Re: 'MOJO'
3 years ago by 🇬🇧 Martin555 (
Fleet Admiral)✧ 145 Views · 0 Likes
Flag
Thank's JB.
They are definitely smaller than i thought. Martin555. ▲
⟩⟩
No likes yet
This member will receive 1 point for every like received |
|
Login To
Remove Ads 💬 Re: 'MOJO'
3 years ago by 🇳🇿 jbkiwi (
Fleet Admiral)✧ 145 Views · 2 Likes
Flag
Hi Martin, here is a pic I took of the local boat I modelled my ST 'Jaguar' on, might give you an idea of size. It is the later MKII 37.5ft model . There were lots of variations due to different companies building them,- not all were British Power Boat models. Here are 3 local boats still in existence,- the one outside the hanger (RNZAF museum, Christchurch) is a New Zealand built ST ( to UK specs) the other 2 are British Power Boat built. The one with the custom cabin (locally added,) is a 40.5 ft model. I've found a few more pics of the Christines I and II.
JB 


▲
⟩⟩
stevedownunder
Martin555
|
|
💬 Re: 'MOJO'
3 years ago by 🇬🇧 Martin555 (
Fleet Admiral)✧ 145 Views · 0 Likes
Flag
Thanks for the photos Doug.
The boat a definitely a lot smaller than i thought when you compare it with a person standing along side it. Martin555. ▲
⟩⟩
No likes yet
This member will receive 1 point for every like received |
|
💬 Re: 'MOJO'
3 years ago by 🇬🇧 Martin555 (
Fleet Admiral)✧ 145 Views · 1 Like
Flag
Thank's Geoff,
Normally me and wood don't get on. Martin555. ▲
⟩⟩
stevedownunder
|
|
💬 Re: 'MOJO'
3 years ago by 🇬🇧 Scratchbuilder (
 Vice Admiral) Vice Admiral)✧ 150 Views · 1 Like
Flag
Hi Martin.
Great News. Looking forward to all the updates and comments. As always you will give the project your total enthusiasm and personal touch. Here is hoping that all is well. Be in touch soon. Regards Bill. ▲
⟩⟩
Martin555
|
|
💬 Re: 'MOJO'
3 years ago by 🇩🇪 RNinMunich (
Fleet Admiral)✧ 147 Views · 3 Likes
Flag
Hi Martin,
Re "I would be interested in seeing a photo of the 200 series tender." There's a goodly bunch here- 

▲
⟩⟩
stevedownunder
Martin555
Colin H
|

|
💬 Re: 'MOJO'
3 years ago by 🇬🇧 mistyoptic (
 Midshipman) Midshipman)✧ 147 Views · 3 Likes
Flag
Glad to hear this Martin and glad your friend has chosen an HAKits for you to build, as you know I am a great advocate of these kits.
I am sure you will find this all very much to your liking and will give you a good basis for you to rediscover your woodworking skills. |Best wishes Geoff. ▲
⟩⟩
stevedownunder
Martin555
Scratchbuilder
|
|
💬 Re: 'MOJO'
3 years ago by 🇬🇧 Martin555 (
Fleet Admiral)✧ 147 Views · 3 Likes
Flag
Hi Peter here is a photo of the kit prototype.
Martin555. 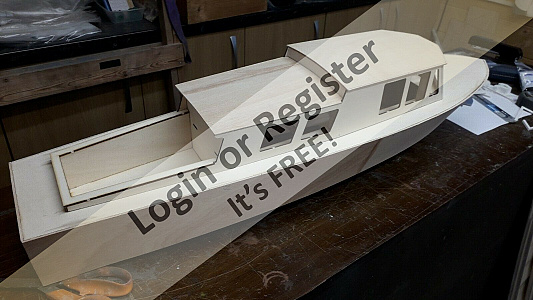
▲
⟩⟩
Scratchbuilder
Colin H
MouldBuilder
|
|
💬 Re: 'MOJO'
3 years ago by 🇬🇧 Martin555 (
Fleet Admiral)✧ 147 Views · 3 Likes
Flag
Thanks for the information JB.
I have shown my friend some photos but he wants it to look a little different altho i do have a bit of free licence. I must admit there is not a lot of photos on the Flying Christine II about. I would be interested in seeing a photo of the 200 series tender. Martin555. ▲
⟩⟩
jbkiwi
Scratchbuilder
RNinMunich
|
|
💬 Re: 'MOJO'
3 years ago by 🇳🇿 jbkiwi (
Fleet Admiral)✧ 147 Views · 6 Likes
Flag
Funny you should chose this model Martin, as I was looking at the Guernsey Ambulance boats about 6 months ago, and was thinking of using my Jaguar hull plans to build one (Christines 1 and 2 are/were ex 200 series flying boat tenders) Here are a couple of pics which might be of interest. Christine 1 was written off in an accident (hence Christine 2 - with purpose built cabin etc) Christine 3 is a totally different modern boat. Christine II was in danger of being scrapped after finishing her duty, not sure if she's been saved (you probably have this info)
JB 


▲
⟩⟩
RNinMunich
stevedownunder
Scratchbuilder
MouldBuilder
Colin H
Martin555
|
|
💬 Re: 'MOJO'
3 years ago by 🇬🇧 Martin555 (
Fleet Admiral)✧ 147 Views · 1 Like
Flag
Hi Peter,
I will have to see if i can find a photo. Martin555. ▲
⟩⟩
Scratchbuilder
|
|
Login To
Remove Ads 💬 Re: 'MOJO'
3 years ago by 🇭🇺 MouldBuilder (
Vice Admiral)✧ 152 Views · 2 Likes
Flag
Great news Martin. I think most members are waiting with anticipation to see how these ‘minor changes’ will look. Do you have a picture of the base kit?
Peter.😊 ▲
⟩⟩
Scratchbuilder
Martin555
|
|
💬 Re: 'MOJO'
3 years ago by 🇳🇿 jbkiwi (
Fleet Admiral)✧ 147 Views · 3 Likes
Flag
Cut with a chainsaw, measured with a tape, shaped with an axe,- Precision wooden boat building Martin😁 This tug started as a 12"x12"x36" piece of driftwood found on a beach, and was made pretty much using the afore mentioned technology (still have the blisters to prove it😁)
YOU CAN DO IT👍 almost like using marg tubs😁 JB 
▲
⟩⟩
Scratchbuilder
Martin555
MouldBuilder
|
|
💬 Re: 'MOJO'
3 years ago by 🇿🇦 redpmg (
 Commodore) Commodore)✧ 147 Views · 2 Likes
Flag
It may not be your favourite material Martin - but I am sure you will make a great job of it as usual . Looking forward to the build blog
▲
⟩⟩
Scratchbuilder
Martin555
|
|
💬 Re: 'MOJO'
3 years ago by 🇬🇧 Martin555 (
Fleet Admiral)✧ 147 Views · 2 Likes
Flag
Hi Colin,
I have been studying to find out what wood is and how i use it. Also my mind is starting to make noises as the cogs have started turning. Martin555. ▲
⟩⟩
stevedownunder
Scratchbuilder
|
|
💬 Re: 'MOJO'
3 years ago by 🇬🇧 Colin H (
Fleet Admiral)✧ 148 Views · 2 Likes
Flag
Well Martin I think it's great , and I expect it will be a little different as your imagination can run riot and put some fun into it.
Cheers Colin. ▲
⟩⟩
Scratchbuilder
Martin555
|
|
💬 Re: 'MOJO'
3 years ago by 🇬🇧 Martin555 (
Fleet Admiral)✧ 147 Views · 3 Likes
Flag
Jb,
When it is finished It will probably look as if it was made with an AXE.LOL! Rick, RE :- Bells and whistles. I will have to see how the mood takes me. Martin555. ▲
⟩⟩
Scratchbuilder
jbkiwi
Newby7
|
|
💬 Re: 'MOJO'
3 years ago by 🇨🇦 Newby7 (
Fleet Admiral)✧ 147 Views · 1 Like
Flag
Come on MOJO Martin needs a new MOJO. Good on you to take up a new project. A few bells and whistles wouldn't hurt ether.
Rick ▲
⟩⟩
Martin555
|
|
💬 Re: 'MOJO'
3 years ago by 🇳🇿 jbkiwi (
Fleet Admiral)✧ 147 Views · 2 Likes
Flag
Go for it Martin,😊 a good excuse to get your whittlin' axe out. Austin Powers will be pleased.😁
Just thought of something,- Austin Martin, ??? has a ring to it😁 JB ▲
⟩⟩
Scratchbuilder
Martin555
|
Login To
Remove Ads
Remove Ads
📝 'MOJO' Kit.
3 years ago by 🇬🇧 Martin555 ( Fleet Admiral)
Fleet Admiral)✧ 146 Views · 8 Likes · 13 Comments
Flag
💬 Add Comment
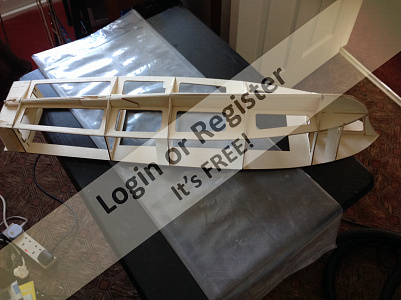
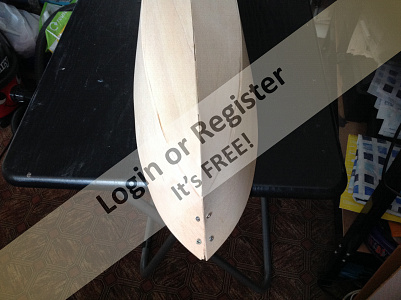
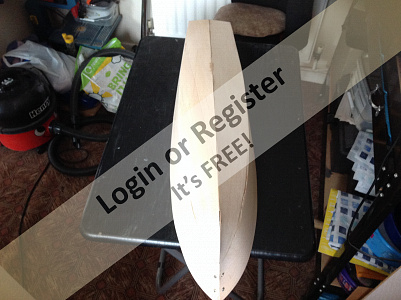
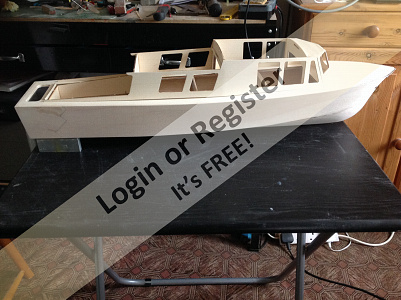
FIRST IMPRESSIONS
It arrived in just a few days from ordering wrapped in brown paper and bubble wrap, and there was no signs of any damage.
The kit is just in a polythene bag with a printed card top with an image and the boat name.
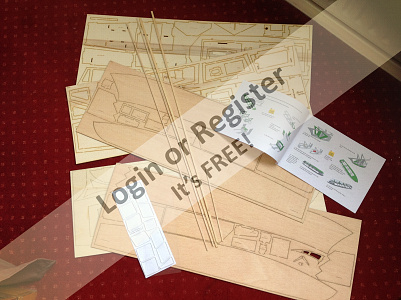
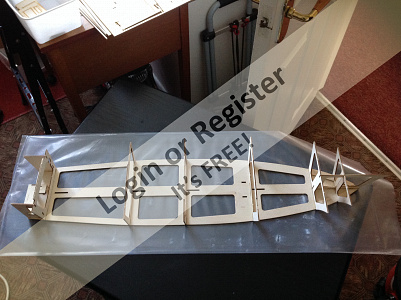
On opening the kit it comprises of two sheets of 2mm x 285mm x 825mm ply wood laser cut parts.
And three sheets of 3mm x285mm x 825mm ply wood of laser cut parts that they are all clearly marked with a name or part number.
The quality of the ply wood is not the best but is suitable and fit for the purpose.
Also there are 2 strips of wood approx 6mm x 3mm x 865mm.
And 2 strips of wood approx 3mm x 3mm x 865mm
and 1 small strip of wood approx 3mm x 3mm x 240mm.
There is a thin card sheet with window templates marked on it and plastic window frames attached to the card.
And a thin sheet of clear plastic for the windows.
The wood smells burnt but that could be because i think the kit is laser cut to order.
The Instructions are very simple and easy to understand with numbered assembly sequence and pictorial images.
The construction is of the Ezzee Build system.
The model is 1/16 scale and measures 32 inches long. (Approx 815mm) and designed to take a radio control system.
You can also get the running gear :-
Prop shaft.
Rudder assembly.
Universal Joint Coupling.
From HAKits.
Martin555.


It arrived in just a few days from ordering wrapped in brown paper and bubble wrap, and there was no signs of any damage.
The kit is just in a polythene bag with a printed card top with an image and the boat name.
On opening the kit it comprises of two sheets of 2mm x 285mm x 825mm ply wood laser cut parts.
And three sheets of 3mm x285mm x 825mm ply wood of laser cut parts that they are all clearly marked with a name or part number.
The quality of the ply wood is not the best but is suitable and fit for the purpose.
Also there are 2 strips of wood approx 6mm x 3mm x 865mm.
And 2 strips of wood approx 3mm x 3mm x 865mm
and 1 small strip of wood approx 3mm x 3mm x 240mm.
There is a thin card sheet with window templates marked on it and plastic window frames attached to the card.
And a thin sheet of clear plastic for the windows.
The wood smells burnt but that could be because i think the kit is laser cut to order.
The Instructions are very simple and easy to understand with numbered assembly sequence and pictorial images.
The construction is of the Ezzee Build system.
The model is 1/16 scale and measures 32 inches long. (Approx 815mm) and designed to take a radio control system.
You can also get the running gear :-
Prop shaft.
Rudder assembly.
Universal Joint Coupling.
From HAKits.
Martin555.
▲
⟩⟩
RNinMunich
stevedownunder
alan44
Rookysailor
Scratchbuilder
jbkiwi
Colin H
MouldBuilder
|
💬 Re: 'MOJO' Kit.
3 years ago by 🇬🇧 Scratchbuilder (
Vice Admiral)✧ 151 Views · 1 Like
Flag
Hi Martin.
Re promotion. Will celebrate with a small dry Sherry at eight bells 🔔 Regards Bill ▲
⟩⟩
Martin555
|
|
Login To
Remove Ads 💬 Re: 'MOJO' Kit.
3 years ago by 🇬🇧 Martin555 (
Fleet Admiral)✧ 146 Views · 1 Like
Flag
Will do Bill as long a i remember.
Congratulations on your promotion Commander. Martin555. ▲
⟩⟩
Scratchbuilder
|
|
💬 Re: 'MOJO' Kit.
3 years ago by 🇬🇧 Scratchbuilder (
Vice Admiral)✧ 151 Views · 1 Like
Flag
Looking good Martin.
Keep us posted with lots of pictures as well. Regards Bill ▲
⟩⟩
Martin555
|
|
💬 Re: 'MOJO' Kit.
3 years ago by 🇬🇧 Martin555 (
Fleet Admiral)✧ 146 Views · 2 Likes
Flag
It looks to be 8 inches JB.
Martin555. ▲
⟩⟩
jbkiwi
Scratchbuilder
|
|
💬 Re: 'MOJO' Kit.
3 years ago by 🇨🇦 Newby7 (
Fleet Admiral)✧ 146 Views · 1 Like
Flag
Thanks Martin for the pictures.Looks to be an interesting build. Will be keeping an eye on your build even if it is WOOD LOL
Rick ▲
⟩⟩
Martin555
|
|
💬 Re: 'MOJO' Kit.
3 years ago by 🇳🇿 jbkiwi (
Fleet Admiral)✧ 146 Views · 3 Likes
Flag
That looks like fun Martin, should be a good starter for you. Instructions look pretty good and clear. 32" is quite a nice sized model as well, -what's the beam on it? . I'm sure you'll make some nice improvements to it with your vivid imagination 😁😊
JB ▲
⟩⟩
stevedownunder
Scratchbuilder
Martin555
|
|
💬 Re: 'MOJO' Kit.
3 years ago by 🇬🇧 Colin H (
Fleet Admiral)✧ 146 Views · 2 Likes
Flag
Martin I think we will both win from taking on these challenges.
Cheers Colin ▲
⟩⟩
Scratchbuilder
Martin555
|
|
💬 Re: 'MOJO' Kit.
3 years ago by 🇬🇧 Martin555 (
Fleet Admiral)✧ 146 Views · 2 Likes
Flag
Colin.
Maybe we should swap LOL!! It will be interesting to see who wins me or the wood LOL!! Martin555. ▲
⟩⟩
Scratchbuilder
Colin H
|
|
💬 Re: 'MOJO' Kit.
3 years ago by 🇬🇧 Colin H (
Fleet Admiral)✧ 146 Views · 2 Likes
Flag
Martin you and Wood is like me and plastic models.
So my free boat is going to give me a headache. Cheers Colin. ▲
⟩⟩
Scratchbuilder
Martin555
|
|
💬 Re: 'MOJO' Kit.
3 years ago by 🇬🇧 Martin555 (
Fleet Admiral)✧ 146 Views · 2 Likes
Flag
It dose look an easy kit to make Colin, but because it is wood it will be like having two dodgy hands to me LOL!!
Martin555. ▲
⟩⟩
Scratchbuilder
Colin H
|
|
💬 Re: 'MOJO' Kit.
3 years ago by 🇬🇧 Martin555 (
Fleet Admiral)✧ 146 Views · 1 Like
Flag
Well you are getting better Peter,
You have learnt what a book is, the next thing you need to do is learn how to use one.LOL!! Between us we will get you there in the end. LOl!! Martin555. ▲
⟩⟩
MouldBuilder
|
|
Login To
Remove Ads 💬 Re: 'MOJO' Kit.
3 years ago by 🇬🇧 Colin H (
Fleet Admiral)✧ 146 Views · 2 Likes
Flag
Martin it looks like it would be easy enough for me to build even with my dodgy hands.
Cheers Colin. ▲
⟩⟩
MouldBuilder
Martin555
|
|
💬 Re: 'MOJO' Kit.
3 years ago by 🇭🇺 MouldBuilder (
Vice Admiral)✧ 151 Views · 2 Likes
Flag
Looks quite a nicely presented model Martin. Nothing much to add at this stage but what is that book with pictures for. I have seen them with the models I have bought but give them to the dog.
This looks a little easy for you. Are you going to change it into a helicopter? Peter.😊 ▲
⟩⟩
Martin555
Colin H
|
📝 HULL (Part 1) (Above the Base deck.)
3 years ago by 🇬🇧 Martin555 ( Fleet Admiral)
Fleet Admiral)✧ 150 Views · 12 Likes · 17 Comments
Flag
💬 Add Comment
Hi guys.
I will mainly be making this kit as the instruction state.
Altho i may make some changes on the way but i will have to see how it goes.
Firstly you will need room to put the sheets of ply wood so that they stay flat.
Then you need a flat surface to assemble on, and a flat surface to enable you to cut out the parts from the ply wood.
The parts are easy to cut out of the ply wood with a sharp scalpel.
The instructions call for thick and thin cyano glue (Super glue) (C A) to glue the model together.
So here we go.
I used the polythene kit bag on the assembly work area to stop the assembly sticking to the Bench/Table top.
The first thing i found it the instructions say glue B2 to the Hull Base then glue the Bow former place.
I found it a lot easer to glue the Bow former to B2 first then glue it all to the Hull base.
I won’t go in to this assembly in great detail as i am sure you have seen this all before, however i will report anything that i find easer than as described in the kit instructions.
The important thing is you keep the Hull Base flat by adding weight or pinning it to the flat work surface. and you make sure that the frames are square to it.
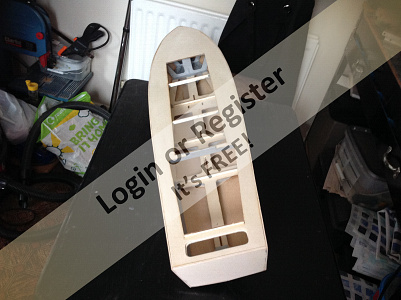
Stage 1.
It is very important to make sure the Base has the word ‘Base’ facing up because you will not be able to fit the servo tray mount in to its corresponding slot mentioned in stages 4 as the slot is off centre.
I again found it much easer to glue the twoTransom supports to B6, then glue the assembly to the base.
Then with a light sanding i was able to slide in the servo tray and servo mount and glue them in position.
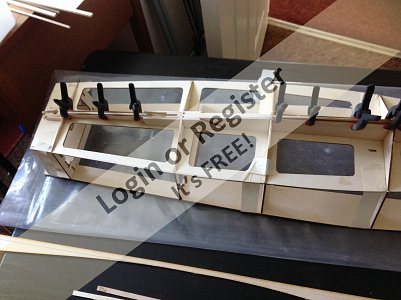
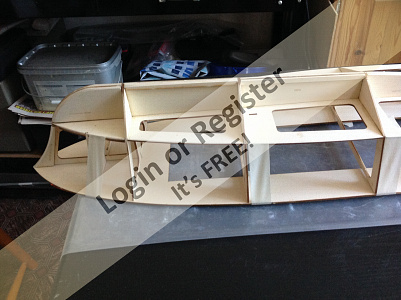
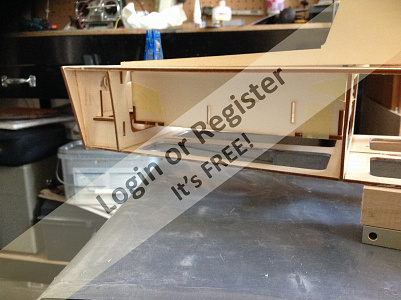
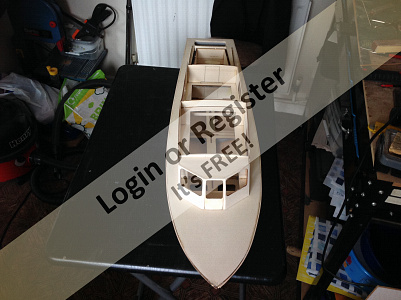
Stage 6.
B6 also has a bit more of a middle cut out to one side it is unclear as to why and also if this should be on the port or starboard side.
Looking ahead to the illustration section 14, it dose look as if it should be on the port side.
See photo.3
I will suggest that the words ‘This way up’ is printed on the Hull Base.
Also i will be making notes as i go along and i will report back to HAKits anything i find.
Stage 9.
Says glue the motor mount supports to the base then fix the mounting plate to the supports. I will skip this as i may make a different motor mount to suit the prop shaft angle.
Stage 10.
Glue and fit the deck, again i will skip this as i don’t like the idea of not gaining access to the rudder servo and rudder linkages.
I will just tape the deck on for the moment as later i will hopefully move the servo and have a hatch above the rudder area.
Martin555.


I will mainly be making this kit as the instruction state.
Altho i may make some changes on the way but i will have to see how it goes.
Firstly you will need room to put the sheets of ply wood so that they stay flat.
Then you need a flat surface to assemble on, and a flat surface to enable you to cut out the parts from the ply wood.
The parts are easy to cut out of the ply wood with a sharp scalpel.
The instructions call for thick and thin cyano glue (Super glue) (C A) to glue the model together.
So here we go.
I used the polythene kit bag on the assembly work area to stop the assembly sticking to the Bench/Table top.
The first thing i found it the instructions say glue B2 to the Hull Base then glue the Bow former place.
I found it a lot easer to glue the Bow former to B2 first then glue it all to the Hull base.
I won’t go in to this assembly in great detail as i am sure you have seen this all before, however i will report anything that i find easer than as described in the kit instructions.
The important thing is you keep the Hull Base flat by adding weight or pinning it to the flat work surface. and you make sure that the frames are square to it.
Stage 1.
It is very important to make sure the Base has the word ‘Base’ facing up because you will not be able to fit the servo tray mount in to its corresponding slot mentioned in stages 4 as the slot is off centre.
I again found it much easer to glue the twoTransom supports to B6, then glue the assembly to the base.
Then with a light sanding i was able to slide in the servo tray and servo mount and glue them in position.
Stage 6.
B6 also has a bit more of a middle cut out to one side it is unclear as to why and also if this should be on the port or starboard side.
Looking ahead to the illustration section 14, it dose look as if it should be on the port side.
See photo.3
I will suggest that the words ‘This way up’ is printed on the Hull Base.
Also i will be making notes as i go along and i will report back to HAKits anything i find.
Stage 9.
Says glue the motor mount supports to the base then fix the mounting plate to the supports. I will skip this as i may make a different motor mount to suit the prop shaft angle.
Stage 10.
Glue and fit the deck, again i will skip this as i don’t like the idea of not gaining access to the rudder servo and rudder linkages.
I will just tape the deck on for the moment as later i will hopefully move the servo and have a hatch above the rudder area.
Martin555.
▲
⟩⟩
mturpin013
RNinMunich
redpmg
figtree7nts
Madwelshman
Rookysailor
stevedownunder
Scratchbuilder
MouldBuilder
Brucep
Colin H
jbkiwi
|
💬 Re: HULL (Part 1) (Above the Base deck.)
3 years ago by 🇬🇧 mistyoptic (
Midshipman)✧ 151 Views · 1 Like
Flag
Thanks Martin, absolute sense, thank you.
Geoff. ▲
⟩⟩
Martin555
|
|
Login To
Remove Ads 💬 Re: HULL (Part 1) (Above the Base deck.)
3 years ago by 🇬🇧 Martin555 (
Fleet Admiral)✧ 150 Views · 0 Likes
Flag
Hi Red,
As soon as i looked at the Instruction booklet i saw it was the EeZeBilt method. If you remember i designed and built a boat for the EeZeBuilt website but that was the last i ever heard about it. I am trying to keep to the original instructions for the new guys to the hobby but at the same time i want to make it slightly different and more eye catching. RE:- will be sending a pm with a new challenge after this build is complete.......... Now you have got the old grey thing turning LOL!! Martin555. ▲
⟩⟩
No likes yet
This member will receive 1 point for every like received |
|
💬 Re: HULL (Part 1) (Above the Base deck.)
3 years ago by 🇿🇦 redpmg (
Commodore)✧ 150 Views · 1 Like
Flag
Great to see you going again Martin - HAkits seem to be using the EeZeBilt method of construction - interesting. See you are still struggling with wood - will be sending a pm with a new challenge after this build is complete..........
Agree with you re access - s-ds law says that if anything does go wrong it will be the one thing you don't have access to................ ▲
⟩⟩
Martin555
|
|
💬 Re: HULL (Part 1) (Above the Base deck.)
3 years ago by 🇬🇧 Martin555 (
Fleet Admiral)✧ 150 Views · 3 Likes
Flag
Hi Geoff.
Thank you for The advice. The plan was to build to the original HAKits instructions, However i will have to jump about a little as i do prefer to be able to get at the rudder linkage and servos. I don't think i will be changing the original build to much. By jumping forward i will then see if i can fit my bits and pieces in a better position to enable maintenance. If not then the rudder servo will be put in the original position as per instructions. A novice should hopefully be able to follow this build log as i will be saying what the added or different bits will be up until the main construction is complete. As i say i will try to keep the basic build standard but there are no instructions as to when to fit the rudder servo that is why i have not glued the deck on as you will not be able to get at the servo mounting screws, or be able to mount the servo with the deck glued down. I hope that makes sense. Martin555. ▲
⟩⟩
mistyoptic
MouldBuilder
Colin H
|
|
💬 Re: HULL (Part 1) (Above the Base deck.)
3 years ago by 🇬🇧 Martin555 (
Fleet Admiral)✧ 150 Views · 0 Likes
Flag
Thank's Stephen,
I will give it my best shot. Ed, Hopefully you won't be disappointed. Martin555. ▲
⟩⟩
No likes yet
This member will receive 1 point for every like received |
|
💬 Re: HULL (Part 1) (Above the Base deck.)
3 years ago by 🇺🇸 figtree7nts (
 Admiral) Admiral)✧ 154 Views · 2 Likes
Flag
Hi Martin,
It's good to see you building again! And a wooden model at that! I will keep track of your build with anticipation! Cheers, Ed ▲
⟩⟩
MouldBuilder
Martin555
|
|
💬 Re: HULL (Part 1) (Above the Base deck.)
3 years ago by 🇦🇺 stevedownunder (
 Captain) Captain)✧ 152 Views · 1 Like
Flag
Hi Martin,
Great to see you are building again, I agree with Mike wood is a relaxing and rewarding material, it has a warmth to it. Most importantly enjoy yourself. Cheer, Stephen. ▲
⟩⟩
Martin555
|
|
💬 Re: HULL (Part 1) (Above the Base deck.)
3 years ago by 🇬🇧 mistyoptic (
Midshipman)✧ 151 Views · 3 Likes
Flag
Steady on Martin, I have found with Ha Kits that it is best to fit all that you want to fit before you add the side skins, That is Rudder and servo, prop shaft and battery placement etc. These kits go together well and don't overlook, in your blog, that novice members may be wanting a straightforward build to follow on what the manufacturers acknowledge is a beginners kit and upwards. Otherwise they lend themselves to personalisation in a good way.
Best regards, Geoff. ▲
⟩⟩
Colin H
Martin555
stevedownunder
|
|
💬 Re: HULL (Part 1) (Above the Base deck.)
3 years ago by 🇬🇧 Martin555 (
Fleet Admiral)✧ 150 Views · 2 Likes
Flag
Thanks Mike,
I will keep telling myself 'wood is good' 'wood is good' I am definitely finding it a bit different to work with. Martin555. ▲
⟩⟩
Madwelshman
stevedownunder
|
|
💬 Re: HULL (Part 1) (Above the Base deck.)
3 years ago by 🇬🇧 mturpin013 (
Admiral)✧ 154 Views · 3 Likes
Flag
Come on Martin boats are made of wood the more you do the more you will like it and find it a relaxing and rewarding medium to work in.
WOOD IS GOOD ▲
⟩⟩
MouldBuilder
stevedownunder
Martin555
|
|
💬 Re: HULL (Part 1) (Above the Base deck.)
3 years ago by 🇬🇧 Scratchbuilder (
Vice Admiral)✧ 155 Views · 1 Like
Flag
Blimey Martin.
Is the TV broken. Your off like a V1rocket.....supersonic. I thought you were going to take it easy and progress in your normal controlled and unflustered state. Keep it up and I watch with interest. Regards Bill. ▲
⟩⟩
Martin555
|
|
Login To
Remove Ads 💬 Re: HULL (Part 1) (Above the Base deck.)
3 years ago by 🇬🇧 Martin555 (
Fleet Admiral)✧ 150 Views · 2 Likes
Flag
I have not got a clue Peter, i am just winging it LOL!!!
Martin555. ▲
⟩⟩
stevedownunder
Scratchbuilder
|
|
💬 Re: HULL (Part 1) (Above the Base deck.)
3 years ago by 🇬🇧 Martin555 (
Fleet Admiral)✧ 150 Views · 2 Likes
Flag
Hi Colin,
I must admit i do try to avoid wood as i don't really like working with it. Martin555. ▲
⟩⟩
stevedownunder
Scratchbuilder
|
|
💬 Re: HULL (Part 1) (Above the Base deck.)
3 years ago by 🇭🇺 MouldBuilder (
Vice Admiral)✧ 156 Views · 3 Likes
Flag
Great start Martin. Do you know what you are doing?😃😬😬
▲
⟩⟩
stevedownunder
Scratchbuilder
Martin555
|
|
💬 Re: HULL (Part 1) (Above the Base deck.)
3 years ago by 🇬🇧 Colin H (
Fleet Admiral)✧ 150 Views · 3 Likes
Flag
That's quite a quick start Martin, mind you don't get a speeding ticket.
Keep it up shipmate, and I thought you didn't work with wood. Cheers Colin. ▲
⟩⟩
stevedownunder
Scratchbuilder
Martin555
|
|
💬 Re: HULL (Part 1) (Above the Base deck.)
3 years ago by 🇳🇿 jbkiwi (
Fleet Admiral)✧ 150 Views · 3 Likes
Flag
Going well Martin, your building method sounds like mine,-go for it then if in doubt, go to the trash bin, retrieve instructions and read😁. Looks like a good little kit with things fitting nicely. Access hatches are always good👍 you can never have too many😁
JB ▲
⟩⟩
stevedownunder
Scratchbuilder
Martin555
|
|
💬 Re: HULL (Part 1) (Above the Base deck.)
3 years ago by 🇨🇦 Newby7 (
Fleet Admiral)✧ 150 Views · 3 Likes
Flag
Changes already Martin looks good. I wonder if a novice were to build if they would see getting at items later is essential to look at before gluing pieces in place. Your blog will help others if they were to get this kit.
Rick ▲
⟩⟩
stevedownunder
Martin555
jbkiwi
|
📝 HULL.(part 2) (Below the Base deck)
3 years ago by 🇬🇧 Martin555 ( Fleet Admiral)
Fleet Admiral)✧ 153 Views · 10 Likes · 9 Comments
Flag
💬 Add Comment
Hi guys.
This part of the hull went together very well.
A Note to the new model makers be careful when using the thin (CA) Super glue.
As i am using an 8mm O/D prop shaft tube i had to double up on the prop shaft doublers, the same with the rudder shaft tube. ( stage 14)
There is plenty of scrap ply to make them out of.
So far the hardest part of this build has been drilling the hole for the prop shaft.
Stage (15)
After cutting and fitting the bow and keel doublers, i decided to cut a 5mm strip from the long side of a 3mm sheet of the ply (scrap at this stage) and glue a piece each side of the keel to give me a little bit more to attach the bottom sheets to.
I sanded them down to match the profile for the bottom sheets to glue to.
So far it all goes together as per the instruction sheet with the exceptions of what i have already mentioned.
I will now skip to stage (24) the start of the superstructure.
The reason behind the skip is i want to see how and were i can locate the servos, motor, batteries, receiver, etc.
It will be a lot easer to see what room you have with out the sides on.
Martin555.
▲
⟩⟩
mturpin013
RNinMunich
MouldBuilder
redpmg
stevedownunder
mistyoptic
Skydive130
Colin H
jbkiwi
Scratchbuilder
|
💬 Re: HULL.(part 2) (Below the Base deck)
3 years ago by 🇨🇦 Newby7 (
Fleet Admiral)✧ 152 Views · 1 Like
Flag
Well on the way Martin. I like the shape of the boat. Martin WOOD IS GOOD.
Rick ▲
⟩⟩
Martin555
|
|
Login To
Remove Ads 💬 Re: HULL.(part 2) (Below the Base deck)
3 years ago by 🇬🇧 Skydive130 (
 Rear Admiral) Rear Admiral)✧ 152 Views · 1 Like
Flag
Hi Martin, just noted that you are building a Hakits model, shall follow with interest as I’ve looked at these a couple of times.
Enjoy! Kind regards. Sy ▲
⟩⟩
Martin555
|
|
💬 Re: HULL.(part 2) (Below the Base deck)
3 years ago by 🇬🇧 Martin555 (
Fleet Admiral)✧ 152 Views · 0 Likes
Flag
No worries Colin,
Hopefully we will see some of his work on the site in years to come. Martin555. ▲
⟩⟩
No likes yet
This member will receive 1 point for every like received |
|
💬 Re: HULL.(part 2) (Below the Base deck)
3 years ago by 🇬🇧 Colin H (
Fleet Admiral)✧ 152 Views · 1 Like
Flag
Martin I've set his tablet app to view only as his parents don't like him having full access at present.
So for the present I will keep him anonymous, but I will pass on his comments. Cheers Colin. ▲
⟩⟩
Martin555
|
|
💬 Re: HULL.(part 2) (Below the Base deck)
3 years ago by 🇬🇧 Martin555 (
Fleet Admiral)✧ 153 Views · 1 Like
Flag
Hi colin,
That is Great. Please let me know what your Grandson would like to be called on the site. Martin555. ▲
⟩⟩
Colin H
|
|
💬 Re: HULL.(part 2) (Below the Base deck)
3 years ago by 🇬🇧 Colin H (
Fleet Admiral)✧ 153 Views · 1 Like
Flag
Thanks Martin, I've put the app on his tablet and we video chat daily.
I have told him he has to earn a kit by his progress at school. So far he's on target, I expect he has already read your comments. I will ask him later after he's finished his homework when he calls me. Cheers Colin. ▲
⟩⟩
Martin555
|
|
💬 Re: HULL.(part 2) (Below the Base deck)
3 years ago by 🇬🇧 Martin555 (
Fleet Admiral)✧ 153 Views · 1 Like
Flag
Hi Colin,
Thank you for your comment. Also your Grandson's comment too. I consider that a huge complement. I would also like to thank your Grandson for following my build log and i hope he gets a nice model boat kit for his Birthday. If he need any help i am sure there are plenty of members here that will be willing to answer any questions he may have. Martin555. ▲
⟩⟩
Colin H
|
|
💬 Re: HULL.(part 2) (Below the Base deck)
3 years ago by 🇬🇧 Colin H (
Fleet Admiral)✧ 153 Views · 2 Likes
Flag
Hi Martin, you are doing really well and I like the way you are explaining your methodology as it's very easy to understand.
My 6 year old grandson likes it as well and is following the build with interest, he asked me if I can get him a kit to build for his birthday in August. He says it's easy to follow your instructions as he thinks I'm to fussy the way I work. Cheers Colin. ▲
⟩⟩
RNinMunich
Martin555
|
|
💬 Re: HULL.(part 2) (Below the Base deck)
3 years ago by 🇳🇿 jbkiwi (
Fleet Admiral)✧ 153 Views · 1 Like
Flag
Going well Martin👍
JB ▲
⟩⟩
Martin555
|
📝 Stage (14) (superstructure)
3 years ago by 🇬🇧 Martin555 ( Fleet Admiral)
Fleet Admiral)✧ 152 Views · 14 Likes · 8 Comments
Flag
💬 Add Comment
Hi Guys,
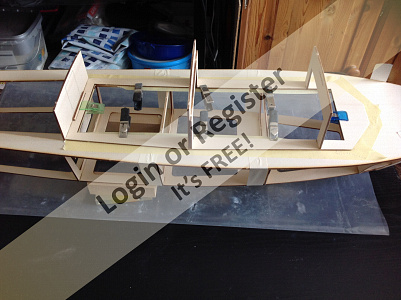
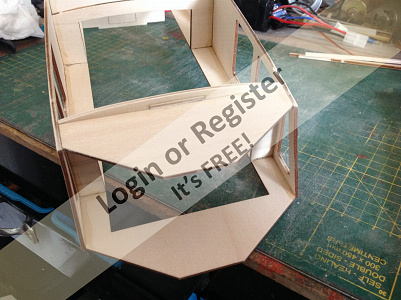
As you will be building on the deck remember to put tape or polythene on the deck to stop the superstructure being glued to it.
I clamped the cabin frame down to the deck as that it will adopt the proper deck shape.
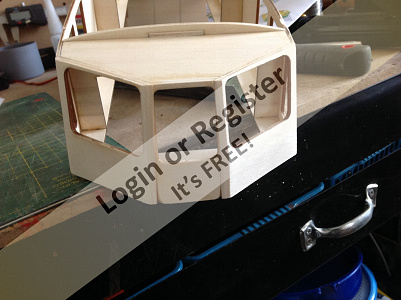
Stage (25)
The instructions say glue C1, C2, C3, C4 to cabin frame.
There is no indication of position as to where they go.
So it was a simple case of dry fitting to find there location.
C1 forward C4 aft.
As the deck has a slight curve to it you will not be able to use a square to make sure they are square to the cabin frame.
so you just have to eye them as vertical as possible.
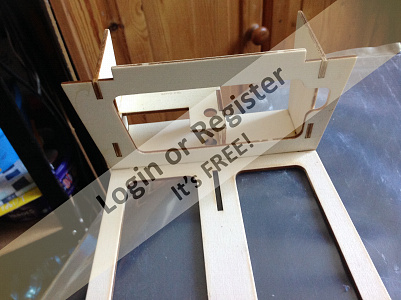
C4 has a doorway laser cut in but held in by two uncut sections.
I am assuming it is so you have the option of an open or closed door.
So a decision has to be made before this part is glued in place.
If you go for an open door you will have to gut away some of the deck and frame 5.
I have decided to have the closed door.
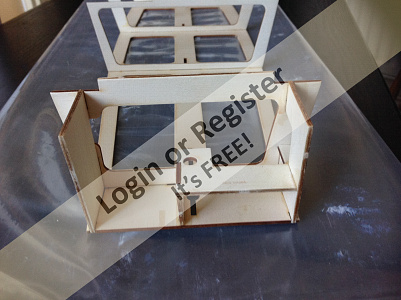
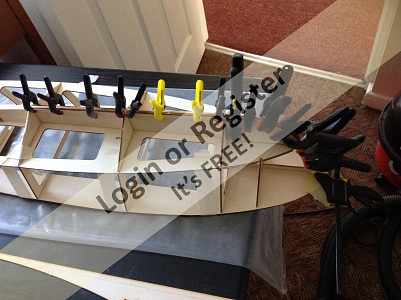
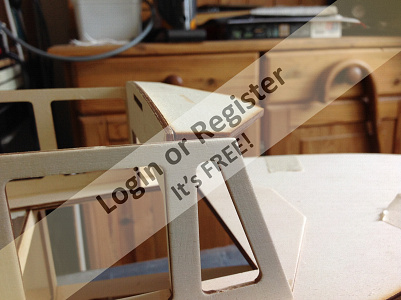
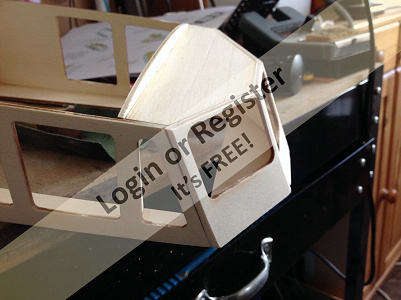
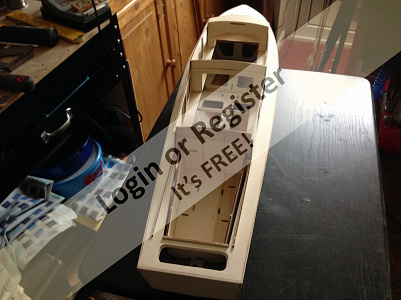
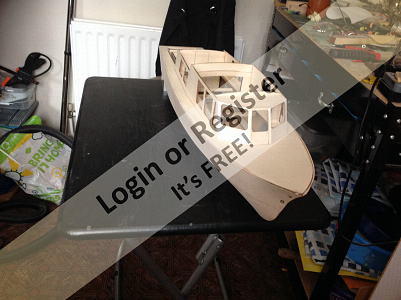
Stage 26.
To fit the super structure sides you first need to sand down the bottom edge to match the slight deck curve.
Because of the sanding to match the deck it has now altered the front cabin roof.
I had to sand down the deck-head curve on C1 to line up with the superstructure sides.
Also the cabin front support (stage 27) had to be lowered.
To do this i just cut off the locating tap and glued it a little lower down also to line up with the superstructure sides.
The slot on C1 was then filled with a small piece of the scrap ply wood.
NOTE.
The cabin front and front side panels (stage 28, 29) will also have to be cut down to fit.
Remove the wood from bottoms of the panels, and remember to chamfer the edges to ensure a good fit.
Keep dry fitting until you are happy with the fit.
Then glue in position.
As you can see in the photos i did not get my angles right but i am sure that a bit of filler will sort that out.
Martin555.

As you will be building on the deck remember to put tape or polythene on the deck to stop the superstructure being glued to it.
I clamped the cabin frame down to the deck as that it will adopt the proper deck shape.
Stage (25)
The instructions say glue C1, C2, C3, C4 to cabin frame.
There is no indication of position as to where they go.
So it was a simple case of dry fitting to find there location.
C1 forward C4 aft.
As the deck has a slight curve to it you will not be able to use a square to make sure they are square to the cabin frame.
so you just have to eye them as vertical as possible.
C4 has a doorway laser cut in but held in by two uncut sections.
I am assuming it is so you have the option of an open or closed door.
So a decision has to be made before this part is glued in place.
If you go for an open door you will have to gut away some of the deck and frame 5.
I have decided to have the closed door.
Stage 26.
To fit the super structure sides you first need to sand down the bottom edge to match the slight deck curve.
Because of the sanding to match the deck it has now altered the front cabin roof.
I had to sand down the deck-head curve on C1 to line up with the superstructure sides.
Also the cabin front support (stage 27) had to be lowered.
To do this i just cut off the locating tap and glued it a little lower down also to line up with the superstructure sides.
The slot on C1 was then filled with a small piece of the scrap ply wood.
NOTE.
The cabin front and front side panels (stage 28, 29) will also have to be cut down to fit.
Remove the wood from bottoms of the panels, and remember to chamfer the edges to ensure a good fit.
Keep dry fitting until you are happy with the fit.
Then glue in position.
As you can see in the photos i did not get my angles right but i am sure that a bit of filler will sort that out.
Martin555.
▲
⟩⟩
Rookysailor
Mike Stoney
mturpin013
GaryLC
Seanympth
stevedownunder
Scratchbuilder
Skydive130
RNinMunich
Colin H
T33CNO
MouldBuilder
jbkiwi
redpmg
|
💬 Re: Stage (14) (superstructure)
3 years ago by 🇬🇧 Martin555 (
Fleet Admiral)✧ 152 Views · 2 Likes
Flag
Hi Colin's Grandson.
Thank you for the complement. I have made quite a few models in my time. And this boat kit is going together quite easily and quickly. I don't make my models to go into museums they are made to be used. So they might be a bit rough in places LOL!! This build will slow down when i get to doing the more interesting bits. I am glad you are enjoying this log and hope you keep following. Colin, Yes she is starting to look like something. Martim555. ▲
⟩⟩
Scratchbuilder
Colin H
|
|
Login To
Remove Ads 💬 Re: Stage (14) (superstructure)
3 years ago by 🇬🇧 Colin H (
Fleet Admiral)✧ 152 Views · 1 Like
Flag
Martin you are really cruising with your build, my grandson says you must be a good modeller to do it so fast.
He also thinks it looks like the water taxi he saw on the school trip to London. Back to me now, I like how you are progressing and the shape is bringing it to life. Keep it up shipmate, cheers Colin. ▲
⟩⟩
Martin555
|
|
💬 Re: Stage (14) (superstructure)
3 years ago by 🇬🇧 Martin555 (
Fleet Admiral)✧ 152 Views · 0 Likes
Flag
Hi Peter,
This kit goes together quite easily, there are a few issues but nothing major. I think a novice will be able to do this kit but a little experience will greatly help. Martin555. ▲
⟩⟩
No likes yet
This member will receive 1 point for every like received |
|
💬 Re: Stage (14) (superstructure)
3 years ago by 🇬🇧 Martin555 (
Fleet Admiral)✧ 152 Views · 0 Likes
Flag
Hi Rick,
At the moment i am struggling with this wood. The amount of dust generated by a little bit of sanding. Martin555. ▲
⟩⟩
No likes yet
This member will receive 1 point for every like received |
|
💬 Re: Stage (14) (superstructure)
3 years ago by 🇭🇺 MouldBuilder (
Vice Admiral)✧ 157 Views · 1 Like
Flag
Are you going for the record Martin. You really have done well. You are getting close to my speed now. Well, maybe a little quicker.😬
▲
⟩⟩
Martin555
|
|
💬 Re: Stage (14) (superstructure)
3 years ago by 🇳🇿 jbkiwi (
Fleet Admiral)✧ 152 Views · 1 Like
Flag
Starting to look like a boat now Martin. I think this will look quite nice. I like the shape of the coamings.
JB ▲
⟩⟩
Martin555
|
|
💬 Re: Stage (14) (superstructure)
3 years ago by 🇿🇦 redpmg (
Commodore)✧ 152 Views · 1 Like
Flag
Good to see Martin - Keep it up.
▲
⟩⟩
Martin555
|
|
💬 Re: Stage (14) (superstructure)
3 years ago by 🇨🇦 Newby7 (
Fleet Admiral)✧ 152 Views · 2 Likes
Flag
Coming nicely Martin. Just an observation but I get the feeling your enjoying this write up and build. I DON'T LIKE WORKING WITH WOOD. LOL
Rick ▲
⟩⟩
Martin555
jbkiwi
|
📝 Back on the Hull
3 years ago by 🇬🇧 Martin555 ( Fleet Admiral)
Fleet Admiral)✧ 155 Views · 12 Likes · 16 Comments
Flag
💬 Add Comment
Hi Guys,
I taped up the aft well deck and fitted it in place just to see what room was available just incase i decided to move the rudder servo.
After some thought i decided to leave it were it was as in the instruction booklet (stage 5, 6.)
The instructions do not tell you when to fit the rudder and rudder servo.
you will have to fit them before the deck is glued on.
Unfortunately when the deck is glued on (stage 10) you will be unable to do any maintaining at a later date should anything go wrong with the rudder/servo/linkage.
So the best answer was to cut a hatch to enable maintenance.
I hope to hide this hatch later.
This was done before fitting the deck.
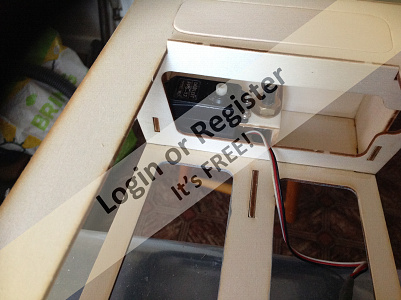
I then temporally fitted the rudder servo and rudder only using the hatch and the opening inside the hull, so i now know that i can do any maintenance in this area when required.
A screwdriver with a Magnet attached helped when screwing down the servo screws.
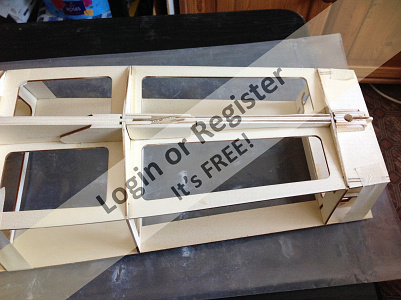
Now with the deck glued on i though it best to give it a coat of paint in all the areas that i will not be able to reach when the bottom and side skins are put on.
I will chamfer the hull prior to fitting the skins.
Soaked the bow ends of the bottom skins for a couple of minutes and temporally clamped them to the hull until they are dry as it makes it easer to fit them without having to much strain on them. (I hope).
Martin555.


I taped up the aft well deck and fitted it in place just to see what room was available just incase i decided to move the rudder servo.
After some thought i decided to leave it were it was as in the instruction booklet (stage 5, 6.)
The instructions do not tell you when to fit the rudder and rudder servo.
you will have to fit them before the deck is glued on.
Unfortunately when the deck is glued on (stage 10) you will be unable to do any maintaining at a later date should anything go wrong with the rudder/servo/linkage.
So the best answer was to cut a hatch to enable maintenance.
I hope to hide this hatch later.
This was done before fitting the deck.
I then temporally fitted the rudder servo and rudder only using the hatch and the opening inside the hull, so i now know that i can do any maintenance in this area when required.
A screwdriver with a Magnet attached helped when screwing down the servo screws.
Now with the deck glued on i though it best to give it a coat of paint in all the areas that i will not be able to reach when the bottom and side skins are put on.
I will chamfer the hull prior to fitting the skins.
Soaked the bow ends of the bottom skins for a couple of minutes and temporally clamped them to the hull until they are dry as it makes it easer to fit them without having to much strain on them. (I hope).
Martin555.
▲
⟩⟩
Mike Stoney
jbkiwi
MouldBuilder
stevedownunder
Rookysailor
AustinG
Skydive130
Scratchbuilder
mturpin013
RNinMunich
mistyoptic
Colin H
|
💬 Re: Back on the Hull
3 years ago by 🇬🇧 mistyoptic (
Midshipman)✧ 156 Views · 1 Like
Flag
Can highly recommend the HA kits Nerys.
Geoff ▲
⟩⟩
Martin555
|
|
Login To
Remove Ads 💬 Re: Back on the Hull
3 years ago by 🇬🇧 Martin555 (
Fleet Admiral)✧ 154 Views · 0 Likes
Flag
Thanks Rick,
Hopefully you will not see it when i have finished. Martin555. ▲
⟩⟩
No likes yet
This member will receive 1 point for every like received |
|
💬 Re: Back on the Hull
3 years ago by 🇬🇧 Martin555 (
Fleet Admiral)✧ 154 Views · 1 Like
Flag
Sounds good to me Nerys.
If you need any help just ask. I doubt that you will need to though. Martin555. ▲
⟩⟩
Nerys
|
|
💬 Re: Back on the Hull
3 years ago by 🇨🇦 Newby7 (
Fleet Admiral)✧ 154 Views · 1 Like
Flag
Hi Martin the boat is coming nicely and the hatch looks like it is part of the design.
Rick ▲
⟩⟩
Martin555
|
|
💬 Re: Back on the Hull
3 years ago by 🇬🇧 Nerys (
Fleet Admiral)✧ 155 Views · 2 Likes
Flag
Hi Martin, It's several years since I built from a kit, but as you know, I'm happier working in wood and reading the write up about the kit thought that it would not tax the Nerysian grey matter too much. Another thing is that space to carry boats in the camper van is a bit limited and I thought that something about this size would pack away somewhere. So, methinks I might place this on order before too long.
Cheers, Nerys ▲
⟩⟩
Martin555
Colin H
|
|
💬 Re: Back on the Hull
3 years ago by 🇬🇧 Martin555 (
Fleet Admiral)✧ 154 Views · 1 Like
Flag
Hi Nerys,
There are a few small issues with this kit but nothing drastic i am trying to mention them as i go along. This is the first kit i have made in a very very long time and it is going together rather well. It is to early to say that i am enjoying the build as working with wood is different for me. But i am sure that with your skills you will enjoy build this model for a change, and as you say it may give you your 'MOJO' back. Martin555. ▲
⟩⟩
Nerys
|
|
💬 Re: Back on the Hull
3 years ago by 🇬🇧 Nerys (
Fleet Admiral)✧ 155 Views · 3 Likes
Flag
I'm still struggling to get out of the lethargic pit that I have been in for ages as regards finishing my current barge project. Towards this end I have looked at a lot of kits and in particular HAkits offerings and I am tempted to buy this same one as you in the hopes it would raise my enthusiasm and get me back in to a boat building mind set. I think perhaps I've been on the barge too long and this, being something completely out of my usual type of boat might stir the old stumps.
Cheers, Nerys ▲
⟩⟩
Martin555
Colin H
RNinMunich
|
|
💬 Re: Back on the Hull
3 years ago by 🇬🇧 Martin555 (
Fleet Admiral)✧ 154 Views · 1 Like
Flag
Thank you Nerys,
I am like you i am not a great believer in not being able to repair/replace things, especially in these days of throw away and get new instead. Martin555. ▲
⟩⟩
Nerys
|
|
💬 Re: Back on the Hull
3 years ago by 🇬🇧 Colin H (
Fleet Admiral)✧ 154 Views · 2 Likes
Flag
Instructions are only there to assist with the general build and I always treat as a basic guide, as there is always the personal touch to suit our own needs.
Cheers Colin. ▲
⟩⟩
Martin555
RNinMunich
|
|
💬 Re: Back on the Hull
3 years ago by 🇬🇧 Nerys (
Fleet Admiral)✧ 155 Views · 3 Likes
Flag
Martin, I agree with Colin about having removable hatches enabling access to any working 'bits'.My LST according to Deans covered up the motors, shafts and much else, but I fitted removable panels everywhere as my trust in anything mechanical is very small.
Cheers, Nerys ▲
⟩⟩
RNinMunich
Martin555
Colin H
|
|
💬 Re: Back on the Hull
3 years ago by 🇬🇧 Martin555 (
Fleet Admiral)✧ 155 Views · 1 Like
Flag
Thank's Bill.
I am trying to stick to the instruction booklet but as i have ideas of what i want it to look like i will have to do bits then assemble as the instructions. If that makes sense. Martin555. ▲
⟩⟩
Colin H
|
|
Login To
Remove Ads 💬 Re: Back on the Hull
3 years ago by 🇬🇧 Scratchbuilder (
Vice Admiral)✧ 159 Views · 1 Like
Flag
Hi Martin.
Well you are certainly going full steam ahead on this build and all is looking good. It’s always good also to bend the rules and plans to suit individual needs,ie the servo fitting. Keep it up. Regards Bill. ▲
⟩⟩
Martin555
|
|
💬 Re: Back on the Hull
3 years ago by 🇬🇧 Martin555 (
Fleet Admiral)✧ 155 Views · 3 Likes
Flag
Hi Geoff.
Thank's The only reason i am using that servo is it is the only one i have to test this out with. I am still unsure about working with wood it is a lot messier than my usual medium, not only that but if i continue to use wood my wife will stop getting me the ice-cream tubs and as you know i am quite partial to a bit of ice-cream LOL!! Martin555. ▲
⟩⟩
mistyoptic
Colin H
RNinMunich
|
|
💬 Re: Back on the Hull
3 years ago by 🇬🇧 mistyoptic (
Midshipman)✧ 157 Views · 2 Likes
Flag
Martin, I am glad to see the legend of the Digifleet servo on your rudder. I bought a Digifleet set in 1982 for sailing yachts at Woodbridge. Two or three other members bought similar sets at the same time. Almost to a day the batteries failed in each set after ten years.
Glad to see the progress you are making and it all looks good, wood is a wonderful medium isn't it.! Best regards Geoff. ▲
⟩⟩
Colin H
Martin555
|
|
💬 Re: Back on the Hull
3 years ago by 🇬🇧 Martin555 (
Fleet Admiral)✧ 155 Views · 0 Likes
Flag
Thanks Colin.
I do have a few ideas buzzing around in my head. Martin555. ▲
⟩⟩
No likes yet
This member will receive 1 point for every like received |
|
💬 Re: Back on the Hull
3 years ago by 🇬🇧 Colin H (
Fleet Admiral)✧ 155 Views · 1 Like
Flag
Martin, that's a very sensible solution to the issue of access. If you make a removable hatch cover it could enhance the look as well.
Cheers Colin. ▲
⟩⟩
RNinMunich
|
📝 Hull Continued ( skinning up )
3 years ago by 🇬🇧 Martin555 ( Fleet Admiral)
Fleet Admiral)✧ 153 Views · 13 Likes · 27 Comments
Flag
💬 Add Comment
Hi Guys,
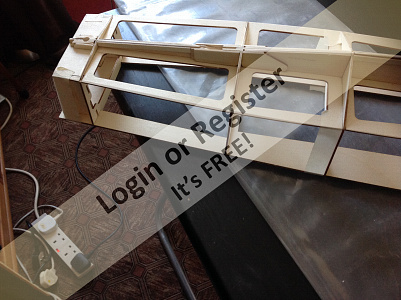
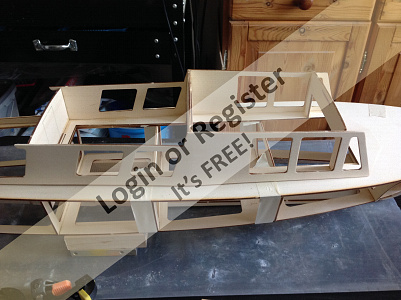
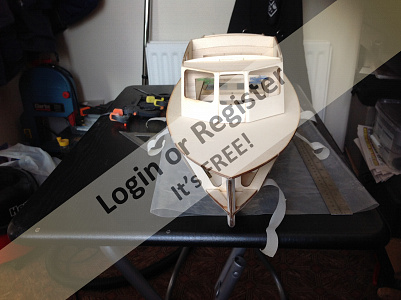
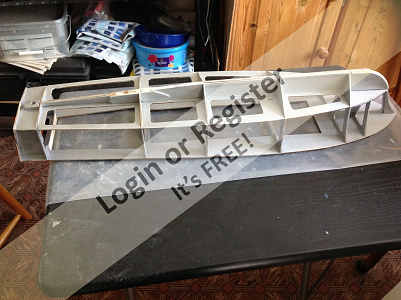
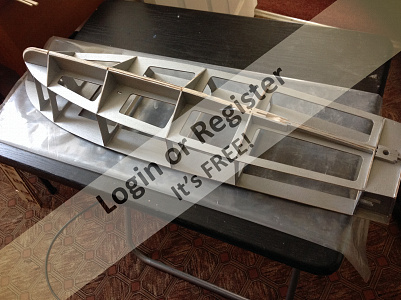
The bottom hull skins went on reasonably well. with little trouble (stage 18, 19)
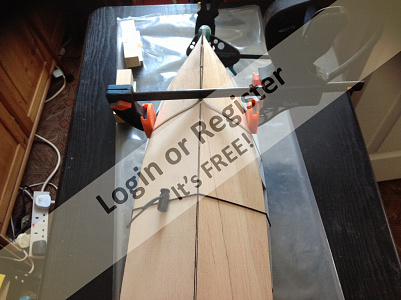
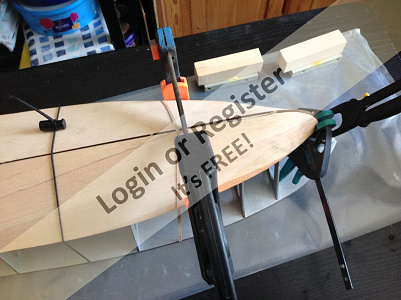
But i did struggle with the side skins. (Stage 20, 21)
At the bow i had to use 4 wood screws to hold everything in place until the glue dries.
When i remove the screws i will plug the holes with dowels or cocktail sticks sand them back and you will never know.
It is not perfect.
Made a few mistakes as you can see in photos (4, 5 ) but they can easily be sorted out with a bit of filler and then the spray rails.
I think i struggled more than most as i have not done much with wood before, and it will definitely be challenging for a novice model makers.
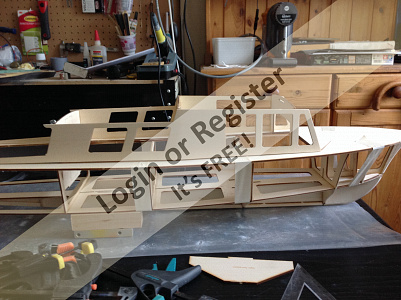
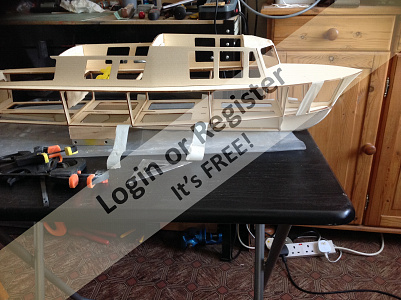
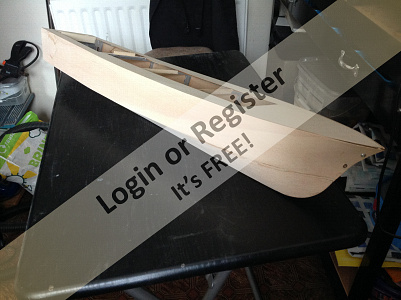
With the exception of fitting the cabin roof (deck head) Spray rails and rubbing strake that is most of the main building done.
I have not made the engine boxes (stage 36 - 39 ) at the moment as i am not sure if i am going to use them yet.
The rest of the stages (40 - 43 ) are just little detail pieces.
So now i can look forward to the more interesting parts of the build.
I think my next job should be to make a stand for it.
If i can find something to make it out of LOL!!
Then i think fitting the prop shaft and motor mount.
Martin555.
The bottom hull skins went on reasonably well. with little trouble (stage 18, 19)
But i did struggle with the side skins. (Stage 20, 21)
At the bow i had to use 4 wood screws to hold everything in place until the glue dries.
When i remove the screws i will plug the holes with dowels or cocktail sticks sand them back and you will never know.
It is not perfect.
Made a few mistakes as you can see in photos (4, 5 ) but they can easily be sorted out with a bit of filler and then the spray rails.
I think i struggled more than most as i have not done much with wood before, and it will definitely be challenging for a novice model makers.
With the exception of fitting the cabin roof (deck head) Spray rails and rubbing strake that is most of the main building done.
I have not made the engine boxes (stage 36 - 39 ) at the moment as i am not sure if i am going to use them yet.
The rest of the stages (40 - 43 ) are just little detail pieces.
So now i can look forward to the more interesting parts of the build.
I think my next job should be to make a stand for it.
If i can find something to make it out of LOL!!
Then i think fitting the prop shaft and motor mount.
Martin555.
▲
⟩⟩
Mike Stoney
mturpin013
jbkiwi
figtree7nts
redpmg
Brucep
Colin H
T33CNO
Nerys
Rookysailor
MouldBuilder
stevedownunder
Scratchbuilder
|
💬 Re: Hull Continued ( skinning up )
3 years ago by 🇬🇧 Martin555 (
Fleet Admiral)✧ 151 Views · 0 Likes
Flag
Excellent Robert,
I will be following your build. And if you need any help i am sure that other members and myself will do our best to help you. Martin555. ▲
⟩⟩
No likes yet
This member will receive 1 point for every like received |
|
Login To
Remove Ads 💬 Re: Hull Continued ( skinning up )
3 years ago by 🇬🇧 Robertcooper (
 Chief Petty Officer 1st Class) Chief Petty Officer 1st Class)✧ 150 Views · 1 Like
Flag
Hi Martin
Yes I will do that as this will be my first build as I am a novice in building.👍 ▲
⟩⟩
Martin555
|
|
💬 Re: Hull Continued ( skinning up )
3 years ago by 🇬🇧 Martin555 (
Fleet Admiral)✧ 151 Views · 0 Likes
Flag
Excellent Robert.
Maybe you can start your build log with a kit contents review. Martin555. ▲
⟩⟩
No likes yet
This member will receive 1 point for every like received |
|
💬 Re: Hull Continued ( skinning up )
3 years ago by 🇬🇧 Robertcooper (
Chief Petty Officer 1st Class)✧ 150 Views · 1 Like
Flag
Hi Martin
I will checked everything out today and see what materials is exactly in the box.👍 ▲
⟩⟩
Martin555
|
|
💬 Re: Hull Continued ( skinning up )
3 years ago by 🇬🇧 Martin555 (
Fleet Admiral)✧ 151 Views · 0 Likes
Flag
Hi Peter,
Thank you. RE :- Have you got a “here is one I made earlier” hull under the work bench? I remember Blue Peter. If i had one under the bench i would not bother making this one LOL!! Martin555. ▲
⟩⟩
No likes yet
This member will receive 1 point for every like received |
|
💬 Re: Hull Continued ( skinning up )
3 years ago by 🇬🇧 Martin555 (
Fleet Admiral)✧ 150 Views · 1 Like
Flag
Hi Robert,
If you start your build log telling us what you are going to build and and the materials the kit consists of we will be able to help you better, as there are different glues for different materials and situations. Also other members will be able to tell you what glues they use. Martin555. ▲
⟩⟩
Colin H
|
|
💬 Re: Hull Continued ( skinning up )
3 years ago by 🇬🇧 Martin555 (
Fleet Admiral)✧ 150 Views · 0 Likes
Flag
Thanks Mike.
I will try my best but my model making skills are nowhere near your standards. Martin555. ▲
⟩⟩
No likes yet
This member will receive 1 point for every like received |
|
💬 Re: Hull Continued ( skinning up )
3 years ago by 🇭🇺 MouldBuilder (
Vice Admiral)✧ 155 Views · 1 Like
Flag
Looking good Martin.
When I made my first wooden hull for the PTB some 35 or 40 years ago, it took me five years to reach this point. Have you got a “here is one I made earlier” hull under the work bench? I remember Blue Peter. 👍👍👍😁 ▲
⟩⟩
Martin555
|
|
💬 Re: Hull Continued ( skinning up )
3 years ago by 🇬🇧 Robertcooper (
Chief Petty Officer 1st Class)✧ 150 Views · 1 Like
Flag
Hi martin555
I am going to start my kit next week what glue would you suggest lease. ▲
⟩⟩
Martin555
|
|
💬 Re: Hull Continued ( skinning up )
3 years ago by 🇬🇧 mturpin013 (
Admiral)✧ 154 Views · 1 Like
Flag
Martin that's looking really good keep up the good work
▲
⟩⟩
Martin555
|
|
💬 Re: Hull Continued ( skinning up )
3 years ago by 🇬🇧 Martin555 (
Fleet Admiral)✧ 151 Views · 0 Likes
Flag
Hi Jb,
I am doing the same as you do so it must be Hay fever. Martin555. ▲
⟩⟩
No likes yet
This member will receive 1 point for every like received |
|
Login To
Remove Ads 💬 Re: Hull Continued ( skinning up )
3 years ago by 🇳🇿 jbkiwi (
Fleet Admiral)✧ 152 Views · 1 Like
Flag
Hi Martin, wood dust (especially balsa dust) can be irritating. Balsa dust from sanding is very light and very small particles seem to just hang in the air. I use a vacuum with the nozzle mounted right next to where I'm sanding to suck the small stuff up,- keeps a lot of it down. Probably not too great if you have hay fever, so a good fitting dust mask would certainly be an idea also. Any big balsa sanding I do outside, standing to windward😁
JB ▲
⟩⟩
Martin555
|
|
💬 Re: Hull Continued ( skinning up )
3 years ago by 🇬🇧 Martin555 (
Fleet Admiral)✧ 153 Views · 1 Like
Flag
Thanks Jb,
Since i started this wooden boat i have had very bad hay fever symptoms. It could be a coincidence. However it has been raining here so i would think that the pollen would be very low and i should not be suffering. Maybe i should wear a mast every time i go in my workshop LOL!!!. Martin555. ▲
⟩⟩
jbkiwi
|
|
💬 Re: Hull Continued ( skinning up )
3 years ago by 🇳🇿 jbkiwi (
Fleet Admiral)✧ 152 Views · 1 Like
Flag
Going well Martin, you're really getting into the 'wood work' by the looks of it. I keep expecting to see a piece of plastic reinforcing suddenly appear somewhere. 😁 The plastics withdrawal symptoms must be terrible😂
JB ▲
⟩⟩
Martin555
|
|
💬 Re: Hull Continued ( skinning up )
3 years ago by 🇬🇧 Martin555 (
Fleet Admiral)✧ 153 Views · 0 Likes
Flag
Thank's Ed,
It is coming along. At the moment it keeps sliding of the bench i need to make the stand for it. Martin555. ▲
⟩⟩
No likes yet
This member will receive 1 point for every like received |
|
💬 Re: Hull Continued ( skinning up )
3 years ago by 🇬🇧 Martin555 (
Fleet Admiral)✧ 153 Views · 0 Likes
Flag
Thanks Red,
i have managed to find something that will do the job. Good idea though. Thanks. Martin555. ▲
⟩⟩
No likes yet
This member will receive 1 point for every like received |
|
💬 Re: Hull Continued ( skinning up )
3 years ago by 🇺🇸 figtree7nts (
Admiral)✧ 156 Views · 2 Likes
Flag
Hi Martin,
Your model is coming out great! It looks fantastic! Some day! I too would like to make a wooden model as well! Job well done....... Cheers, Ed ▲
⟩⟩
MouldBuilder
Martin555
|
|
💬 Re: Hull Continued ( skinning up )
3 years ago by 🇿🇦 redpmg (
Commodore)✧ 152 Views · 2 Likes
Flag
Martin as its summer you could nick a bit of pipe lagging plus rods from an old broom to make a comfy stand.
Also check the builders skips in your area - found a lot of scrap timber that way in Bournemouth - some of it made good planking timber after running it through my old Black & Decker saw mounted in a workbench. Who knows you may even find scrap foam pipe lagging...... Its a very good build for someone who hates working in wood............. ▲
⟩⟩
Martin555
Colin H
|
|
💬 Re: Hull Continued ( skinning up )
3 years ago by 🇬🇧 Colin H (
Fleet Admiral)✧ 153 Views · 1 Like
Flag
I agree Martin, it makes life very difficult when I am restoring old models.
Cheers Colin. ▲
⟩⟩
Martin555
|
|
💬 Re: Hull Continued ( skinning up )
3 years ago by 🇬🇧 Martin555 (
Fleet Admiral)✧ 153 Views · 0 Likes
Flag
Thanks Cash,
I hate the idea of not being able to get at things to repair/replace them. Martin555. ▲
⟩⟩
No likes yet
This member will receive 1 point for every like received |
|
💬 Re: Hull Continued ( skinning up )
3 years ago by 🇬🇧 Martin555 (
Fleet Admiral)✧ 153 Views · 0 Likes
Flag
Thanks for the complement Nerys.
I am glad this bit is over. Hopefully it should get easer now. Martin555. ▲
⟩⟩
No likes yet
This member will receive 1 point for every like received |
|
Login To
Remove Ads 💬 Re: Hull Continued ( skinning up )
3 years ago by 🇺🇸 Cashrc (
Vice Admiral)✧ 153 Views · 1 Like
Flag
Martin, you are doing a grand job on this kit, you have a good eye. And kudos for building a maintenance hatch, that’s a smart move. Keep up the good work!!
Cash ▲
⟩⟩
Martin555
|
|
💬 Re: Hull Continued ( skinning up )
3 years ago by 🇬🇧 Nerys (
Fleet Admiral)✧ 154 Views · 1 Like
Flag
Looks as if you are making a good job of this boat Martin, would never know you are not an experienced woodworker. Carry on with the good work.
Cheers, Nerys ▲
⟩⟩
Martin555
|
|
💬 Re: Hull Continued ( skinning up )
3 years ago by 🇬🇧 Martin555 (
Fleet Admiral)✧ 153 Views · 1 Like
Flag
Bill,
I cannot lie a few choice words did slip out. Martin555. ▲
⟩⟩
RNinMunich
|
|
💬 Re: Hull Continued ( skinning up )
3 years ago by 🇬🇧 Scratchbuilder (
Vice Admiral)✧ 156 Views · 2 Likes
Flag
Well done again Martin.
Amazing what trials and tribulations can be overcome along with a few choice words at times 🤐 Keep it coming. Regards Bill ▲
⟩⟩
RNinMunich
Martin555
|
|
💬 Re: Hull Continued ( skinning up )
3 years ago by 🇬🇧 Martin555 (
Fleet Admiral)✧ 153 Views · 1 Like
Flag
Thank's Vice Admiral Rick, and congratulations on your promotion.
Martin555. ▲
⟩⟩
Scratchbuilder
|
|
💬 Re: Hull Continued ( skinning up )
3 years ago by 🇨🇦 Newby7 (
Fleet Admiral)✧ 153 Views · 1 Like
Flag
Martin You may not like working in wood but you are doing a great job.
Rick ▲
⟩⟩
Martin555
|
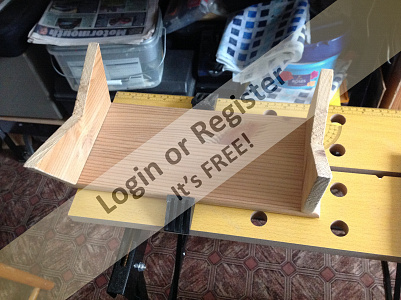
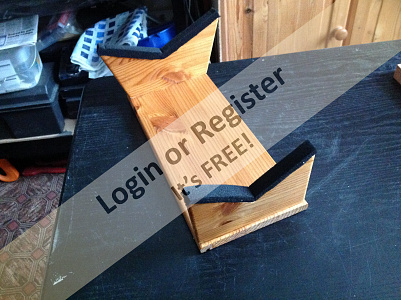
📝 The Stand
3 years ago by 🇬🇧 Martin555 ( Fleet Admiral)
Fleet Admiral)✧ 160 Views · 8 Likes · 6 Comments
Flag
💬 Add Comment
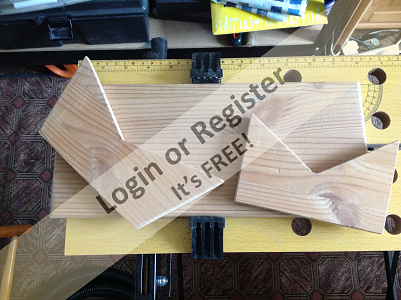
Hi Guys.
The stand is made from some old Draw backs that a neighbour had thrown out.
It is nothing fancy but it will stop the boat falling allover the place whilst i work on it.
Gave it a quick coat of yacht varnish to make it look a little better.
Fitted a strip of black foam to each upright just to stop the hull getting damaged.
Martin555.
▲
⟩⟩
MouldBuilder
redpmg
RNinMunich
jbkiwi
Skydive130
jacko
Colin H
T33CNO
|
💬 Re: The Stand
3 years ago by 🇳🇿 jbkiwi (
Fleet Admiral)✧ 152 Views · 1 Like
Flag
Looks like your old wingsuit Doug😁
JB ▲
⟩⟩
Martin555
|
|
Login To
Remove Ads 💬 Re: The Stand
3 years ago by 🇩🇪 RNinMunich (
Fleet Admiral)✧ 157 Views · 1 Like
Flag
Amazing what one can make out of old drawers (😮) Martin
😁😂😎 
▲
⟩⟩
Martin555
|
|
💬 Re: The Stand
3 years ago by 🇬🇧 Martin555 (
Fleet Admiral)✧ 156 Views · 1 Like
Flag
Hi Jb,
I am sure your stand will look much better. I should if given more thought it should of been wider so that i could attach carrying straps. I will have to modify it so that it looks deliberate LOL!! Martin555. ▲
⟩⟩
jbkiwi
|
|
💬 Re: The Stand
3 years ago by 🇳🇿 jbkiwi (
Fleet Admiral)✧ 155 Views · 1 Like
Flag
Nice bit of recycling Martin, looks good - AND it's WOOD!👍. You've got me going now-must get my a into g and make one for the runabout, as it's like trying to hold onto an eel,- curves everywhere!😁 (maybe tonight).
JB ▲
⟩⟩
Martin555
|
|
💬 Re: The Stand
3 years ago by 🇬🇧 Martin555 (
Fleet Admiral)✧ 156 Views · 0 Likes
Flag
Thank's Rick,
I was not being fussy i Just wanted something to do the job. Martin555. ▲
⟩⟩
No likes yet
This member will receive 1 point for every like received |
|
💬 Re: The Stand
3 years ago by 🇨🇦 Newby7 (
Fleet Admiral)✧ 159 Views · 1 Like
Flag
Martin the stand and boat look great coming nicely.
Rick ▲
⟩⟩
Martin555
|
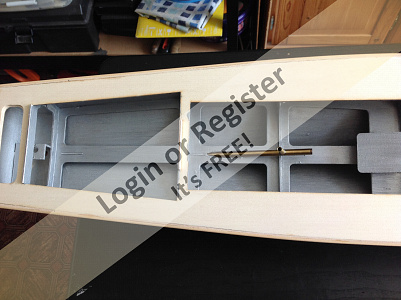
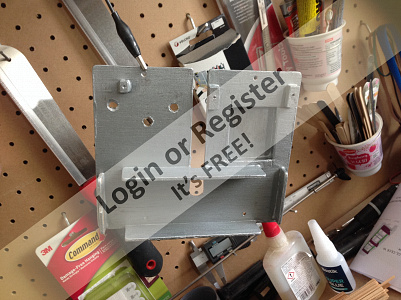
📝 Hull Continued (Mounts)
3 years ago by 🇬🇧 Martin555 ( Fleet Admiral)
Fleet Admiral)✧ 156 Views · 10 Likes · 15 Comments
Flag
💬 Add Comment
Hi Guys,
Glued on the rubbing strake’s and spray rails
Fitted the prop shaft.
Although a motor mount is supplied in three bits of ply in the kit I used some scrap kit ply wood to make a new Motor mount to make sure that the alignment of motor and prop shaft was correct.
I will do the Final tweaking latter.
Also made a removable tray to hold the battery, receiver, ESC and a couple of other little bits.
I wish i had drilled some holes in some of the frame bottoms before i put the skins on then i could of hidden the wires better.
Gave the inside of the hull a quick coat of paint.
Now i will be jumping about on this build as the main assembly has been done.
Martin555.
▲
⟩⟩
Mike Stoney
MouldBuilder
T33CNO
redpmg
RNinMunich
stevedownunder
Colin H
Skydive130
jbkiwi
Robertcooper
|
💬 Re: Hull Continued (Mounts)
3 years ago by 🇬🇧 Nerys (
Fleet Admiral)✧ 154 Views · 2 Likes
Flag
True Doug, but you couldn't expect everything, he or she left us to make those things if we wanted them, but did give us water to float our boats on, where would we have sailed them if he or she hadn't done that?
Cheers, Nerys ▲
⟩⟩
Rookysailor
Martin555
|
|
Login To
Remove Ads 💬 Re: Hull Continued (Mounts)
3 years ago by 🇬🇧 Martin555 (
Fleet Admiral)✧ 154 Views · 0 Likes
Flag
Thank's Red.
I do were a dust mask when sanding, it just strikes me that working with wood is quite messy. My little workshop has never been vacuum cleaned so many times in a day LOL! The bad news is my wife now knows that i know how to use the vacuum cleaner. LOL!! Martin555. ▲
⟩⟩
No likes yet
This member will receive 1 point for every like received |
|
💬 Re: Hull Continued (Mounts)
3 years ago by 🇿🇦 redpmg (
Commodore)✧ 155 Views · 1 Like
Flag
Martin its coming along nicely now - you should rightly wear a dust mask when sanding - wood dust is bad for your health as are most dusts - plastic and its solvents are also bad for you..........
Did you mean "Plastic Bottles" JB ? Awful things - mostly ugly and un-seaworthy long term pollutants - the whole worlds having problems disposing of old fibreglass boats as it is.......... ▲
⟩⟩
Martin555
|
|
💬 Re: Hull Continued (Mounts)
3 years ago by 🇳🇿 jbkiwi (
Fleet Admiral)✧ 154 Views · 1 Like
Flag
Don't forget boats with glass bottoms, not to mention the thousands of tons of plastic fantastics floating all round the world. Just thought of cotton covered kayaks as well.
JB ▲
⟩⟩
Martin555
|
|
💬 Re: Hull Continued (Mounts)
3 years ago by 🇩🇪 RNinMunich (
Fleet Admiral)✧ 159 Views · 2 Likes
Flag
"if the Deity had intended us to build plastic boats he would have had plastic trees."
And if he'd meant for us to trundle round the countryside, or fly around the world, he might have fitted us with wheels and/or wings Nerys 😁😂 😎 ▲
⟩⟩
Martin555
Rookysailor
|
|
💬 Re: Hull Continued (Mounts)
3 years ago by 🇩🇪 RNinMunich (
Fleet Admiral)✧ 159 Views · 2 Likes
Flag
Hi Bruce,
The fuse /connector board is from Action Electronics, sold by Component Shop. 'Fuse Indicator Board' type P95. The holder is for standard auto type blade fuses, or resettable circuit breakers. 
▲
⟩⟩
Martin555
Colin H
|

|
💬 Re: Hull Continued (Mounts)
3 years ago by 🇬🇧 Nerys (
Fleet Admiral)✧ 154 Views · 3 Likes
Flag
Colin, re- rubber trees, well, they did make rubber dinghies!
Nerys ▲
⟩⟩
jbkiwi
Martin555
Colin H
|
|
💬 Re: Hull Continued (Mounts)
3 years ago by 🇬🇧 Colin H (
Fleet Admiral)✧ 155 Views · 3 Likes
Flag
Nerys, maybe there are plastic trees somewhere, as they have discovered Rubber trees .
Cheers Colin. ▲
⟩⟩
jbkiwi
RNinMunich
Martin555
|
|
💬 Re: Hull Continued (Mounts)
3 years ago by 🇬🇧 Martin555 (
Fleet Admiral)✧ 156 Views · 0 Likes
Flag
Hi Bruce,
Sorry but it is something i had lying around in a draw. there are lots of different Maxiblade fuse terminal available. I am sure other members might be able to help with identifying it and where you could get them from. I will have a quick look around on the web to se if i can find them. Martin555. ▲
⟩⟩
No likes yet
This member will receive 1 point for every like received |
|
💬 Re: Hull Continued (Mounts)
3 years ago by 🇬🇧 Martin555 (
Fleet Admiral)✧ 156 Views · 1 Like
Flag
Thank you guys,
It is slowly coming together. Nerys, I maybe doing it wrong but it seem to me that it is very dusty working with wood. Even my Henry Vacuum Cleaner is asking for a pay rise LOL!! RE :- Is there any possibility you will give up on that plastic stuff. Now that is a tricky one and to early to say. Also i have seen plastic grass and flower and believe it or not even plastic trees.LOL!! Martin555. ▲
⟩⟩
jbkiwi
|
|
💬 Re: Hull Continued (Mounts)
3 years ago by 🇬🇧 Brucep (
 Petty Officer 1st Class) Petty Officer 1st Class)✧ 161 Views · 1 Like
Flag
That looks a very tidy installation. Can you tell me where you get the fused connectors from, please?
▲
⟩⟩
Martin555
|
|
Login To
Remove Ads 💬 Re: Hull Continued (Mounts)
3 years ago by 🇨🇦 Newby7 (
Fleet Admiral)✧ 156 Views · 1 Like
Flag
Nice job Martin
Rick ▲
⟩⟩
Martin555
|
|
💬 Re: Hull Continued (Mounts)
3 years ago by 🇬🇧 Nerys (
Fleet Admiral)✧ 156 Views · 4 Likes
Flag
Martin, Are you beginning to realise why we wood devotees like the medium so much? Is there any possibility you will give up on that plastic stuff. After all, if the Deity had intended us to build plastic boats he would have had plastic trees.
Cheers, Nerys ▲
⟩⟩
jbkiwi
RNinMunich
Colin H
Martin555
|
|
💬 Re: Hull Continued (Mounts)
3 years ago by 🇳🇿 jbkiwi (
Fleet Admiral)✧ 155 Views · 2 Likes
Flag
Steady on Martin, we'll be calling you Simon soon😁 It's all that excitement of working with wood that's doing it 😁! Going great guns👍
JB ▲
⟩⟩
RNinMunich
Martin555
|
|
💬 Re: Hull Continued (Mounts)
3 years ago by 🇬🇧 Robertcooper (
Chief Petty Officer 1st Class)✧ 156 Views · 1 Like
Flag
It looks fantastic very well done
Robert👍 ▲
⟩⟩
Martin555
|
📝 The Main Deck.
3 years ago by 🇬🇧 Martin555 ( Fleet Admiral)
Fleet Admiral)✧ 158 Views · 12 Likes · 11 Comments
Flag
💬 Add Comment
Hi Guys.
This part of the build is not in the instructions, in fact most of this build now will be me just having a play.
Believe it or not i have got a plan in my head or at least i did have when i started this.
I have seen some fantastic deck work done by other more skilful members on this site so i have decided that it is something that i will have a go at.
Firstly
Two strips of wood was soaked in water for a couple of minuets then clamped to the ply wood former.
I used the sheet of ply wood that the deck came out of to help form the wood strips that go around the edge of the deck.
The wood i am using is odds and ends that i have collected over the years.
I don’t know what the different woods are called so i will call them light wood or dark wood or even lighter wood and darker wood.
Most of the build was put together using CA glue (superglue)
The wooden deck planks (7 mmx 1mm x 320mm) was glued down with white wood glue (PVA), that allowed time to move and align the wood and plastic strips.
Unfortunately i have been getting withdraw symptoms for not building in plastic, LOL!!
So i cut some plastic (1mm x 0.5mm) white strips from a sheet of A4 to go in-between the planks.
The deck was sanded back and given a few coats of Yacht Varnish.
(The photos were taken prior to rubbing down and varnishing)
Martin555.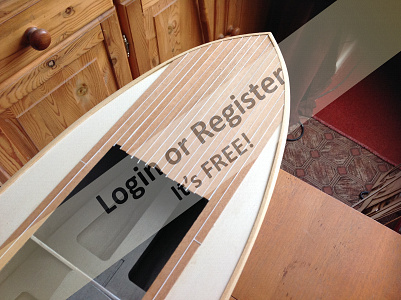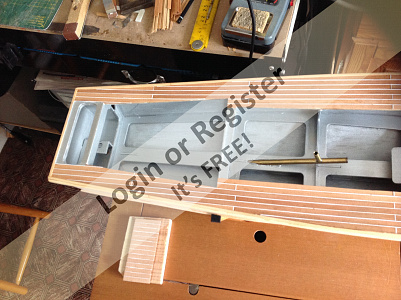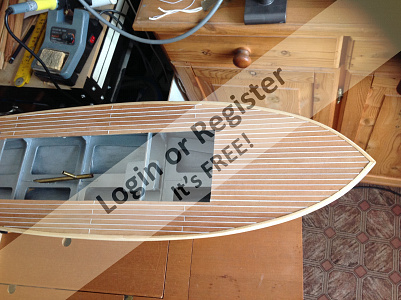
▲
⟩⟩
MouldBuilder
Graham93
redpmg
jbkiwi
Scratchbuilder
Rookysailor
T33CNO
stevedownunder
RNinMunich
Skydive130
Colin H
Newby7
|
💬 Re: The Main Deck.
3 years ago by 🇬🇧 Martin555 (
Fleet Admiral)✧ 158 Views · 0 Likes
Flag
Thank's Jb,
I am sort of getting the hang of it but it is definitely not my favourite material to work with. I would probably benefit by making a few more boats in wood. Martin555. ▲
⟩⟩
No likes yet
This member will receive 1 point for every like received |
|
Login To
Remove Ads 💬 Re: The Main Deck.
3 years ago by 🇳🇿 jbkiwi (
Fleet Admiral)✧ 156 Views · 1 Like
Flag
And you said you were worried about building with wood!, excellent job Martin,- spot on👍
JB ▲
⟩⟩
Martin555
|
|
💬 Re: The Main Deck.
3 years ago by 🇬🇧 Martin555 (
Fleet Admiral)✧ 158 Views · 0 Likes
Flag
Thanks Geoff,
Hopefully if i do another one it will look a little better. As for my friend he won't be getting it if he don't start parting with some cash LOL!! Martin555. ▲
⟩⟩
No likes yet
This member will receive 1 point for every like received |
|
💬 Re: The Main Deck.
3 years ago by 🇬🇧 Martin555 (
Fleet Admiral)✧ 157 Views · 0 Likes
Flag
Thank you Mike,
I am quite pleased with it seeing as it is my first attempt but it is nowhere near your standard of workmanship. Martin555. ▲
⟩⟩
No likes yet
This member will receive 1 point for every like received |
|
💬 Re: The Main Deck.
3 years ago by 🇬🇧 mistyoptic (
Midshipman)✧ 163 Views · 1 Like
Flag
Good job here Martin, some thoughts and inspiration for me on my next build. Looks like your friend could finish up with a super model.
Regards Geoff. ▲
⟩⟩
Martin555
|
|
💬 Re: The Main Deck.
3 years ago by 🇬🇧 mturpin013 (
Admiral)✧ 160 Views · 3 Likes
Flag
Great work Martin, deck planking is really satisfying job, Its one of my favourite parts of a build, yours looks really very professional.
▲
⟩⟩
Martin555
mistyoptic
stevedownunder
|
|
💬 Re: The Main Deck.
3 years ago by 🇬🇧 Martin555 (
Fleet Admiral)✧ 157 Views · 4 Likes
Flag
Thank's for the nice comments guys.
I think i am starting to get the hang of this wood stuff. The funny bit about working with head plans is they get updated regularly LOL!! Another thing is i use metric and imperial measurements depending on the situation, and sometimes it is just two marks on a bit of tape or the thickness of a screwdriver blade LOL!! Dose anyone use the same system ? Nerys, RE :- dare I ask if this is the first of more wooden boats to come. I have always wanted to make the Sea Queen but that will be just be a dream (maybe one day) Another boat i would like to make is a luxury motor yacht. The problem is there are so many boats i would like to make. So in answer to your question Nerys Possibly LOL!! I did manage to slip a little plastic in LOL!! Martin555. ▲
⟩⟩
jbkiwi
T33CNO
stevedownunder
RNinMunich
|
|
💬 Re: The Main Deck.
3 years ago by 🇬🇧 Nerys (
Fleet Admiral)✧ 157 Views · 2 Likes
Flag
As it is clear that you are beginning to like the look of a wooden build and appreciating the beautiful variations in colour given by the many different woods, and, I hope, realising what a wonderful medium it is to work in, dare I ask if this is the first of more wooden boats to come.
cheers, Nerys ▲
⟩⟩
stevedownunder
Martin555
|
|
💬 Re: The Main Deck.
3 years ago by 🇬🇧 Skydive130 (
Rear Admiral)✧ 158 Views · 2 Likes
Flag
Really liking the white caulking between the planks Martin, looking very much like the planking on a Riva type boat. Keep up the excellent work 👍
▲
⟩⟩
stevedownunder
Martin555
|
|
💬 Re: The Main Deck.
3 years ago by 🇬🇧 Colin H (
Fleet Admiral)✧ 158 Views · 3 Likes
Flag
Martin it seems that you have become a master of the wood.
I like head plans, that way nobody can tell you it's wrong. Well done sir, a fine job you are doing. Cheers Colin. ▲
⟩⟩
stevedownunder
RNinMunich
Martin555
|
|
💬 Re: The Main Deck.
3 years ago by 🇨🇦 Newby7 (
Fleet Admiral)✧ 159 Views · 2 Likes
Flag
Martin and his new element.Doing a wonderful job.
Rick ▲
⟩⟩
stevedownunder
Martin555
|


Login To
Remove Ads
Remove Ads