
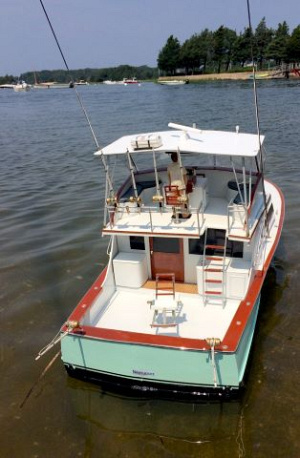
I came across this “mutt”. A 1/19 scale 50 ft Chris Craft Catalina. The original kit was produced by Sterling sometime between 1950 & 1980 when Sterling models were popular & Sterling was still in business. I really enjoy this type of building challenge; replace broken parts, repair less than stellar work, figure out how to get to areas in need of repair, & making it sail at some reasonable level.
Some photos showing “as found”.
[{"id":"17832098764","name":"17832098764.jpeg","caption":"","url":"https:\/\/model-boats.com\/media\/17832098764\/l","thumbUrl":"https:\/\/model-boats.com\/media\/17832098764\/s","isImage":true,"ext":"jpeg"},{"id":"17832098799","name":"17832098799.jpeg","caption":"","url":"https:\/\/model-boats.com\/media\/17832098799\/l","thumbUrl":"https:\/\/model-boats.com\/media\/17832098799\/s","isImage":true,"ext":"jpeg"},{"id":"17832098735","name":"17832098735.jpeg","caption":"","url":"https:\/\/model-boats.com\/media\/17832098735\/l","thumbUrl":"https:\/\/model-boats.com\/media\/17832098735\/s","isImage":true,"ext":"jpeg"}]
I came across this “mutt”. A 1/19 scale 50 ft Chris Craft Catalina. The original kit was produced by Sterling sometime between 1950 & 1980 when Sterling models were popular & Sterling was still in business. I really enjoy this type of building challenge; replace broken parts, repair less than stellar work, figure out how to get to areas in need of repair, & making it sail at some reasonable level.
Some photos showing “as found”.
@zooma Tx Bob. Any photos or in-water of the final results? I am concerned that mine, with its minimal ballast weight is going to be a cork in the water.
Bill
@Chum444 Sorry Bill, this’s is one of the very few restoration projects that I did not keep as it was just too big for me to work on in my small workshop(shed).
Most of the final restoration work was done outside the workshop(shed) on my drive once the boat was rebuilt and completed (on a folding Go-Kart mechanics stand !).
I passed it on to a local enthusiast (member for the Bury Model Boat Club) at a stage where it just needed the radio and some final finishing details, but it was back in one lump and looking good.
My future plans include visiting the Bury Club and hopefully I will be able to see the Corsair on the water and let you know what sort of ballast was needed - I suspect it would need quite a lot!
The first order of business was to give both the inside & outside two coats of flowable epoxy giving particular emphasis to the keel, turn of the bilge, & stern. Filled the hull with water to a bit above the waterline & didn’t see any leaks. Couldn’t put it my test tank since a recent medical procedure restricts use of my left arm. Ballasting trial in that tank coming soon.
I am beginning to think that I’m the second person that began restoration on this model. From the filling job that was done.(in a rather haphazard way) indicates that someone else started the restoration and gave up on it. Apparently many glued in place components such as the windshield, mast, etc were broken off from the underlying balsa.
[{"id":"17832805985","name":"17832805985.jpeg","caption":"After sanding off the filler used by someone else. Many dings, gouges, and scarred areas remain in the balsa\r\n.","url":"https:\/\/model-boats.com\/media\/17832805985\/l","thumbUrl":"https:\/\/model-boats.com\/media\/17832805985\/s","isImage":true,"ext":"jpeg"},{"id":"17832807925","name":"17832807925.jpeg","caption":"More filling and sanding to follow.","url":"https:\/\/model-boats.com\/media\/17832807925\/l","thumbUrl":"https:\/\/model-boats.com\/media\/17832807925\/s","isImage":true,"ext":"jpeg"}]
After sanding off the filler used by someone else. Many dings, gouges, and scarred areas remain in the balsa
.More filling and sanding to follow.
The first order of business was to give both the inside & outside two coats of flowable epoxy giving particular emphasis to the keel, turn of the bilge, & stern. Filled the hull with water to a bit above the waterline & didn’t see any leaks. Couldn’t put it my test tank since a recent medical procedure restricts use of my left arm. Ballasting trial in that tank coming soon.
I am beginning to think that I’m the second person that began restoration on this model. From the filling job that was done.(in a rather haphazard way) indicates that someone else started the restoration and gave up on it. Apparently many glued in place components such as the windshield, mast, etc were broken off from the underlying balsa.
On my Sterling Corvette, I admire the work that the original owner did with the balsa hull skin and what looks like 3/4 oz glass cloth and polyester resin. I wanted this Sterling's hull to be "bullet proof" so I sanded his work and redid the entire hull exterior with 1 1/4 oz glass cloth and West Systems epoxy.
I never had enough epoxy to do the interior properly, so it has been sealed with about six coats of thinned spar urethane .
@gcladd I think there is always a tension between honoring what the original builder accomplished & how far to go with the restoration. I’ve always chosen to respect the original builder, within structural considerations, hull integrity limits, & really poor craftsmanship, so I won’t make this restoration blemish free. Right now it’s looking like the hull was just launched which I will correct since my builds look used as is appropriate for the type of vessel.
I have a newly found respect for the builders of these early balsa models. The softness of the balsa required a delicate touch to create a worthy model.Soft balsa & hard, brittle mahogany. What a contrast in materials.
Well, photos & rather extensive narratives lost when I edited the title.
I have a newly found respect for the builders of these early balsa models. The softness of the balsa required a delicate touch to create a worthy model.Soft balsa & hard, brittle mahogany. What a contrast in materials.
Well, photos & rather extensive narratives lost when I edited the title.
Lost while editing previous post title
[{"id":"17833562197","name":"17833562197.jpeg","caption":"After three iterations of Prime, fill, and sand the fore cabin\u2019s roof looks respectable, but certainly not perfect.","url":"https:\/\/model-boats.com\/media\/17833562197\/l","thumbUrl":"https:\/\/model-boats.com\/media\/17833562197\/s","isImage":true,"ext":"jpeg"},{"id":"17833561907","name":"17833561907.jpeg","caption":"Portions of the cabin side where there were connections to bulkhead, etc. were filled with the same mystery filler. Sanded down and then primed with an undercoat of tan and red paint.\r\nPort window pillar for forward windscreen also missing.","url":"https:\/\/model-boats.com\/media\/17833561907\/l","thumbUrl":"https:\/\/model-boats.com\/media\/17833561907\/s","isImage":true,"ext":"jpeg"},{"id":"17833566653","name":"17833566653.jpeg","caption":"A couple of foredeck planks broken.","url":"https:\/\/model-boats.com\/media\/17833566653\/l","thumbUrl":"https:\/\/model-boats.com\/media\/17833566653\/s","isImage":true,"ext":"jpeg"},{"id":"17833566773","name":"17833566773.jpeg","caption":"Opened up the deck and found no support for the deck planking forward from the last bulkhead to the stem. Cobbled together some structural support for the deck planking.","url":"https:\/\/model-boats.com\/media\/17833566773\/l","thumbUrl":"https:\/\/model-boats.com\/media\/17833566773\/s","isImage":true,"ext":"jpeg"},{"id":"17833567812","name":"17833567812.jpeg","caption":"Repairs completed and close the deck. Didn\u2019t open up the starboard side to brace the planking. Didn\u2019t want to poke the bear.","url":"https:\/\/model-boats.com\/media\/17833567812\/l","thumbUrl":"https:\/\/model-boats.com\/media\/17833567812\/s","isImage":true,"ext":"jpeg"}]
After three iterations of Prime, fill, and sand the fore cabin’s roof looks respectable, but certainly not perfect.Portions of the cabin side where there were connections to bulkhead, etc. were filled with the same mystery filler. Sanded down and then primed with an undercoat of tan and red paint.
Port window pillar for forward windscreen also missing.
A couple of foredeck planks broken.Opened up the deck and found no support for the deck planking forward from the last bulkhead to the stem. Cobbled together some structural support for the deck planking.Repairs completed and close the deck. Didn’t open up the starboard side to brace the planking. Didn’t want to poke the bear.
I decided to give the hull a bit of attention so it doesn’t look quite so bad just sitting there.
[{"id":"17835464061","name":"17835464061.jpeg","caption":"Surprisingly the hull sides are in pretty good shape when compared to the forward cabin. Another person obviously began to redo the hull sides.","url":"https:\/\/model-boats.com\/media\/17835464061\/l","thumbUrl":"https:\/\/model-boats.com\/media\/17835464061\/s","isImage":true,"ext":"jpeg"},{"id":"17835464166","name":"17835464166.jpeg","caption":"A coat of epoxy had been previously applied & was done rather well. I am puzzled though why there were random spots with no coating. Repaired those spots with epoxy, did some filling, primed, sanded, & decided to let well enough alone.","url":"https:\/\/model-boats.com\/media\/17835464166\/l","thumbUrl":"https:\/\/model-boats.com\/media\/17835464166\/s","isImage":true,"ext":"jpeg"},{"id":"17835468926","name":"17835468926.jpeg","caption":"A coat of white & it doesn\u2019t look bad at all.","url":"https:\/\/model-boats.com\/media\/17835468926\/l","thumbUrl":"https:\/\/model-boats.com\/media\/17835468926\/s","isImage":true,"ext":"jpeg"}]
Surprisingly the hull sides are in pretty good shape when compared to the forward cabin. Another person obviously began to redo the hull sides.
A coat of epoxy had been previously applied & was done rather well. I am puzzled though why there were random spots with no coating. Repaired those spots with epoxy, did some filling, primed, sanded, & decided to let well enough alone.A coat of white & it doesn’t look bad at all.
I decided to give the hull a bit of attention so it doesn’t look quite so bad just sitting there.
Things are coming along. First hull wetting is always good to have behind you. Almost no ballast was required to get to where I determined the water line to be. That would have made the boat like a cork ON the water rather than enough weight to get the hull IN the water. I will have to raise the water line a click. Motor, battery, & ballast weigh around 3.5 lbs. I hope it sails okay with so little weight. We shall see.
[{"id":"17838906684","name":"17838906684.jpeg","caption":"3 pc wjdscreens always present a challenge with the deck cambered, angle of the three sections, & slant.","url":"https:\/\/model-boats.com\/media\/17838906684\/l","thumbUrl":"https:\/\/model-boats.com\/media\/17838906684\/s","isImage":true,"ext":"jpeg"},{"id":"17838907025","name":"17838907025.jpeg","caption":"Corrected filling of various connections, undercoated with reddish tan acrylic & applied thin coat of new stain over the mahogany.","url":"https:\/\/model-boats.com\/media\/17838907025\/l","thumbUrl":"https:\/\/model-boats.com\/media\/17838907025\/s","isImage":true,"ext":"jpeg"},{"id":"17838914464","name":"17838914464.jpeg","caption":"Applied anti fouling to the bottom.","url":"https:\/\/model-boats.com\/media\/17838914464\/l","thumbUrl":"https:\/\/model-boats.com\/media\/17838914464\/s","isImage":true,"ext":"jpeg"},{"id":"17838915804","name":"17838915804.jpeg","caption":"Installed shaft log with oiling tube and a rushed motor from parts bin. Test run proved to be without binding or vibration. Support will be added to fwd end of motor.","url":"https:\/\/model-boats.com\/media\/17838915804\/l","thumbUrl":"https:\/\/model-boats.com\/media\/17838915804\/s","isImage":true,"ext":"jpeg"},{"id":"17838912237","name":"17838912237.jpeg","caption":"Into the ballast tank. No leaks after 3 hrs residency.positioned ballast & tack glued in place.","url":"https:\/\/model-boats.com\/media\/17838912237\/l","thumbUrl":"https:\/\/model-boats.com\/media\/17838912237\/s","isImage":true,"ext":"jpeg"}]
3 pc wjdscreens always present a challenge with the deck cambered, angle of the three sections, & slant.Corrected filling of various connections, undercoated with reddish tan acrylic & applied thin coat of new stain over the mahogany.
Applied anti fouling to the bottom.Installed shaft log with oiling tube and a rushed motor from parts bin. Test run proved to be without binding or vibration. Support will be added to fwd end of motor.Into the ballast tank. No leaks after 3 hrs residency.positioned ballast & tack glued in place.
Things are coming along. First hull wetting is always good to have behind you. Almost no ballast was required to get to where I determined the water line to be. That would have made the boat like a cork ON the water rather than enough weight to get the hull IN the water. I will have to raise the water line a click. Motor, battery, & ballast weigh around 3.5 lbs. I hope it sails okay with so little weight. We shall see.
Bill
Most of the final restoration work was done outside the workshop(shed) on my drive once the boat was rebuilt and completed (on a folding Go-Kart mechanics stand !).
I passed it on to a local enthusiast (member for the Bury Model Boat Club) at a stage where it just needed the radio and some final finishing details, but it was back in one lump and looking good.
My future plans include visiting the Bury Club and hopefully I will be able to see the Corsair on the water and let you know what sort of ballast was needed - I suspect it would need quite a lot!
Bob.