
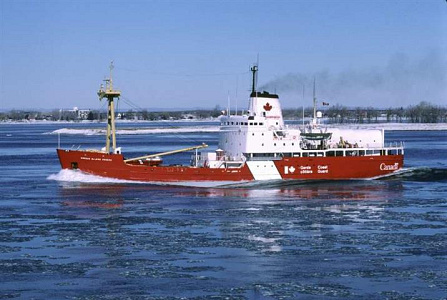
C.C.G.S Norman McLeod Rogers

By Seaspray 46 entries 12 Apr 2021 — 19 Sep 2022
118Likes
151Comments
Chapter 21 / 46

46 chapters · Page 3 of 5

Redone frames

Started doing the frames but using tracing paper as I did firstly, not grease proof paper the good tracing paper from W.H.Smiths
working from and to the LWL line. Originally when I got the plan had it blown up and got the frame section cut out and two copies made plus got them to flip them. At home I cut in down the centre line and joined them. Did a long check to verify that the joint pieces now referred as the " Masters " were exactly the same dimensions as the blown up plan. Spot on. Work to info I received for John I've redone the frames. I believe there just about right but that frame 8 still is annoying me slightly. Third pictures looks like frame 8 is not up to the deck line, it is thats frame 7 slightly kinked underneath.
Liked by Colin H

The Hull

The hull doesn't have a knife edge on it just what looks looks like a lance under the hull to help break the ice see pic 1. On the first keel I cut I didn't include it, The second and third keel I did. Was thinking to remove it and carry on the build but the frame are wrong. Next two picture are Tom Gorman's and the third is his keel/ frames. You can see his frame 8 is slightly down a little from the his keel and there is no lance there. I believe it was fitted later after the hull was plated. I'll think long and hard before I decide to cut the frames as it is getting expensive in wood used for far. The fourth keel is cut out waiting a decision.
Liked by Martin555 and Colin H

C.C.G.S. Norman Mcleod Rogers Icebreaker

Hi Guys,
I'm putting this Ice Breaker project on ice (😁) for a while.
To clear my head and maybe practice on a less complex model.
Don't worry, I ain't gonna bin her!"
Regards to all
Martin (Seaspray)
Liked by RNinMunich and Newby7

C.C.G.S. Norman McLeod Rogers

Before I resume the build a question. Will Eze-Kote
work with Halford's mat tissue on the model ? Because working with Deluxe Materials fibreglass tissue seems to split open easy when worked with. Also with sharpened scissors it always leaves a very jagged edge. Yet the matt
cuts straight. Both have lines where they were folded, matt being the more affected with holes in the fold corner.
This is going to be an awkward hull to fibreglass but I like a challenge
Liked by Colin H and dave976 and

Caldercraft Propshafts

Hi I was wondering what the two (looks like ) bearings with crub screws where used. Is this at the opposite end of the prop from the propeller. Never came across this before.
Liked by stevedownunder and Colin H

Norman McLeod Rogers Icebreaker (restart build)

Previously I had a lot of trouble with the frames. Their height wasn't right with the Keel. This time on the rebuild using a new keel, I made sure the the frames did come up to level with the keel. Starting at the stern up to frame 7. After this frame and having marked on the keel with the angle the other frame height should be. Although I had to pack up frames 8, 9, 91/2 for some reason things worked. But frame 9 needed to be increased in height. I had a little talk with Martin555 and we decided to add more ply to the top and shape it suit. The build... My thanks to John for his advise where to place the stringers before planking. And dave976 for his help with fibre glassing and the many others
Liked by Colin H and jbkiwi

Norman McLeod Rogers Icebreaker

First 3 images are making and using template to get the turn on the stern correct, as it decreases as it goes up to the keel. I took the first template off the deck turn PIC 1 then marked two further points up ( see pencil lines) for the the others. Using the same template as the turn would be the same but smaller. I cut off the two straight edges till I had a good fit. Ply from the templates was used and glued in their places. The areas between the ply was filled with Balsa wood and sanded to shape. Pic 4,5 last piece of planking to complete of the main part of the hull. Pic 6 the Bow was planked separately as the bend too sharp and filled in with filler to making the bend. Pic 7 hull filled and smoothed down many times then a coat of Eze-Kote. I used the filler in Pic 8 found it smoother than P38
Liked by Colin H and jbkiwi

Norman McLeod Rogers Icebreaker

Decided to build the boat's stand, nice strong ply used. Started to rub down the hull as it wasn't as smooth as I thought and gave it another coat of Eze-Kote. Offered up the fibreglass cloth to the model and just had enough length to do the glassing in one go. A thing I didn't think off. Finally got the hull covered and trimmed. The wood wasn't that great as I bought it during lockdown so I blasted it with Halfords primer filler and left it for a couple of weeks to set. Rubbed it down with wet n dry, every so often I would wipe it clean with a tack cloth. Let it dry for a day then repeat the process till I was happy.
Liked by Colin H and jbkiwi

Norman McLeod Rogers Icebreaker

Pic1 This is the way Deluxe Material cloth does if you do not treat it with caution. All the demonstrations I've seen they have applied the cloth on a flat level surface but this cloth is easy to slowly get around bends i.e. bow and stern.Pic2 Finished rubbing down the filler /primer but will spray with white primer as I want the red hull to look bright.
Pic 3-6 removed from building board support blocks removed then support legs trimmed off. Hull sanded smooth. Lastly few coats of Ronseal yaught varnish inside of hull . Looks good and not much height lost on the deck levels.
Liked by Colin H and jbkiwi and

Norman McLeod Rogers Icebreaker

Just a little update today, the rudder assembly. But firstly the anchors are plastic and pretty rough they stick out just too much from the hull. I fibreglassed ( secured )behind the anchors just in case they came adrift after the model has been built as that area is covered in.. Tricky to repair.
The rudder.. drilling and cutting the lower support from the keel to the rudder post. The brass tubing and the rod used sizes are on the packets. I do like Albion Alloys. Bored a hole though the keel and fitted the assembly / tiller arm temporary A piece of 6mm ply was cut and shaped to make the rudder. Last Pic rudder in position on hull some slight adjust.
Liked by Colin H

Delete this post?

It will be removed from the site.

Discard this draft?

Your draft will be deleted and cannot be recovered.

You have an unfinished draft

What would you like to do with it?