Join Us On Social Media!

|

|

|
Download The App!
Login To
Remove Ads
Remove Ads
Login To
Remove Ads
Remove Ads
Model Boats Website
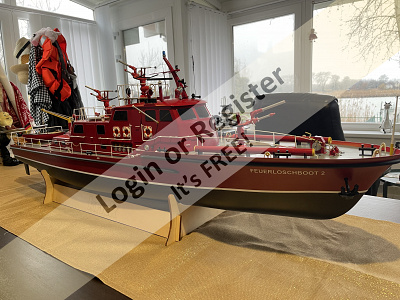
RoMarin/Krick Dusseldorf Fire Boat.
38 Posts · 36 Followers · 408 Photos · 378 Likes
Began 7 years ago by
 Hungary
Follow This Thread
Not currently following
> Click to follow
> Click to follow
Latest Post 2 years ago by
| Most recent posts shown first (Show Oldest First) | (Print Booklet) |
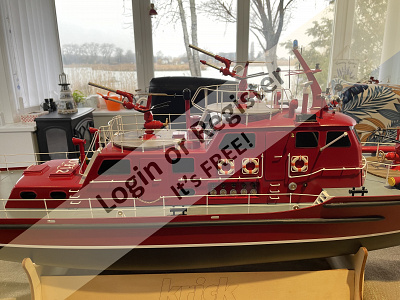
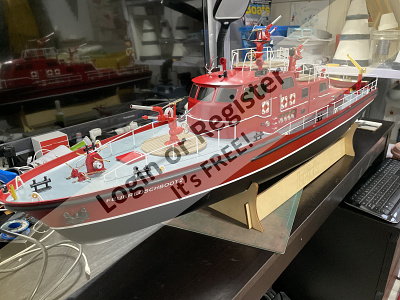
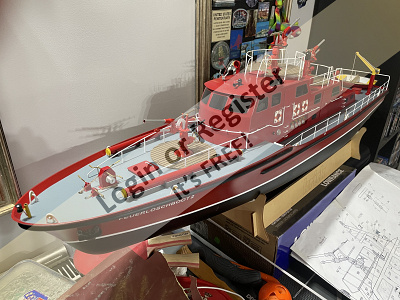
📝 First River Trial, One Year After Completion.
2 years ago by 🇭🇺 MouldBuilder ( Admiral)
Admiral)✧ 74 Views · 23 Likes · 10 Comments
Flag
💬 Add Comment
The first trial on the river took place today. I was reasonably pleased but there are a few alterations needed.
The first is to add some ballast weights. They are required on the port side and at the bow. The batteries are quite heavy so I was not too surprised.
The small boat on the stern also needs some weight. There was only a light breeze today but the small boat kept blowing off of the deck. I have just noticed that I have lost both of the oars during the test. I was happy with the way they turned out as well. Never mind. Teaches me a lesson. If they do not function, stick them down!!
The rudders caused me some problems. The servo needs reversing but I did not know how at that moment. I will have to check the instructions. Yes, I did say that JB and Steve. Now, where are they?
The Port light was flickering a bit but behaved itself once the boat was retrieved.
I have a few corrections to make but I was generally very pleased with the results. The water jets were better than I expected but the monitor rise and fall needs a little improvement.
I will perform the second trial once I have dealt with these issues, probably in 2027.
The video of the trial might be found on this link, but if not, I will add in the Media Gallery later.
▲
⟩⟩
Cashrc
Rogal118
renew
PeteJev
MartinW
Trident73
Isaac
Ronald
jbkiwi
Doogle
luckyduck
SimpleSailor
Commodore-H
EdW
LewZ
stevedownunder
RNinMunich
Len1
hermank
AlessandroSPQR
Peejay
ChrisG
Wolle
|
💬 Re: First River Trial, One Year After Completion.
2 years ago by 🇳🇿 jbkiwi (
 Fleet Admiral) Fleet Admiral)✧ 44 Views · 4 Likes
Flag
Hi Pete, I see your first instruction sheet was in Mandarin, - obviously why you were having problems. Having to read from right to left and up and down must have been distracting 😁
I see you have translated it in the second pic😂 JB ▲
⟩⟩
Len1
MouldBuilder
RNinMunich
stevedownunder
|
|
Login To
Remove Ads 💬 Re: First River Trial, One Year After Completion.
2 years ago by 🇭🇺 MouldBuilder (
Admiral)✧ 40 Views · 3 Likes
Flag
Ah. I see what you mean. The video does rotate because it appears that the boss didn’t quite get the instruction to keep the phone upright whilst filming.
I have attached my detail sheet JB. There are pauses in action as I try to find the correct switch etc for the different functions. One other problem I did have was operating the crane. The left to right is on the same lever as the throttle and I kept adjusting the e speed by accident. Not sure how to solve that one. Not sure how to rotate the photo. 
▲
⟩⟩
stevedownunder
Len1
hermank
|
|
💬 Re: First River Trial, One Year After Completion.
2 years ago by 🇺🇸 Isaac (
 Lieutenant) Lieutenant)✧ 54 Views · 4 Likes
Flag
I never seen a fireboat in action. very impressive! I really like it. 👍😎
The middle portion of your video went sideways??? Isaac ▲
⟩⟩
stevedownunder
hermank
MouldBuilder
Len1
|
|
💬 Re: First River Trial, One Year After Completion.
2 years ago by 🇳🇿 jbkiwi (
Fleet Admiral)✧ 66 Views · 4 Likes
Flag
Hi Pete, top job, -looks great and sails well (although I think the captain had been on the Unicum 😋) you must be happy with that ! Great that it all works, as that was a mission getting so many options operating during construction. Monitors work well and the crane looked good once the dinghy behaved, (bit hard to get spot on with no crew to steady it, as would be the case on the full sized boat) With all those features, you probably need an 'instruction' card strapped to the TX 😁🤓 The next outing should be easier once you get familiar with everything.
I find, with some of my boats, If I don't use them for a while, I have to try and remember how to operate some of the features I've added, and do a bench run through before going to the pond. Old age doesn't help either lol. Sometimes I think, simple is better. Re reversing the rudder servo, you might find you need to adjust the rudder positions on the link when you reverse them in the TX, as they may not line up as they were. Were you running it outside your place ? looked like ideal conditions. JB ▲
⟩⟩
stevedownunder
hermank
MouldBuilder
Len1
|
|
💬 Re: First River Trial, One Year After Completion.
2 years ago by 🇭🇺 MouldBuilder (
Admiral)✧ 62 Views · 5 Likes
Flag
Hi Lew.
I have seen your length addition which you pictured on this blog earlier. Quite a task. I have put a full wiring diagram in the blog in pdf format if that helps. You can find it about half way through. I found them and have added here. Peter. 


▲
⟩⟩
hermank
Isaac
Len1
Doogle
Peejay
|
|
💬 Re: First River Trial, One Year After Completion.
2 years ago by 🇺🇸 LewZ (
Admiral)✧ 64 Views · 4 Likes
Flag
You did a very good job on the Dusseldorf. I hope to get back to mine which is a total rebuild, lengthening the hull, scratch built superstructure and more.
I would like to hear more about the mechanisms and electronics (including the RC setup). Lew Florida ⛱️, USA 🇺🇸 ▲
⟩⟩
Peejay
Len1
MouldBuilder
hermank
|
|
💬 Re: First River Trial, One Year After Completion.
2 years ago by 🇮🇹 AlessandroSPQR (
Fleet Admiral)✧ 75 Views · 5 Likes
Flag
Sorry Moulbuilder meaning:
At minute 4:09 the shot of the video is shot. You can see it well, it's just turned 90 degrees compared to the previous shots. ▲
⟩⟩
hermank
Peejay
MouldBuilder
stevedownunder
Len1
|
|
💬 Re: First River Trial, One Year After Completion.
2 years ago by 🇭🇺 MouldBuilder (
Admiral)✧ 72 Views · 4 Likes
Flag
It looks like the video attacked to the post ok.
I forgot to add another small problem. I have to alter the drive to the anchor as it slips too easily at present.😊 ▲
⟩⟩
Peejay
hermank
stevedownunder
Len1
|
|
💬 Re: First River Trial, One Year After Completion.
2 years ago by 🇮🇹 AlessandroSPQR (
Fleet Admiral)✧ 73 Views · 5 Likes
Flag
Great job, Mouldbuilder!
The water jets work great. After you add some ballast in the right places as you say, it will be perfect. I enjoyed the entire navigation, it's just a shame that the video, at a certain point, rotates the frame. ▲
⟩⟩
hermank
Peejay
stevedownunder
Len1
MouldBuilder
|
|
💬 Re: First River Trial, One Year After Completion.
2 years ago by 🇧🇪 hermank (
 Rear Admiral) Rear Admiral)✧ 73 Views · 4 Likes
Flag
Mouldbilder well Made. I made the Düsseldorf quite some years ago and it is still a popular model. We wait for the video👍👍👍👍👍👍
▲
⟩⟩
Peejay
Len1
MouldBuilder
AlessandroSPQR
|
Login To
Remove Ads
Remove Ads
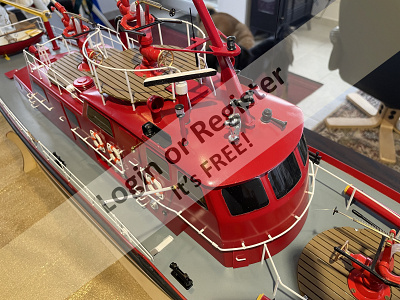
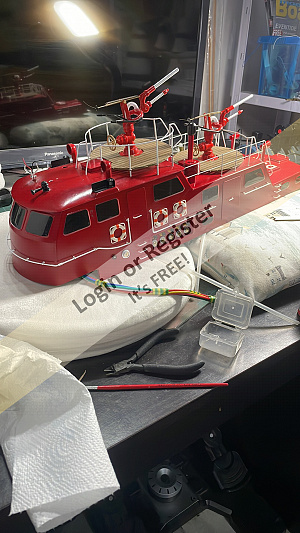
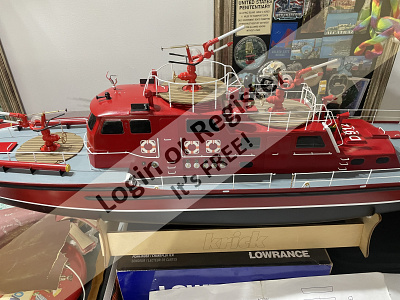
📝 Function test
3 years ago by 🇭🇺 MouldBuilder ( Admiral)
Admiral)✧ 122 Views · 25 Likes · 13 Comments
Flag
💬 Add Comment
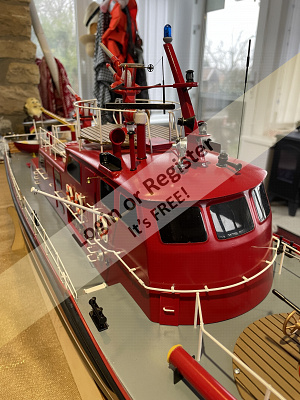
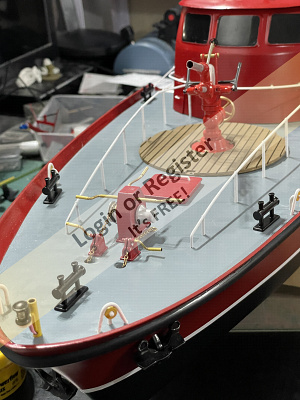
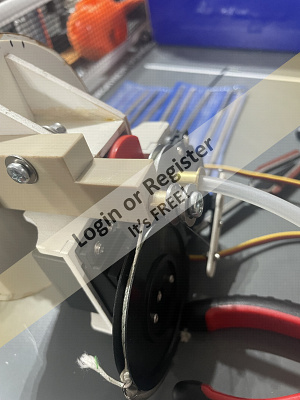
I had tried a full test of the functions but had issues with three of them. The first concerned the rotation of the search light. It would not move at all. I checked the full circuit for continuity and all was as it should be. I then placed a battery separately onto the motor and it worked. Strange. I found that I had a dry joint on the negative motor terminal. I re-soldered the joint and this cleared the problem.
The second was that the anchor would go down but the connection of the chain drum to the motor slipped as soon as the weight of the anchor was lifted. I remedied this by putting flats onto the drum spindle and then glueing the connector in place.
The third was the lift of the monitors. This was just an adjustment problem.
The second test went very well with all 16 functions working well. The monitor lift and fall is still not perfect but the best I can achieve at this time.
There are two videos attached. One is very short and shows some of the electronics required. The other shows all of the functions in action.
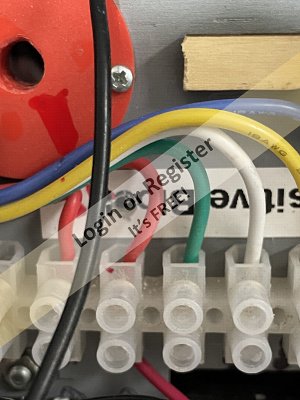
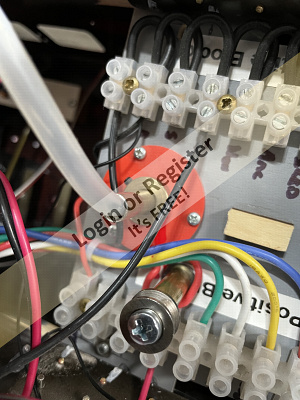
The electronics are made up of six ESC’s, five rc controlled switches, five servos and six voltage regulators.
The radio control is made up of one eight channel receiver and two four channel s-bus decoders.
I have found that I cannot add the videos here so I will attempt to load them into the media section.
Peter.😊
I am having problems loading the video files but will update as soon as I can.😉
[Admin Edit: Video added 👍]

The second was that the anchor would go down but the connection of the chain drum to the motor slipped as soon as the weight of the anchor was lifted. I remedied this by putting flats onto the drum spindle and then glueing the connector in place.
The third was the lift of the monitors. This was just an adjustment problem.
The second test went very well with all 16 functions working well. The monitor lift and fall is still not perfect but the best I can achieve at this time.
There are two videos attached. One is very short and shows some of the electronics required. The other shows all of the functions in action.
The electronics are made up of six ESC’s, five rc controlled switches, five servos and six voltage regulators.
The radio control is made up of one eight channel receiver and two four channel s-bus decoders.
I have found that I cannot add the videos here so I will attempt to load them into the media section.
Peter.😊
I am having problems loading the video files but will update as soon as I can.😉
[Admin Edit: Video added 👍]
▲
⟩⟩
PemyslJ
Rogal118
Isaac
EdW
Len1
Peejay
River Rat
ChrisG
ToraDog
AndyN
GaryLC
luckyduck
firefighter
pressonreguardless
Mike Stoney
Graham93
ZdenekB
dave976
RNinMunich
Colin H
hermank
jbkiwi
Scratchbuilder
stevedownunder
bombero
|
💬 Re: Function test
3 years ago by 🇬🇧 ChrisG (
 Commander) Commander)✧ 105 Views · 4 Likes
Flag
Absolutely amazing, I am sure I am not alone in being envious of your skills.
Superb model. Regards ChrisG ▲
⟩⟩
PemyslJ
Peejay
MouldBuilder
Colin H
|
|
Login To
Remove Ads 💬 Re: Function test
3 years ago by 🇬🇧 Colin H (
Fleet Admiral)✧ 109 Views · 6 Likes
Flag
Peter your skill set is amazing and your model deserves all the praise.
It has been well worth the effort, can't wait to see it performing on the water. Fantastic result sir, cheers Colin. ▲
⟩⟩
PemyslJ
hermank
Peejay
RNinMunich
MouldBuilder
Scratchbuilder
|
|
💬 Re: Function test
3 years ago by 🇪🇸 bombero (
 Warrant Officer) Warrant Officer)✧ 107 Views · 7 Likes
Flag
Peter, congratulations a superb model you should be proud of.
When are we going to swap? ▲
⟩⟩
PemyslJ
hermank
Peejay
Colin H
MouldBuilder
RNinMunich
Scratchbuilder
|
|
💬 Re: Function test
3 years ago by 🇬🇧 flaxbybuck (
 Captain) Captain)✧ 106 Views · 6 Likes
Flag
Respect ! You have produced a fantastic model that anyone would be really proud of. The electrical side of it is a master class on its own.😉
▲
⟩⟩
PemyslJ
hermank
Peejay
Colin H
MouldBuilder
Scratchbuilder
|
|
💬 Re: Function test
3 years ago by 🇬🇧 firefighter (
Lieutenant)✧ 112 Views · 7 Likes
Flag
Absolutely brilliant! What functionality. Amazing.
A great fire boat. Very well done. Just love it! Greg 👍 ▲
⟩⟩
PemyslJ
hermank
Peejay
Colin H
MouldBuilder
Scratchbuilder
stevedownunder
|
|
💬 Re: Function test
3 years ago by 🇬🇧 Scratchbuilder (
 Vice Admiral) Vice Admiral)✧ 117 Views · 5 Likes
Flag
Pete.
One word says it all re the functions in the video…..Superb!! Bill👍👍 ▲
⟩⟩
PemyslJ
Peejay
Colin H
MouldBuilder
stevedownunder
|
|
💬 Re: Function test
3 years ago by 🇺🇸 pressonreguardless (
Rear Admiral)✧ 120 Views · 7 Likes
Flag
Very Impressive, Peter👍👍👍
Trev ▲
⟩⟩
PemyslJ
Peejay
Colin H
Scratchbuilder
stevedownunder
MouldBuilder
hermank
|
|
💬 Re: Function test
3 years ago by 🇭🇺 MouldBuilder (
Admiral)✧ 113 Views · 6 Likes
Flag
I did that at the point when the circuit diagram was completed JB.
I may not read them but I actually write them.😃😃 
▲
⟩⟩
EdW
Peejay
Colin H
RNinMunich
stevedownunder
hermank
|
|
💬 Re: Function test
3 years ago by 🇳🇿 jbkiwi (
Fleet Admiral)✧ 118 Views · 6 Likes
Flag
Well done Peter, looks great 👍👍 No doubt you'll be writing yourself an instruction manual you can refer to, when you forget later how it all works ?😁
JB ▲
⟩⟩
Peejay
Colin H
RNinMunich
stevedownunder
hermank
MouldBuilder
|
|
💬 Re: Function test
3 years ago by 🇧🇪 hermank (
Rear Admiral)✧ 118 Views · 4 Likes
Flag
Very Nice impressive vidéo with all thé différent fuctions 👍👍👍
▲
⟩⟩
Peejay
Colin H
stevedownunder
MouldBuilder
|
|
💬 Re: Function test
3 years ago by 🇦🇺 stevedownunder (
 Commodore) Commodore)✧ 128 Views · 5 Likes
Flag
Nice video Peter,
That is a lot of functions... Cheers, Stephen. ▲
⟩⟩
PemyslJ
Peejay
Colin H
hermank
MouldBuilder
|
|
Login To
Remove Ads 💬 Re: Function test
3 years ago by 🇩🇪 RNinMunich (
Fleet Admiral)✧ 120 Views · 5 Likes
Flag
Well done Peter👍
Looking forward to the vid ... 😎 ▲
⟩⟩
Peejay
Colin H
hermank
MouldBuilder
stevedownunder
|
|
💬 Re: Function test
3 years ago by 🇦🇺 stevedownunder (
Commodore)✧ 130 Views · 4 Likes
Flag
Great that you have sorted out all the issues Peter,
I couldn't find the video, will try later. Cheers, Stephen. ▲
⟩⟩
Peejay
Colin H
MouldBuilder
Scratchbuilder
|
📝 Completion
3 years ago by 🇭🇺 MouldBuilder ( Admiral)
Admiral)✧ 150 Views · 21 Likes · 10 Comments
Flag
💬 Add Comment
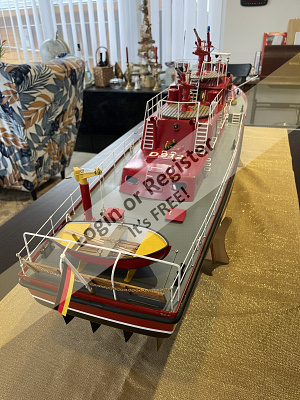
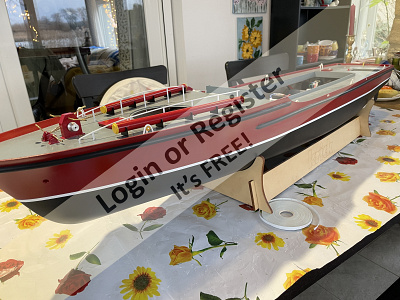
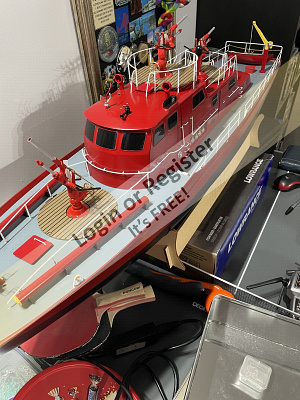
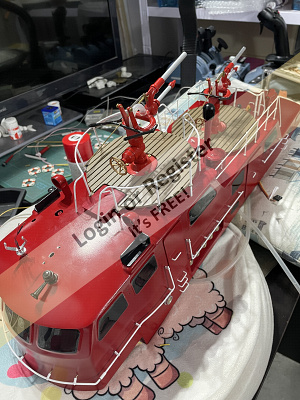
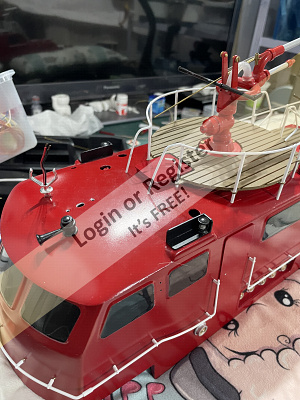
After four years of working whenever I could between work and normal living, retirement has finally given me the time to complete this model much earlier than I had first thought.
Over the past two weeks I have managed to successfully get all three monitors to work correctly in both left to right and up and down directions. The up and down did take a bit of tuning where three hands would have been useful. I still have to check the extremities of up and down movement with the transmitter connected as there is restrictions to this by the cabin wall and the amount of movement actually possible. I have restricted this to 30% ready for the full electrical testing which I will carry out next week.
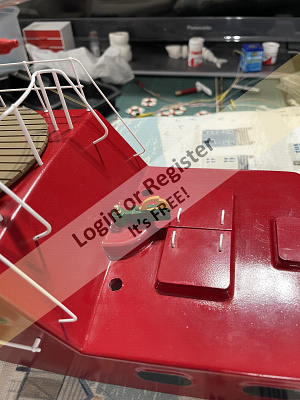
An envelope with small o rings arrived from the UK today which has allowed me to complete. These are to cover small errors I made early in the project by drilling the holes for the radar and anchor lights slightly too big in the cabin roof outer skin. The look good as they are only 1mm section. I also used one to hold the speaker on to the top of the search light. I connected up the wiring for the anchor light which completed the model.
The only things I have left to do are the full electrical test and final connection of the water pump to the monitors. I am still trying to find some suitable quick connectors for the water pipes so that cabin removal is easier. To remove the cabin I will have to remove the electrical plug, disconnect two servo cables and disconnect the water. Not too bad considering.
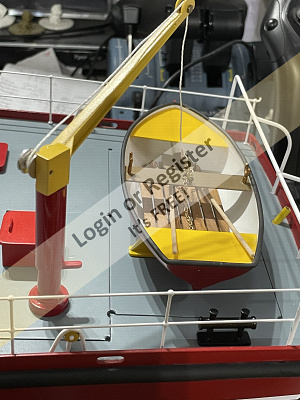
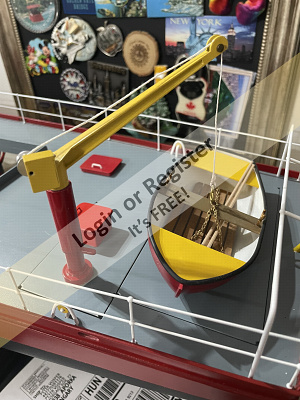
In conclusion, I have really enjoyed making this model. Krick have done a wonderful job but there are still areas in which improvements could be made. I have made modifications in a few areas which have been discussed earlier in the log. Some were for aesthetic reasons but a few were necessary if full functionality was required. The crane height was necessary so that the small boat went over the railing. Another was the tow hook. The method that the supplier designed used a bent wire spring. The force needed to actuate this was immense. I changed the design by burying a small coil spring inside the unit. It works really well but for now, remains disconnected as I have run out of channels. Krick designed to actuate this tow hook at the same time as lifting the cabin monitors. This is unrealistic so I want to isolate the unit and operate it with a servo. I cannot do this yet as I have used all of the sixteen channels available right now but more importantly, I have run out of operating switches on the transmitter. I will correct this one day by doubling it up with another channel.
The electronics and radio equipment to operate all sixteen channels has been a challenge but one which I have really enjoyed. I had to completely overhaul the wiring diagram and redrew it in Acad, well DraftSight actually which is almost identical but much, much cheaper.
I can highly recommend this model to anybody but if you want to get full functionality, you must be prepared to get involved in some quite complex circuitry.
I will post the functions video soon but the full test on the river will have to wait until April.
Thank you for your interest in this project. I have a couple of boats to complete before I start another major build. In my to do box I have a Tamar Class Lifeboat, an RAF Crash Tender, HMS Hood with Rc upgrades and a 47” Huntress. Which one should I attempt?
Peter.


Over the past two weeks I have managed to successfully get all three monitors to work correctly in both left to right and up and down directions. The up and down did take a bit of tuning where three hands would have been useful. I still have to check the extremities of up and down movement with the transmitter connected as there is restrictions to this by the cabin wall and the amount of movement actually possible. I have restricted this to 30% ready for the full electrical testing which I will carry out next week.
An envelope with small o rings arrived from the UK today which has allowed me to complete. These are to cover small errors I made early in the project by drilling the holes for the radar and anchor lights slightly too big in the cabin roof outer skin. The look good as they are only 1mm section. I also used one to hold the speaker on to the top of the search light. I connected up the wiring for the anchor light which completed the model.
The only things I have left to do are the full electrical test and final connection of the water pump to the monitors. I am still trying to find some suitable quick connectors for the water pipes so that cabin removal is easier. To remove the cabin I will have to remove the electrical plug, disconnect two servo cables and disconnect the water. Not too bad considering.
In conclusion, I have really enjoyed making this model. Krick have done a wonderful job but there are still areas in which improvements could be made. I have made modifications in a few areas which have been discussed earlier in the log. Some were for aesthetic reasons but a few were necessary if full functionality was required. The crane height was necessary so that the small boat went over the railing. Another was the tow hook. The method that the supplier designed used a bent wire spring. The force needed to actuate this was immense. I changed the design by burying a small coil spring inside the unit. It works really well but for now, remains disconnected as I have run out of channels. Krick designed to actuate this tow hook at the same time as lifting the cabin monitors. This is unrealistic so I want to isolate the unit and operate it with a servo. I cannot do this yet as I have used all of the sixteen channels available right now but more importantly, I have run out of operating switches on the transmitter. I will correct this one day by doubling it up with another channel.
The electronics and radio equipment to operate all sixteen channels has been a challenge but one which I have really enjoyed. I had to completely overhaul the wiring diagram and redrew it in Acad, well DraftSight actually which is almost identical but much, much cheaper.
I can highly recommend this model to anybody but if you want to get full functionality, you must be prepared to get involved in some quite complex circuitry.
I will post the functions video soon but the full test on the river will have to wait until April.
Thank you for your interest in this project. I have a couple of boats to complete before I start another major build. In my to do box I have a Tamar Class Lifeboat, an RAF Crash Tender, HMS Hood with Rc upgrades and a 47” Huntress. Which one should I attempt?
Peter.
▲
⟩⟩
PemyslJ
EdW
Mike Stoney
Scratchbuilder
RNinMunich
Commodore-H
hermank
jbkiwi
ToraDog
bombero
Peejay
DWBrinkman
Graham93
Ronald
fireboat
stevedownunder
Rookysailor
Colin H
pressonreguardless
luckyduck
River Rat
|
💬 Re: Completion
3 years ago by 🇪🇸 bombero (
Warrant Officer)✧ 134 Views · 1 Like
Flag
swap it for mine?🤔
▲
⟩⟩
MouldBuilder
|
|
Login To
Remove Ads 💬 Re: Completion
3 years ago by 🇺🇸 River Rat (
Captain)✧ 149 Views · 6 Likes
Flag
You do very nice work, it is a beautiful finished example. I recently retired myself (50 years on payroll 🤔). So I am sure it won't take that long on your next project. I'm really enjoying it...(down to 4 months on my last build 😉) I would love to see some video of it in action. Keep up the great work! Dave RR
▲
⟩⟩
PemyslJ
Peejay
hermank
Cashrc
pressonreguardless
MouldBuilder
|
|
💬 Re: Completion
3 years ago by 🇺🇸 DWBrinkman (
Commodore)✧ 142 Views · 6 Likes
Flag
What a gorgeous boat! Your craftsmanship and attention to detail are amazing. VERY well done!
Dave B ▲
⟩⟩
PemyslJ
Peejay
Cashrc
pressonreguardless
MouldBuilder
stevedownunder
|
|
💬 Re: Completion
3 years ago by 🇳🇿 jbkiwi (
Fleet Admiral)✧ 143 Views · 8 Likes
Flag
I think the 4 yrs has been worth it Peter, absolutely brilliant job of a accessory loaded model. Really looking forward to the trials video in April.
Re the next model, - some of us are getting old, will it be finished in time for us to see it in action 😂 ▲
⟩⟩
PemyslJ
Peejay
hermank
Cashrc
MouldBuilder
stevedownunder
Graham93
pressonreguardless
|
|
💬 Re: Completion
3 years ago by 🇺🇸 Cashrc (
Fleet Admiral)✧ 145 Views · 5 Likes
Flag
My word Peter she’s gorgeous. The paint, attention to detail, even underdeck she’s nicely thought out and looks good!! Here’s hoping all function checks are met with flying colors. Nice job sir!!!
As far as future projects…I’m leaning the direction of the RAF crash tender. ▲
⟩⟩
Peejay
hermank
pressonreguardless
MouldBuilder
stevedownunder
|
|
💬 Re: Completion
3 years ago by 🇦🇺 stevedownunder (
Commodore)✧ 150 Views · 4 Likes
Flag
Hi Peter,
That is a beautifully made and fantastic looking model, looking forward to the video. 👍 Cheers, Stephen. ▲
⟩⟩
Peejay
Cashrc
MouldBuilder
pressonreguardless
|
|
💬 Re: Completion
3 years ago by 🇨🇦 Newby7 (
Fleet Admiral)✧ 156 Views · 5 Likes
Flag
WOW 👍👍👍👍👍Quality work Well done
Rick ▲
⟩⟩
Peejay
Cashrc
pressonreguardless
stevedownunder
MouldBuilder
|
|
💬 Re: Completion
3 years ago by 🇬🇧 luckyduck (
Lieutenant)✧ 151 Views · 6 Likes
Flag
Awesome - now you need a boat on fire to dowse!!! Maybe the next model is a simulated on fire boat?
▲
⟩⟩
hermank
Peejay
pressonreguardless
stevedownunder
MouldBuilder
Colin H
|
|
💬 Re: Completion
3 years ago by 🇬🇧 Colin H (
Fleet Admiral)✧ 152 Views · 5 Likes
Flag
At last Peter, it's one of the finest models that I've seen in a long time.
It's obvious to me that you possess infinite skill and patience. If only one of my models could be that good I'd be the happiest man on the planet. Keep it up super modeller, cheers Colin. ▲
⟩⟩
hermank
Peejay
pressonreguardless
stevedownunder
MouldBuilder
|
|
💬 Re: Completion
3 years ago by 🇺🇸 pressonreguardless (
Rear Admiral)✧ 146 Views · 5 Likes
Flag
Absolutely Beautiful Job Peter👍👍
Time to sit back and admire your Creation with the Beverage of your Choice😊😊 Trev ▲
⟩⟩
hermank
Peejay
stevedownunder
MouldBuilder
Colin H
|
📝 Final assembly 2
3 years ago by 🇭🇺 MouldBuilder ( Admiral)
Admiral)✧ 163 Views · 15 Likes · 4 Comments
Flag
💬 Add Comment
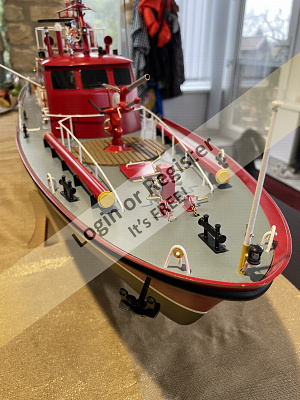
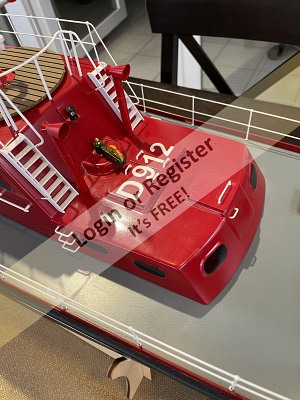
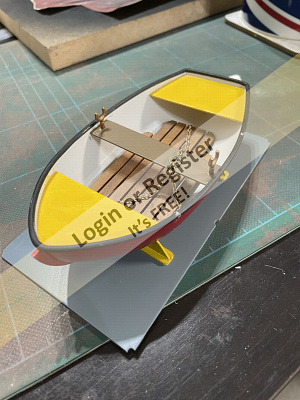
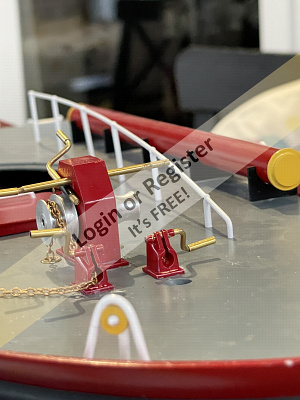
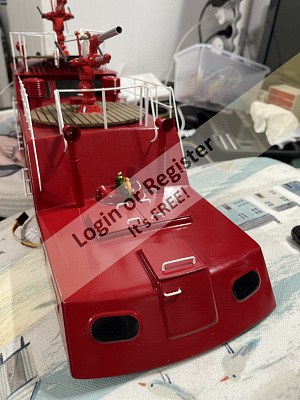
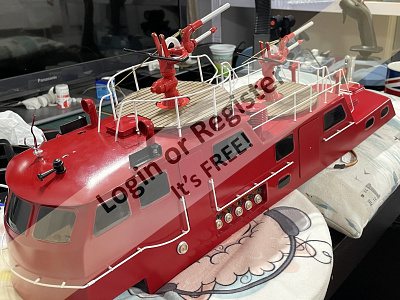
Things are moving along at pace now. I have fitted the life rings and their hooks and the hand wheels for the two forward hose connections.
I have completed the up and down movement of the two cabin mounted monitors which was quite tricky with only two hands. The bollards have been painted and fitted and most of the cabin handrails have been glued in place.
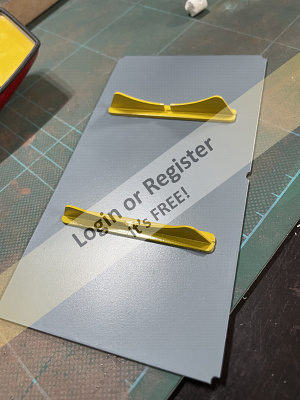
I decided to do another small design change to the deck supports for the rowing boat. The supports are made from 1mm thick ABS which you would have to stick down using the long edge. I could see these being knocked off regularly so I decided to make bases for them from scrap. I cut to size and then milled a 1mm slot in the middle along their length. The supports then pushed in and glued. I painted them and then fixed them in place with glue. Much better.
I have also painted the two antenna that I made earlier, from brass rod and tube, ready for fitting.
Next will be to tidy up a few loose ends before the final push for completion.
Peter😊


I have completed the up and down movement of the two cabin mounted monitors which was quite tricky with only two hands. The bollards have been painted and fitted and most of the cabin handrails have been glued in place.
I decided to do another small design change to the deck supports for the rowing boat. The supports are made from 1mm thick ABS which you would have to stick down using the long edge. I could see these being knocked off regularly so I decided to make bases for them from scrap. I cut to size and then milled a 1mm slot in the middle along their length. The supports then pushed in and glued. I painted them and then fixed them in place with glue. Much better.
I have also painted the two antenna that I made earlier, from brass rod and tube, ready for fitting.
Next will be to tidy up a few loose ends before the final push for completion.
Peter😊
▲
⟩⟩
PemyslJ
EdW
hermank
Peejay
Len1
bombero
Martin555
pressonreguardless
Graham93
RNinMunich
jbkiwi
stevedownunder
GaryLC
River Rat
Colin H
|
💬 Re: Final assembly 2
3 years ago by 🇺🇸 Peejay (
 Sub-Lieutenant) Sub-Lieutenant)✧ 143 Views · 1 Like
Flag
Hope to see some future pictures of her on the water. Should be very realistic on the water, given the quality of your build.
▲
⟩⟩
MouldBuilder
|
|
Login To
Remove Ads 💬 Re: Final assembly 2
3 years ago by 🇬🇧 Martin555 (
Fleet Admiral)✧ 185 Views · 4 Likes
Flag
Very nice indeed Peter.
I bet it feels good seeing that light at the end of this long very tunnel. Great work, well done. Martin. ▲
⟩⟩
PemyslJ
Peejay
MouldBuilder
stevedownunder
|
|
💬 Re: Final assembly 2
3 years ago by 🇳🇿 jbkiwi (
Fleet Admiral)✧ 159 Views · 7 Likes
Flag
Almost there Peter, looking better each time as you add bits. Good mod for the dinghy cradle, much more robust.
JB ▲
⟩⟩
Peejay
stevedownunder
Martin555
River Rat
pressonreguardless
Graham93
MouldBuilder
|
|
💬 Re: Final assembly 2
3 years ago by 🇺🇸 River Rat (
Captain)✧ 166 Views · 5 Likes
Flag
Peter that is some excellent work! Fantastic detail, one to be very proud of! Dave RR 👍👍👍
▲
⟩⟩
Peejay
Martin555
pressonreguardless
MouldBuilder
stevedownunder
|
📝 Hull Completion 2
3 years ago by 🇭🇺 MouldBuilder ( Admiral)
Admiral)✧ 172 Views · 15 Likes · 2 Comments
Flag
💬 Add Comment
The weather here is not so good which is a plus for modelling. I have never had this much spare time in one stretch so I am determined to finish this model.
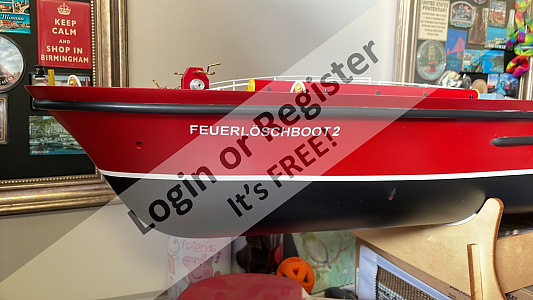
First on the list was naming the ship. I have read how Krick advise on how to do this but was never really comfortable with it. I had no better ideas so onward I went. The first thing was to cut the pre-arranged letters from the laser cut foil sheet. Then the waste around the lettering was removed leaving just the ship name still stuck to the backing. This had to be done really carefully as the letters are quite small and still attached to the outer area in places. Once this was done, a piece of masking tape was stuck across the front face of the lettering leaving just the tops showing to aid alignment. The next stage was to very carefully remove the backing to leave only the letters still in place. Then the letters were aligned on the hull a few millimetres away and then slowly lowered to make contact. The tape was then smoothed down to ensure that the letters had stuck and then again, very carefully, removed. You were right Krick. I am very happy with the results.
Next job was to fit the anchors. To attach the chains I raided the wife’s sowing box for some strong cotton. After removing my cat burglar suit I then tied the anchors on three times for security and threaded them through. The non-moving anchor was glued in place along with the chain.
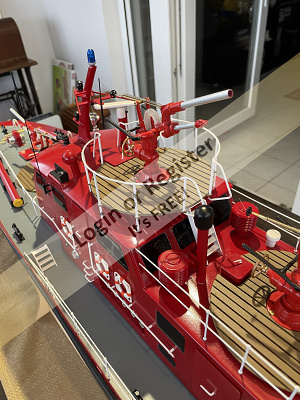
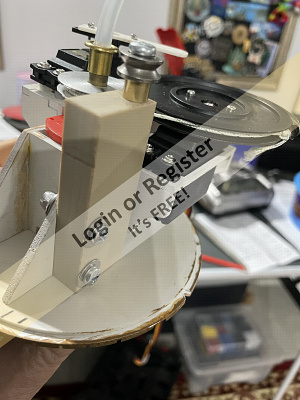
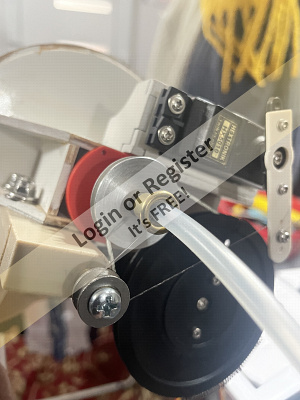
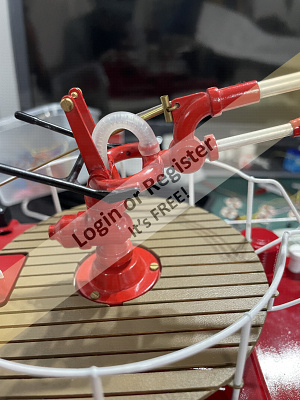
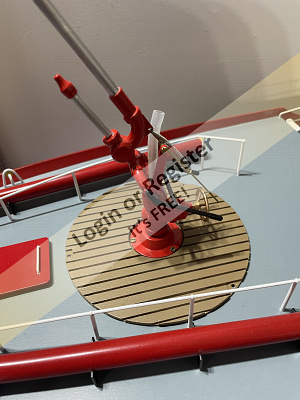
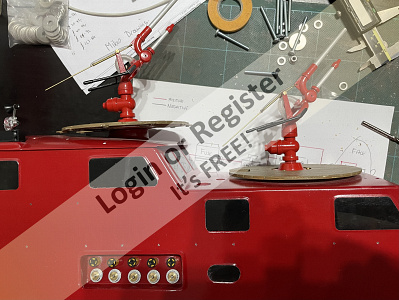
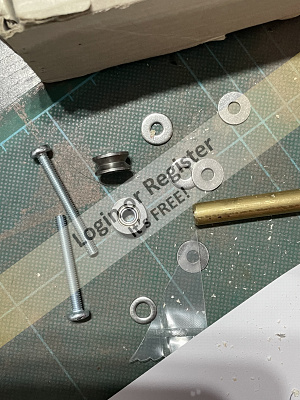
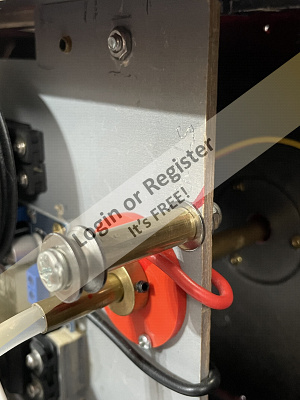
The last job for this update was to get the rise and fall working on the deck mounted monitor. The line supplied was threaded through the small tube to the top. This end is trapped under the small hand wheel behind the top spring. This was always a concern of mine but, in fact, holds really well. The rod is 1mm diameter as is the hole I drilled in the hand wheel. I threaded the line through the centre of the hand wheel and then pushed the handwheel onto the shaft which very successfully trapped the cord. The bottom end goes around the pulley assembly that I had made to correct my error, explained earlier, and then through the servo arm and trapped between two washers and locking screw. The results were better than expected. I tried to fit the monitor unit into the hull but then spotted another small error. The pulley mounting block would not fit through the hole in the deck mainly due to the offset nature of the rotation disc on the servo. A quick disassembly and onto the mill for a quick modification. It fits!!
My next job is to connect the up and down motion on the other two cabin mounted monitors. This will be a little more difficult as the two have to work together and all of the cabin detail is fitted so easy to knock off.


First on the list was naming the ship. I have read how Krick advise on how to do this but was never really comfortable with it. I had no better ideas so onward I went. The first thing was to cut the pre-arranged letters from the laser cut foil sheet. Then the waste around the lettering was removed leaving just the ship name still stuck to the backing. This had to be done really carefully as the letters are quite small and still attached to the outer area in places. Once this was done, a piece of masking tape was stuck across the front face of the lettering leaving just the tops showing to aid alignment. The next stage was to very carefully remove the backing to leave only the letters still in place. Then the letters were aligned on the hull a few millimetres away and then slowly lowered to make contact. The tape was then smoothed down to ensure that the letters had stuck and then again, very carefully, removed. You were right Krick. I am very happy with the results.
Next job was to fit the anchors. To attach the chains I raided the wife’s sowing box for some strong cotton. After removing my cat burglar suit I then tied the anchors on three times for security and threaded them through. The non-moving anchor was glued in place along with the chain.
The last job for this update was to get the rise and fall working on the deck mounted monitor. The line supplied was threaded through the small tube to the top. This end is trapped under the small hand wheel behind the top spring. This was always a concern of mine but, in fact, holds really well. The rod is 1mm diameter as is the hole I drilled in the hand wheel. I threaded the line through the centre of the hand wheel and then pushed the handwheel onto the shaft which very successfully trapped the cord. The bottom end goes around the pulley assembly that I had made to correct my error, explained earlier, and then through the servo arm and trapped between two washers and locking screw. The results were better than expected. I tried to fit the monitor unit into the hull but then spotted another small error. The pulley mounting block would not fit through the hole in the deck mainly due to the offset nature of the rotation disc on the servo. A quick disassembly and onto the mill for a quick modification. It fits!!
My next job is to connect the up and down motion on the other two cabin mounted monitors. This will be a little more difficult as the two have to work together and all of the cabin detail is fitted so easy to knock off.
▲
⟩⟩
PemyslJ
EdW
hermank
Peejay
Martin555
GaryLC
HappyHaggis
RNinMunich
figtree7nts
AndyN
stevedownunder
Graham93
jbkiwi
pressonreguardless
Colin H
|
💬 Re: Hull Completion 2
3 years ago by 🇺🇸 figtree7nts (
Admiral)✧ 172 Views · 5 Likes
Flag
Hi Peter,
Fantastic workmanship! 👍 Cheers, Ed- ▲
⟩⟩
PemyslJ
Peejay
Martin555
stevedownunder
MouldBuilder
|
|
💬 Re: Hull Completion 2
3 years ago by 🇦🇺 stevedownunder (
Commodore)✧ 173 Views · 6 Likes
Flag
Hi Peter,
Your fireboat is looking fantastic, very clean details as well. 👍 Cheers, Stephen. ▲
⟩⟩
PemyslJ
Peejay
Martin555
pressonreguardless
MouldBuilder
jbkiwi
|
📝 Hull completion 1 of ?
3 years ago by 🇭🇺 MouldBuilder ( Admiral)
Admiral)✧ 175 Views · 13 Likes · 1 Comment
Flag
💬 Add Comment
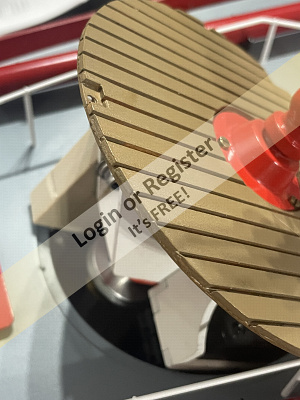
Today and yesterday I concentrated on completing the hull. I have written a list of items to finish on both the hull and cabin. There are 15 entries on each so far.
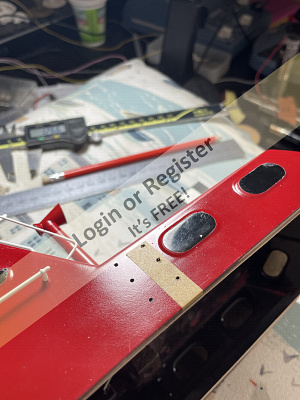
I have added the rubbing strakes and the waterline today and completed the windlass yesterday. Three down and 12 to go, so far.
Note: If you see any waveyness in my waterline that is because the river is quite wavey so that the waterline looks level.😜
Peter.😀


I have added the rubbing strakes and the waterline today and completed the windlass yesterday. Three down and 12 to go, so far.
Note: If you see any waveyness in my waterline that is because the river is quite wavey so that the waterline looks level.😜
Peter.😀
▲
⟩⟩
PemyslJ
EdW
RNinMunich
hermank
Peejay
HappyHaggis
figtree7nts
jbkiwi
Cashrc
stevedownunder
Martin555
Colin H
pressonreguardless
|
💬 Re: Hull completion 1 of ?
3 years ago by 🇺🇸 figtree7nts (
Admiral)✧ 172 Views · 4 Likes
Flag
Hi Peter,
Just tell everybody to shake their head up and down? That'll make the waterline even! LOL! Cheers, Ed- ▲
⟩⟩
Peejay
Martin555
MouldBuilder
RNinMunich
|
📝 Final assembly part 1 of ?
3 years ago by 🇭🇺 MouldBuilder ( Admiral)
Admiral)✧ 182 Views · 21 Likes · 13 Comments
Flag
💬 Add Comment
This is probably the most enjoyable part of any build project when all of the parts, which have taken hours to get to this point, can finally be fitted.
I have spent the past few days drilling small holes to fit the metalwork, painting some small items and fitting everything. I still have to fit and wire up the mast but I think I will leave this until last along with the radar for safety.
The rear navigation light is fitted to a small metal bracket which in turn us screwed to the cabin. This looks rather strange so I decided to make a bracket for it which, in my opinion, looks much better.
The rise and fall of the monitors still needs to be completed but I am waiting for Krick, who have very kindly offered to replace a spring I destroyed foc.
I also have to complete the anchor area which is also next.
There is still a lot of small jobs to do but I really want to get this one completed as soon as possible so that it can collect dust on the shelves with the others.
Peter.
▲
⟩⟩
PemyslJ
EdW
hermank
Peejay
bruce1946
DWBrinkman
Ronald
jbkiwi
RNinMunich
Graham93
luckyduck
bombero
Cashrc
HappyHaggis
figtree7nts
mturpin013
stevedownunder
pressonreguardless
marky
Martin555
Colin H
|
💬 Re: Final assembly part 1 of ?
3 years ago by 🇳🇿 jbkiwi (
Fleet Admiral)✧ 174 Views · 5 Likes
Flag
Immaculate work Peter, looking forward to the upcoming video (no pressure😁)
JB ▲
⟩⟩
Peejay
MouldBuilder
stevedownunder
pressonreguardless
Martin555
|
|
Login To
Remove Ads 💬 Re: Final assembly part 1 of ?
3 years ago by 🇺🇸 Cashrc (
Fleet Admiral)✧ 177 Views · 5 Likes
Flag
Peter, it’s been so long since I built the Dolly I don’t quite remember how I attached the monitor end of that line. I had an altercation during the build with thin ca so she’s fixed in place. Give me a few let me see if I remember.
Cash ▲
⟩⟩
hermank
Peejay
MouldBuilder
Martin555
pressonreguardless
|
|
💬 Re: Final assembly part 1 of ?
3 years ago by 🇭🇺 MouldBuilder (
Admiral)✧ 175 Views · 3 Likes
Flag
Hi Len.
I painted the originals. I thought they would look a lot better. Peter. ▲
⟩⟩
Peejay
Martin555
pressonreguardless
|
|
💬 Re: Final assembly part 1 of ?
3 years ago by 🇺🇸 Len1 (
 Lieutenant Commander) Lieutenant Commander)✧ 177 Views · 5 Likes
Flag
Like the brass hand wheels on the monitors. I think I will replace my red ones with brass.Len1
▲
⟩⟩
hermank
Peejay
Martin555
MouldBuilder
pressonreguardless
|
|
💬 Re: Final assembly part 1 of ?
3 years ago by 🇪🇸 bombero (
Warrant Officer)✧ 180 Views · 8 Likes
Flag
Peter,
Just remembered!. when you do water test make sure hose from keel to pump is connected(or outlet above water level) when I did mine I found I had buggered the pump and was waiting for replacement and forgot about the pipe and when I did my water test I notice it started to get sluggish and on investigation found at least 1/2 inch of water in the hull, I had just tucked the hose in the hull!!!!!!😂😂😂 Len ▲
⟩⟩
hermank
Peejay
pressonreguardless
RNinMunich
MouldBuilder
Len1
Colin H
Martin555
|
|
💬 Re: Final assembly part 1 of ?
3 years ago by 🇭🇺 MouldBuilder (
Admiral)✧ 177 Views · 4 Likes
Flag
Yours is perfect Len. This is not an easy model to build. It has taken me 4 years. The electronics with 16 channels has been a challenge and required me to completely redraw the wiring diagram.
Thanks for your comments Ed, Martin, Trev and Scott. I am really looking forward to the launch but I did a list of things to do last night. 26 items on it so far. I will start on them today.😬 ▲
⟩⟩
Peejay
pressonreguardless
Martin555
Colin H
|
|
💬 Re: Final assembly part 1 of ?
3 years ago by 🇪🇸 bombero (
Warrant Officer)✧ 180 Views · 4 Likes
Flag
Well done peter, quality puts mine to shame, hope you enjoy it when in water as it has great speed and manoeuvrability. Put some other boats in the water and do a slalom between them(only kidding)!
Len ▲
⟩⟩
Peejay
Martin555
Colin H
MouldBuilder
|
|
💬 Re: Final assembly part 1 of ?
3 years ago by 🇭🇺 MouldBuilder (
Admiral)✧ 178 Views · 5 Likes
Flag
Thanks Cash.
Regarding the up and down movement, how did you fix the operating line at the monitor end. On these, the line is held under a small tap wheel which might not give enough fixing area. The combination of the internal pipe spring and the monitor spring offer a reasonable resistance to the pull force. Thanks.😃 ▲
⟩⟩
Peejay
Cashrc
pressonreguardless
Martin555
Colin H
|
|
💬 Re: Final assembly part 1 of ?
3 years ago by 🇺🇸 Cashrc (
Fleet Admiral)✧ 180 Views · 5 Likes
Flag
I did the same thing on my monitor, just destroyed the spring, it was working well but I kept fiddling with it and just jacked it up😠
But, on a brighter side, I’m loving that cabin!! It looks great! The rest of the details, the crane, ships boat, it all looks good.👍👍 Cash ▲
⟩⟩
Peejay
pressonreguardless
Martin555
Colin H
MouldBuilder
|
|
💬 Re: Final assembly part 1 of ?
3 years ago by 🇬🇧 HappyHaggis (
Sub-Lieutenant)✧ 184 Views · 6 Likes
Flag
She's a work of art. Lovely boat and look forward to seeing her on the water
Regards Scott ▲
⟩⟩
Peejay
Cashrc
pressonreguardless
Martin555
Colin H
MouldBuilder
|
|
💬 Re: Final assembly part 1 of ?
3 years ago by 🇺🇸 figtree7nts (
Admiral)✧ 184 Views · 6 Likes
Flag
Hi Peter,
Your Düsseldorf looks fantastic she has awesome details too. Very nice lines! Cheers, Ed- ▲
⟩⟩
Peejay
Cashrc
pressonreguardless
Martin555
Colin H
MouldBuilder
|
|
Login To
Remove Ads 💬 Re: Final assembly part 1 of ?
3 years ago by 🇺🇸 pressonreguardless (
Rear Admiral)✧ 182 Views · 6 Likes
Flag
Really looks GREAT, Peter👍👍👍
Would love to see her on the water? I can't talk, mine just sit on the shelves collecting dust also. Although, I do like looking at them😊😊 Trev ▲
⟩⟩
Peejay
Cashrc
Martin555
Colin H
MouldBuilder
stevedownunder
|
|
💬 Re: Final assembly part 1 of ?
3 years ago by 🇬🇧 Martin555 (
Fleet Admiral)✧ 214 Views · 7 Likes
Flag
Hi Peter,
All your hard work is paying off. She is looking great and you are on the homeward run now. Well done. Martin555. ▲
⟩⟩
PemyslJ
Peejay
Cashrc
Colin H
stevedownunder
pressonreguardless
MouldBuilder
|
📝 Ladders and Bollards
3 years ago by 🇭🇺 MouldBuilder ( Admiral)
Admiral)✧ 195 Views · 12 Likes · 2 Comments
Flag
💬 Add Comment
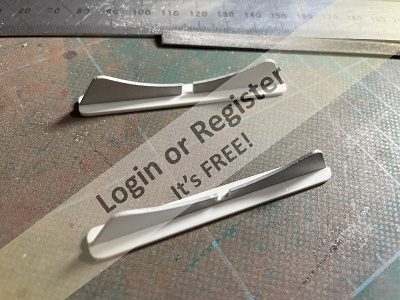
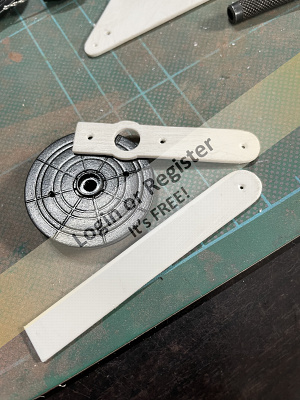
Just a quick update. I have just started to prepare the last parts for painting. When I was just about to start the monitors, Martin555 asked me if I was going to remove all of the split lines from the parts. I really hadn’t thought of doing that because of the time it would take but it just kept nagging away at my mind, just like a second wife really.😁 I just had to do it. I tidied them all up with files and paper and then painted them. I was sold in the idea. It made a massive difference, so much so that I now do this to all of the pre-moulded parts. I include a picture showing the difference. One ladder still has all of the production sink marks on the side whereas the other ladder has been smoothed out. Thanks Martin for making me do this as the difference is really pleasing.😀

▲
⟩⟩
EdW
RNinMunich
Peejay
mturpin013
RonH
stevedownunder
Martin555
Graham93
Len1
jbkiwi
pressonreguardless
Colin H
|
💬 Re: Ladders and Bollards
3 years ago by 🇺🇸 LewZ (
Admiral)✧ 195 Views · 6 Likes
Flag
You might want to take a closer look at the ladders. There should be six steps instead of nine for the lower ladders and five for the upper ladder. I made new ones for my Dusseldorf FB.
Lew 
▲
⟩⟩
PemyslJ
EdW
RNinMunich
Peejay
MouldBuilder
Martin555
|
|
💬 Re: Ladders and Bollards
3 years ago by 🇺🇸 Len1 (
Lieutenant Commander)✧ 193 Views · 4 Likes
Flag
Martin555 is right on the mark about removing mold /parting lines on cast or molded parts. It sure makes a difference as you ladder points out. It takes time but it surely makes a difference in MHO. Len2
▲
⟩⟩
Peejay
MouldBuilder
stevedownunder
Martin555
|
📝 Monitor rise and fall repair
3 years ago by 🇭🇺 MouldBuilder ( Admiral)
Admiral)✧ 197 Views · 14 Likes · 3 Comments
Flag
💬 Add Comment
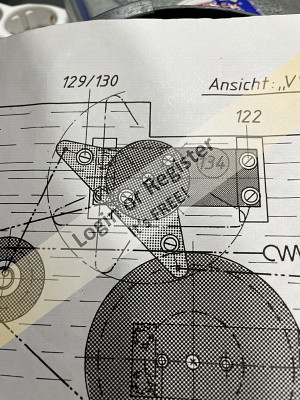
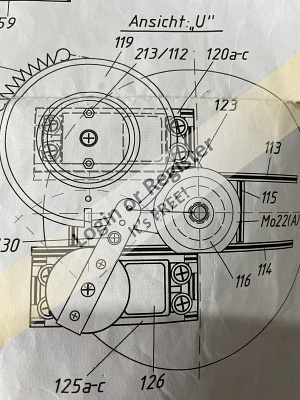
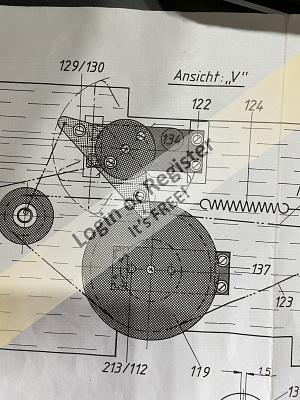
As mentioned earlier, I made a mistake earlier on in the build which needed a repair solution. The error was to glue the main actuation brass tube into the monitor base without aligning it properly to the axis of the nozzle and its actuating arm below. All three monitors are different but I just didn’t see how important this was. Inside the main tube runs the water tube and beside that there is a very small 1mm tube which guides the filament which operates the rise and fall of the monitor. All of them are out of alignment by quite some way. I have overcome this by making some brass spacers and screwing a bearing filled pulley wheel onto the top which transfers the angle that the filament operates to the correct one. This seems to have solved the initial problem but I think that Krick may have made one of their own. As you can see on the drawing attached, the dotted line shows the end position for the actuator arm rotation. The edge of the mounting plate is the inside edge of the cabin so they have their arm going right through. I will overcome this, somehow.
An issue I have yet to solve, and cannot until the model is complete, is that when the monitors are rotated, due to how the rise and fall is actuated through the rotating main tube, the rise and fall will also move slightly. I am hoping to reduce this by mixing the two channels with the mixer so that when the monitor is rotated, a small compensation input is made to the rise and fall at the same time. I have never done this before but looking forward to giving it a go. I know that aeroplane flyers do this with their controls so I think it is only a case of trial and error.😊
An issue I have yet to solve, and cannot until the model is complete, is that when the monitors are rotated, due to how the rise and fall is actuated through the rotating main tube, the rise and fall will also move slightly. I am hoping to reduce this by mixing the two channels with the mixer so that when the monitor is rotated, a small compensation input is made to the rise and fall at the same time. I have never done this before but looking forward to giving it a go. I know that aeroplane flyers do this with their controls so I think it is only a case of trial and error.😊
▲
⟩⟩
PemyslJ
EdW
Peejay
marky
Julio
Martin555
RNinMunich
stevedownunder
jbkiwi
Len1
pressonreguardless
Colin H
Cashrc
bombero
|
💬 Re: Monitor rise and fall repair
3 years ago by 🇺🇸 figtree7nts (
Admiral)✧ 197 Views · 5 Likes
Flag
Hi Peter,
I really like the way you've wired your boat! It looks great! My Smit Nederland is a plumber's nightmare! Nice job on the wiring! You'll get everything sorted out! I know you will! Cheers, Ed- ▲
⟩⟩
Peejay
MouldBuilder
Colin H
Martin555
RNinMunich
|
|
Login To
Remove Ads 💬 Re: Monitor rise and fall repair
3 years ago by 🇺🇸 Len1 (
Lieutenant Commander)✧ 195 Views · 6 Likes
Flag
Looks like you are sorting it out. As far as the rise and fall of the nozzle this is no different than the rise and fall as the boat itself will rise and fall with the waves.
▲
⟩⟩
Peejay
Colin H
Martin555
stevedownunder
jbkiwi
MouldBuilder
|
|
💬 Re: Monitor rise and fall repair
3 years ago by 🇪🇸 bombero (
Warrant Officer)✧ 198 Views · 3 Likes
Flag
Peter,
As the monitor rotates the 1mm rise and fall tube and the water pipe also rotates so should not be a problem. Len😊 ▲
⟩⟩
Peejay
Martin555
MouldBuilder
|
📝 Back tracking
3 years ago by 🇭🇺 MouldBuilder ( Admiral)
Admiral)✧ 208 Views · 13 Likes · 10 Comments
Flag
💬 Add Comment
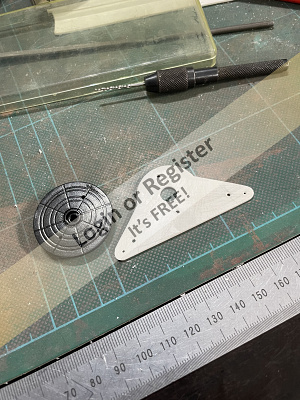
Considering this model was transported to Hungary in many pieces, it is amazing that not too much has gone missing. The only things I have not found so far are both of the monitor raise and lower levers. Fortunately I still have the plate that they came from so all I had to do was trace the shape onto a fresh piece of waste and cut them out. I have now drilled the holes and prepared them for fitting to the servos. As I mentioned in the last entry, this is all part of repairing an error I made very early on in the build. I will explain exactly what I did wrong next time when I do the rest of the repair.
Dog walking time now. No, not quite right. Human walking with dogs in control.😁

Dog walking time now. No, not quite right. Human walking with dogs in control.😁
▲
⟩⟩
PemyslJ
EdW
Peejay
Cashrc
Rookysailor
RNinMunich
stevedownunder
Graham93
Len1
jbkiwi
pressonreguardless
Martin555
Colin H
|
💬 Re: Back tracking
3 years ago by 🇺🇸 pressonreguardless (
Rear Admiral)✧ 200 Views · 4 Likes
Flag
Congratulations on your Promotion, Peter
Well Deserved👍👍 I am enjoying following your progress! Trev ▲
⟩⟩
Peejay
MouldBuilder
jbkiwi
Cashrc
|
|
Login To
Remove Ads 💬 Re: Back tracking
3 years ago by 🇭🇺 MouldBuilder (
Admiral)✧ 201 Views · 7 Likes
Flag
Thanks Doug and Colin. I will try to please Command.
Thanks Cash. The Dusseldorf does use a very similar system which I have just started to address. My next post will address the problem I caused for myself by mis-understanding the instructions, not that I have read them of course, and how I will get over this. As for the filament, I will try to take great care to get this to work. The bottom end attachment looks well designed but the monitor end looks quite dodgy. We will see. As for being King Colin, I forgot to mention that after my rather poor performance in the quiz, the government here might deport me to an uninhabited island 100 miles south of the Fauklands where nobody is there to care if my robes get dirty.😃🤣 ▲
⟩⟩
RNinMunich
Peejay
pressonreguardless
Cashrc
Martin555
jbkiwi
Colin H
|
|
💬 Re: Back tracking
3 years ago by 🇺🇸 Cashrc (
Fleet Admiral)✧ 200 Views · 6 Likes
Flag
She’s coming right along Peter. Your attention to detail is really starting to show!
The Dolly I built up as a fireboat has a monitor that is part of an optional fittings kit. It uses a servo to pull a very fine monofilament line to pull the nozzle down, and a spring to help raise it. My spring god damaged, and I fixed that, but then I got thin ca near the line, so I said heck with it and just glued it at an angle. Went into this as I’m wondering if the Düsseldorf uses the same or a variant of that monitor, and wondering if you had a similar problem, and how you’re going to fix it. I’m sure you’ll have no problem in taking care of that little setback judging by the quality of the work you’ve posted so far. Keep at it boss, I’m with Doug, wanna see a spring launch..no pressure!!😁 Cash ▲
⟩⟩
RNinMunich
Peejay
pressonreguardless
Martin555
Colin H
MouldBuilder
|
|
💬 Re: Back tracking
3 years ago by 🇬🇧 Colin H (
Fleet Admiral)✧ 207 Views · 6 Likes
Flag
Well done on your promotion Peter, can you be a King in Hungary? Mind you don't get your robes dirty.
Cheers Colin. ▲
⟩⟩
Peejay
pressonreguardless
Martin555
MouldBuilder
Cashrc
RNinMunich
|
|
💬 Re: Back tracking
3 years ago by 🇩🇪 RNinMunich (
Fleet Admiral)✧ 203 Views · 6 Likes
Flag
Now now Vice Admiral Peter!
You're on the home straight now👍 Command is expecting the launching ceremony and commissioning this Spring. Congratulations on your promotion, well earned through exceptional valour and devotion to duty in the face of a mind frazzling kit, new insignia and Command Flag attached this message. FLEET😎 


▲
⟩⟩
PemyslJ
Peejay
pressonreguardless
Martin555
MouldBuilder
Colin H
|
|
💬 Re: Back tracking
3 years ago by 🇭🇺 MouldBuilder (
Admiral)✧ 203 Views · 6 Likes
Flag
Thank you Martin but I think by the time I finish Dusseldorf I would have been promoted to King.😊
▲
⟩⟩
Peejay
pressonreguardless
Martin555
jbkiwi
Colin H
RNinMunich
|
|
💬 Re: Back tracking
3 years ago by 🇬🇧 Martin555 (
Fleet Admiral)✧ 205 Views · 7 Likes
Flag
Hi Peter,
Congratulations on your promotion to Vice Admiral. By the time you finish your Dusseldorf you will be a Fleet Admiral.LOL!! Martin. ▲
⟩⟩
Peejay
pressonreguardless
jbkiwi
RNinMunich
MouldBuilder
stevedownunder
Colin H
|
|
💬 Re: Back tracking
3 years ago by 🇺🇸 Len1 (
Lieutenant Commander)✧ 206 Views · 6 Likes
Flag
Know what you mean, my dog just got done taking me for the morning walk
▲
⟩⟩
Peejay
Martin555
MouldBuilder
stevedownunder
Colin H
RNinMunich
|
|
💬 Re: Back tracking
3 years ago by 🇭🇺 MouldBuilder (
Admiral)✧ 208 Views · 7 Likes
Flag
Just as soon as I have finished scratching my head.😬
▲
⟩⟩
Peejay
stevedownunder
Colin H
pressonreguardless
Martin555
jbkiwi
RNinMunich
|
|
💬 Re: Back tracking
3 years ago by 🇬🇧 Martin555 (
Fleet Admiral)✧ 206 Views · 7 Likes
Flag
Steady Peter,
You will be scratch building boats next.LOL!! Martin. ▲
⟩⟩
Peejay
stevedownunder
Colin H
jbkiwi
MouldBuilder
RNinMunich
pressonreguardless
|


Login To
Remove Ads
Remove Ads